Web Push notifications are a vital part of many marketing strategies. However, in order to send them, you need the subscriber’s permission to send the messages. For this purpose, you need a consent form. A well-designed and aesthetically pleasing consent form will help you grow your Web Push notifications subscriber base. With the intuitive SALESmanago wizard, you can easily prepare your own forms. You can also save them as drafts to quickly return to editing whenever you need them.
To create a Web Push consent form, go to
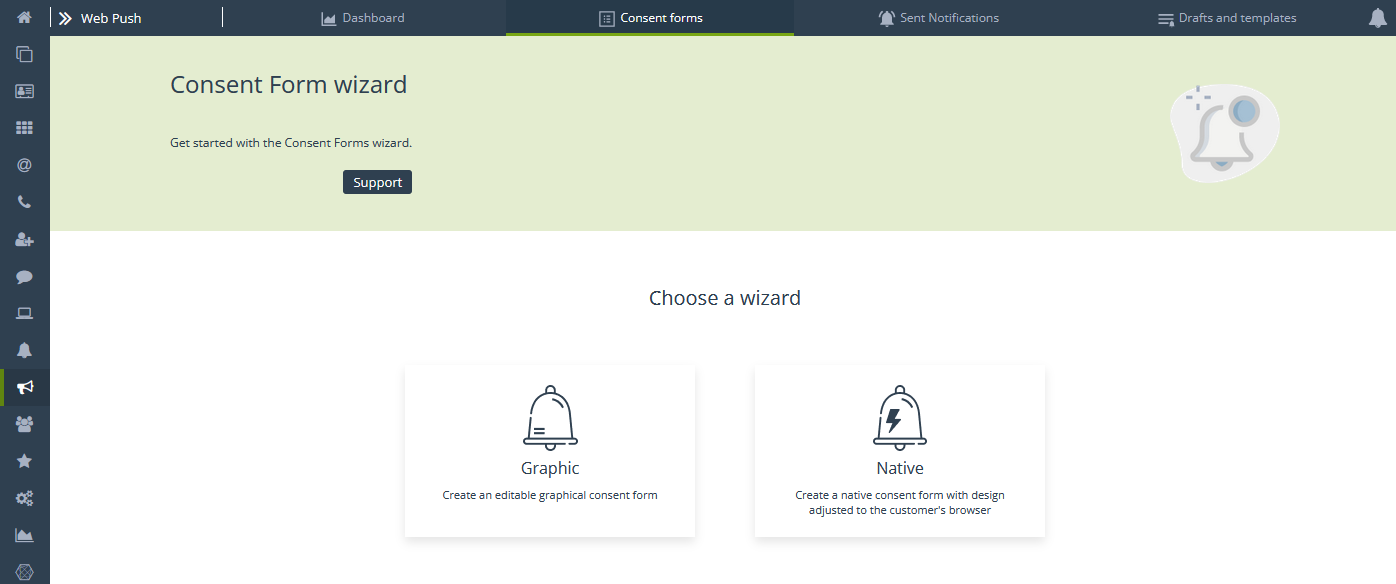
Channels → Web Push → Consent forms → + New Form
or
Channels → Web Push → Dashboard → + New Form
Contents
1. Basic information
2. Create a new graphic Web Push consent form
1. Devices
2. Design
3. Settings
4. Save
3. Create a new native Web Push consent form
1. Devices
2. Settings
3. Save
1. Basic information
Web Push and Rich Web Push notifications can only be sent to people who subscribe to receive them via the form. The subscription doesn’t require any personal information (e.g., email address), so this can significantly increase your audience size. Web Push notifications are not dependent on marketing consent—you can reach not only people with opt-in status but also unmonitored contacts, email opt-out status, and even those who are not in the database and do not want to provide their data—all they have to do is agree to receive notifications.
IMPORTANT: For security reasons and based on the latest Web Push notification standards, consent forms only display on certified websites (in the https domain).
The consent forms work on both desktop and mobile devices, where they responsively adapt to the phone screen. Thus, the user will receive Web Push notifications on the specific device on which they gave consent.
There is a separate wizard for creating the forms. The Web Push consent form wizard is a simple, intuitive tool that allows you to create native and graphical forms. For your convenience, the form creation is divided into several stages. Each of them is a separate action relating to a specific aspect of the form preparation process. What’s more, the new wizard allows you to save prepared forms as drafts so that you can quickly access them when they are needed.
IMPORTANT: In order to display the consent form, you don’t need to implement any additional code. You only need to paste the monitoring code into the domain where the consent form is to be displayed and activate it (Save and Activate). If you have been using this feature for a long time and have pasted code to display the consent form, you need to remove it for the new display settings to take effect. Otherwise, the consent form will display as before, ignoring the new settings.
Form types
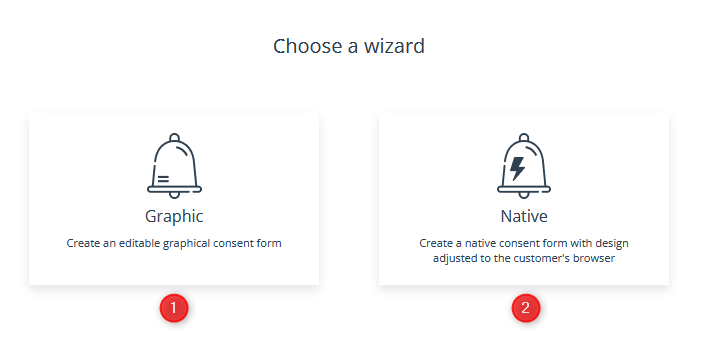
In the SALESmanago wizard, you can create two types of forms: graphic and native.

[1] Graphic Web Push consent form – Displays as a pop-up during a website visit. You have many options to customize the design.
[2] Native Web Push consent form – Displays as a browser message during a website visit. You don’t have much influence over its appearance, as it mainly depends on the browser where it displays.

2. Create a new graphic Web Push consent Form
Sending Web Push notifications requires linking them to forms. The sequence of actions when creating a new graphic form looks like this:
Go to Menu → Channels → Web Push → Consent forms → + New Form.

Select the form type. In this case, it will be [1] graphic.

When you get to the new page, you will see a consent form wizard consisting of 3 steps:

- Device
- Design
- Settings
The Next [D] button allows you to move between steps.
A.Devices
The first step in creating a form is to choose the device on which it will display. This gives you better control over what message is displayed to specific audiences, such as smartphone- or desktop-only users. You can also create a form that displays on both types of devices.
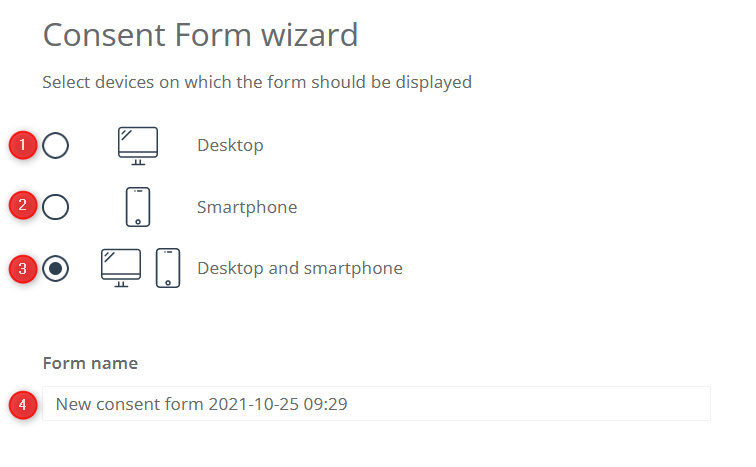
[1] Desktop – The form will be displayed on computers and laptops only.
[2] Smartphone – The form will be displayed on phones only.
[3] Desktop and smartphone – The form will be displayed on all types of devices.
[4] Form name – Enter the name of the form for identification in the system.
When you have established the basic settings, click Next.
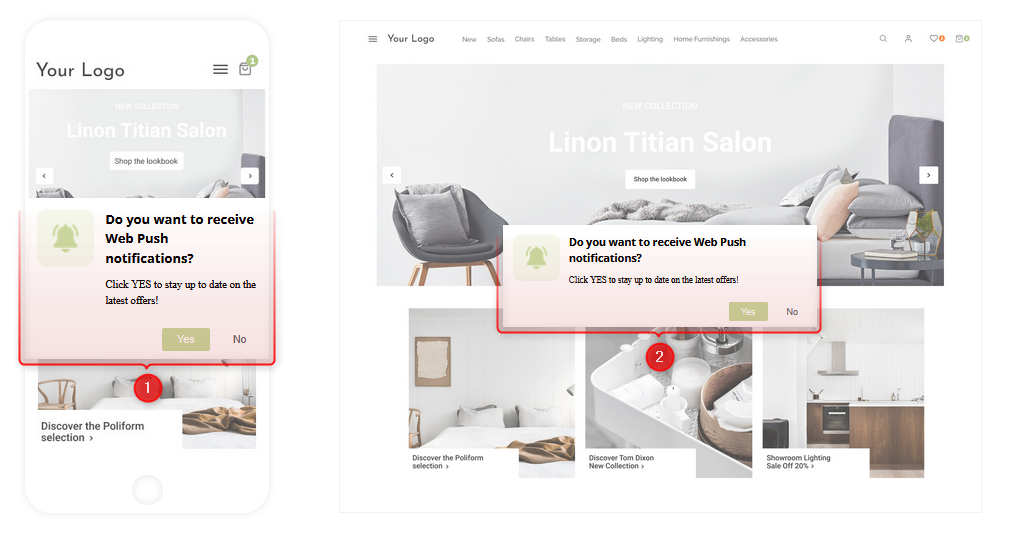
On the right-hand section of the screen, you will see a visualization of the form you are currently working on.

[1] Form preview on smartphone – Here, you can observe in real time how the changes made affect the appearance of the form on smartphones.
[2] Form preview on desktop – Here, you can observe in real time how the changes made affect the appearance of the form on computers and laptops.When you have established the basic settings, click Next.
B.Design
On the second screen, you move on to specifying the appearance of the graphic form.

If you want the form to display on both types of device (desktop and smartphone), you will see an option at the very top to toggle the view so that you can monitor in real time whether the form is aesthetically pleasing and attractive regardless of the device on which it displays.
Data
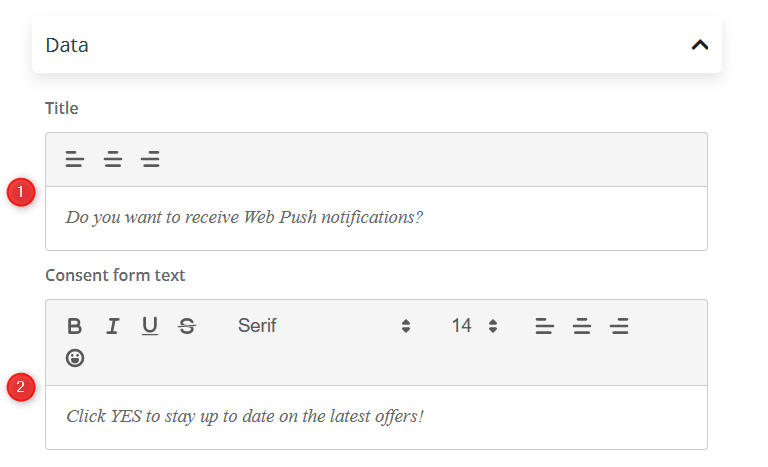
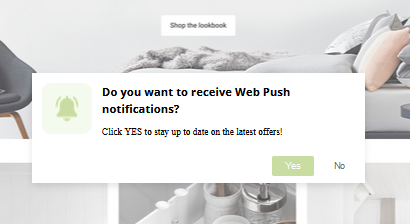
[1] Title – Enter the title of the form, which will be seen by subscribers. There’s a 48-character limit.
[2] Content of consent form – Enter the content of the form. There’s a limit of 200 characters. You can also style the message using the standard text editing toolbar. You can change the font, text layout, and size and add emoticons to make the message more visually appealing.
Consent form icon

[1] Drop file / select from gallery – Add a graphic to the form. You can either drag an image stored on your disk or select a file previously uploaded in the gallery. JPG, PNG, WebP, ICO/CUR, and BMP files can be used as icons. GIF files are not supported by browsers. The suggested icon size is 150×150 px.
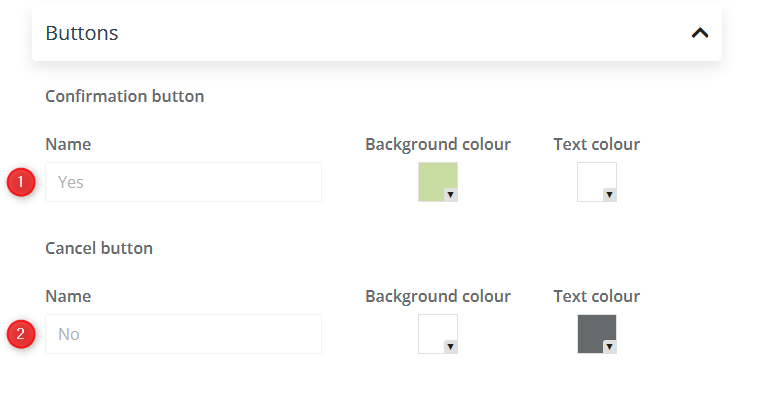
[1] Confirmation button – In the Name field, enter a name for the button (text confirming subscription intent). There’s a 20-character limit. Then choose the background and text color. To do this, click in the desired field and select the appropriate options from the color menu that appears.
[2] Unsubscribe button – In the Name field, enter a name for the button (text declining subscription intent). There’s a 20-character limit. Then choose the background and text color. To do this, click in the desired field and select the appropriate options from the color menu that appears.
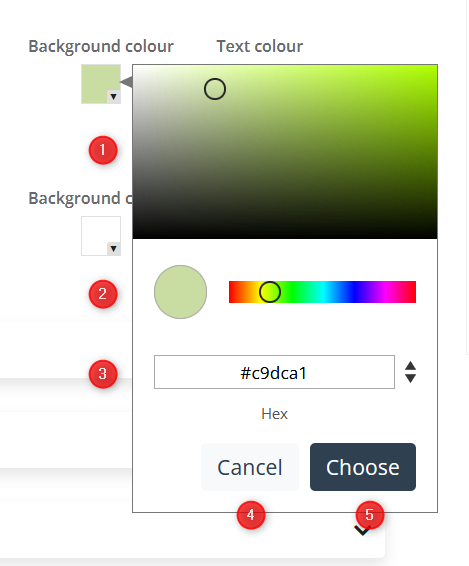
[1] Select color hue – By moving the cursor within the rectangle filled with the gradient of the indicated color, select the hue you want to assign to the selected element.
[2] Select color – By moving the pointer left and right, pick the color you want to assign to the selected element. You can adjust the hue of the color accordingly by returning to the hue selection box [1].
[3] Enter color manually – Enter the designation of the selected color. Use the arrows to switch between different input methods (Hex, RGB, HSL).
[4] Cancel – Click to cancel the color selection.
[5] Choose – Click to save the selected color.
Position on the page
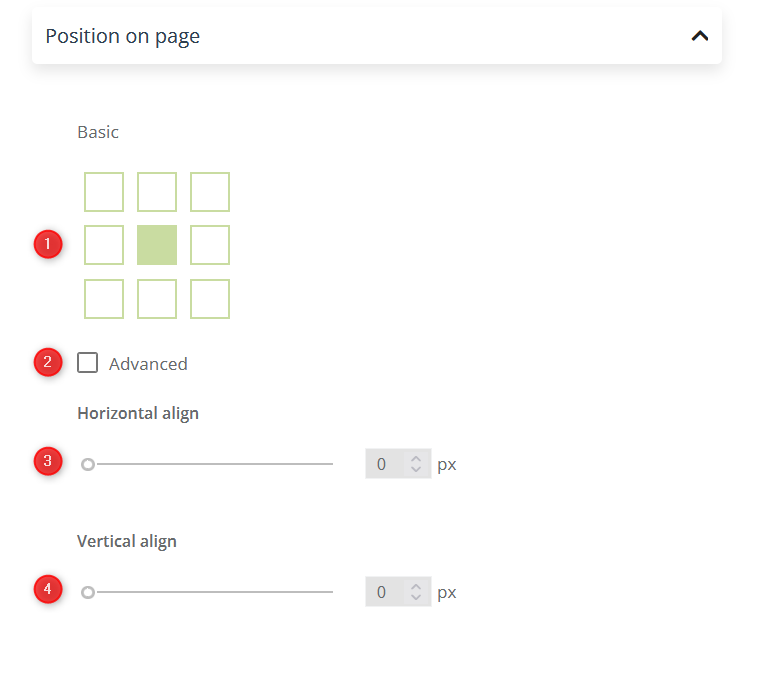
[1] Basic setting – Use a simple diagram to select where the form will be displayed on the page. Select the appropriate box by clicking on it.
[2] Advanced option – Check the box to further specify the position of the form on the page.
[3] Horizontal alignment – Use the slider or manually enter a value (in pixels) for the horizontal alignment of the form within the selected page area.
[4] Vertical alignment – Use the slider or manually enter the value (in pixels) for the vertical alignment of the form position within the selected page area.
Width
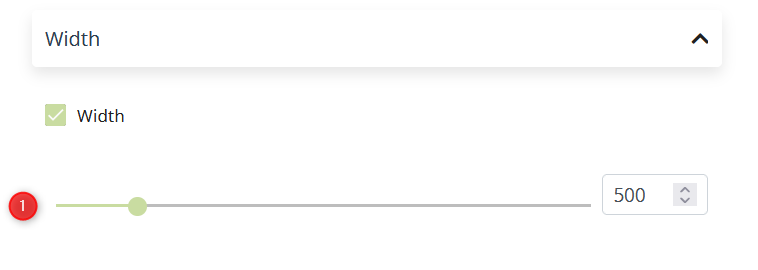
Check the Width box to further customize the width of the form.
[1] Set the form width – Use the slider or manually enter a value (in pixels) of the form width.
Confirmation window
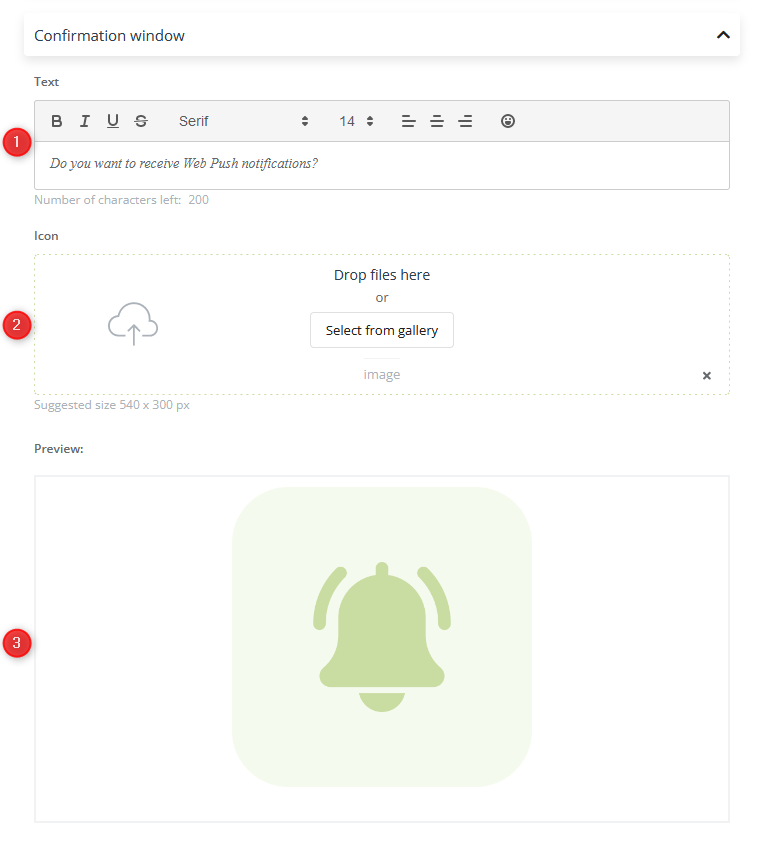
[1] Text – Enter the content to be displayed in the confirmation window. There’s a limit of 200 characters. You can also style the message using the standard text editing toolbar. This will allow you to change the font, text layout, and size, as well as add emoticons to make the message more visually appealing.
[2] Icon – Add a graphic to the form. Simply drag and drop an image from your hard drive or select a file you have previously uploaded from the gallery. JPG, PNG, WebP, ICO/CUR, and BMP files can be used as icons. GIF files not supported by browsers. The suggested icon size is 150×150 px.
[3] Preview – Here, you will see how the confirmation window will look.
ATTENTION: You can disable the confirmation window by configuring your own domain. Learn how to turn off the thank you page after the confirmation of Web Push agreement form >>
Select language
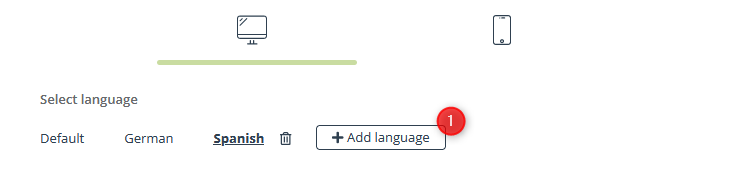
To add different languages to a consent form, click +Add language. The form language will be matched to the browser language of the person who sees it.

Then select the languages you are interested in from the drop-down menu [1]. You can also use the search engine and type in your desired language. If you want to stop using a particular language, simply remove it from the list by clicking on the trash can icon [2] next to its name.
When you are done making changes, click Next.
C.Settings
On the last screen, you specify the form settings, including its location (domain), when it will be displayed, and the tag that will appear on the contact’s card when they sign up through the form.
Consent form location
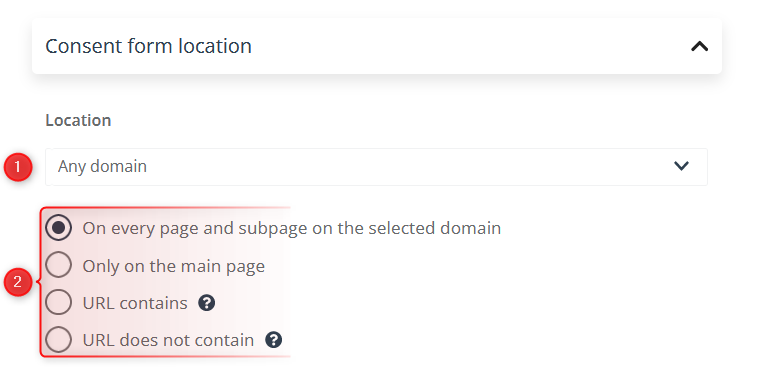
[1] Location – from the drop-down list, select the location where the form will be displayed; also select the appropriate check box:
- on every page and subpage on the selected domain
- only on the main page
- URL contains (When clicked, a box will appear for you to enter a phrase or phrases.)
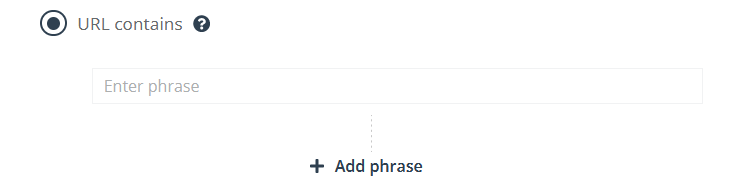
IMPORTANT: The form will display on all pages that have a URL containing the specified phrase.
- URL does not contain (When clicked, a box will appear for you to enter a phrase or phrases.)
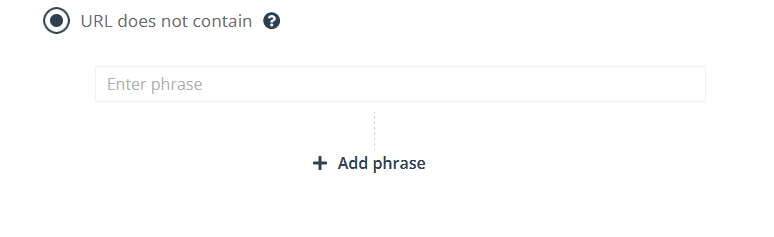
IMPORTANT: The form won’t display on the pages that have a URL containing the specified phrase.
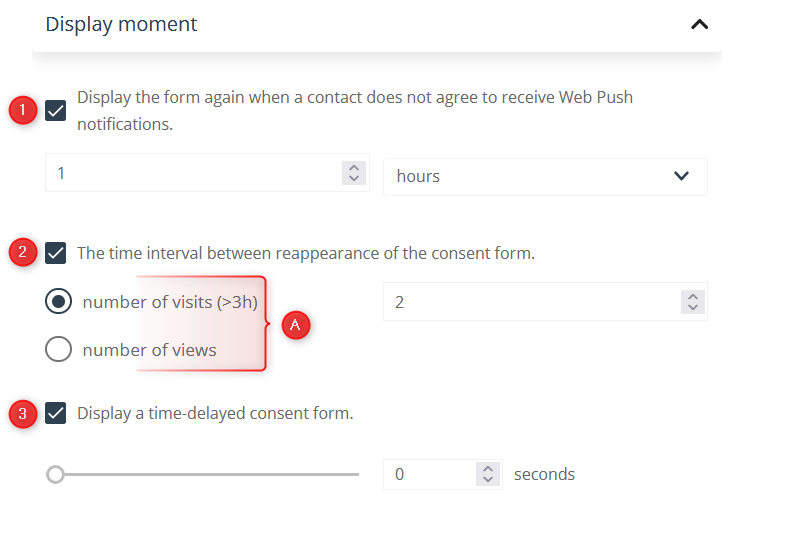
Display moment

[1] Display the form again when a contact does not agree to receive Web Push notifications – Specify the time after which you want the form to display again to people who have not agreed. You can express the time in hours, days, or weeks.
[2] The time interval between reappearance of the consent form – Specify how many visits or page views must occur before the form reappears to people who have not given consent so far. You can express the interval in visits (longer than 3 hours) or page views.
[3] Display a time-delayed consent form – Use the slider or manually enter a value (in seconds) for the delay in displaying the form.
Tag
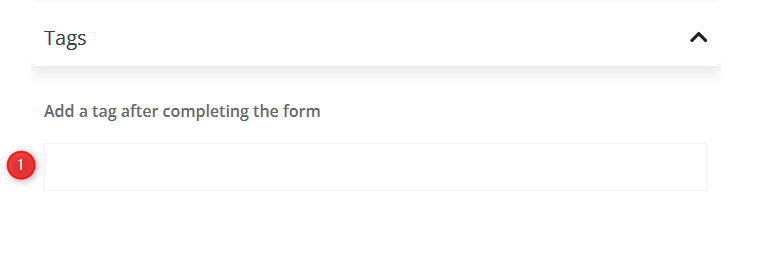
[1] Add a tag after completing the form – Enter a tag to be automatically added to the contact’s card after they agree to receive notifications using this form.
Automatically add consents
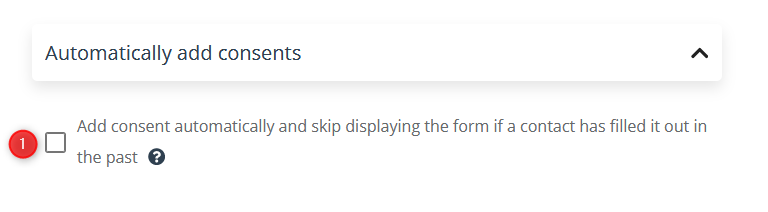
[1] Add consent automatically and skip displaying the form if a contact has filled it out in the past – Check this box if you want the consent to be added automatically, without displaying the form, if the contact has filled it out in the past.
IMPORTANT: If the contact has already given consent for another form, it will be assigned to this one as well. As a result, the system may show more consents than form views in the statistics.
Save and activate
Once you have finished entering data, you have several options for saving your work:

[1] Save – By clicking on the Save button, you will gain access to a drop-down menu.
[2] Save as draft – Saves the created form as a draft.
[3] Save – Saves the created form without activating it.
[4] Save and activate – Saves the created form and immediately activates it to display when you have monitoring code implemented on the website.
2. Create a new native Web Push consent form
The sequence of actions when creating a new native form looks like this:
Go to Menu → Channels → Web Push → Consent forms → + New Form.

Select the form type. In this case, it will be [2] native.
When you get to the new page, you will see a consent form wizard consisting of 2 steps:

- Devices,
- Settings.
Plus there is the Next [D] button that allows you to move between steps.
A. Devices
The first step in creating a form is to choose the device on which it will display. This gives you better control over what message is displayed to specific audiences, such as smartphone- or desktop-only users. You can also create a form that displays on both types of devices.

[1] Desktop – Form will be displayed on computers and laptops only.
[2] Smartphone – Form will be displayed on phones only.
[3] Desktop and smartphone – Form will be displayed on all types of devices.
[4] Form name – Enter the name of the form for identifying it in the system.
When you have established the basic settings, click Next.
On the right-hand section of the screen, you will see a visualization of the form you are currently working on.
[1] Form preview on smartphone – Here, you can observe in real time how the changes made affect the appearance of the form on smartphones.
[2] Form preview on desktop – Here, you can observe in real time how the changes made affect the appearance of the form on computers and laptops.
When you have established the basic settings, click Next.
B. Settings
On the last screen, you specify the form settings, including its location (domain), when it will be displayed, and the tag that will appear on the contact’s card when they sign up through the form.

[1] Location – From the drop-down list, select the location where the form will be displayed; also select the appropriate check box:
- on every page and subpage on the selected domain
- only on the main page
- URL contains (When clicked, a box will appear for you to enter a phrase or phrases.)

IMPORTANT: The form will display on all pages that have a URL containing the specified phrase.
- URL does not contain. (When clicked, a box will appear for you to enter a phrase or phrases.)
Display moment
[1] Display the form again when a contact does not agree to receive Web Push notifications – Specify the time after which you want the form to display again to people who have not agreed. You can express the time in hours, days, or weeks.
[2] The time interval between reappearance of the consent form – Specify how many visits or page views must occur before the form reappears to people who have not given consent so far. You can express the interval in visits (longer than 3 hours) or page views.
[3] Display a time-delayed consent form – Use the slider or manually enter a value (in seconds) for the delay in displaying the form.
Tag

[1] Add a tag after completing the form – Enter a tag to be automatically added to the contact’s card after they agree to receive notifications using this form.
Automatically add consents

[1] Add consent automatically and skip displaying the form if a contact has filled it out in the past – Check this box if you want the consent to be added automatically, without displaying the form, if the contact has filled it out in the past.
IMPORTANT: If the contact has already given consent for another form, it will be assigned to this one as well. As a result, the system may show more consents than form views in the statistics.
Save and activate
Once you have finished entering data, you have several options for saving your work:

[1] Save – By clicking on the Save button, you will gain access to a drop-down menu.
[2] Save as draft – Saves the created form as a draft.
[3] Save – Saves the created form without activating it.
[4] Save and activate – Saves the created form and immediately activates it to display when you have monitoring code implemented on the website.