Useful links
SALESmanago offers integrations with display ad services that enable posting advertisements in search engine results and on other websites (Google Ads) or on social media platforms (Facebook and TikTok). Such integrations allow you to shape your ad audiences based on data stored in SALESmanago. You can add or remove Contacts to or from ad audiences based on specified criteria. This way, you can deliver tailored marketing messages that increase engagement and conversion rates. Additionally, these integrations can help you ensure that your advertising campaigns are based on the most current information, leading to higher conversion rates with lower costs-per-click (CPC).
Contents
- Getting started
- Scope of integration and important information
- Integration process
- Creating ad audiences
- Managing Contacts in ad audiences
- Audience analytics
- Use cases and examples
1. Getting started
By integrating your SALESmanago account with ad services, you can leverage your Contact data for more precise targeting and highly personalized ad campaigns.
SALESmanago offers integrations with the following ad services:
- Google Ads,
- Meta Ads Manager (Facebook),
- TikTok Ads Manager.
These integrations allow you to create and manage ad audiences (which can be referred to as custom audiences, audience segments, data segments, etc.) based on Contact details and transactional data stored in SALESmanago. Such audiences can later be targeted with dedicated ad campaigns through the integrated services.
Read on to learn more about the scope of these integrations and how to use them.
2. Scope of integration and important information
The scope of SALESmanago integrations with ad services (Facebook, Google Ads, TikTok) includes:
- Creating ad audiences via SALESmanago.
- Displaying the list of existing ad audiences in SALESmanago, with the option to delete an ad audience via SALESmanago.
- Adding and removing Contacts that meet specified criteria to/from ad audiences, either manually (using SALESmanago selectors and filters) or via Automation Processes.
- Audience analytics—the number of Contact addition and removal requests sent to the integrated service.
Data transfer and Contact matching
SALESmanago does not add or remove Contacts in ad audiences directly—instead, it sends requests to the integrated advertising platform (Meta Ads, Google Ads, or TikTok). The request contains the following Contact details: email address and phone number, which are transferred to the advertising platforms in a hashed format (SHA-256). Since the advertising platforms store personal data in the same hashed format, they are able to match the transferred details to their own data and thus determine which SALESmanago Contacts correspond to specific users of their own services. Based on this information, they are able to execute the requests received from SALESmanago and add or remove specific Contacts to/from specific audiences.
Each Contact in SALESmanago has their email address, and some can also have phone numbers. To maximize the chances of successful matching, SALESmanago transfers both the email address and the phone number to the integrated advertising platforms. If a Contact cannot be matched based on the email address, the advertising platform will try to match them based on the phone number, and the other way round.
As the advertising platforms operate on a global scale, phone numbers must include the country code (for example, +49 for Germany). Therefore, when adding or removing Contacts, you need to provide the default country code that will be added to those phone numbers that do not already have one.
Note that the default country code that you provide may not be the right one for all Contacts. If the wrong country code is added to a phone number, the Contact may not be matched at all, or a different user from a different country may be matched instead.
IMPORTANT: Only those Contacts that are successfully matched will actually be added to or removed from ad audiences.
EXAMPLE: You have integrated your SALESmanago account with Facebook, Google Ads, and TikTok. You have created ad audiences on each of these platforms and have added a number of Contacts to each of these audiences. The requests have been sent by SALESmanago to the respective platforms, however, not all Contacts selected in SALESmanago have actually been added to your ad audiences. Some of those Contacts had no Facebook or TikTok account and so, they could not be matched to any Facebook or TikTok users. Other Contacts do not use any Google services (for example, they use browsers other than Chrome) or have a number of email addresses, and so, they could not be matched to any Google users.
The Contacts that were successfully matched based on their email address or phone number were added to the respective ad audiences as requested.
Waiting time
Requests for adding or removing Contacts are transferred in batches, at different intervals, depending on the advertising platform. The requests need to be processed by the platforms and executed, which also takes some time. Due to these factors, changes in the membership of ad audiences are not implemented immediately, but only after a certain time.
The details are summed up in the table below.
| Parameter | Google Ads | TikTok | |
|---|---|---|---|
|
Request interval How frequently requests are sent to the advertising platform |
Workflow: Every hour Manual: Immediately after saving |
Every 24 hours (at 01:00 UTC) |
Workflow: Every hour Manual: Immediately after saving |
|
Waiting time How much time may pass before requests submitted via SALESmanago are executed by the advertising platforms and visible on the list of audiences |
Up to 24 hours | Up to 72 hours | Up to 48 hours |
Audience management
When you have integrated an ad service with SALESmanago, you can see the list of all your existing ad audiences in SALESmanago, by going to Menu → Audiences → Social Media → Ad audiences → Your audiences tab. Select one of your integrations and then one of your ad accounts existing on that platform. The table below will show all ad audiences associated with that ad account, irrespective of whether they were created directly on the integrated platform or via SALESmanago.
If you edit or delete an audience in SALESmanago, it will also be edited or deleted on the advertising platform.
Number of audience members
The table showing your existing ad audiences includes the column: Number of members. The actual value will only be displayed if the number of members in an audience exceeds the minimum threshold, which differs depending on the advertising platform:
- Facebook—The number of members is displayed if the audience has at least 1000 members. Above this threshold, the number of members is rounded to the nearest 100.
- Google Ads—The number of members is displayed if the audience has at least 100 members. Above this threshold, the number of members is rounded to the nearest 100.
- TikTok—The number of members is displayed if the audience has at least 1000 members.
3. Integration process
To integrate an ad service with SALESmanago, go to Menu → Audiences → Social Media → Ad audiences. There, select the Integrations tab. Find the integration of interest and click Integrate.
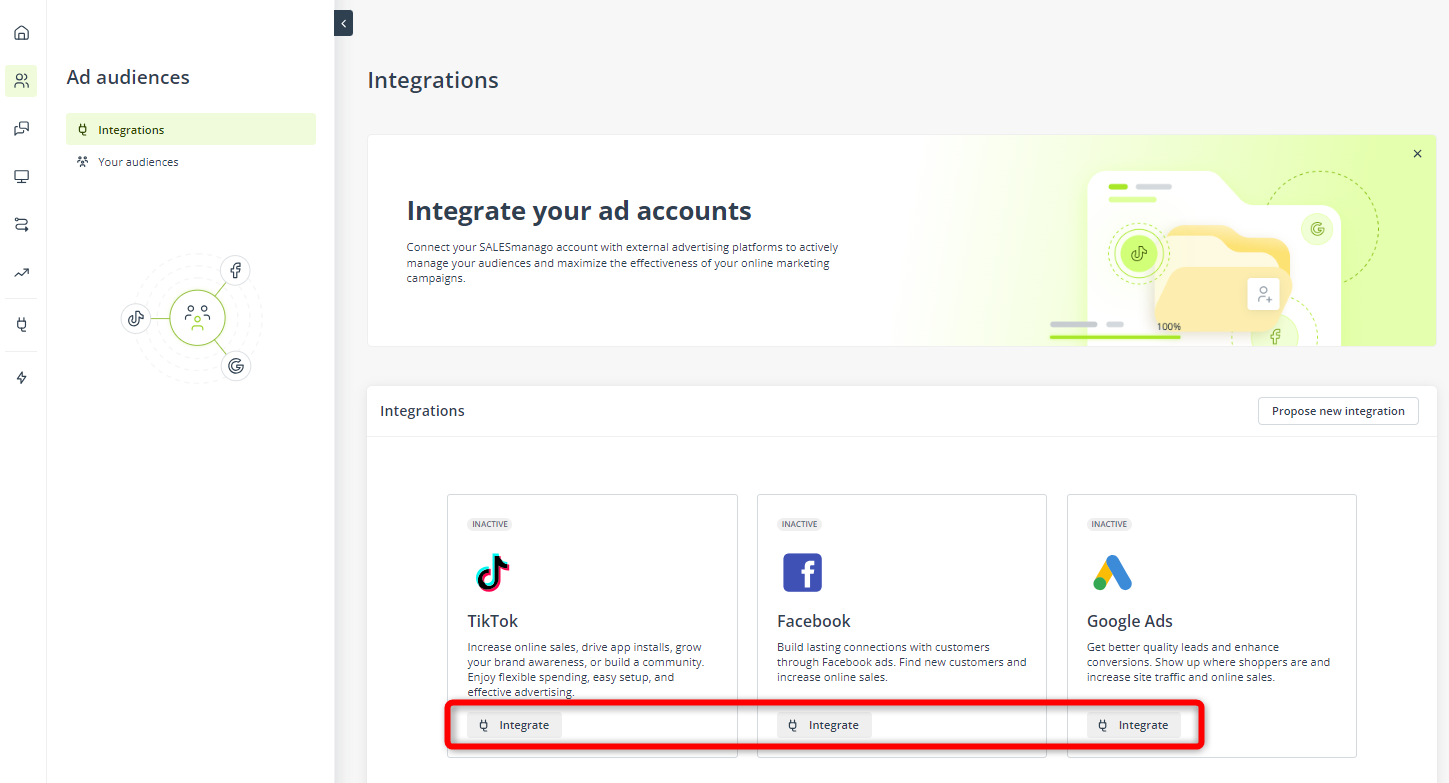
If the integration you want to implement is unavailable, contact your Customer Success Manager to expand your SALESmanago package.
After clicking Integrate, you will be redirected to the respective portal, where you need to log in using your business account credentials. Note that in the case of Facebook, first, you need to provide credentials for your personal account, and only then for your business account.
After providing your credentials, you need to grant the requested permissions to SALESmanago. Follow the instructions of the ad service provider to complete the integration process.
Following a successful integration, you will be automatically redirected to the SALESmanago platform. There, you will see that the button has changed from Integrate to Disconnect:
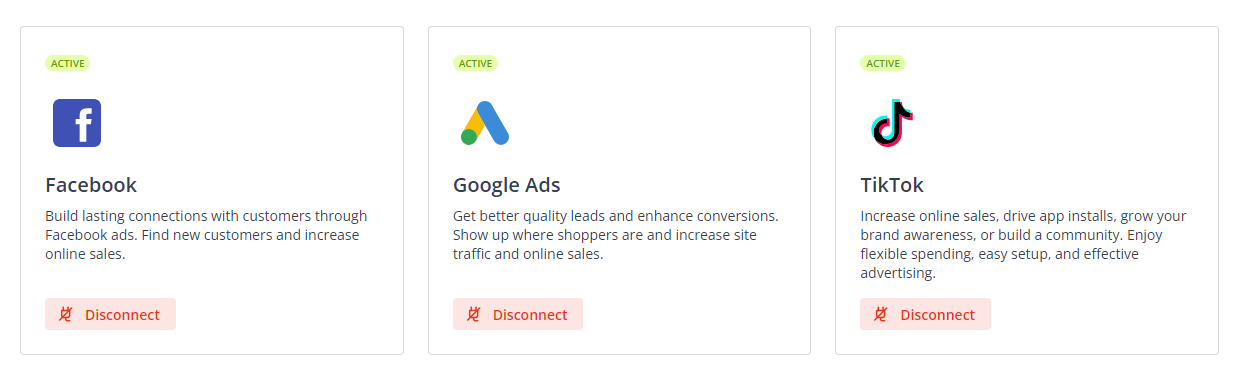
Now you are able to create and manage ad audiences in the integrated ad service via SALESmanago, using Contact details and transactional data stored in your SALESmanago CDP.
4. Creating ad audiences
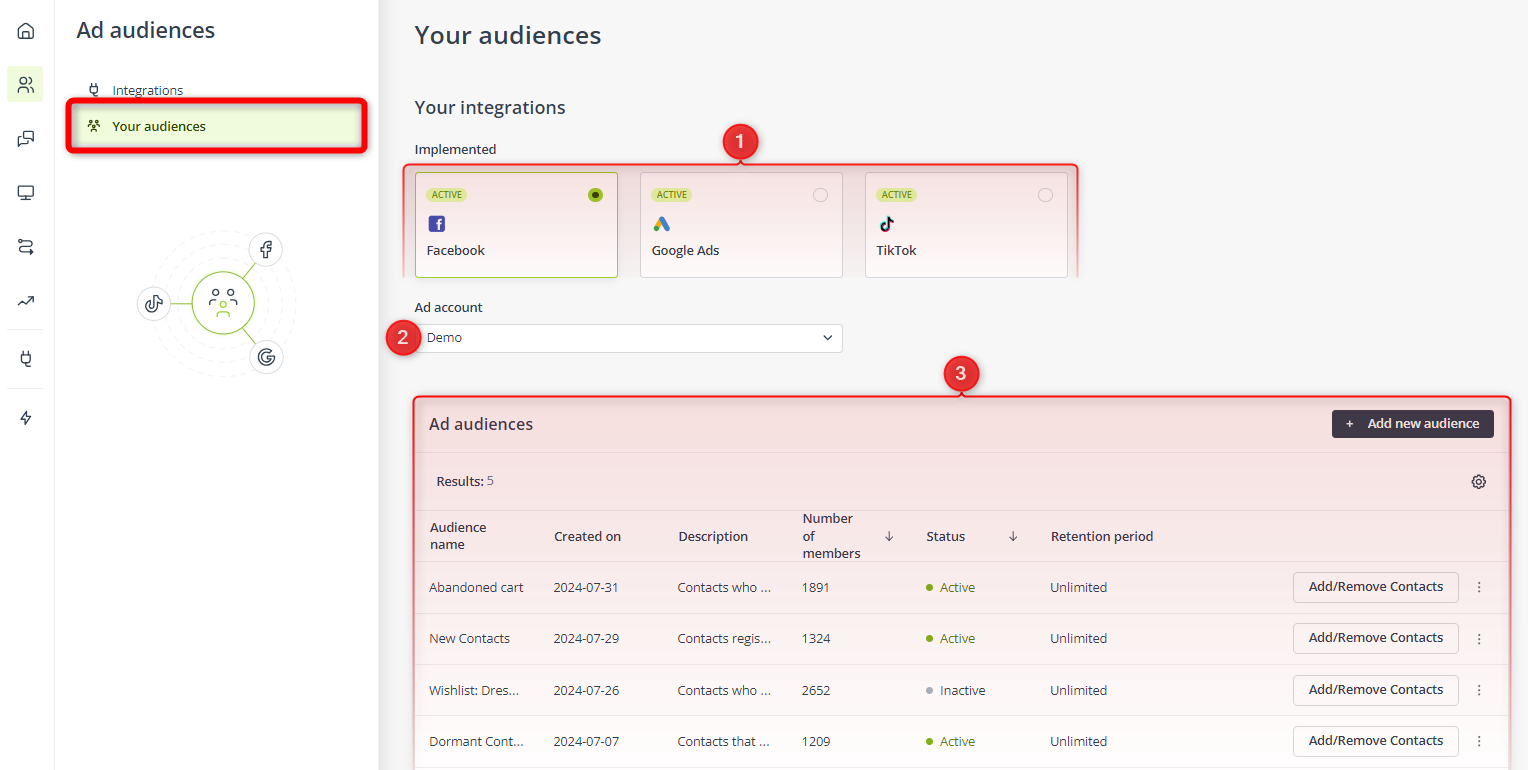
When your SALESmanago account is successfully integrated with one or more ad services, you can go to Your audiences to create and manage ad audiences.
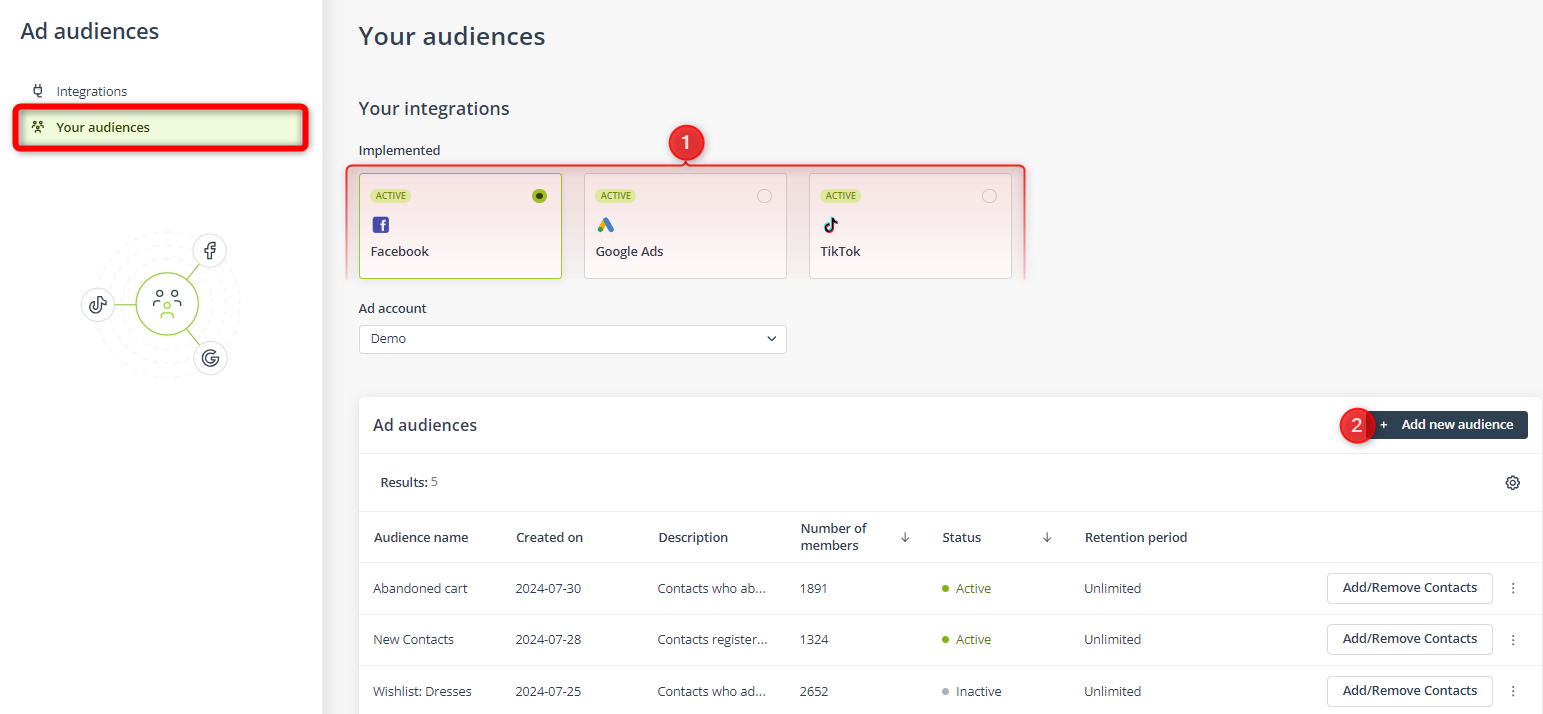
To create a new audience, first, select one of the integrated ad platforms [1]. Then, click the button + Add new audience [2], visible above the list of existing audiences.
The audience creation process looks very similar for all the ad services.
For Facebook and Google Ads, select the ad account[1] on which you want to create the audience and provide a name [2] and a description [3] that will allow you to distinguish this audience from other ones.
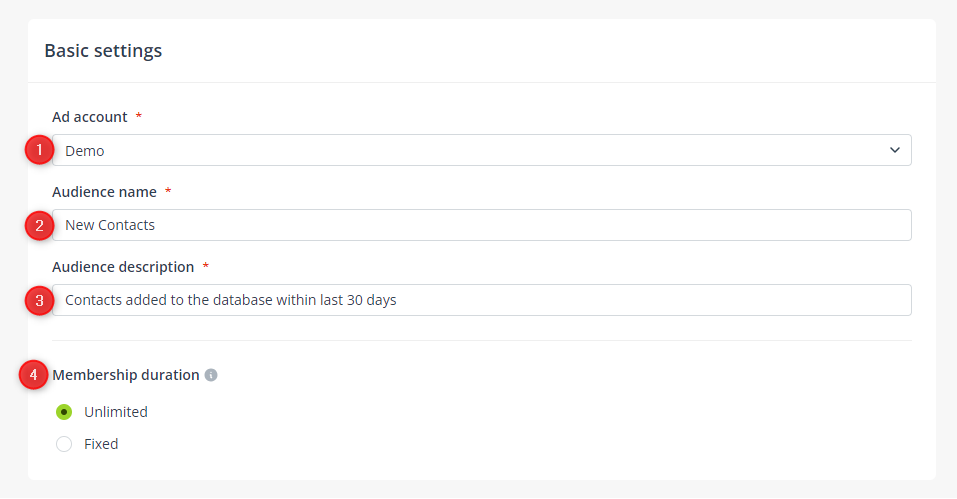
Then, define the retention period (Facebook) or the membership duration (Google Ads) [4]. This is how long a Contact added to this audience will remain in this audience before being automatically removed from it by the respective ad service.
For TikTok, select the ad account [1] on which you want to create the audience and a name [2] that will allow you to distinguish this audience from other ones.
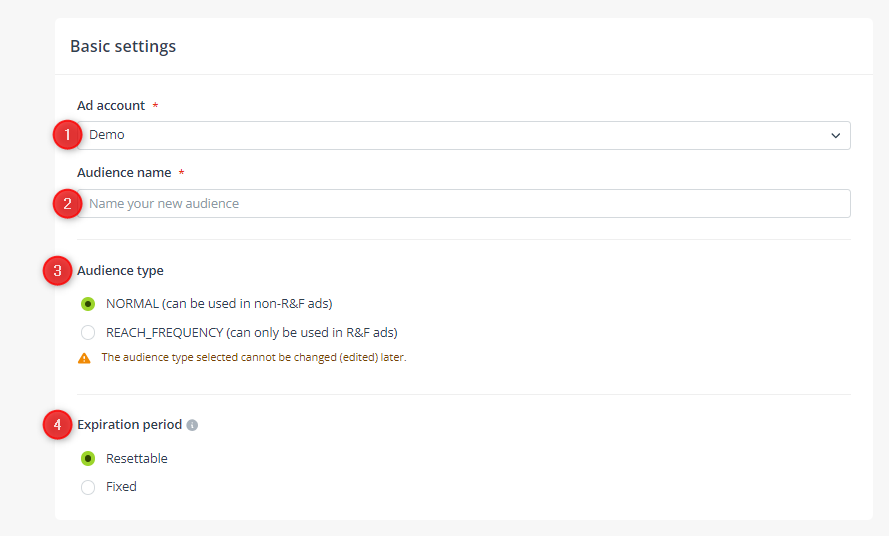
As TikTok distinguishes between two campaign types: Normal and Reach & Frequency, when creating a TikTok audience, you also need to select its type [3]. Note that this setting cannot be edited (changed) later.
Finally, define the expiration period [4]. This is how long the audience will remain functional. When this period elapses, the audience will become unavailable for use.
If you select Resettable, the expiration date will be 365 days from the last time the audience was modified or applied to an active ad group.
If you select Fixed, the audience will expire the specified number of days from the date when it was created. No operations to the audience will reset the expiration date.
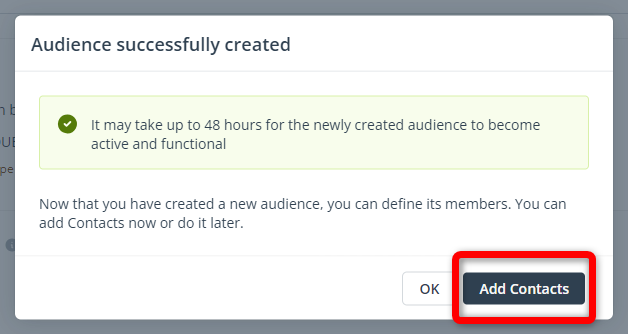
After completing all the required fields and selecting the desired configuration, click Save. You have just created a new audience, and now you can start managing its members. You can add the first Contacts immediately, by clicking Add Contacts, or at any later time (see Section 5 below).
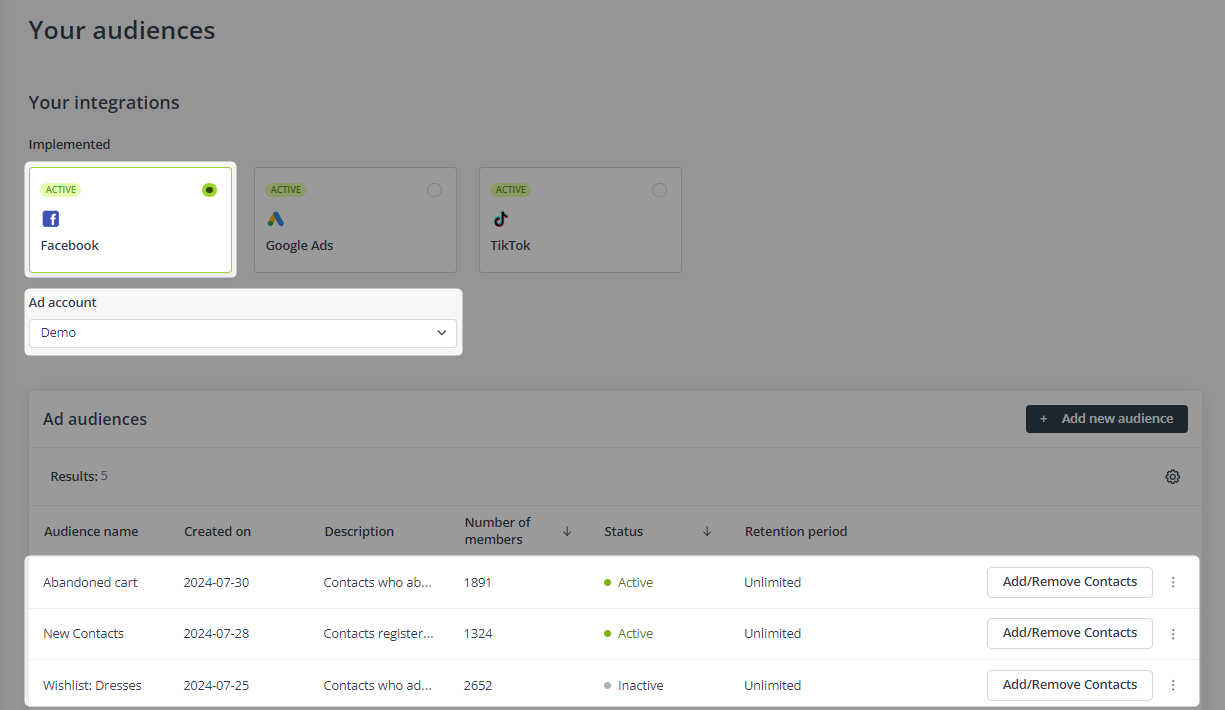
The newly created audience will appear on the list of existing ad audiences, under the appropriate integration and the appropriate ad account, for example:
5. Managing Contacts in ad audiences
The SALESmanago integrations with ad services allow you to either add Contacts to audiences or remove Contacts from audiences, based on your specified criteria. This Contact management can be performed in two ways: either manually, using the standard SALESmanago selectors and filters, or through Automation Processes. You can use these two methods of Contact management interchangeably or at the same time, as required.
Manual Contact management involves using the standard SALESmanago selectors and filters to define a group of Contacts that will be added to or removed from your audience.
Note that this is a one-time operation: if any Contact data used as the criteria changes afterwards, the composition of the audience will not be affected. For example, if a Contact in an audience no longer meets a condition they used to meet, they will not be automatically removed from that audience.
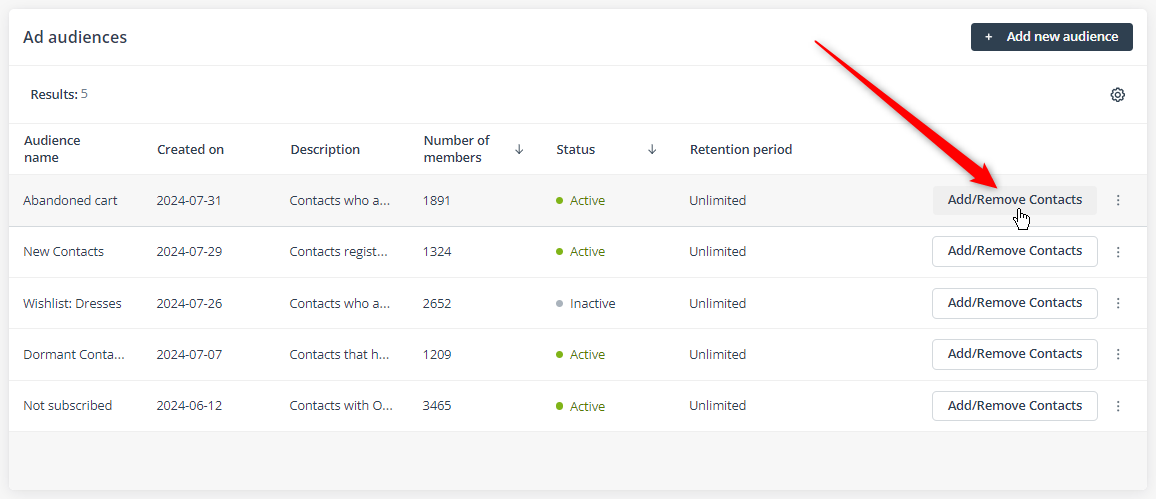
To manage Contacts manually in an existing ad audience, go to Your audiences and select the appropriate integration [1]. Then, select the ad account [2] to which the ad audience is assigned. You will see a list [3] of all existing ad audiences assigned to this ad account.
Find the audience you want to manage on the list. Then, click Add/Remove Contacts.
Next, provide the necessary details.
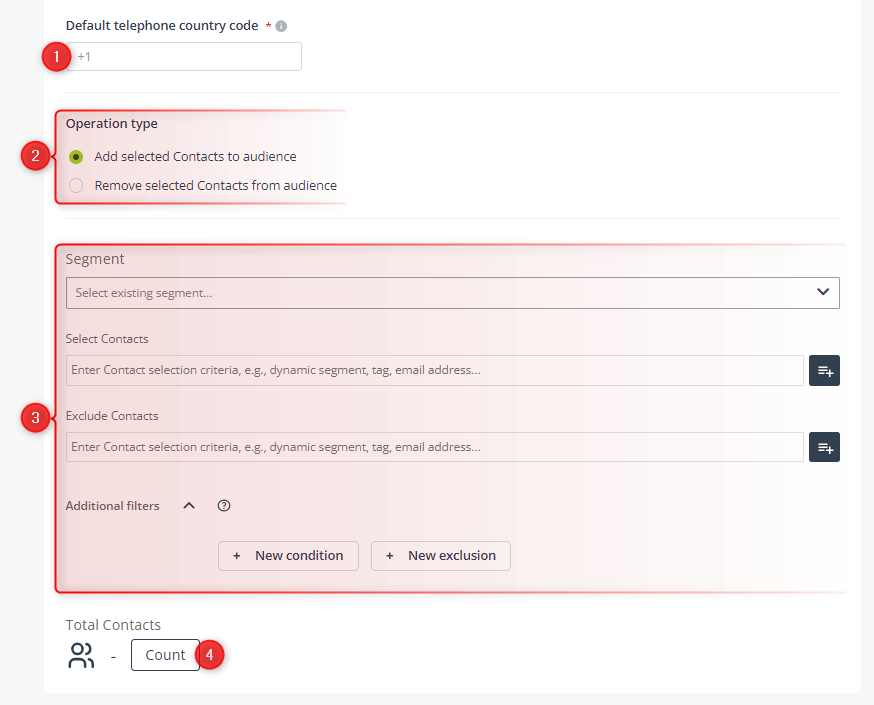
[1] Default telephone country code—The country code is required by the E.164 standard and therefore must be provided when telephone numbers are transferred from SALESmanago to the integrated ad services. Some Contacts in your database may have provided their telephone numbers without the country code. In this field, you can specify the default country code that will be added to those numbers to enable their transfer and matching (see also Section 2 above).
We recommend entering the country code that is likely to work for the largest number of your Contacts (which will usually be the country code for your primary market).
Remember to precede the country code with the plus sign.
[2] Operation type—Choose whether the Contacts that you are about to select will be added to this audience or removed from it.
[3] Select Contacts—Select an existing segment or use the standard selectors and filters to define the group of Contacts that will be added to or removed from the audience (depending on your selection in point [2]).
Read more about selecting Contacts in SALESmanago >>
[4] Count—Click this button to see how many Contacts meet the criteria specified above and therefore will be added to or removed from the audience.
Automated Contact management consists in configuring an Automation Process that includes the Action: Add/Remove Contact in ad audience. This can be either a Workflow or an Automation Rule.
Specify the Event(s) that must occur and the Condition(s) that must be met for a Contact to be added to or removed from the selected ad audience.
Note that you can configure many Automation Processes for the same ad audience.
Read more about the Action: Add/Remove Contact in ad audience >>
Remember that it may take some time before the requests are executed and the changes are actually visible in SALESmanago and on the respective advertising platform (see Section 2 above).
6. Audience analytics
The SALESmanago analytics for ad audiences includes the number of Contact addition and removal requests sent from SALESmanago for each individual audience.
To access this data, find the audience of interest on the list, click the three dot icon and select Analytics:
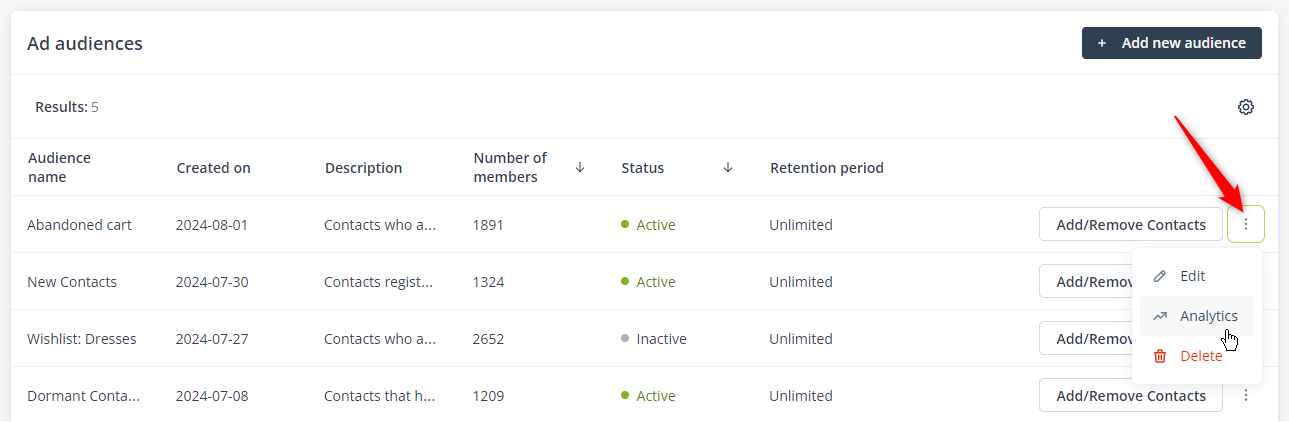
You will see a sidebar that looks like this:
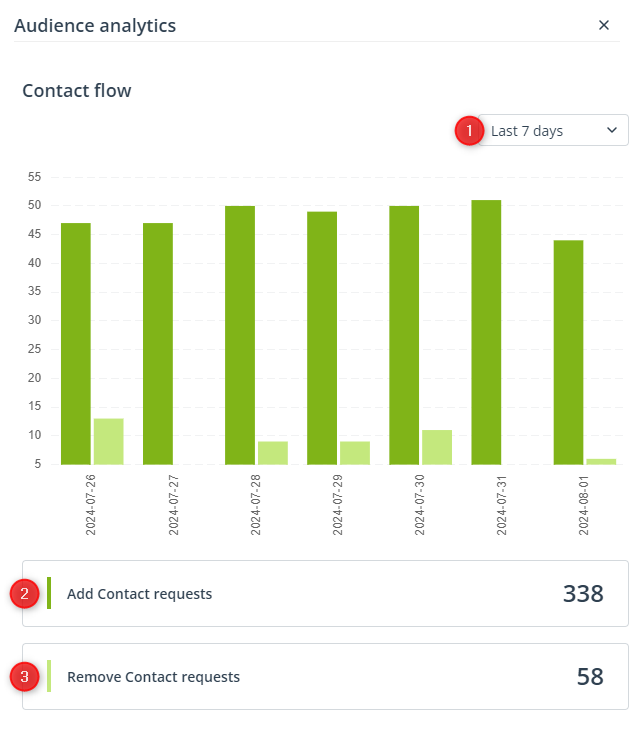
First, select the time range [1] for which you want to display data. Below, you will see how many requests for adding [2] or removing [3] a Contact in this specific ad audience were sent from SALESmanago to the integrated platform within the selected time period.
IMPORTANT:
- This analytics shows the number of requests sent from SALESmanago, not the actual number of Contacts added to or removed from the audience. If a Contact could not be matched based on their email address or phone number, the request was not executed for this Contact.
- SALESmanago counts the number of requests sent for individual audiences, without keeping a history for individual Contacts. For example, if a Contact is added to the same audience twice, first manually and then through an Automation Process, this will be counted as two requests.
7. Use cases and examples
The SALESmanago integrations with advertising services allow you create and manage ad audiences that can be targeted with dedicated advertisements. Below, you will find a number of examples combining different marketing use cases and Contact management methods (manual and automatic).
EXAMPLE 1: TikTok & Preference Center.
You are a travel agency that uses the Preference Center >> to collect zero-party data about your Contacts, including their preferred travel destinations. You have just enriched your offer with interesting trips to different countries in Africa, and you want to advertise them via TikTok.
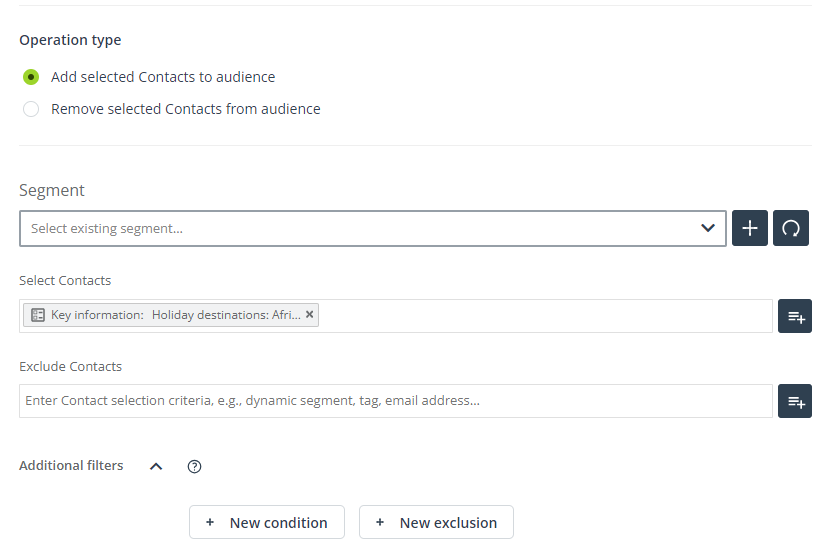
Create a TikTok audience with Contacts who have informed you that they are interested in visiting Africa by providing the Key Information named “Holiday destinations”.
Add Contacts to this audience manually, using the selector: Key Information and choosing the item: Holiday destinations from the list. Use the radiobutton: Defined value and select Africa from the list. Remember to click + Add, and only then: Next and Save.
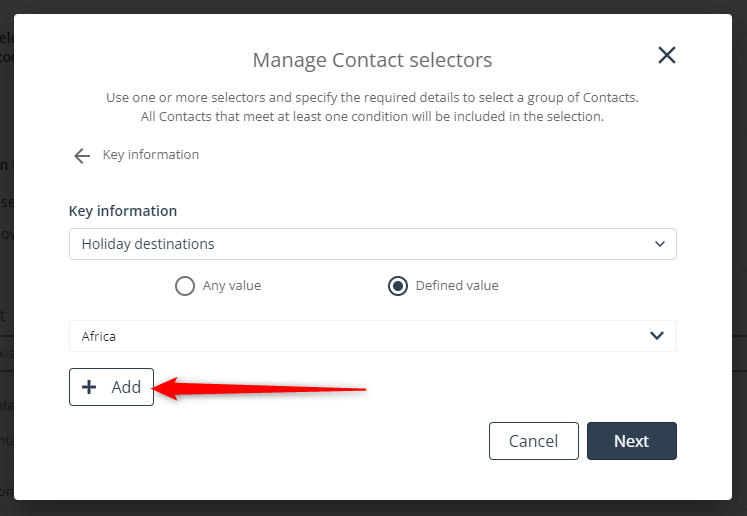
The configuration will look as follows:
In TikTok Ads, configure your creatives for trips around Africa to be displayed to this specific ad audience.
EXAMPLE 2: Google Ads & Selected cities.
You are organizing an exhibition that will be staged in three cities. You want to inform Contacts from these cities about the upcoming event. You decide to use Google Ads.
You have created a Google Ads audience called “Summer Exhibition”. Add Contacts manually by using the following selectors:
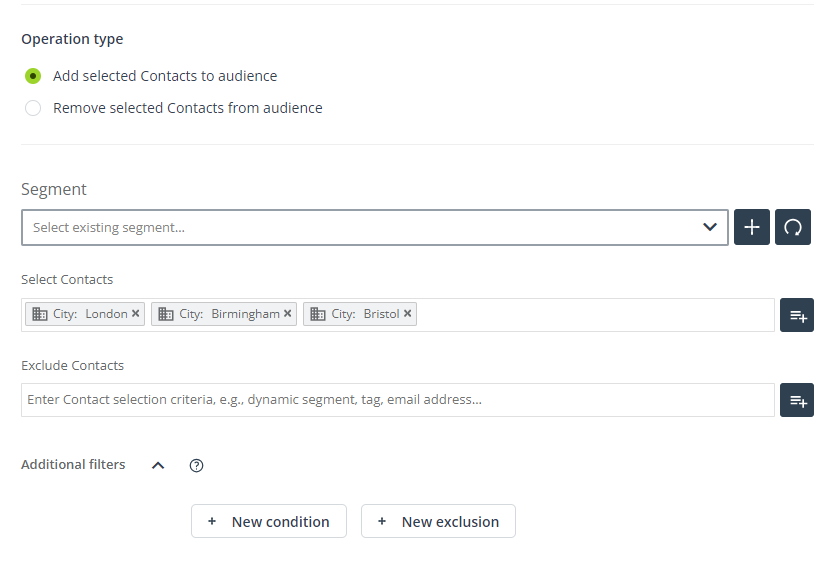
Prepare dedicated Google Ads advertisements inviting your Contacts to the event and configure them to be displayed to the new audience.
TIP: For even more precise targeting, prepare separate creatives for each of the cities and add Contacts living in those cities to different ad audiences. Remember to deactivate the campaign when all the tickets are sold out.
EXAMPLE 3: Google Ads & Personalized Banner.
Recently, you have been displaying a Personalized Banner recommending specific groups of products on your website. Now, you want to encourage Contacts who clicked the Banner but made no purchase to return to your store. You decide to use the Email Marketing channel (because sending emails comes at no additional cost) and if this doesn’t succeed, you will retarget the Contacts with a Google Ads campaign.
Create the following Workflow:
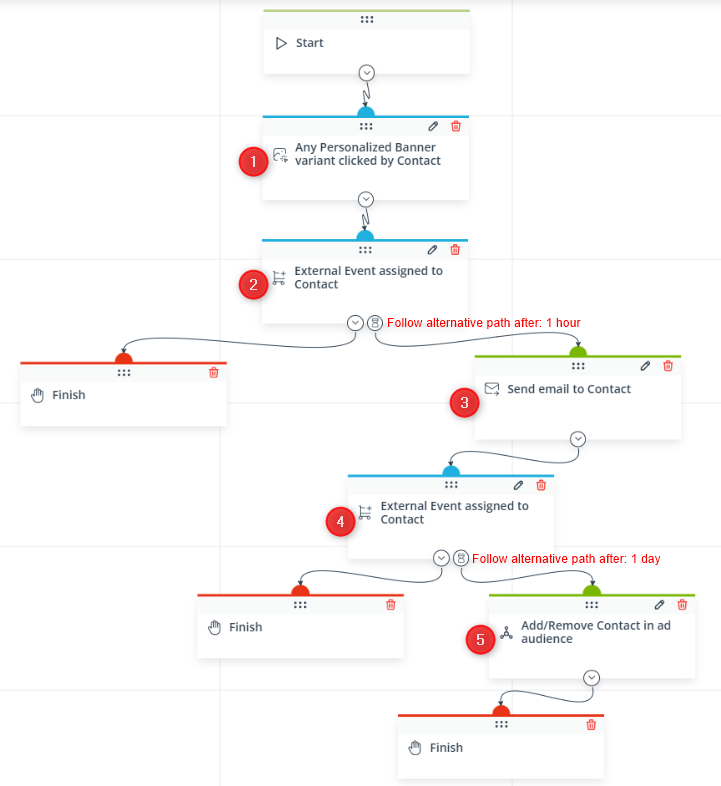
The Workflow starts when a Contact clicks any variant of the Personalized Banner [1]. If the Contact makes a purchase [2], the Workflow will end. If the Contact does not make a purchase, the system will wait 1 hour and then send an email [3] to that Contact. The email contains a Dynamic Product Block with recently viewed products.
If the Contact makes a purchase [4], the Workflow will end. If the Contact does not make a purchase, the system will wait 1 day and then add the Contact to the selected Google Ads audience [5].
Prepare dedicated Google Ads advertisements and configure them to be displayed to the audience selected in the Action’s settings.