CRON is a tool that schedules and automatically runs tasks on your website’s server. E-stores can use it to automate tasks such as updating product inventories, cleaning up logs, or running regular database backups. This supports smooth and efficient store management with minimal manual effort. In the context of the SALESmanago-PrestaShop integration, CRON facilitates the smooth transfer of product data to SALESmanago, enhancing the performance of your e-store and product management processes.
PrestaShop is a self-hosted platform, meaning the user is responsible for hosting the software on their own server or a third-party hosting provider of their choice. Consequently, CRON needs to be implemented individually by each SALESmanago customer. Below, you will find generic instructions supported by an example (for the popular software cPanel).
Contents
1. Getting started
CRON allows users to automate repetitive tasks by running scripts or commands at specified intervals. For example, it can automatically sync product inventories, prices, and promotions, minimizing delays and reducing the likelihood of errors associated with manual updates.
Additionally, CRON increases the performance of your e-store by transferring data in larger batches. Without this functionality, any product updates are transferred to SALESmanago individually, immediately after each change. With CRON, updates are accumulated in real-time but transferred at predefined intervals. This approach reduces the number of API calls and lowers server load, ensuring smoother operation of the integration.
PrestaShop does not offer a ready-made CRON management mechanism. As a result, a CRON-like solution cannot be integrated directly into the SALESmanago plugin. Instead, each SALESmanago client must implement CRON individually on their hosting platform. Below are generic instructions on how to achieve this.
2. Configuring CRON for PrestaShop
The configuration of the CRON mechanism for the SALESmanago-PrestaShop integration consists of two steps:
- Step 1: Creating a CRON job for your domain.
- Step 2: Activating the dedicated option in the plugin settings (plugin version: 3.7.0 or above).
IMPORTANT: If you activate the dedicated option in the plugin but do not create a CRON job for your domain, product data will not be transferred to SALESmanago at all. Therefore, the recommended order is as above: first, create the CRON job (and activate it, if necessary), and then adjust the plugin settings.
Detailed instructions can be found below.
Step 1: Create a CRON job for your domain
First, determine how to create a CRON job for your domain.
Most likely, your hosting provider offers a dedicated tool for this purpose. Access the administrator panel of your hosting platform and locate this option. It may be called, for example, “CRON jobs”, “CRON tasks”, “Cron rules, “job scheduling”, etc.
If you are unable to find this option, consult the help materials of your hosting provider or reach out to their customer support for assistance.
Once you locate the CRON management option, proceed to add a new CRON job and configure its settings, most importantly:
- The time interval for job execution—Typically, this value is defined using five white-space separated fields, representing minutes, hours, days of the month, months, and days of the week. Custom settings can probably also be achieved.
The recommended interval is 2 minutes.
-
The command—In this specific case, the command has the form of a URL that calls the front controller. Enter the following URL address as the command:
http://your_domain/prestashop/index.php?fc=module&module=salesmanago&controller=cron
Remember to replace the highlighted fragment with your own domain.
Save your changes to implement the new CRON job.
IMPORTANT: Make sure that the newly created CRON job is active (enabled).
For an example of this configuration, refer to Section 3 below, which demonstrates the setup process in cPanel, a tool commonly used by many hosting platforms. Bear in mind that different control panels and hosting providers may offer different methods and tools for adding CRON jobs.
Step 2: Activate the dedicated option in the plugin settings
Ensure that you have the SALESmanago plugin for PrestaShop installed in version 3.7.0 or above. Next, proceed to configure the plugin within PrestaShop.
Log in to your PrestaShop administration panel, navigate to the SALESmanago plugin and select Platform Settings. Go to the section: Batch product data transfer using CRON and toggle the switch to enable this option.
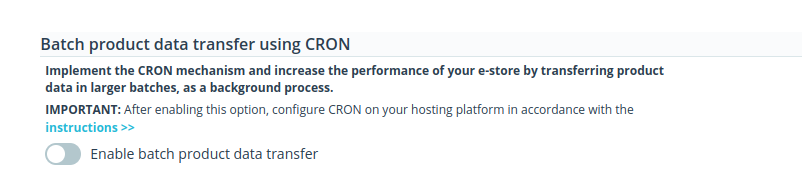
Remember that if the switch is activated but the corresponding CRON job has not been created or is inactive, product data will not be transferred to SALESmanago at all.
That’s it! The configuration is now complete.
Testing the configuration
To verify that the CRON job has been successfully implemented, follow the steps below:
- After adding the new CRON job and ensuring that it is enabled (active), make changes to the details of several products.
- Wait for the time set as the interval for the execution of the CRON job.
- Open the SALESmanago product gallery and check whether the changes are visible in the products’ details.
3. Example: cPanel
Below are step-by-step instructions for implementing the CRON mechanism in the cPanel software. Remember this is just an example. The method and the steps may be different for your software or hosting provider.
To create a CRON job for a domain administered via cPanel, follow these instructions:
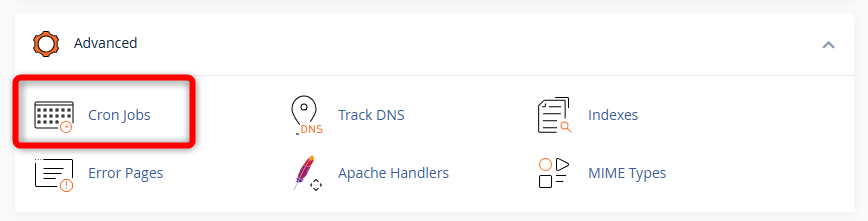
- Log in to your cPanel account. In the left-hand menu, select Tools.
- Find the Advanced section and select Cron Jobs.
- Scroll down to Add New Cron Job and configure the new job.
Specify the time interval. You can select one of the common settings from the list [1A] or enter your custom settings [1B].
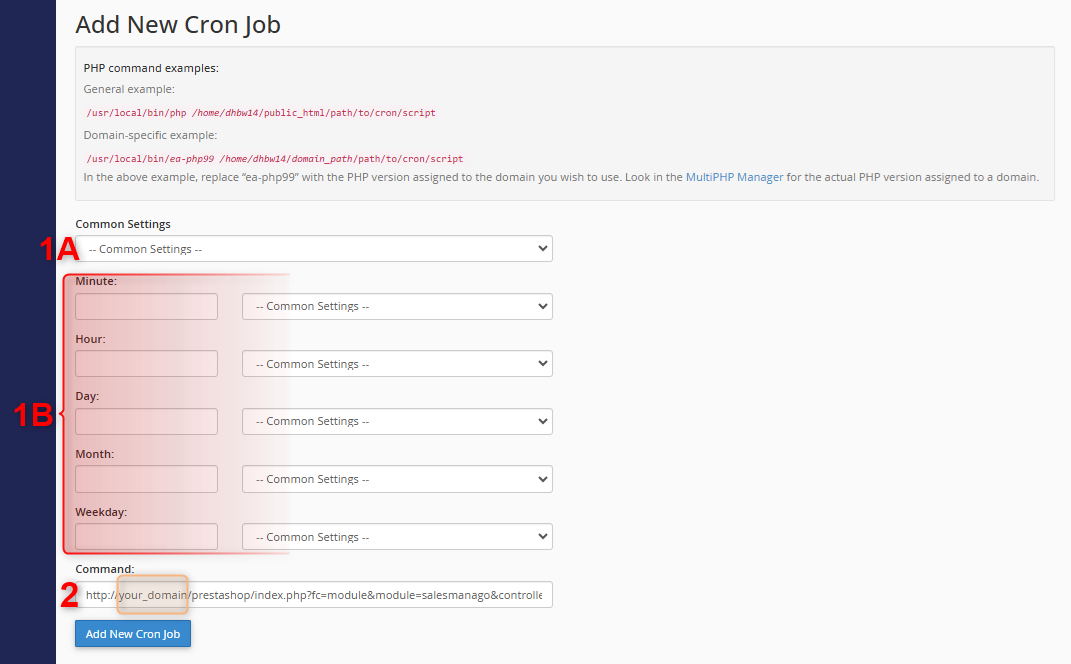
Next, paste the following link:
http://your_domain/prestashop/index.php?fc=module&module=salesmanago&controller=cron
into the Command field [2], replacing the highlighted fragment with your own domain.
- Click Add New Cron Job. The task will appear in the list of your existing CRON rules:

IMPORTANT: Depending on the software or hosting platform you use, the new CRON job may need to be activated after its creation. As long as the dedicated option in the SALESmanago plugin is active, ensure that the CRON job is also set as active. Otherwise, product data will not be transferred to SALESmanago.
4. Technical details
Since PrestaShop does not provide an embedded CRON mechanism, the SALESmanago plugin relies on a Front Controller (cron.php) instead.
For more information, refer to PrestaShop’s documentation on using a Front Controller as a CRON task >>
Starting from version 3.7.0, the SALESmanago plugin utilizes the ps_sm_cron table to store products whose details have changed. A periodic CRON job transfers the data of all affected products in batches.
If the CRON mechanism has been configured correctly (see Section 2 above), data is transferred according to the following scenario:
- When you install the SALESmanago plugin in version 3.7.0 or above, a ps_sm_cron table is created in your PrestaShop database.
- When the details of a product are updated, the product’s unique ID is added to the ps_sm_cron table, as a queued_product entry.
- When the CRON job is called, all queued_product entries are retrieved from the ps_sm_cron table. The table is cleared of all queued_product entries, and product details are exported to SALESmanago. (If there are no entries in the ps_sm_cron table, the CRON job will be executed but no products will be exported).