One of the ways to segment database is assigning details and their values to contacts. This way we can classify contacts for example according to their interests, activity on the website, sex or the way of obtaining the contact. We can add a detail and Its value to contact, values can be inserted as words or numbers, detail can contain up to 255 signs. The number of details for one contact is unlimited. Every entered details are being saved in the system you can preview them on each contact card but there is no place where you can find them cumulated all. Thanks to details we can:
- address sending off to strictly specified group of contacts for example, interested in a particular product,
- personalize email sending off for this group of contacts,
- create automation rules allowing to add details to contact or activating action If a contact has a detail,
- manage contacts in CRM,
- import contacts to the system with defined details,
- export contact groups with chosen details and their values.
VALUES:
Details can have values. For one detail you can assign one value. If we want to conduct an operation for group of contacts (send an email or set a rule) that has particular detail we can specify Its value thanks to operators:
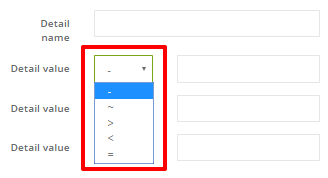
For numerical values use mathematical operator:
- „=” if value is to be equal to the entered number,
- „<” for lower value,
- „>” for higher value.
For non-numeric values use signs:
- „=” if detail value is to be exactly the same as the entered text,
- „~” or “–” (some browsers may use a different sign) if detail value is to be include the entered text,
- “-“ If we do not want to use value, but just the fact of having a detail of a certain name, leave the default sign.
How to add details to a contact
[1] On contact card. Menu → Audiences → Contacts → Contact management → Contact List → individual Contact Cards → Details and Tags.

Go to the custom details tab, insert the name of the detail and Its value, after that click add.
IMPORTANT: To fully leverage the potential of personalization, do not use the words “points” or “tier” in the names of details as this will limit your ability to use placeholders for these details. Read more in the article dedicated to personalization using placeholders >>
[2] With an import. Menu → Audiences → Contacts → Contact Management → Imports → New Import.
In order to import details and their values to the system correctly, you need to create import file properly, more information you can find HERE>>. You can upload maximum 16 details with one import.
[3] It is possible to add details through automation rule and workflow campaign.
[4] Details and values can be sent via API (while creating API inquiry, its also set which information is going to be uploaded as a detail on a contact card, and thanks to prepared integrations information is sent automatically), for example, in contact forms and web questionnaire.
See our API docs and learn how external events are processed >>
[5] If a contact has an external event integration then three additional detail will be assigned to him:
- ORDER_AVG – the average value of the purchase,
- ORDER_NUMBER – the number of orders,
- ORDER_SUMMARY – the amount of all carried orders.
More information about this details you can find HERE>>.
[6] It is possible to create automation rule with event elements: New contact detail, Modified contact detail, condition: Contact has a detail, action: Add/change contact detail. Creating automation rule we can set various elements that contact has to go through so a detail is going to be assigned to him and activate other actions after detail is already assigned, after modifying old one or after the condition that contact has particular detail.
More information about creating a rule you find HERE>>.
More information about setting particular element you can find here: New contact detail, Modified contact detail, Contact has a detail, Add/change contact detail>>.
We can also create a workflow campaign with Contact has a detail element. Inserted in the structure elements have to fulfill the assumption so other elements can be activated.
More information about creating workflow campaign you find HERE>>.
More information about setting condition element you can find here Contact has a detail>>.
Usage possibilities
Except mentioned above automation rules and workflow campaigns we use details to select groups of recipients for following actions:
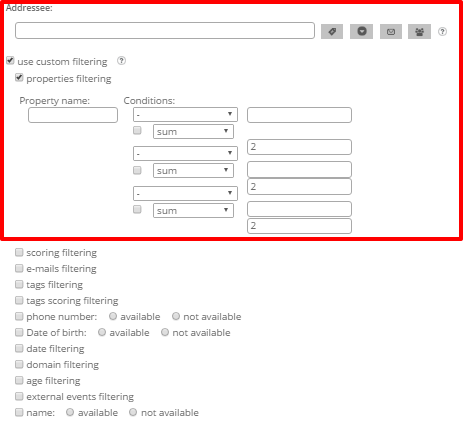
[1] Adding a group of recipients. Every time we have the option to choose the addressees we can use custom filtering and filter contacts according to their details.
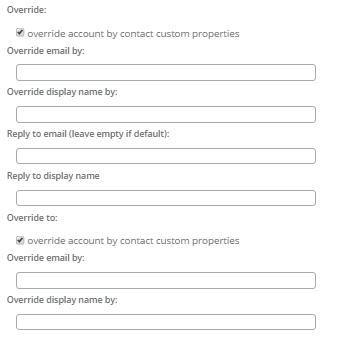
[2] Override with detail. You can configure your sending account to override the default values of from: (sender’s name and email address) with values from details. If you enter the name of a detail into one of the fields, then for contacts who have this detail, the default name and address will be overridden with what was in the detail. For contacts who don’t have that detail, default values will be used.
TIP: If you don’t have a configured sending account yet, create one in Menu → Channels → Email Marketing → Settings → Sender accounts → Add new account.
Override FROM:
- Override Sender’s Email Address – an address the recipient will see in the from field.
- Override Sender’s Name – a name the recipient will see in the from field.
- Override Reply-to Email Address – an address the recipient will see in the reply-to field.
- Override Reply-to Name – a name the recipient will see in the reply-to field.
Override TO:
- This works the same as above, it can be used to create yet another layer of specificity.
Use case: Imagine an online service business. Each paying client is assigned to a personal assistant. The company has a default info@company address for general inquiries, but wants each paying client to handle issues personally with their assistant. To achieve this, the company marks all paying clients with two details pertaining to assistants. One detail, assistant specifies the name of the assistant, while another detail assistant_email specifies their email address. After overriding the fields above with those details, customers with the details will receive emails as if from their assistant. For example, instead of getting emails from Company [info@company.com] they will get them from John Doe [john.doe@company.com]
[3] Creating the group of Custom Audience. While integrating Facebook Ads we can create Custom Audience. Menu → Audiences → Social Media → Facebook. More information about Custom Audience you can find HERE>>.
[4] Personalize email messages. System can upload individual data from contact card to an email.
In order system to upload individual data from a detail to an email, It is necessary to insert manually $cst.name_detail$, so Its value is going to be uploaded in chosen place. Example: detail name: $cst.interested_trip$, value: Bulgaria.
IMPORTANT: To fully leverage the potential of personalization, do not use the words “points” or “tier” in the names of details as this will limit your ability to use placeholders for these details. Read more in the article dedicated to personalization using placeholders >>
[5] Uploading information from filled in forms onto contact card. Except for the personalization you can upload data from filled in forms by contact onto Its contact card.
In order the filled in information by contact to be uploaded on contact card as a detail It is necessary to add $cst.name_detail$ in the field from which data is going to be uploaded from.
IMPORTANT: To fully leverage the potential of personalization, do not use the words “points” or “tier” in the names of details as this will limit your ability to use placeholders for these details. Read more in the article dedicated to personalization using placeholders >>
More information about creating a form in HTML you can find HERE>>, in Drag&Drop creator HERE>>. Details can also be uploaded via API integrated form, help with integration you can find HERE>>.
[6] Using date inserted as a detail on the contact card. On the contact card, there is only one field available for the date. If you would like to add another date, for example, a contact’s wedding anniversary or a date of birth of their relative, you can do that by adding a detail.
- Required detail format is
date.Value format is YYYY-MM-DD. Example: detail name: date.child_birthday, value: 1998-07-12. - If you’re adding a date of a detail via API, enter the value in the unix timestamp format. A timestamp is a time that passed since January 1st 1970 UTC 00:00, expressed in miliseconds, Learn more about adding external event details from our API docs
- If you want to include an additional date in one event (for example, 1st date is when an insurance policy was issued and the 2nd date when it ends), add it as a
detail1-20in any of these formats:YYYY-MM-DD HH:MM,YY-MM-DD HH:MM,YY-M-D'T'HH:MM:SS,YYYYMMDD,YYYY-MM-DD. - If you would like to use email personalization or create a form, that would upload information as a detail, insert $cst.date.name_detail$. Example: $cst.date.birthday_child$.
IMPORTANT: To fully leverage the potential of personalization, do not use the words “points” or “tier” in the names of details as this will limit your ability to use placeholders for these details. Read more in the article dedicated to personalization using placeholders >> - You can plan an email sending off with the date inserted as a detail. Menu → Channels → Email Marketing → Email List → Periodic → + New periodic email.
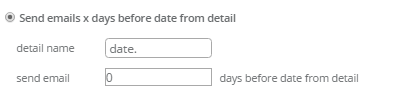
Choose send email x days before date from detail and type the detail name and select how many days before the date fro the detail an email will be sent. Thanks to this option you can send a birthday coupon in the birthday day or a week before anniversary send the offer of a proper present.
Submit your review | |