Use the Download center if you wish to:
– add a file to the repository, so that the contact can download it through an email message;
– add a form with a downloadable file to your website so as to source new monitored contacts.
How do I add a link to a file stored in the repository in an email message?
1. From the menu select Menu → Settings → Content Repository.
After clicking on „Add file” you will see a page with fields to fill in:
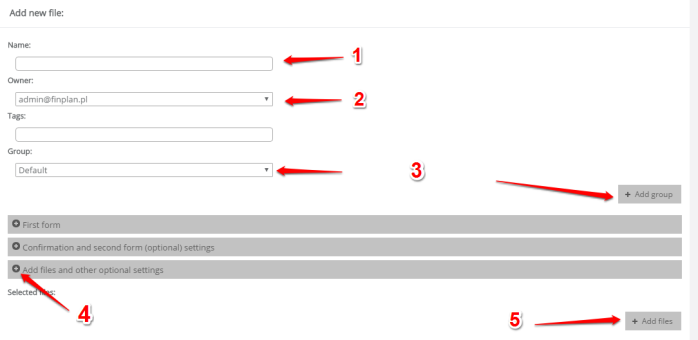
Enter Name (1) for the Download Center, select the Owner (2), specify the Group (optionally) (3). Click on the plus sign below next to ‘Add files and other optional settings’ (4), and then on ‘Add files’ (5).
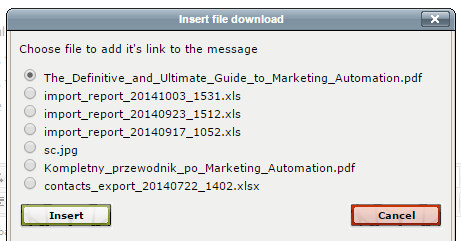
2. You will see a window for inserting files (1). After saving the file (2) select it (3) and click OK (4).

3. After uploading the file you can fill in the ‘Optional tags’ field. The tag will be assigned to a contact after the file has been downloaded.
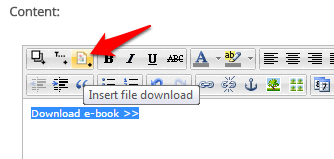
4. In a template or an editable message (Email Marketing-> Email Templates, Email Marketing-> Standard Emails) select a required text and click on ‘Insert file download’.
5. Select the file and click ‘Insert’.
How do I create forms with downloadable files?
1. The initial steps will be the same as for adding files only, although you should remember to add tags to be assigned once the contact has registered via the form (screen 1).
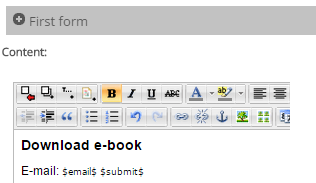
2. Then select „+ First form” which is where you create your form. You can use the following markers: $email$, $name$ i $submit$. You are required to use at least $email$ and $submit$. After switching edition you can freely edit the HTML code using CSS styles.
3. Type in text of the confirmation message using :
$file.no_file.linkedName$(1) – linked file name (eg: $file.1.linkedName$)
$file.no_file.link$(2) – link to file (eg: $file.1.link$); using this marker you can link any content.
You can also upload just the file name using: $file.no_file.name$ – (np: $file.1.name$)
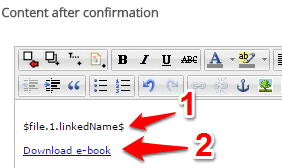
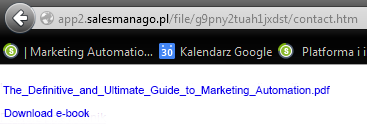
You can view the result generated by the string (see above) after the form has been completed:
4. Optionally, select ‘Confirmation and second form settings’ if you wish the link to your file to be sent in a message after confirming the email address. You can additionally check the ‘Add second form’ option if the link is to direct the user to the second form before the file is downloaded.
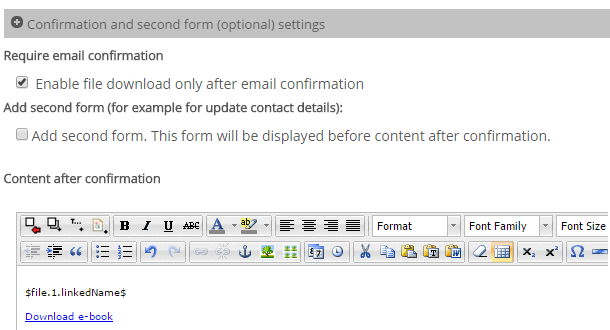
Add text to the body of the message (the second option form) or you can add a file to be downloaded straight away as in the example no 3. However, you will have to add the file to the repository (see: 2) ‘How do I add a link to a file stored in the repository…’).
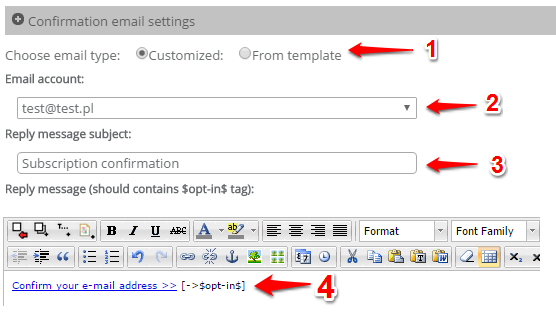
5. If you have chosen the option with an email address confirmation you will have to remember to select ‘Confirmation email settings’. You can use the template created before or design the message layout here (1). Next, select a sending account (2) and fill in the message subject line (3). The message content must contain the opt-in (link to confirmation – $opt-in$) (4).
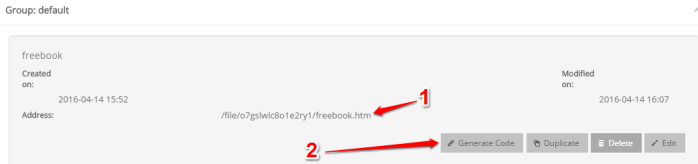
6. Once all settings have been saved you can preview your form by clicking the address in the Download Center (1) and then, after testing, generate <iframe> with the form (2) that you can add to any website.
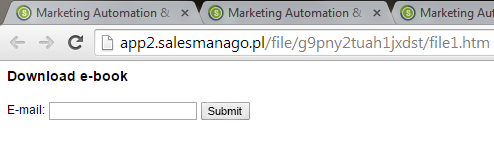
See preview of the form: