Useful links
LeadsBridge is a platform designed for transferring leads generated on various platforms. The rich offer guaranteed by LeadsBridge, you can connect with a multitude of platforms. Among all, LeadsBridge connects with SALESmanago and Facebook Lead Ads that enables legal acquisition of the contact data on Facebook. You can use them later in sales and marketing activities. From now on, you can join Facebook Lead Ads activities with SALESmanago by LeadsBridge.
Instruction:
- SALESmanago integration with LeadsBridge
- Creating a new bridge
- Settings of platforms between which the leads will be transferred
- Adjusting settings of the platform from which the leads will be transferred
- Adjusting settings of the platform to which the leads will be transferred
- Mapping of fields from Facebook form to a contact card in SALESmanago
- Testing
1.SALESmanago integration with LeadsBridge
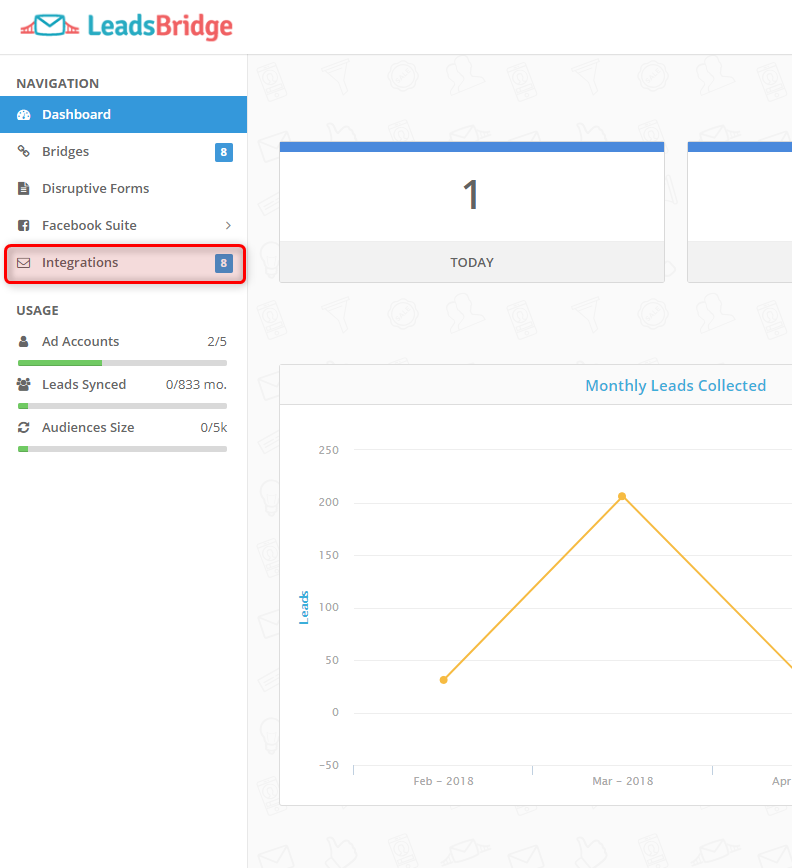
After you log in to LeadsBridge, you need to proceed to Integrations tab marked red on the illustration above.

>>More information about SALESmanago integration with LeadsBridge
2. Creating a new bridge
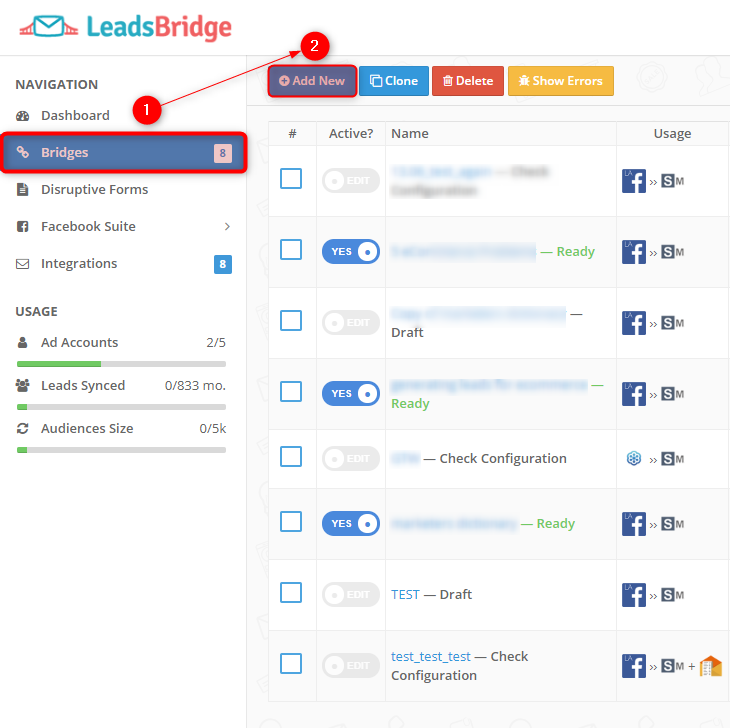
[1] Bridge – a bridge is a connection between two platforms that enables transfer of leads between them. In this tab, you can create a new bridge and also you can find new bridges that you have already created. Each new bridge will show up on the list with the information about its status.
[2] Add new – the option of adding a new bridge.
3. Settings of platforms between which the leads will be transferred
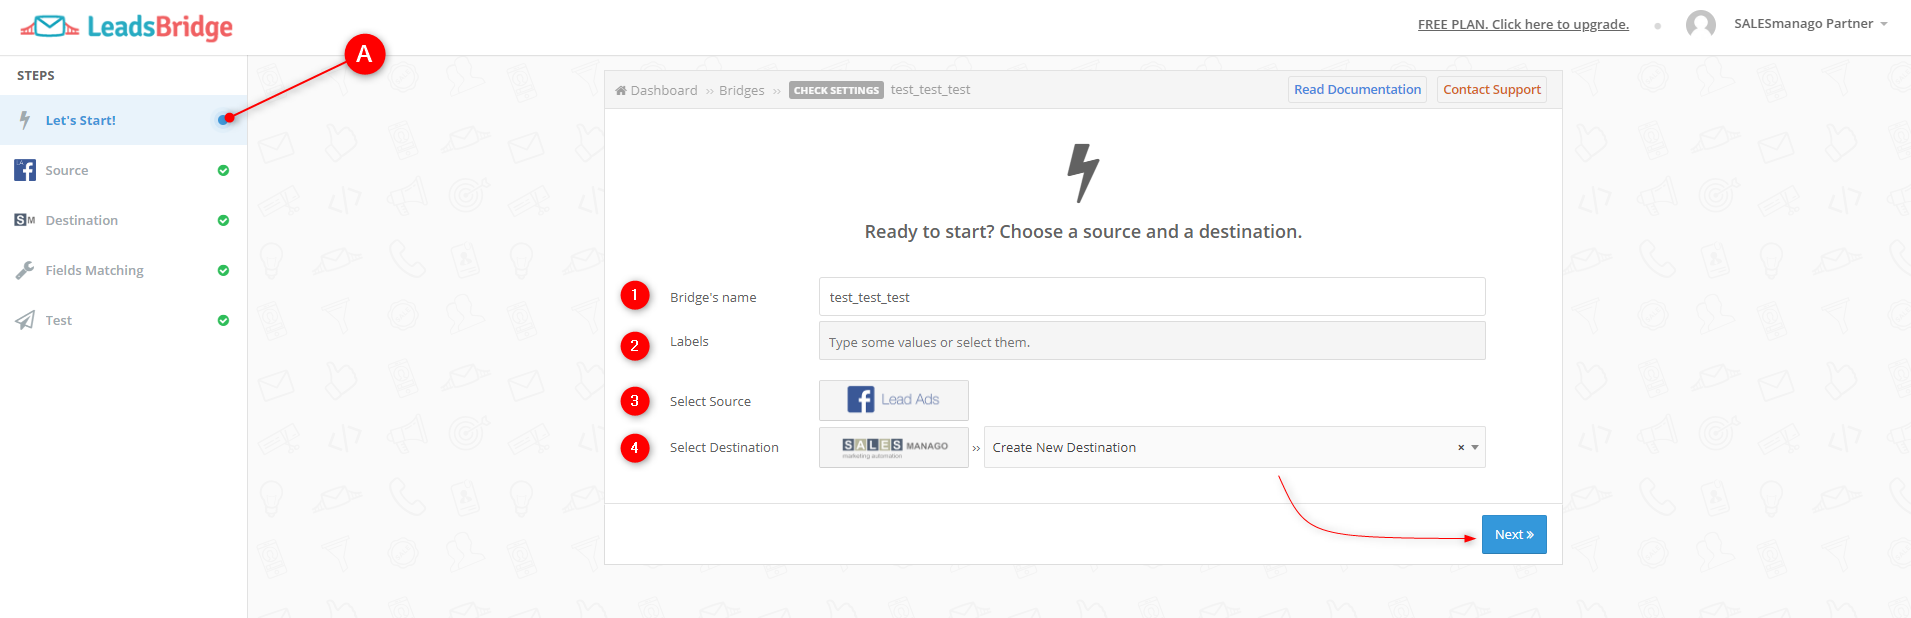
[A] Let’s start – it is the first step in which you determine between which platforms you will establish the connection (bridge).
[1] Bridge’s name – typed in the system name of the bridge under which you can find it on the list of bridges.
[2] Labels – determine the category of the bridge. However, it is of little importance if it comes to the lead transfer.
[3] Select Source – choose a source from which the generated leads will be transferred. Type in the name of the platform or choose it from the list.
[4] Select Destination – choose a destination to which the leads will be transferred. Type in the name of the platform or choose it from the list. Next to the field, you can find an additional field, so you can specify the area of the platform from which leads will be generated and transferred. Choose to Create New Destination if you want to create new destination.
To proceed, click Next.
4. Adjusting settings of the platform from which the leads will be transferred
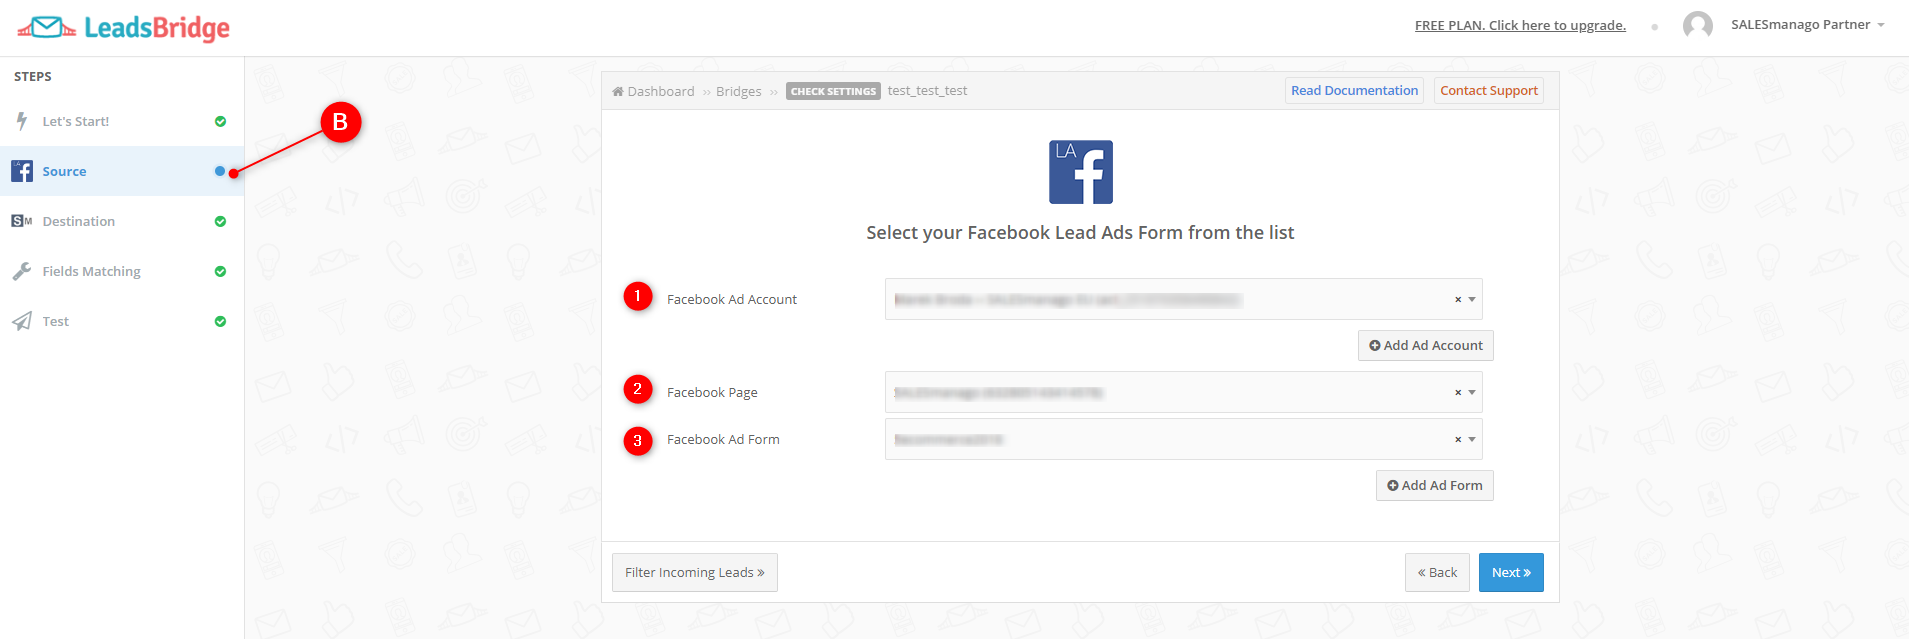
[B] Source – in this tab you will adjust the setting of the platform from which leads will be generated and transferred to the other platform.
[1] Facebook Ad Account – choose a Facebook Ad Account or add new by clicking Add Ad Account. You will be redirected to the Facebook.
[2] Facebook Page – choose a page created within an ad account.
[3] Facebook Ad Form – choose a form displayed within a chosen page. You generate leads through that form. If you haven’t created a form yet, you can add it by clicking Add Ad Form, and then you will be redirected to the Facebook website.
Click Next to proceed.
5. Adjusting settings of the platform to which the leads will be transferred
[C] Destination – in this tab, you will adjust the settings of the platform to which leads will be transferred.
[1] Integration’s name – a name of the destination’s integration.
[2] URL – type in URL address (endpoint), in this case it will be www.salesmanago.com
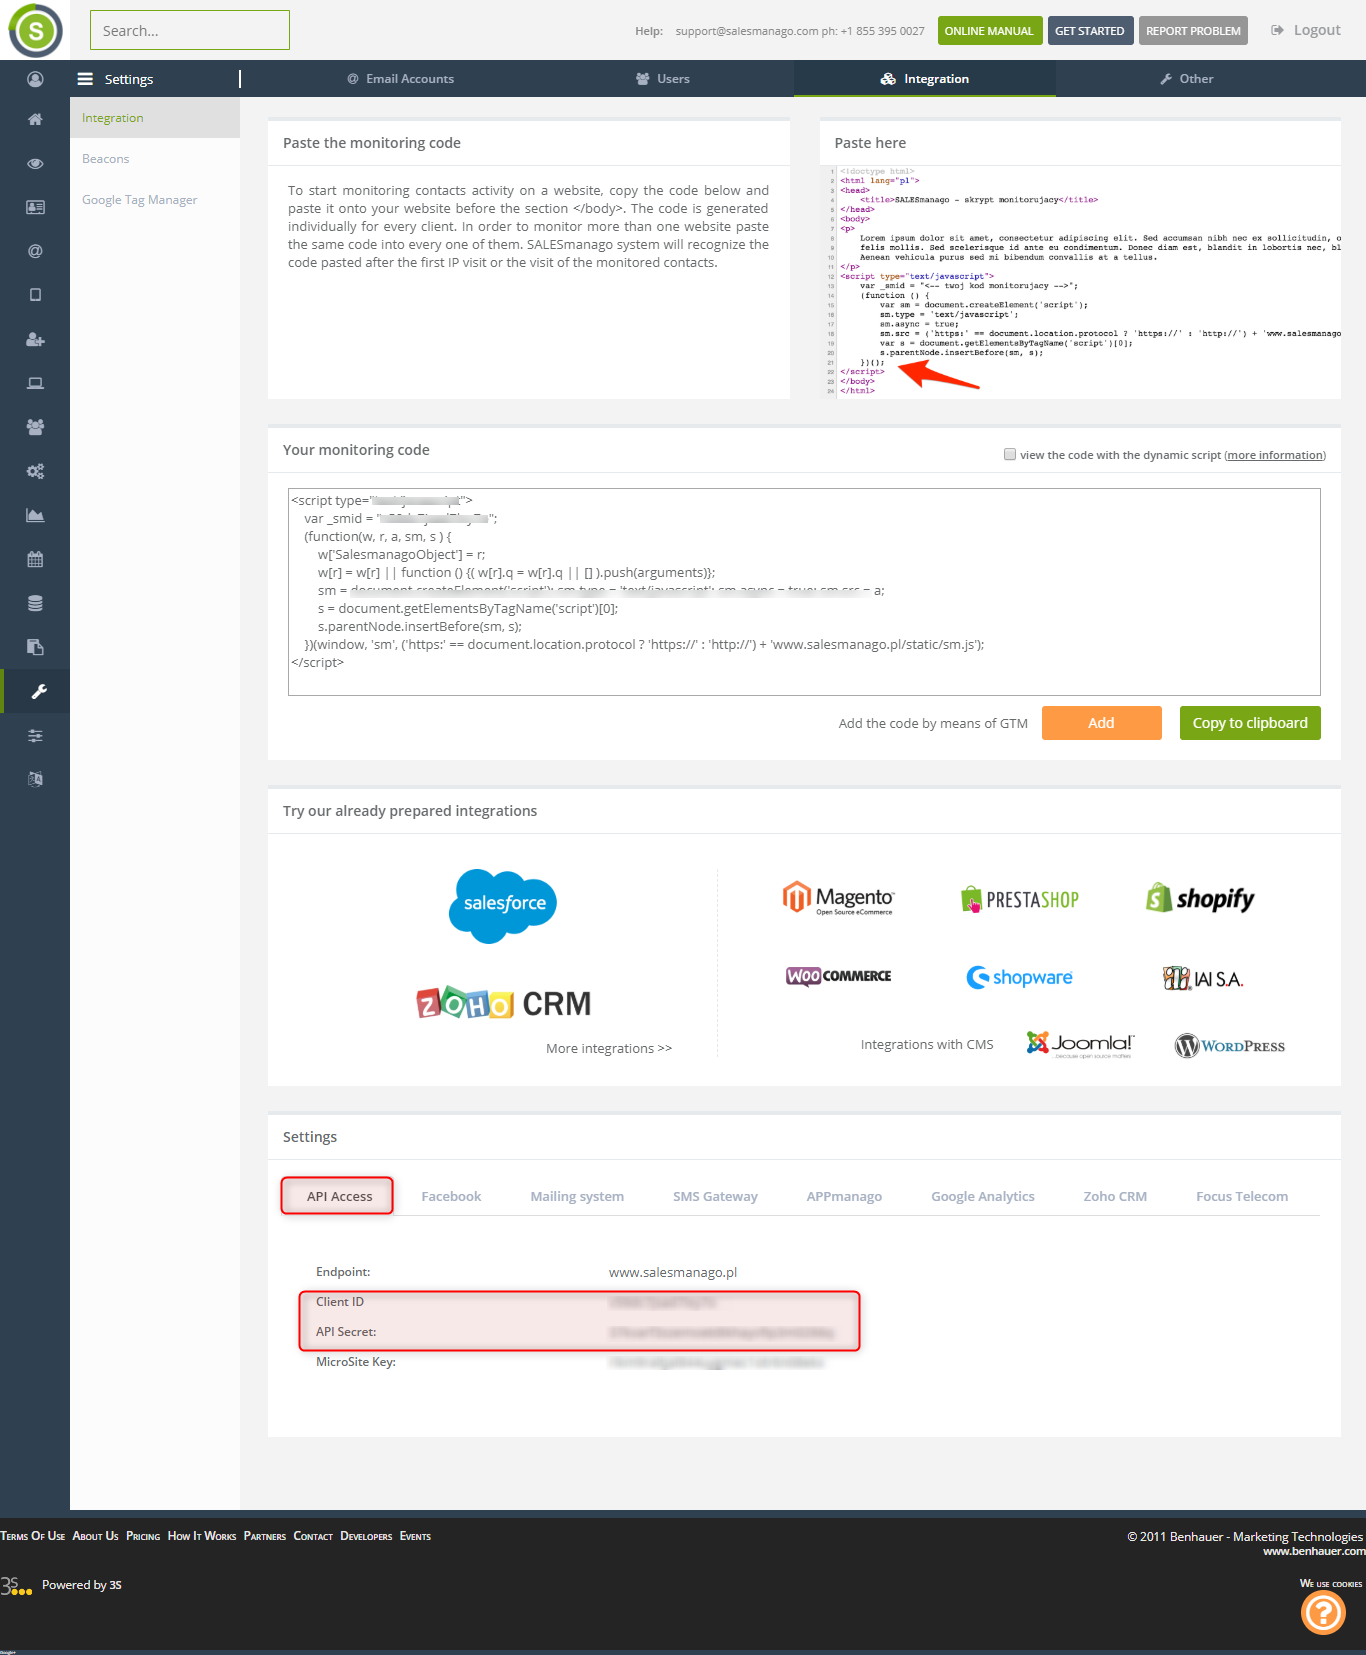
[3] Client id – type in the identification number of the customer which you can find on the SALESmanago platform in Settings => Integration => API Access
[4] API secret – type in the key which you can find on the SALESmanago platform in Settings => Integration => API Access
[5] Owner Email – type in the email address of the owner of the transferred leads.
[6] Custom fields – type in names of the additional fields which you can add to the contact cards in SALESmanago to which you can transfer information from the Facebook form.
[7] Show “Segmentation” as – you can choose tags or stages in the sales funnel. In the first case, the transferred leads will be marked with tags, whereas in the second case the transferred leads will be placed in the stages within sales funnels.
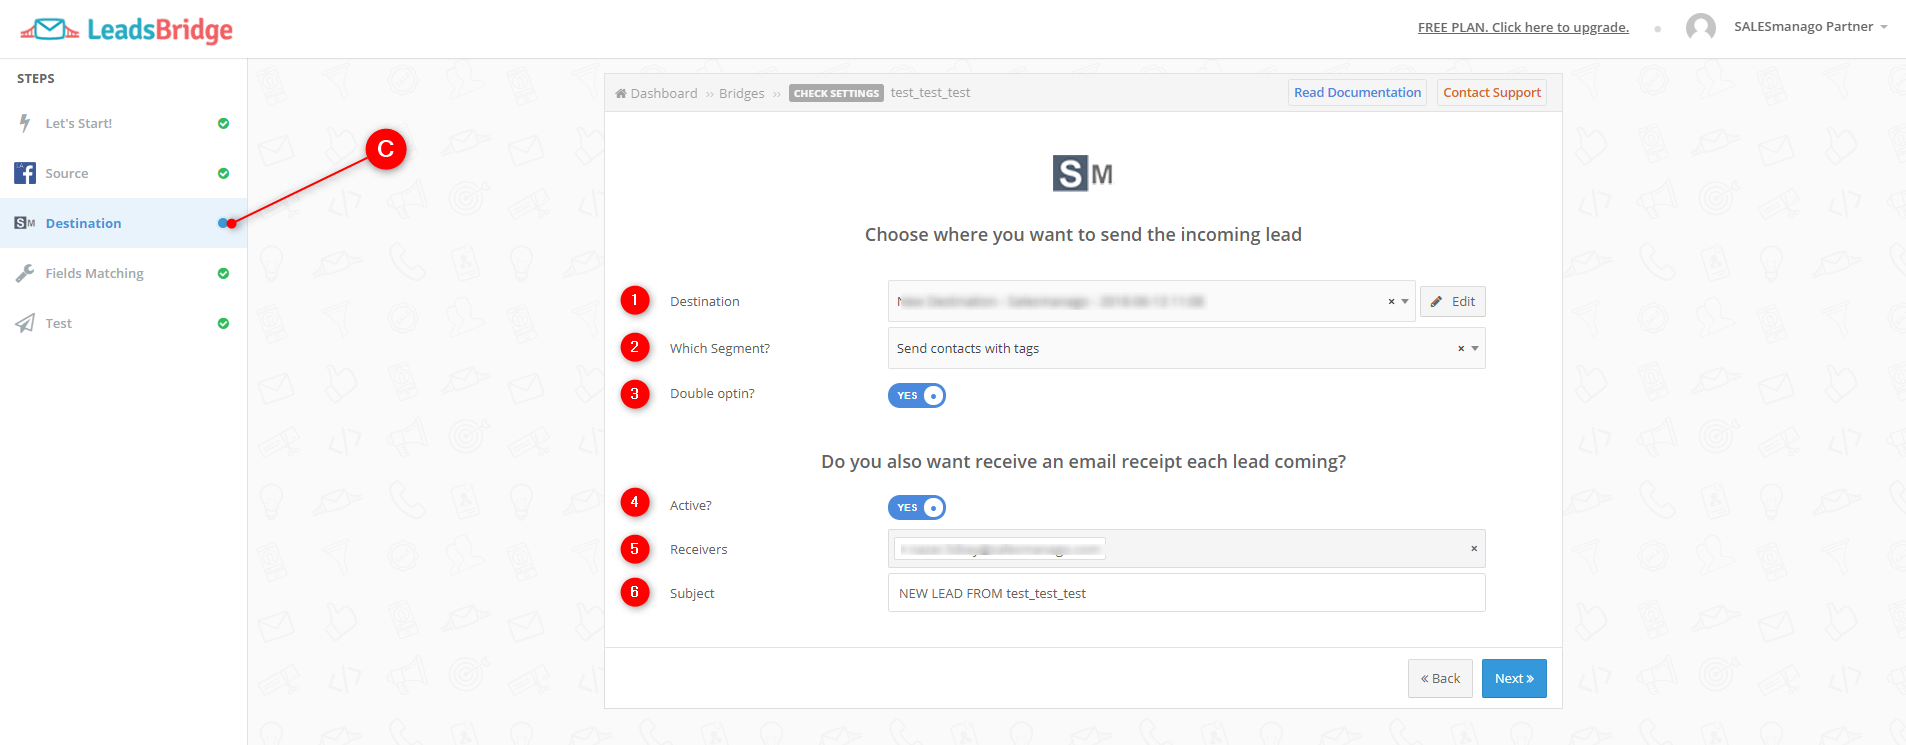
[C] Destination – in this tab, you will adjust the settings of the platform to which leads will be transferred.
[1] Destination – choose from where exactly leads will be transferred.
[2] Which segment? – choose the kind of information assigned to the leads. It can be either a tag or stage in the funnel.
[3] Double opt-in? – mark the option if you want to assign a double opt-in status to the leads transferred to SALESmanago.
[4] Active? – click the button to activate or deactivate sending alert emails about each transferred lead.
[5] Receivers – email addresses to which alert emails will be sent.
[6] Subject – type in the email subject of the alert email.
6. Mapping of fields from Facebook form to a contact card in SALESmanago
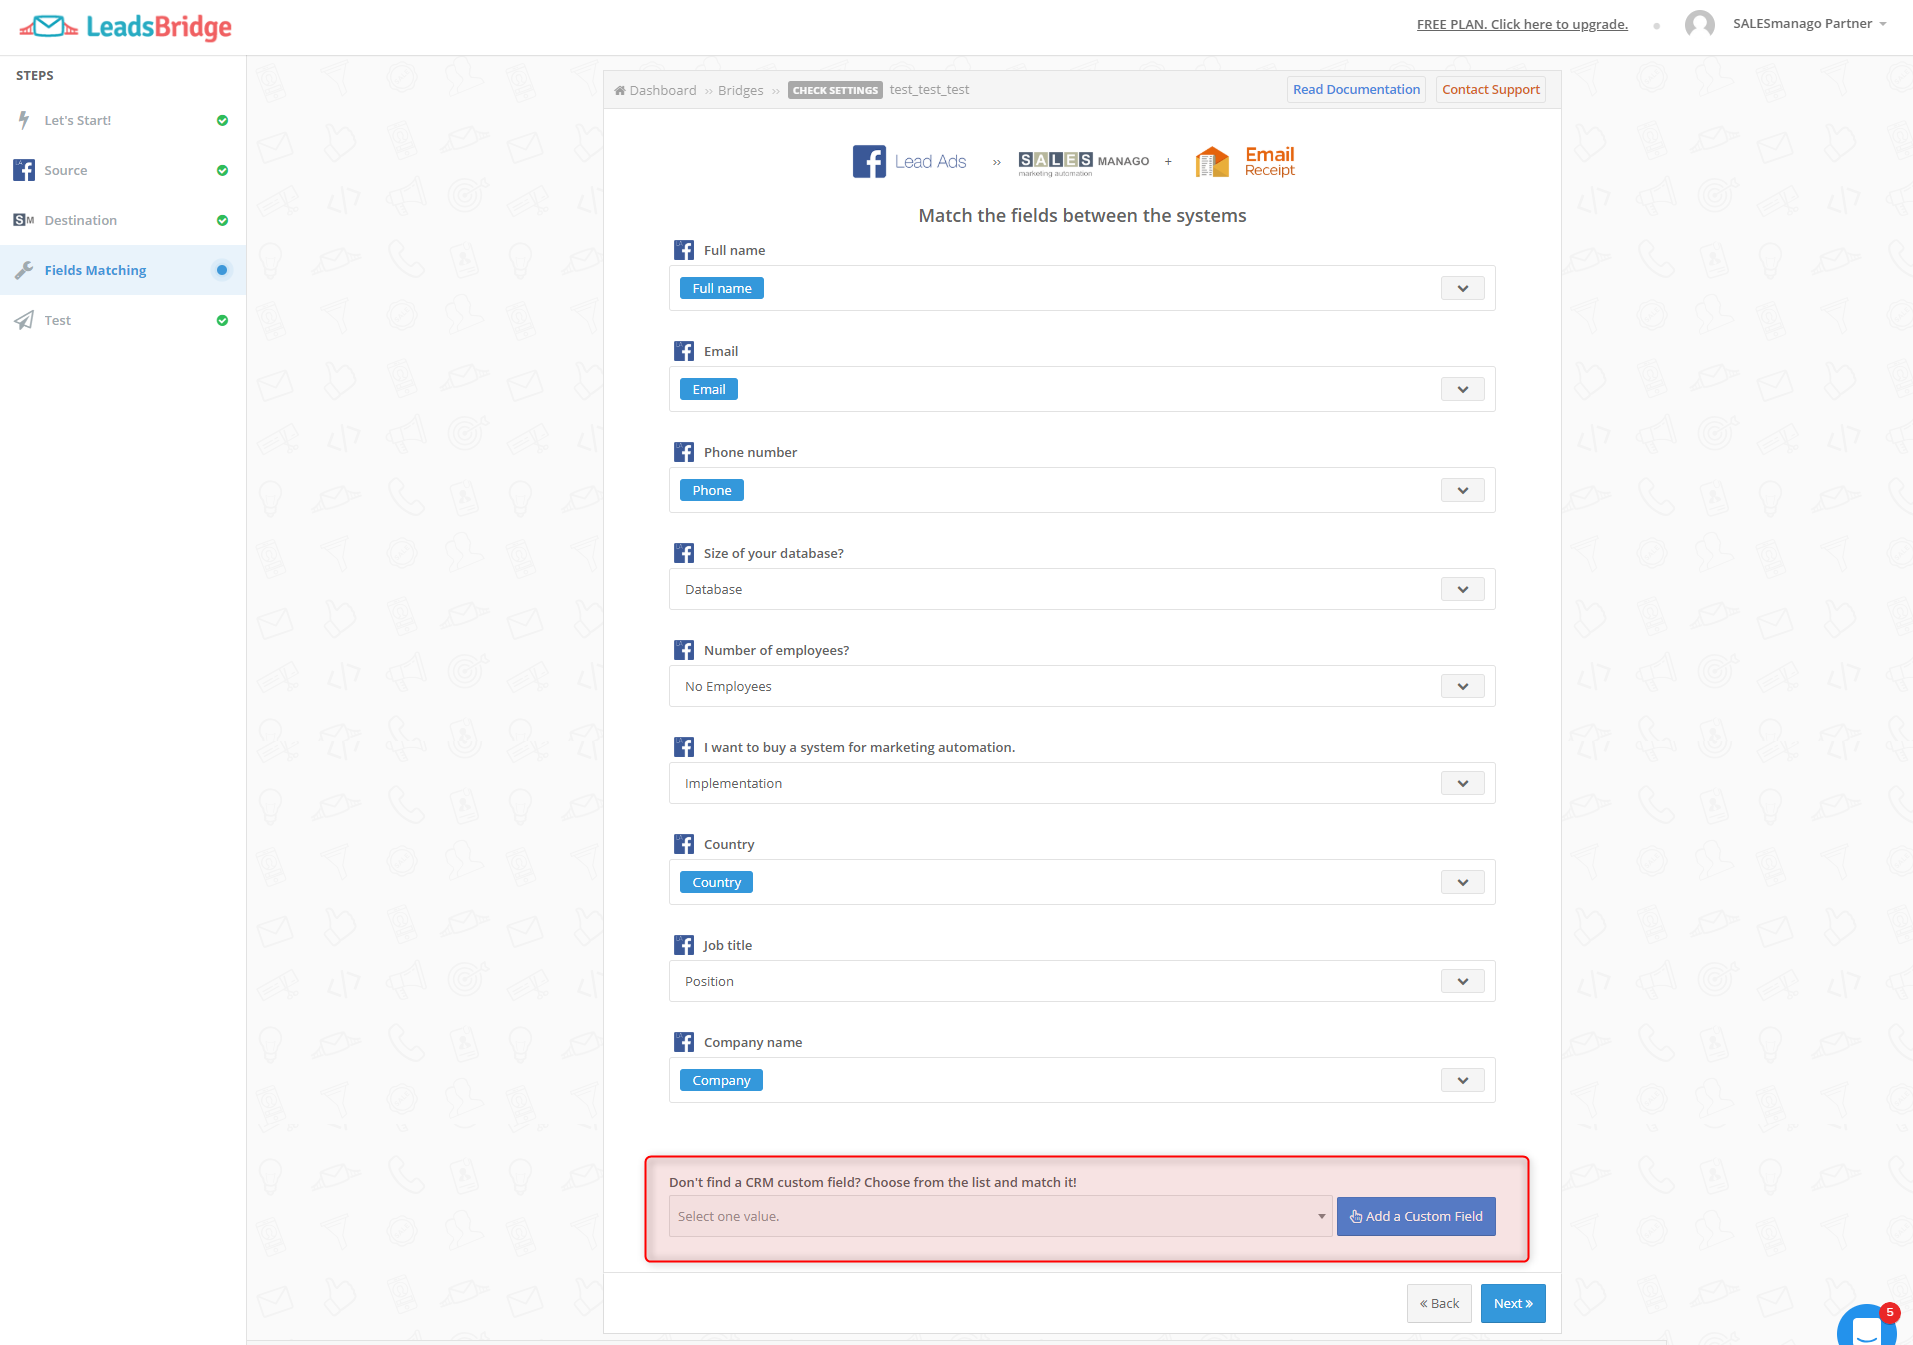
The next step is adjusting information taken from the Facebook form and transferred to a contact card in SALESmanago,e.g. you need to choose where information from the field Full Name will be saved on the contact card in SALESmanago.
To add a field with tags you need to type Tags in the field marked red, and then click Add a Custom Field.

7. Testing
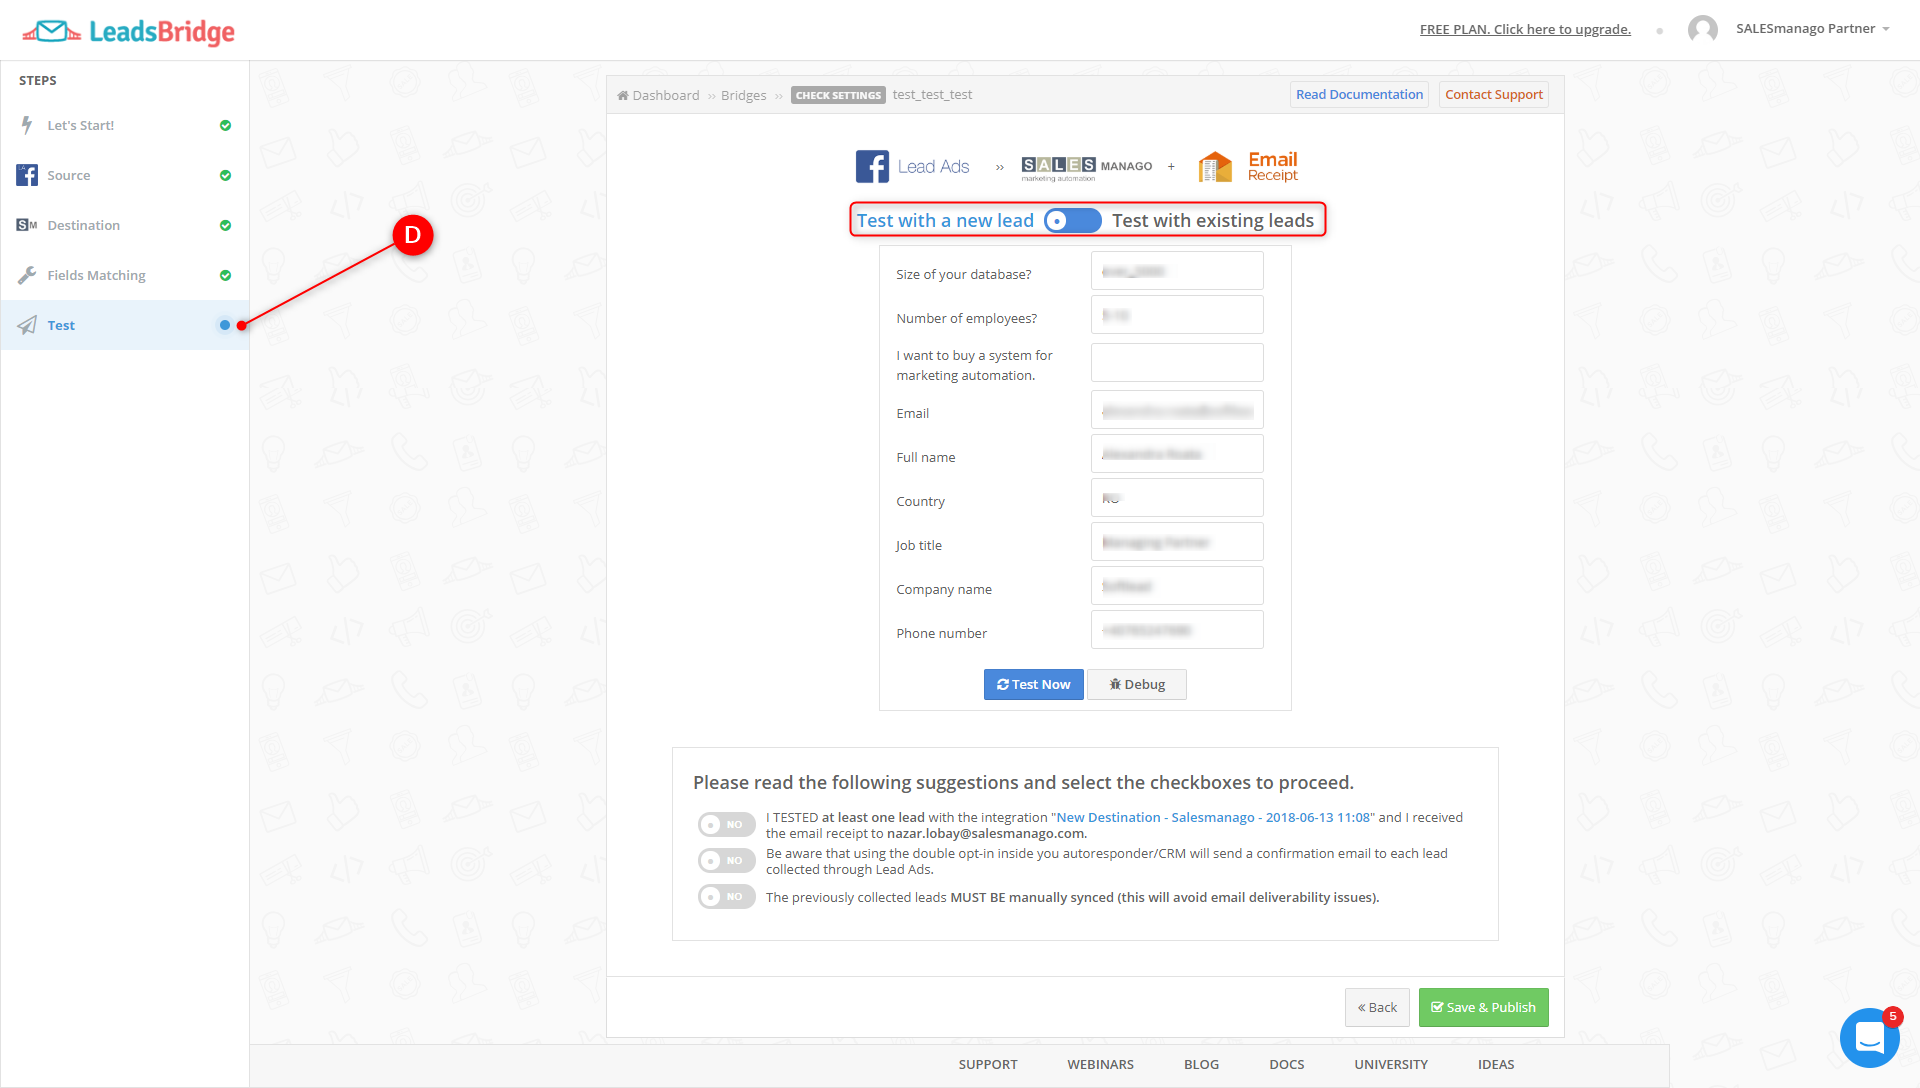
[D] Test – in this tab, you can test the bridge, you can verify whether all settings are correct and the bridge works.
You can test the settings on the new or existing lead. After you choose the option, make a test, familiarise yourself with the suggestions and mark the options.