This article concerns two-factor authentication with the use of an authenticator app as the second authentication step. These instructions are intended for account administrators and explain how to enable and disable 2FA.
Instructions for configuring the authenticator app by individual users are provided here.
For instructions on authentication by SMS, read this article.
Two-factor authentication (2FA) is a security mechanism whereby a user is required to follow a two-step verification process to access their account:
- Step 1 is the provision of conventional login credentials (login/email and password).
- Step 2 is the provision of a short-lived code delivered to the user’s mobile device.
2FA adds an extra layer of defense against unauthorized access to your data and operations. Even if one authentication factor (the password) is compromised, the additional layer of verification (the code delivered to your mobile device by SMS or via an authenticator app) ensures that unauthorized access remains a big challenge.
By implementing 2FA, you increase the overall security of your account, safeguarding sensitive information from potential breaches and ensuring peace of mind for you, your team, and your entire company.
To access the 2FA settings in SALESmanago, go to
Settings → Security → Two-factor authentication

Contents
1. Getting started
Configuring 2FA is a simple yet effective way of protecting your account from unauthorized access. It adds an extra layer of security by requiring users to provide two different authentication factors instead of one.
As an administrator of a SALESmanago account, you can enable 2FA for selected users or enforce it for all users at once, enhancing the overall system security. You can also disable (deactivate) 2FA for selected users, if necessary. Keep in mind, however, that your account is not fully secure until two-factor authentication (2FA) is set up for all users.
Once 2FA is activated, the user needs to download an authenticator application onto their smartphone and connect it with SALESmanago. Following this configuration, the app will provide them with short-lived codes (TOTP—Time-based One-Time Password) that need to be entered on the SALESmanago login screen in addition to the conventional password.
See instructions for 2FA configuration by individual users >>
The authenticator apps recommended by SALESmanago are Google Authenticator and Microsoft Authenticator.
2. Enabling two-factor authentication for users
If you are an account administrator, you can enable 2FA either for all users at once or for selected individual users.
The activation of 2FA will require the user(s) to follow a configuration procedure that is described in detail here.
Note that the procedure looks slightly different when you enable 2FA for all users at once and when you enable it for an individual user. In the former case, users are able to perform the configuration on their own. In the latter case, you need to assist the user in person. Read on to learn more.
A. Enabling 2FA for all users
To enable or disable 2FA for all users at once, go to Menu → Settings → Security → Login policy.

Click Enforce 2FA [1] to enable 2FA for all users of this SALESmanago account.
When you enable two-factor authentication for users of your account, they need to configure the second authentication step by downloading an authenticator app and connecting it with SALESmanago. They can perform this process on their own, by following these instructions.
Following the configuration, the authenticator app will provide them with short-lived codes that need to be entered on the SALESmanago login screen as the second authentication factor (in addition to the conventional password).
B. Enabling 2FA for an individual user
To enable 2FA for selected individual users, go to Menu → Settings → Security → Two-factor authentication. There, you will see the list of all users of your SALESmanago account, with an indication of their user roles [A] and 2FA status [B].
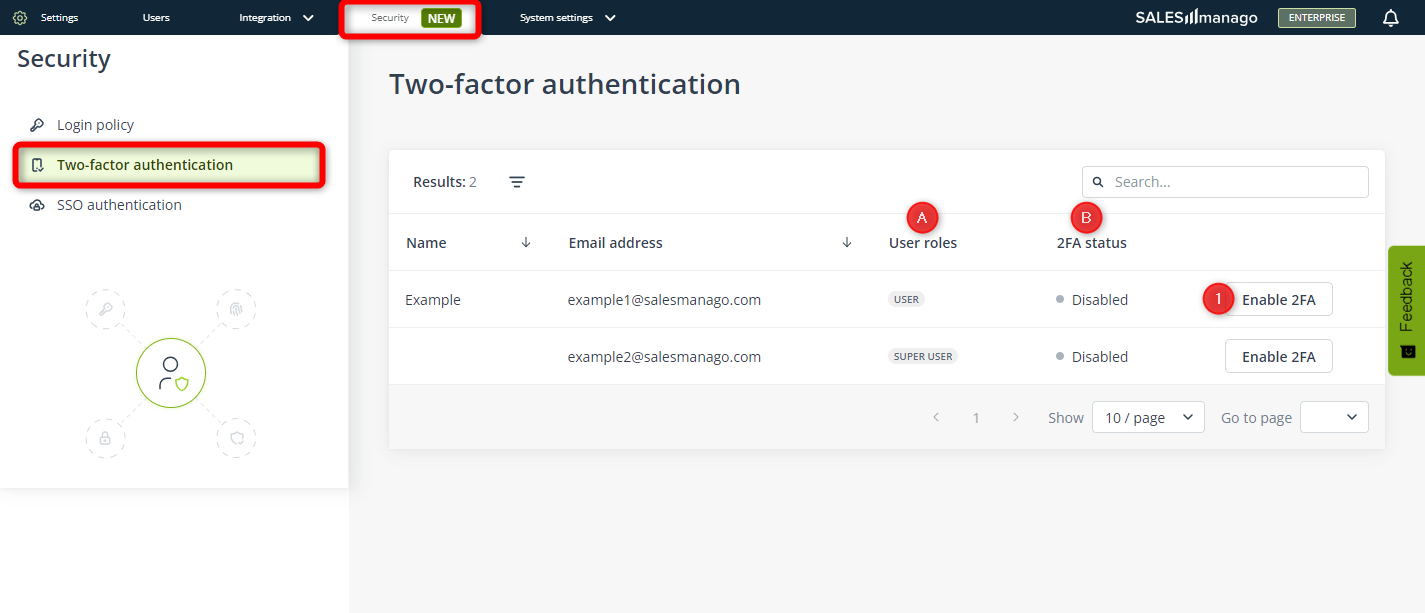
To enable 2FA for an individual user, find that user on the list and click Enable 2FA [1].
You will see a message asking you to configure the second authentication step—this is because if you enable 2FA for an individual user, you need to assist them in this process. The recommended way is to do this either in person (during a face-to-face meeting) or during an online meeting. Do not send codes or screenshots by email, SMS, chat, or any other channel. This is considered a breach of security.
After clicking “Enable 2FA”, you will see the following screen:
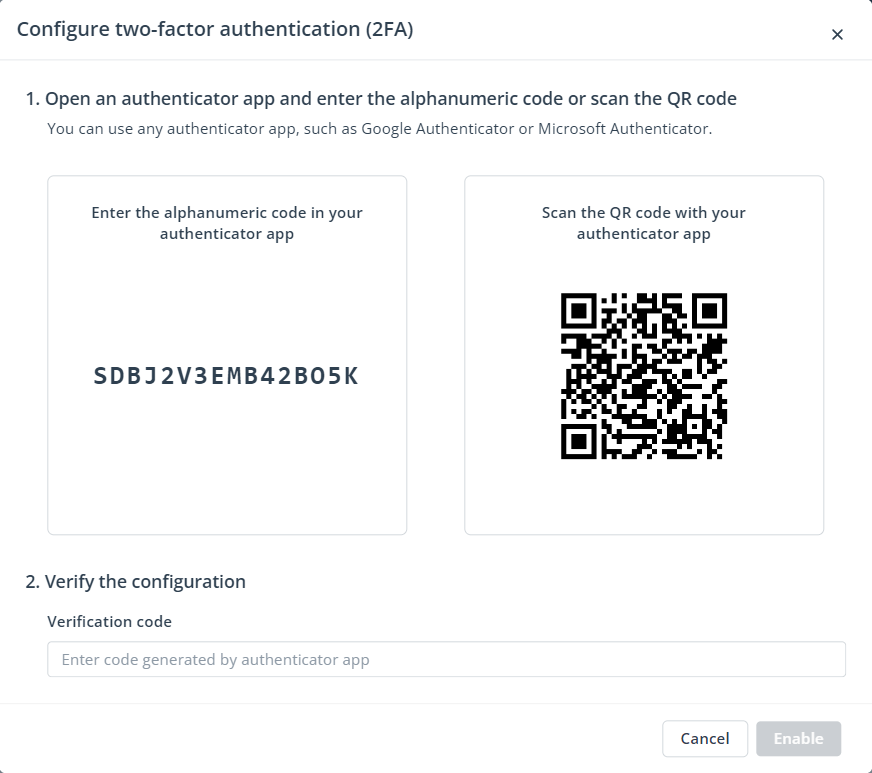
Now, you need to cooperate with the user to configure the second authentication step for them.
First, the user needs to download an authenticator app onto their mobile device and enter the alphanumeric code or scan the QR code provided in Step 1.
Then, the user needs to provide you with a verification code returned by the app, which must be entered in Step 2.
The process is very similar to that followed by individual team members when 2FA is enforced for all users at once. The difference is that in this case, the configuration is performed on the administrator’s account, which requires cooperation (direct communication) between the administrator and the user.
IMPORTANT:
- When configuring the second authentication step with a team member, do not send screenshots or codes from the authenticator app. Instead, use a more secure method like in-person communication or an online meeting through trusted platforms such as Google Meet or MS Teams.
- Keep in mind that your account is not fully secure until two-factor authentication (2FA) is set up for all users.
3. Disabling two-factor authentication
You can disable 2FA for selected individual users, but not for all users at once.
Disabling 2FA for a user is only recommended in the following cases:
- The user has lost their mobile device and is unable to log into their account.
- The user is unable to access their authenticator app.
- A security breach occurred, i.e., the user has exposed their alphanumeric/QR code used to establish the connection between the authenticator app and SALESmanago.
To disable 2FA for individual users, go to Menu → Settings → Security → Two-factor authentication. There, you will see the list of all users of your SALESmanago account, with an indication of their user roles [A] and 2FA status [B].
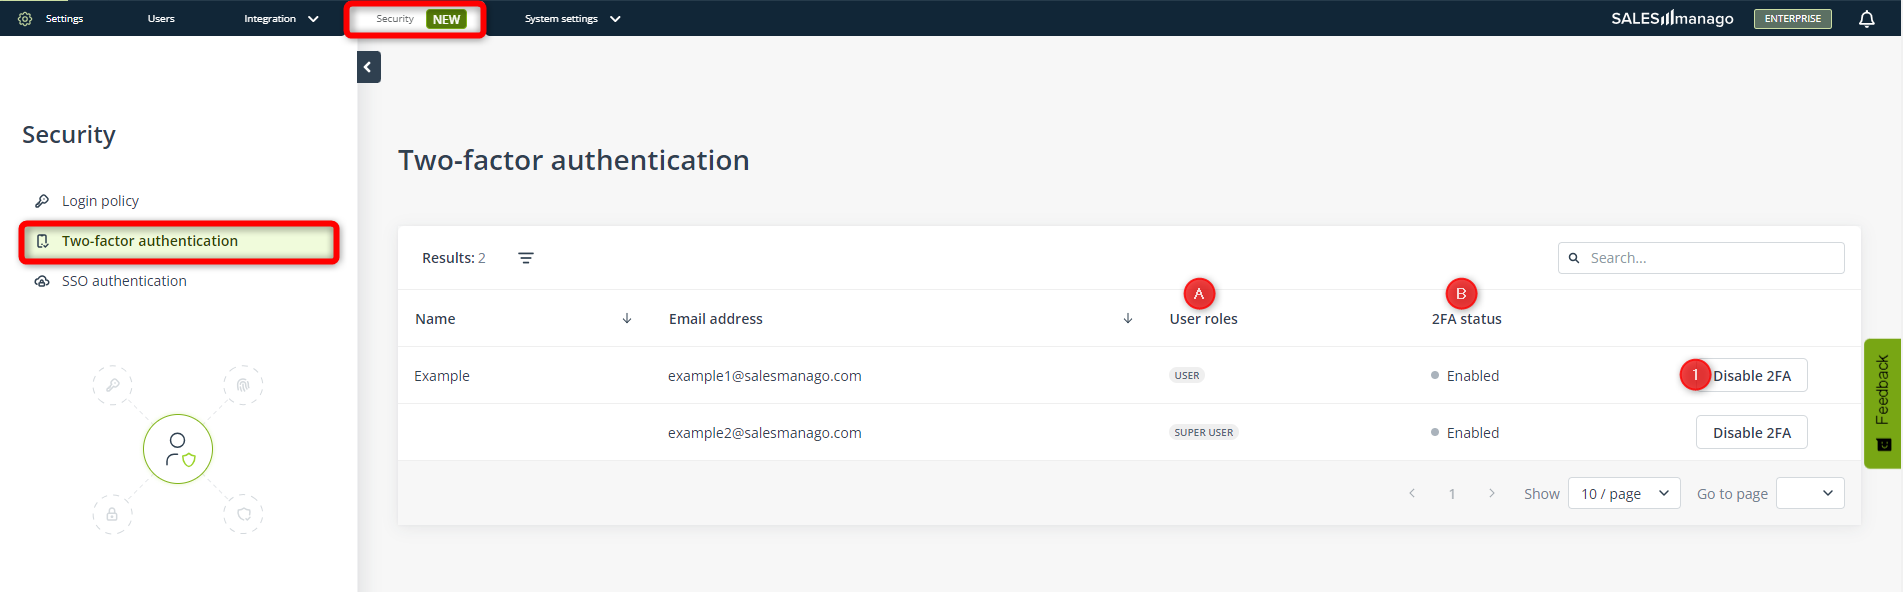
Find the user on the list and click Disable 2FA [1].
From now on, the user will be able to log into SALESmanago with only one authentication factor (the conventional password).
IMPORTANT: Keep in mind that your account is not fully secure until two-factor authentication (2FA) is set up for all users.