This article explains how to import Contacts from local files to the SALESmanago platform.
The Contact import wizard allows you to import Contacts along with their details (such as email addresses, personal data, and additional information) into your SALESmanago database. This way you can add or update Contacts in your database, which is the first step for your data management and the basis for all your marketing actions on the SALESmanago platform.
The only detail required to add a Contact to your database is the email address. The best marketing practice, however, is to collect as much data on individual Contacts as possible. Creating rich 360° profiles allows you to run targeted campaigns and build customer intimacy.
To import Contacts to your SALESmanago account, go to
Audiences → Contacts → Contact Management → Imports → New Import
Contents
- Preparing a file for import
- IMPORTANT: Opt-in/opt-out status
- Importing Contacts to SALESmanago
- Mapping—detailed instructions
- Import List and import details
1. Preparing a file for import
Start by preparing the file to be imported. The file should contain all the Contact data you want to include in your database. Each data type must be included in a separate column (for example, use one column for email addresses, one for first names, one for last names, etc.). The only data type necessary to import a Contact is the email address.
The recommended file formats are .CSV and .XLSX. The maximum file size is 20 MB (larger files must be divided into smaller ones). The file must not include any empty lines.
IMPORTANT: If you are using a CSV file for import, you must use the semicolon [ ; ] as the data separator. If you use any other separator, all the data from the file will end up in a single cell.
IMPORTANT: After uploading an XLSX file, you may receive the information that the file is too big, despite its size being less than 20 MB. This stems from the fact that following the decompression of an XLSX file, its size can increase considerably. In that event, split your XLSX file into several smaller files and perform several imports.
Read more about preparing a file for Contact import >>
2. IMPORTANT: Opt-in/opt-out status
When importing new Contacts, the good practice is to include two status columns in your file: one specifying the Contacts’ opt-in/opt-out statuses for Email Marketing and the other specifying the Contacts’ opt-in/opt-out statuses for Mobile Marketing.
IMPORTANT:
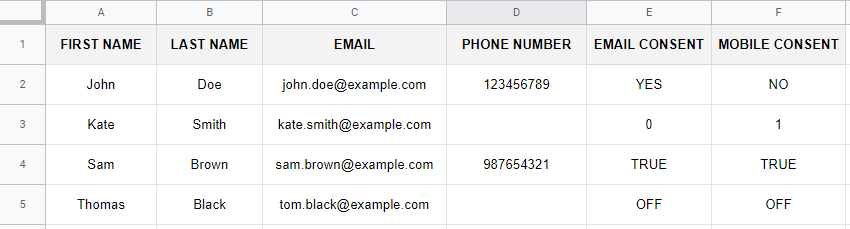
- Use one of the following formats to indicate the opt-in/opt-out statuses in your file:
- TRUE/FALSE
- YES/NO
- 1/0
- ON/OFF
EXAMPLE: Correct status formats:
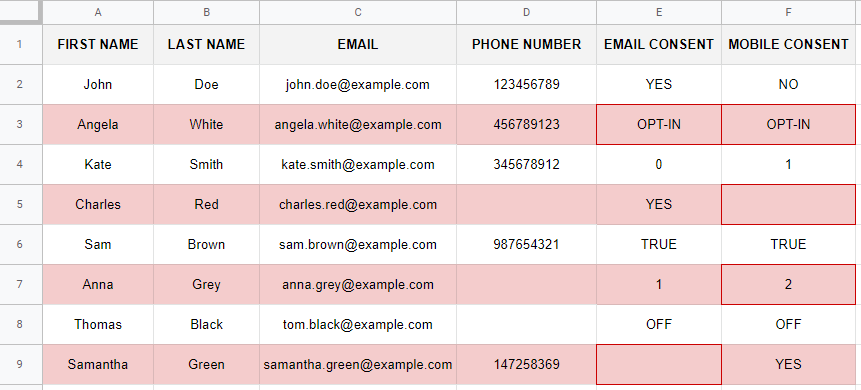
- If your file contains a status column and the status is not indicated or is incorrect for any Contacts, those Contacts will not be imported. This applies to both Email Marketing consent and Mobile Marketing consent.
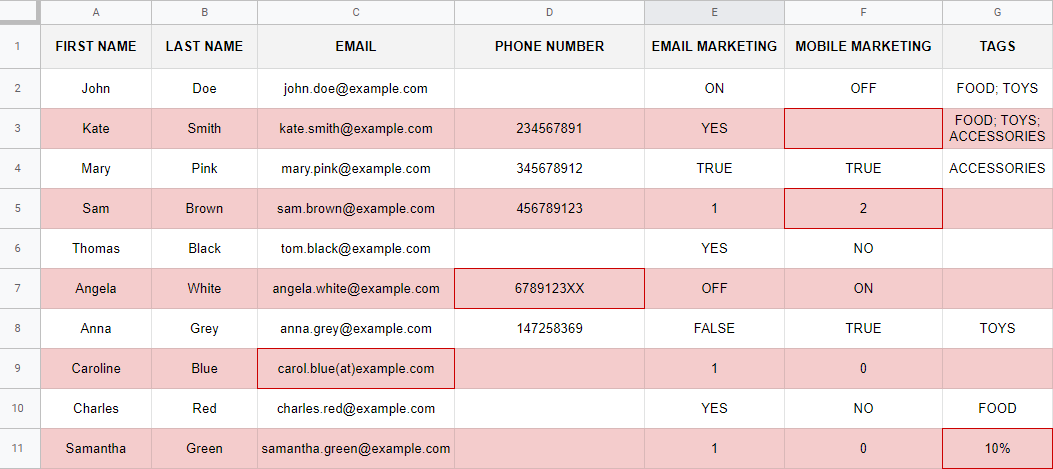
EXAMPLE: The Contacts marked in red will not be imported:
IMPORTANT: If you haven’t mapped any column as “Email Marketing consent”, all Contacts will be imported with the opt-in status by default (based on their email addresses).
TIP: If all the Contacts listed in your file have the opt-in status (for either Email Marketing or Mobile Marketing), you don’t need to include a column specifying the status—all Contacts will be uploaded to the system with the opt-in status. However, if the Contacts in your file have different statuses, this must be specified in a dedicated column.
If you want to update Contacts’ opt-in/opt-out statuses, you need to remember about the following rules:
- There is no option to change a Contact’s Email Marketing status from opt-out to opt-in via a Contact import. To learn more, contact our Customer Support at [email protected].
- The other statuses:
- Email Marketing: opt-in → opt-out,
- Mobile Marketing: opt-out → opt-in and opt-in → opt-out,
will be updated on the SALESmanago platform according to the contents of your import file.
IMPORTANT: The import of untrue consent statuses for Email Marketing and Mobile Marketing into the system is illegal.
3. Importing Contacts to SALESmanago
When your .CSV or .XLSX file is ready, go to Menu → Audiences → Contacts → Contact Management → Imports and click + New import. The import process comprises four steps, which are described in detail below.
A. File upload

[1] Import name—enter a name for your new import, which will allow you to identify the import in the future. If you don’t specify a name, the name of your file will be used as the import name.
[2] Upload CSV or XLSX file—select a CSV or XLSX file by locating it on your computer or by dragging it from a local folder and dropping it into the indicated area.
[A] Download sample file—click here to download a file that demonstrates how to correctly prepare your data for import. You can also use the file to perform a test import.
Click Next to proceed to Mapping.
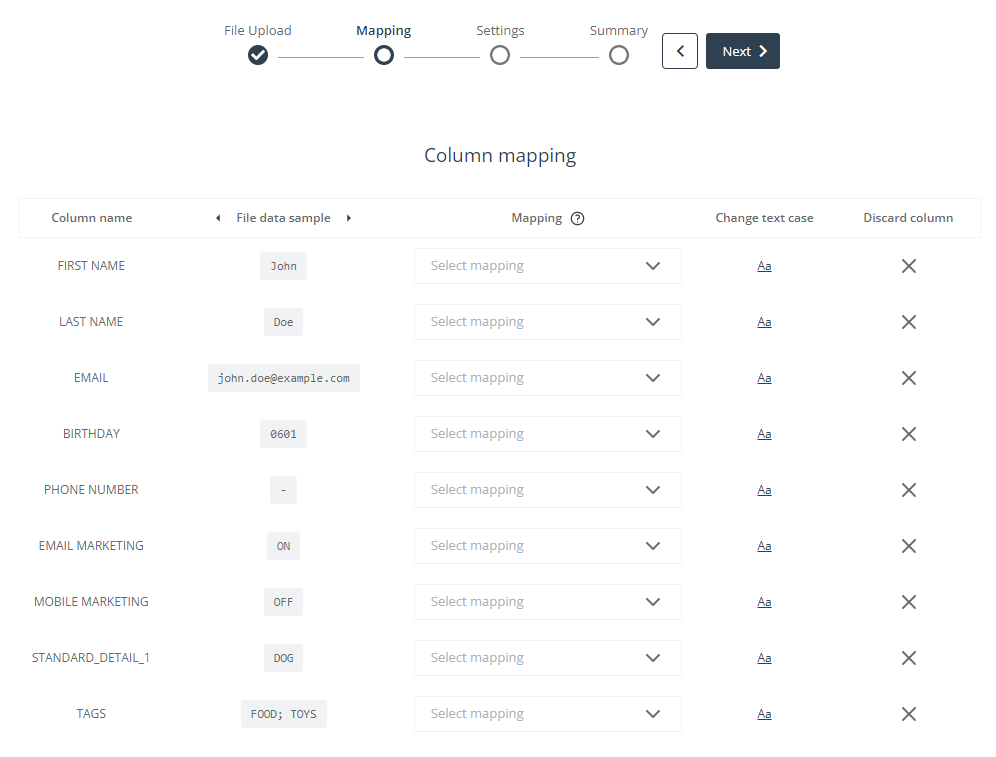
B. Mapping
Mapping allows you to assign the imported data to the corresponding data categories on the Contact Card. In other words, at this stage, you match the columns in your file with the appropriate Contact data categories.
Read more about the Contact Card >>

[1] Column name—the list of all columns included in your imported file. Column names are determined based on the values provided in the first row of your file.
[2] File data sample—here you can see examples of the values included in each column of your file. Use the small arrows at the top to cycle through the Contacts.
[3] Mapping—use the drop-down lists to specify the data type in each of the columns in your file. The items on the drop-down lists correspond to the data categories on the Contact Card.
EXAMPLE: You have included the email addresses of Contacts in a column named “Email”. To correctly map this column, select “Email” from the drop-down list:
Your data will be validated by the system (the system will check the format of your email addresses to confirm that they are correct). If the format of an email address is incorrect, the Contact will not be imported.
Verified email addresses will be displayed as Email on the Contact Cards:
IMPORTANT: For an import to succeed, you need to map the email category. All other data types are optional.
Ensure that you have correctly mapped all your data so that your Contact data can be used effectively in marketing processes in the future.
For more detailed instructions on data mapping, see section 4 below.
[4] Letter case—here you can change the letter case for values in each column. You can choose to use: the original spelling; UPPERCASE; lowercase; or Title Case. This may be useful in the future, for instance, if you want to personalize your marketing communications with Contacts’ names.
EXAMPLE: One of the rows in the “First name” column of your file includes the following value: JOhn doe. If you select Title Case, this value will be changed as follows: John Doe.
[5] Discard column—if you don’t want to import a column, click the X icon to exclude it.
All discarded columns will show in a separate list at the bottom of the page. If you change your mind, you can restore a discarded column and then map it.
NOTE: If you don’t map a column and proceed to the next stage (Settings), the column will automatically be discarded (i.e., excluded from the import).
Click Next to proceed to Settings.
C. Settings
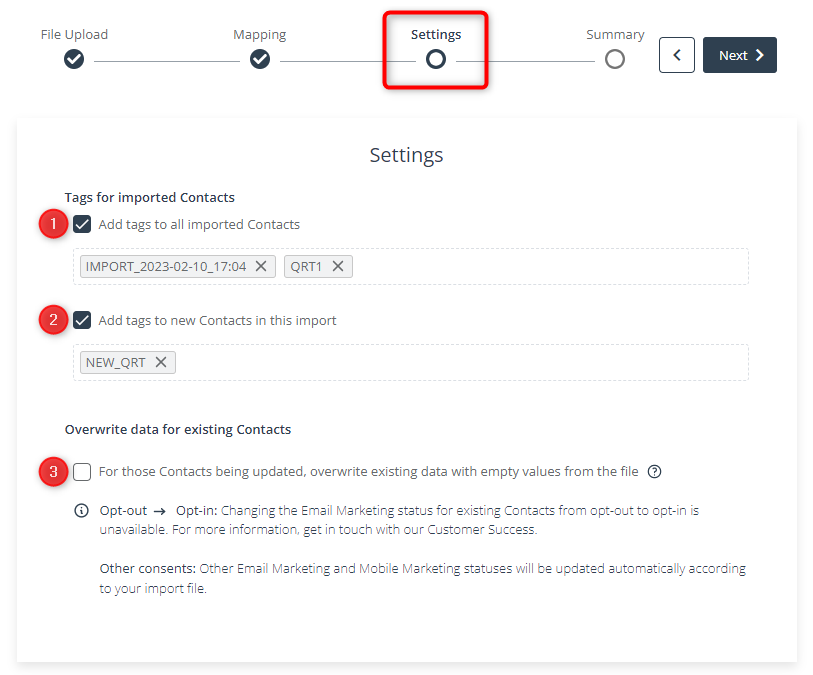
[1] Add tags to all imported Contacts—enter up to 16 tags that will be added to all successfully imported Contacts (both new and updated).
[2] Add tags to new Contacts—enter up to 16 tags that will be added to all new imported Contacts.
NOTE: Remember that in the SALESmanago system, tags must consist of at least 3 characters. Use the “_” character (and not the space) as the separator, e.g., TOYS_DOG.
[3] For updated Contacts, overwrite existing data with empty values from the file—decide whether empty values in your file should replace the corresponding data for these Contacts in the system.
Your import file may contain empty cells—for some Contacts, no values are provided in some of the columns. However, the corresponding Contact Card data fields may already contain information. If you check this box, Contact data will be updated with these empty cells, meaning that some data fields that previously contained a value may now become empty.
This option is especially useful when you want to remove outdated information from the system.
TIP: If you want to clear a data category for a group of Contacts, prepare a file containing these Contacts and an empty column. Perform a Contact import, mapping the empty column as the data category you want to clear. At the Settings stage, check the box: For updated Contacts, overwrite existing data with empty values from the file.
Click Next to proceed to Summary.
D. Summary
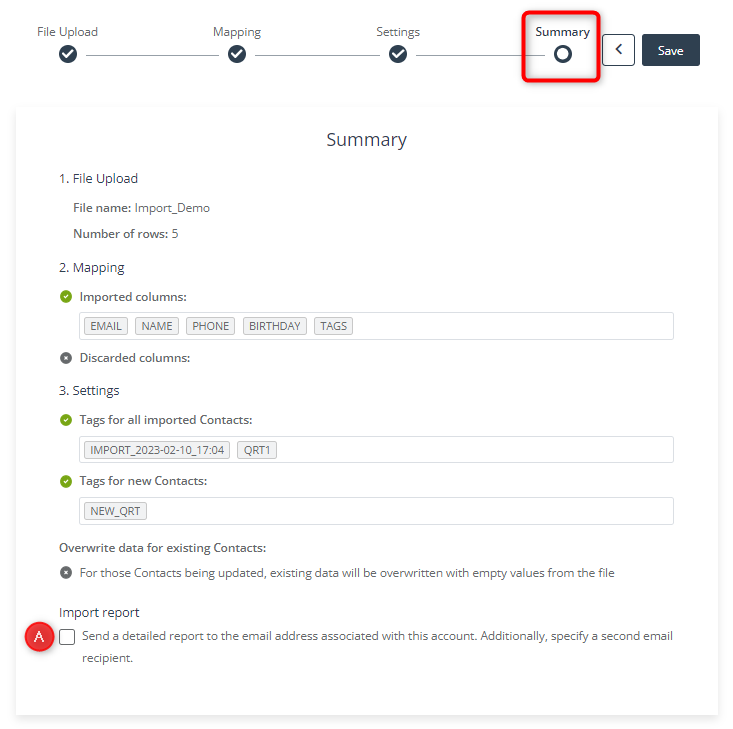
At this stage, you can review the summary of your Contact import:
- the name of your file,
- the number of rows (Contacts) in your file (including duplicates),
- the columns that have been mapped and will be imported,
- any discarded columns (including unmapped columns),
- the tags that will be added to all imported Contacts,
- the tags that will be added to new imported Contacts, and
- information about the option to overwrite existing data with empty values.
Check option [A] to have an import report sent to the email address associated with your account (and, optionally, to an additional email address).
At this stage, you can review all your choices and potentially go back to make any necessary changes.
4. Mapping—detailed instructions
A. How to map data
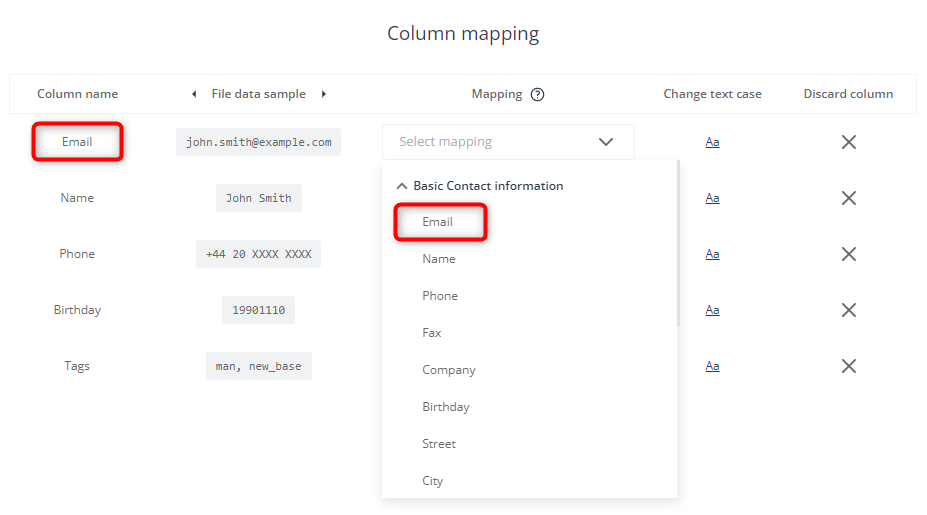
In the second step of a Contact import, you will see a list of all the columns included in your file (the column names are determined based on the values provided in the first row of your file).
You need to match the columns with the appropriate Contact data categories.
For each column, expand the drop-down menu (Select mapping) and locate the data category represented by the data in the column. For example, to map a column containing the birthdays of your Contacts, expand the Basic Contact information section:

Then select Birthday:

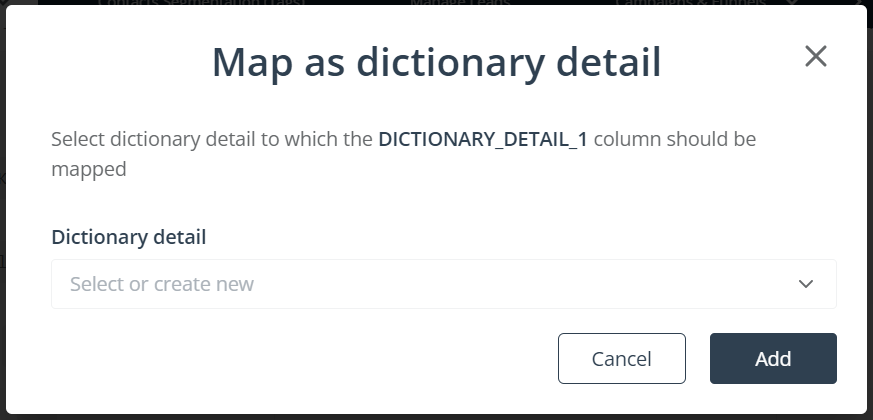
If you select Dictionary detail, you need to select a detail from the list of existing dictionary details or create a new dictionary detail (by entering its name and specifying the data type: Date or Number).
If you select Standard detail, you will be asked to enter the detail name. If you enter the name of an existing detail, the data in that column will be uploaded to the system as that existing standard detail. If you enter any other name, a new standard detail will be created. You can include up to 16 standard details in a single import.

If you select Contact tags, you need to specify what type of tag separator is used in your file. Otherwise all the tags listed in this column will be merged into one.
EXAMPLE: A correctly selected tag separator:
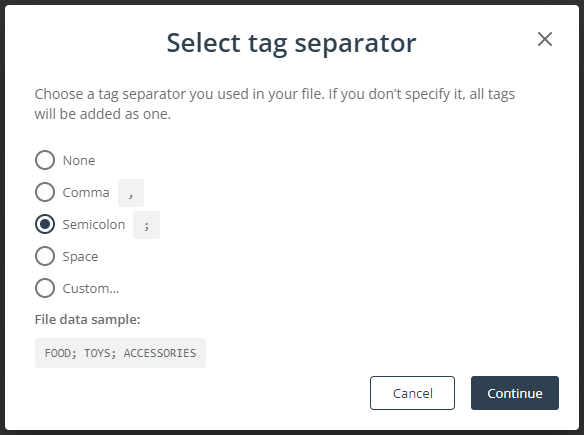
IMPORTANT: You can add up to 30 tags for one Contact via a single import. All tags must be included in a single column in the file because the “Contact tags” column can only be mapped once.
IMPORTANT: In the SALESmanago system, tags must consist of at least 3 characters. Tags shorter than 3 characters will be omitted during an import (all other, correct tags will be imported as normal).
Use the “_” character (and not the space) as the separator in tags, e.g., TOYS_DOG.
IMPORTANT: For an import to succeed, you need to map the email category. All other data types are optional.
IMPORTANT: Ensure that you have correctly mapped all your data. If you realize that any data type is mapped incorrectly, perform another import using the same file, and this time map the data correctly. The data will be updated in the system for all Contacts included in the file.
B. Validation errors
Following your selections at the Mapping stage, the system validates whether the values included in the file have the correct format.
If any values are found to be incorrect (non-compliant with the system requirements), you will see a small warning icon at the top of the drop-down menu:
This warning indicates that some rows in the file contain incorrect values in this specific column. In any of the following cases:
- no email address or an incorrect email address;
- an incorrect phone number (e.g.,
+1 123XYZ789); - a tag including the % character;
- if you have mapped a column as Email Marketing or Mobile Marketing consent and no value for a Contact is present or the provided value is incorrect
—the Contacts affected will be omitted during the import process (will not be imported).
This does not affect the rest of the Contacts in your import (all Contacts for whom correct values are provided will be imported with all the details).
C. Merging columns
The Contact Card data categories: Name and Street can be mapped twice and merged into single values, to form full names and full addresses:
- If you have two name-related columns in your file, you can map each of them as Name. The two columns will be merged into a single value (full name).
- If you have two address-related columns in your file, you can map each of them as Street. The two columns will be merged into a single value (full address).
Note that you can drag and drop an element to change the order:
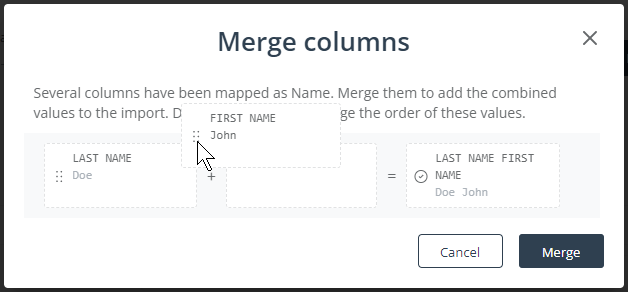
If you click on any of the merged elements, you will see the option to edit the merging settings:

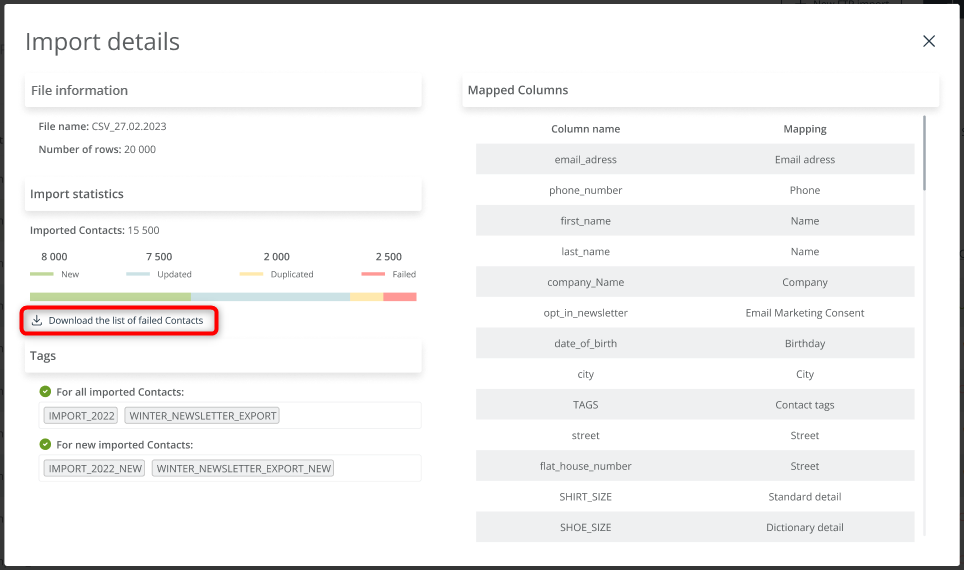
5. Import List and import details
All your Contact imports are listed on the Import List (Menu → Audiences → Contacts → Contact Management → Imports).
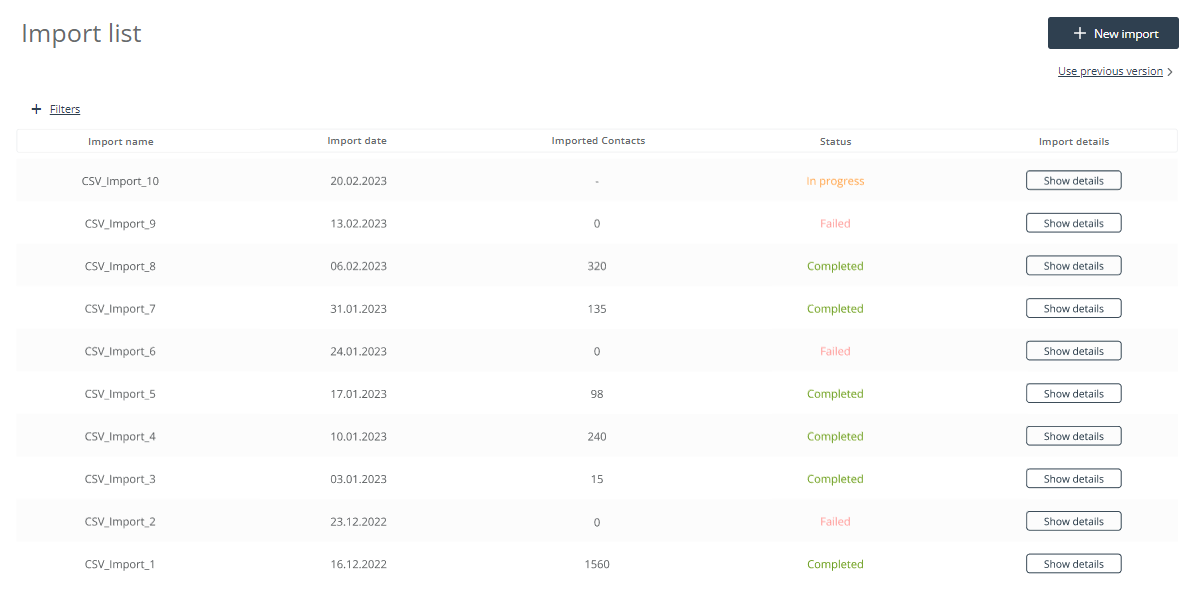
Here you can:
- see the dates of individual imports,
- review the number of Contacts that were successfully imported,
- check the import status (Completed/In progress/Failed), and
- access detailed import analytics.
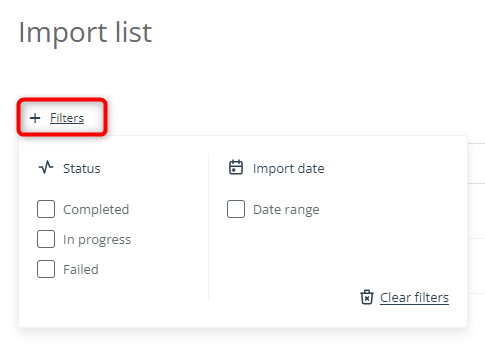
You can filter Contact imports by status and date range:
If you want to see the detailed analytics for a selected import, click Show details in the right-most column.
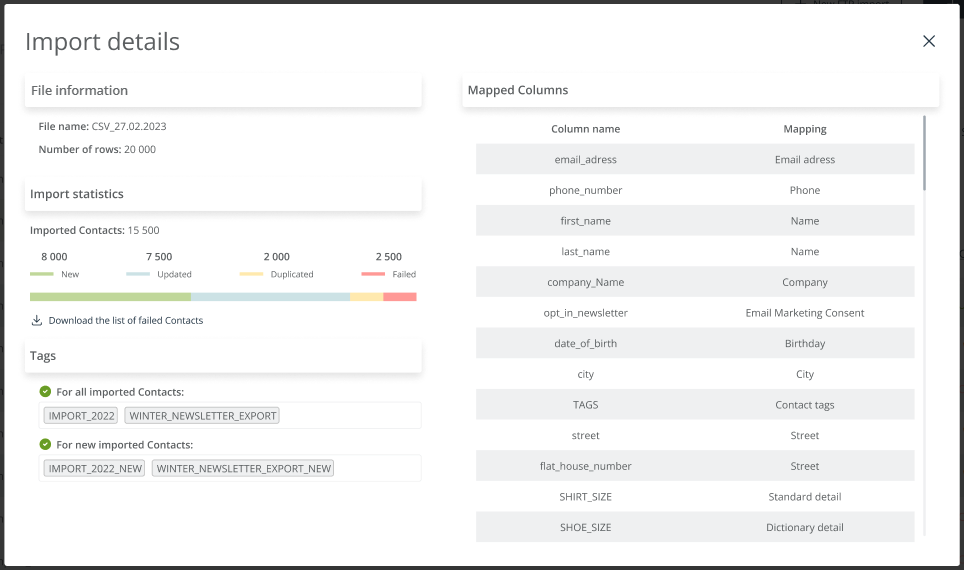
Here you can review:
- basic file information: the file name and the number of rows in the file,
- import statistics (see below),
- any tags assigned to all successfully imported Contacts or to new Contacts (Contacts added to your database through this import),
- mapped columns: how individual columns were mapped.
In the Import statistics section, you can review:
- The number of all successfully imported Contacts (new and updated).
- The number of new Contacts—Contacts added to your database through this import.
- The number of updated Contacts—Contacts whose email addresses were present in your database prior to this import.
- The number of duplicates—A Contact is considered a duplicate if its email address is the same as that in another row.
IMPORTANT: Duplicates are uploaded as one Contact, according to the data provided in the first of the duplicated rows.
EXAMPLE:
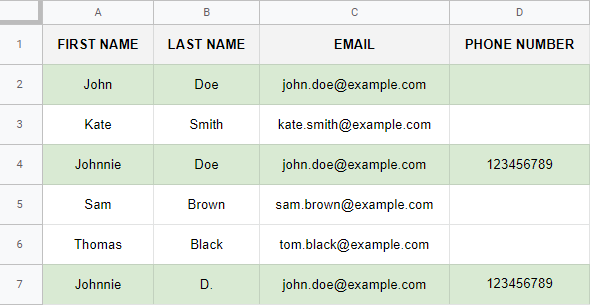
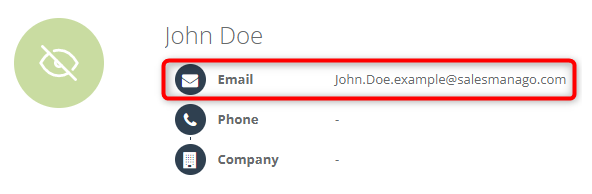
The list contains three rows with the same email address: [email protected]. All three rows will be uploaded to your database as a single Contact, according to the data provided in the first row on the list. Note that the phone number is missing from the first row; therefore, it will not be uploaded.
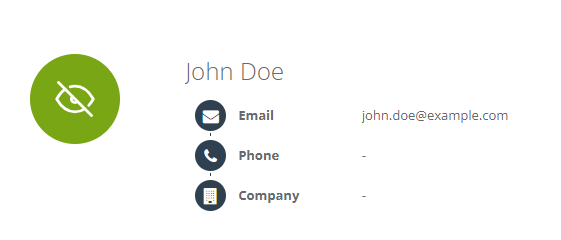
Following this import, the Contact Card will look as follows:
- Failed—A Contact can fail to be imported for the following reasons:
- no email address or an incorrect email address;
- an incorrect phone number (e.g.,
+1 123XYZ789); - a tag including the % character;
- if you have mapped a column as “Email Marketing consent” or “Mobile Marketing consent”, but no value for a Contact is present or the value provided is incorrect, that Contact will not be imported.
EXAMPLE: The Contacts marked in red will not be imported (the incorrect values preventing their import are framed):
NOTE: If no column is mapped as “Email Marketing consent” or “Mobile Marketing consent”, Contacts with provided email addresses and phone numbers will be added to your database with the opt-in status.
You can download the list of Contacts that could not be imported (with the reasons indicated):