Magento 1 is one of the eCommerce platforms that can be integrated with SALESmanago. The integration will allow you to transfer data between the two platforms. You can use the data for analytics or to automate your marketing activities and boost your eCommerce sales.
To download the Magento 1 plugin, click HERE >>
Contents
- Basic information
- Scope of integration
- Plugin installation
- Configuration
1. Basic information
In this article, you will find detailed information about integration with the Magento 1 platform. The plugin is available for free for our customers and is constantly being improved.
The integration will allow you to transfer relevant Contact and transaction data between the two platforms. You can use this information to automate your marketing activities and thus boost your e-store sales.
2. Scope of integration
After logging in to the plugin, synchronization and data transfer are performed automatically.
The scope of integration includes sending the following data to SALESmanago:
- External events such as CART and PURCHASE, both for Contacts who are logged in and those who are not – as long as they have an smclient tracking cookie.
- Export of Contacts and historical transactions from Magento 1 to SALESmanago;
- Automatic addition of a monitoring code to the website.
- Option to assign tags in the SALESmanago system when a Contact registers, subscribes to the newsletter or makes a purchase.
- Automatic addition of features like Live Chat, Pop-up Basic, and Web Push.
Contact form integration:
- Adding a monitoring parameter to Contacts that filled in a contact form.
- Transferring data provided by Contacts when registering and logging in.
- Transferring Contact data (personal details, date of creation, tags assigned in Magento 1, etc.).
- Transferring Contacts along with their opt-in/opt-out status.
- Back synchronization (this feature allows you to check if Contacts registering on Magento 1 already exist in your SALESmanago database. If a Contact exists in the database with the opt-in status but does not give consent when registering, they will have the opt-in status both in SALESmanago and in Magento 1).
- Transferring Contacts along with tags indicating the name of the source platform.
3. Plugin installation
Click HERE to download the latest version of the plugin.
Then go to the Magento Admin Panel. Log in to your account.

On the top menu, select System → Magento Connect → Magento Connect Manager.
Log in to Magento Connect Manager using the data for your Magento Admin Panel.
Go to Direct package file upload.
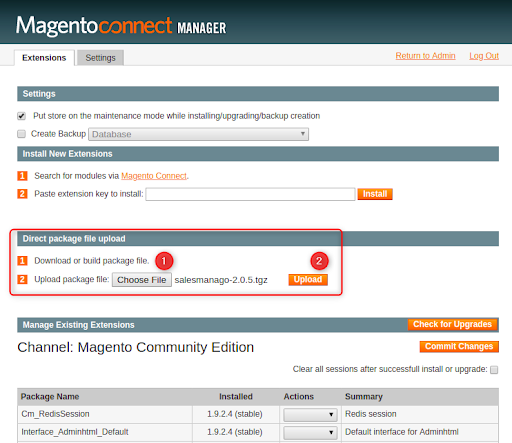
[1] Choose file – select the downloaded file.
[2] Upload – click here to upload the file.
You will be automatically redirected to a console where you are informed that the installation has been completed and where you can check the name and version of the package.
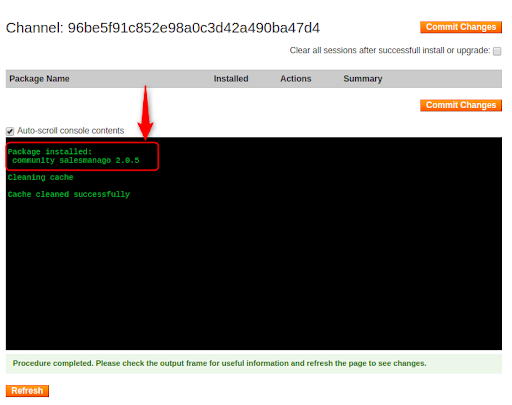
After refreshing the page, you will see the SALESmanago plugin on the list of extensions.

Go to the Magento 1 Admin Panel. Now you can see a SALESmanago tab on the top menu.
4. Configuration
Log in to your e-commerce platform. On the homepage, select SALESmanago from the top menu.

See how to configure integration with Magento 1 >>