VTEX is a popular eCommerce platform for managing and scaling your B2B and B2C operations across all sales channels. If you have an e-store on the VTEX platform, you can easily integrate it with SALESmanago using our ready-made plugin. The integration allows you to transfer Contact and transactional data to SALESmanago, where you can use it in your marketing activities.
Contents
1. Getting started
In this article, you will find detailed information about the SALESmanago-VTEX integration. The integration plugin, developed by SALESmanago, is available for free for our customers and is constantly being improved. New plugin versions are implemented automatically, without the need for manual updating.
IMPORTANT:
- For the integration to work correctly, your VTEX credentials must be provided in the plugin’s settings, as described in Section 4.C.
- A single e-store can be integrated with only one SALESmanago account at a time (whereas a single SALESmanago account can be integrated with a number of e-stores).
- The SALESmanago plugin requires PHP version 7.4 or higher.
2. Scope of integration
The scope of the integration includes the transfer of the following data from VTEX to SALESmanago:
- Transferring Contact data (first and last name, email, Email Marketing status, phone number, street address, postal code, city, region/state, and country) obtained through registration, purchase, or newsletter subscription
- Transferring External Events: CART and PURCHASE (including guest purchases)
- Transferring Email Marketing consent status (opt-in/opt-out)
- Exporting historical Contact data
Changes to Email Marketing consent status (opt-in/opt-out) occurring in SALESmanago can be reflected in VTEX (if you configure callbacks—see Section 4.A. below). Additionally, if you enable the dedicated option, Contacts’ opt-in status for Email Marketing can be synchronized from SALESmanago to VTEX (during the first Contact data upsert—see Section 4.A. below).
Unless you change the default setting (see Section 4.B below), as a result of the integration, the SALESmanago Monitoring Code will be automatically added to all pages of the integrated e-store.
When you are logged in to the plugin, data synchronization and transferring occurs automatically. The moment you log out from the plugin, the integration is deactivated and data is no longer transferred.
3. Installation
At present, the SALESmanago plugin is not available on the VTEX marketplace and needs to be installed via the VTEX IO CLI, using the following command:
vtex install salesmanagopartnerde.salesmanago
Following the installation, log in to the plugin to activate the integration.

[1] SALESmanago credentials—Provide the login and password you use to log in to SALESmanago.
[2] Change endpoint—Check this box if your SALESmanago account uses a non-standard endpoint (i.e., an endpoint other than www.salesmanago.com, app2.salesmanago.com or app3.salesmanago.com). Specify the endpoint in the input field that will appear below.
NOTE: Do not add „http://”, „https://” or any trailing slashes (/) to the address of your endpoint (correct example: domain.salesmanago.com).
The integration remains active as long as you are logged in to the plugin.
4. Configuration
After installing and activating the plugin, define its settings and provide the required data.
4.A. Account settings
In this tab, you can define integration settings related to your SALESmanago account.
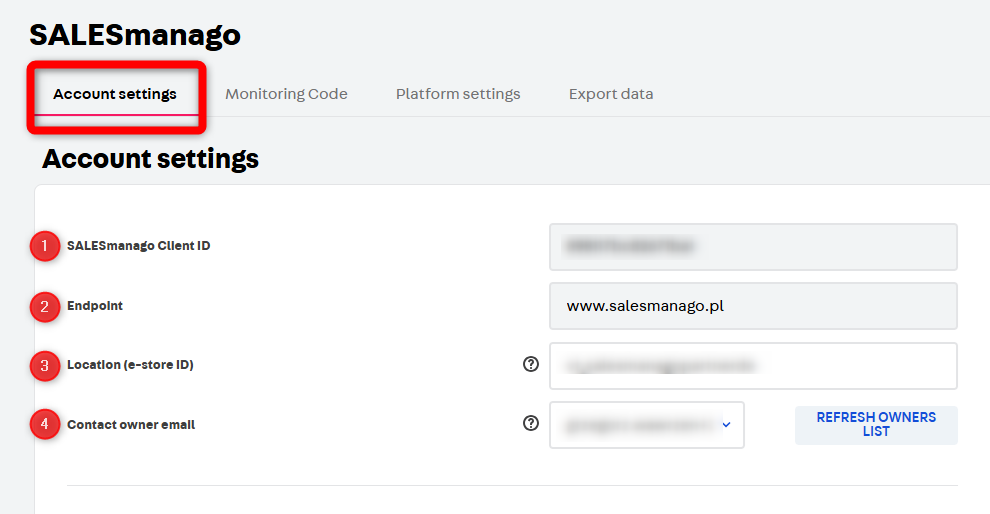
[1] SALESmanago Client ID—The unique identifier of your SALESmanago account. This data is retrieved automatically from SALESmanago and cannot be edited.
[2] Endpoint—The SALESmanago domain on which your account operates. This data is retrieved automatically from SALESmanago and cannot be edited.
[3] Location (e-store ID)—Here, you can define the value of the Location data field that will be transferred in External Events. Ensure that this value is the same as the Location of your Product Catalog or XML Product Feed configured in SALESmanago.
[4] Contact owner email—Select the SALESmanago user who will be the main owner of Contacts acquired via your website and transferred to SALESmanago.
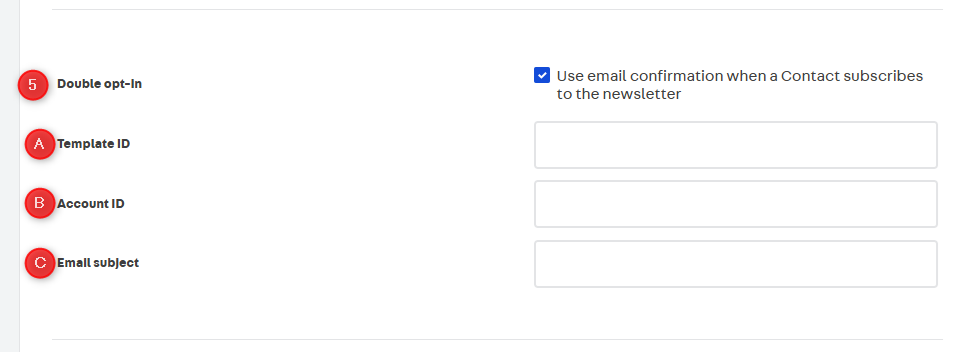
[5] Double opt-in—Check this box if you want Contacts subscribing to your newsletter to confirm their subscription via a link in a dedicated email.
If you leave this box unchecked, each new Contact that subscribes to your newsletter will be assigned the opt-in status immediately, without additional confirmation.
IMPORTANT: For the double opt-in mechanism to work, the option: Activate subscription confirmations must be enabled on the SALESmanago platform (Menu → Channels → Email Marketing → Settings).
After selecting “YES”, you will see three input fields [A, B, C] related to the double opt-in mechanism. You have two options:
- If you leave all three fields empty, all template data will be automatically retrieved from your SALESmanago account, as configured in Menu → Channels → Email Marketing → Settings → Subscription confirmation languages.
- To overwrite these settings, you can provide the ID [5A] of the email template you want to send as your subscription confirmation email. In this case, only this one template will be sent, irrespective of the subscriber’s language.
You do not need to complete fields [5B] Account ID and [5C] Email subject, as this information will be retrieved automatically based on the template ID.

[6] Opt-in consent synchronization—If you check this box, when a Contact’s data is transferred from VTEX to SALESmanago for the first time, and that Contact’s Email Marketing status in VTEX is set to opt-out, SALESmanago will check whether a Contact with this email address already exists. If the Contact already exists and has opt-in status for Email Marketing in SALESmanago, that opt-in status will also be applied in VTEX.

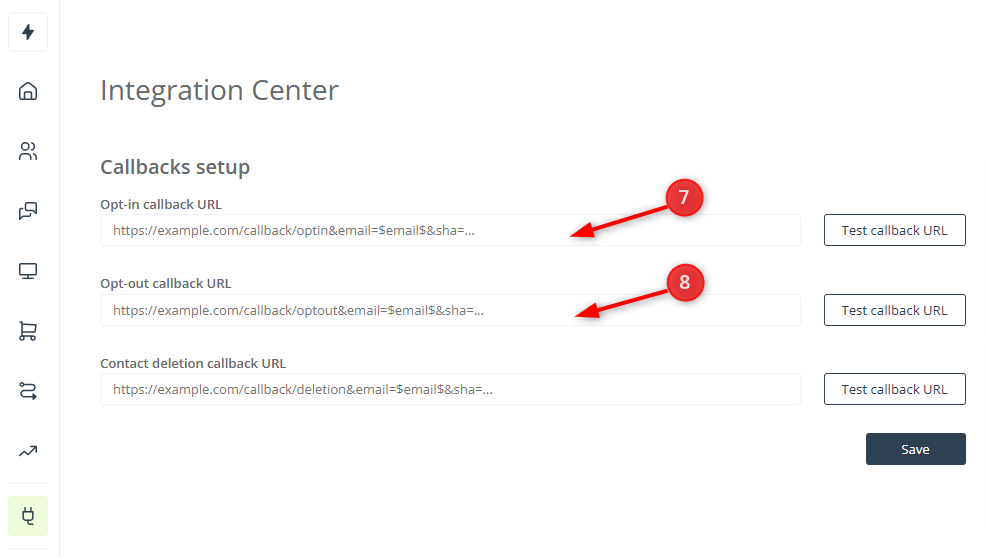
Callbacks are a mechanism that allows you to reflect changes in Contacts’ Email Marketing status, occurring in SALESmanago, also on the VTEX platform. Copy the two URL addresses—[7] and [8]—and paste them into the respective fields in SALESmanago (Menu → Integrations → Callbacks), as shown in the screenshot below:
After defining all account settings, click Save.
4.B. Monitoring Code
In this tab, you can view your unique SALESmanago Monitoring Code—the code snippet that should be added to all pages of your website to monitor visitors’ activity and enable the display of various creations and widgets configured in SALESmanago.By default, the plugin implements the Monitoring Code automatically. If you prefer to implement it manually, on your own, turn off toggle [1].
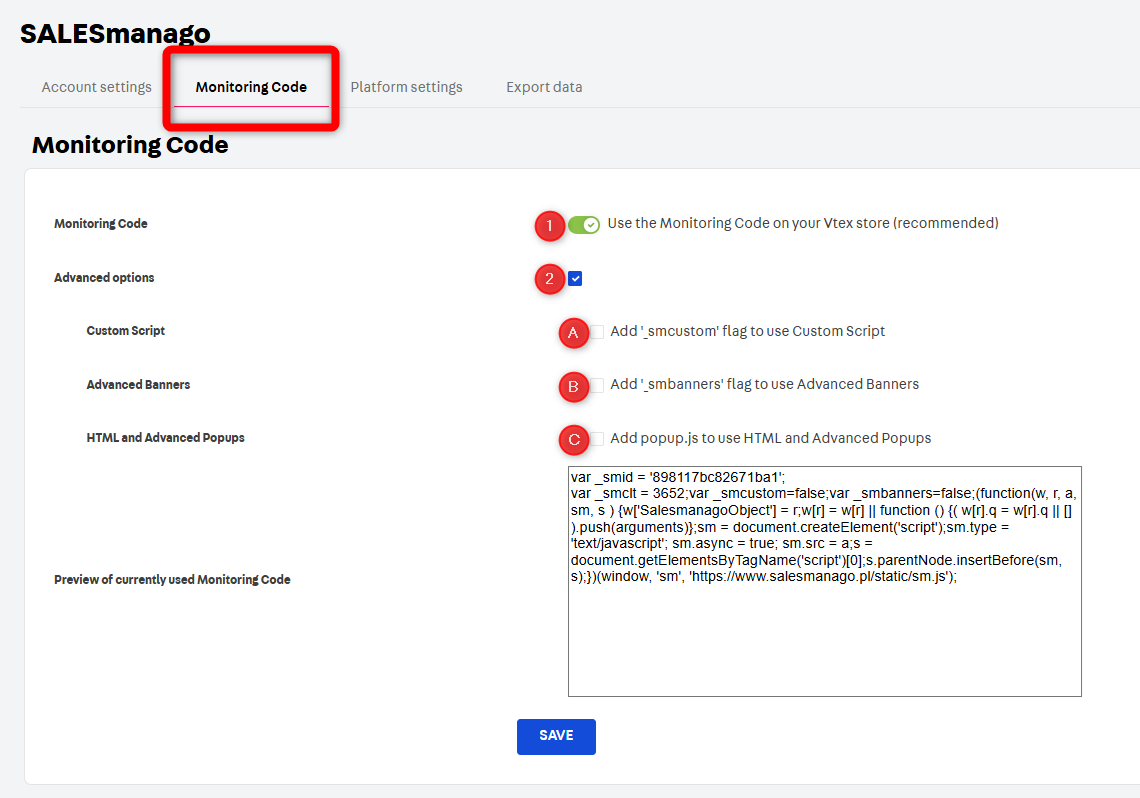
To modify the Monitoring Code with additional elements, enable Advanced options [2] and select the capabilities you want to add:
[2A] Add ‘_smcustom’ flag to use Custom Script—Check this box to enable the execution of custom scripts configured in SALESmanago on your website.
[2B] Add ‘_smbanners’ flag to use Advanced Banners—Check this box to enable the display of Personalized Banners created in SALESmanago on your website.
[2C] Add popup.js to use HTML and Advanced Popups—Check this box to enable the display of pop-ups created in SALESmanago’s HTML and Advanced wizards on your website. This flag is not required for pop-ups created in the Web Engagement Studio.
After defining all settings, click Save.
4.C. Platform settings
Here, you can provide the required VTEX credentials, configure tags that will be assigned to Contacts following specific events, and define a number of other settings related to your VTEX e-store.
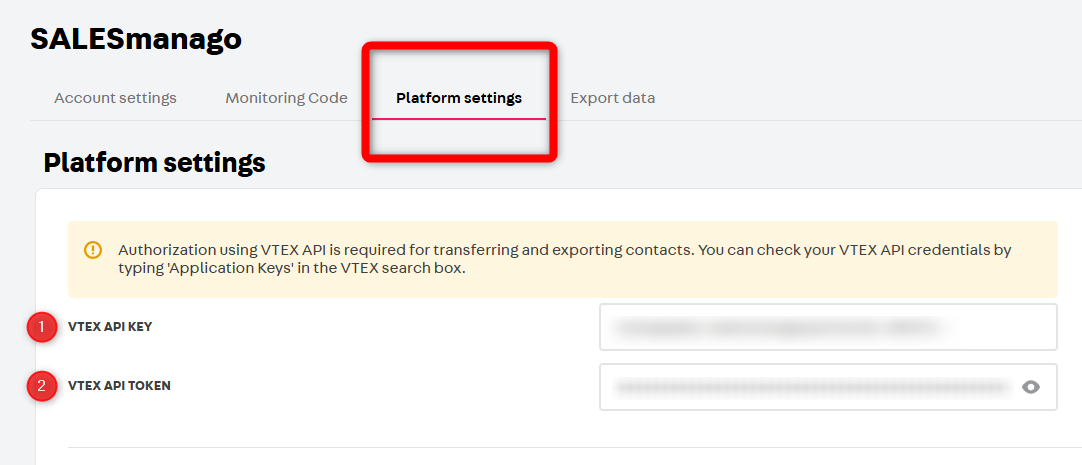
VTEX API KEY [1] and VTEX API TOKEN [2]—Provide your VTEX account credentials.
Learn more in the VTEX Help Center >>
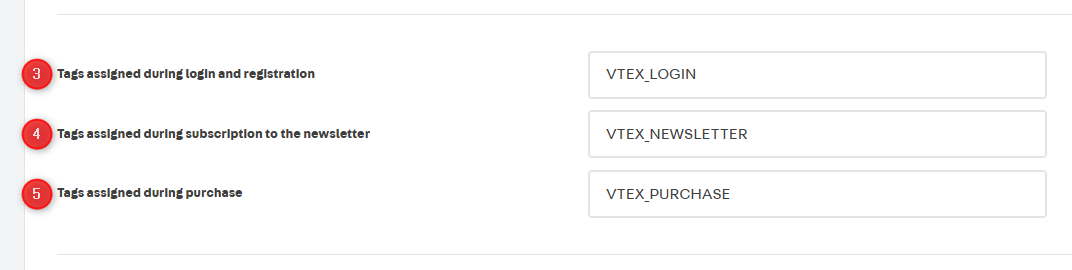
[3] Tags assigned during login —Enter the tag(s) that will be assigned to Contacts each time they log in to your e-store.
[4] Tags assigned during subscription to the newsletter—Enter the tag(s) that will be assigned to Contacts after they subscribe to your newsletter.
[5] Tags assigned during purchase—Enter the tag(s) that will be assigned to Contacts (both registered users and guests) after they make a purchase in your e-store.
NOTE:
- If you want to enter more than one tag in any of fields [3], [4], and [5], separate them with commas (without spaces), for example: REGISTRATION,LOGIN.
- In SALESmanago, tags must consist of at least 3 characters. Use the “_” character (and not the space) as the separator, for example: REGISTRATION_LOGIN.
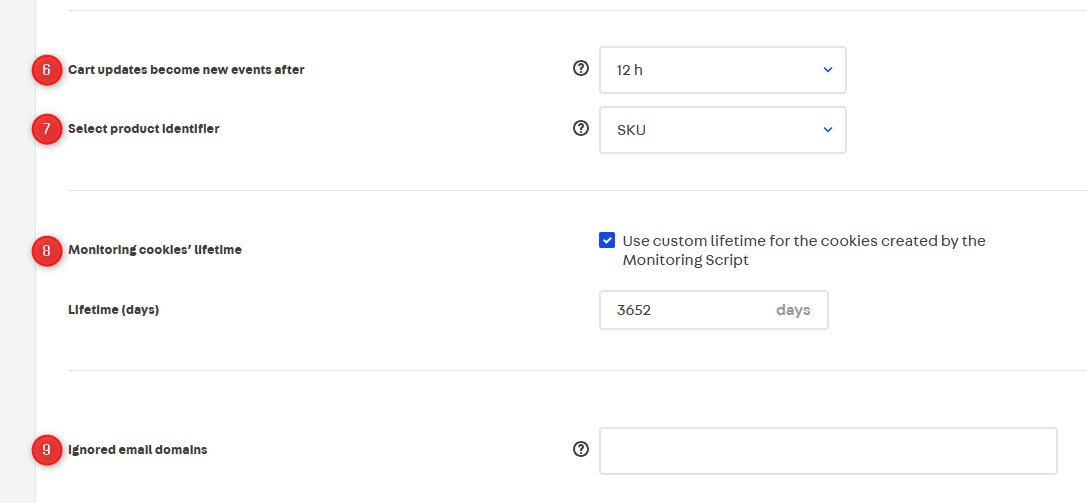
[6] Cart updates become new events after—Choose how long a CART External Event will be updated before a new CART is recorded. Any changes to the cart made before the expiry of this period will be treated as part of the same External Event.
[7] Select product identifier—Specify the type of product identifier (Product ID, Variant ID, or SKU) used in your e-store.
[8] Monitoring cookies’ lifetime—Specify how long SALESmanago cookies (all except smevent) will remain active, i.e., after what time they will expire. Enter the number of days in the input field below.
The default setting is 3652 days, i.e., 10 years.
[9] Ignored email domains—Specify the email domains you want to ignore. If a Contact has an email address at one of these domains, their data will not be transferred to SALESmanago.
It is particularly recommended to list single-use/disposable email domains used to protect customer privacy.
If you want to list more than one domain, separate them with commas (without spaces), for example: domain1.com,domain2.es,domain3.de
After defining all platform-related settings, click Save.
4.D. Export data
In this tab, you can export historical Contact data from VTEX to SALESmanago.
Historical data is data from before the SALESmanago–VTEX integration—there is no need to export data collected after the integration as it is transferred automatically, as long as the integration is active (i.e., as long as you remain logged in to the plugin).
IMPORTANT:
- Before performing an export, ensure the VTEX API Key and Token are provided in the Platform settings tab.
- You can export Contact data any number of times as there is no risk of such data being duplicated in the SALESmanago database.
- Depending on the configuration of your SALESmanago account, an export of historical data may trigger Automation Rules or Workflows that include the following Events: Contact added to system or External Event assigned to Contact. Therefore, before performing an export, you may want to ensure no such Automation Processes are currently active.
- Contacts with email addresses at domains listed as ignored in the Platform settings tab will be excluded from the export.
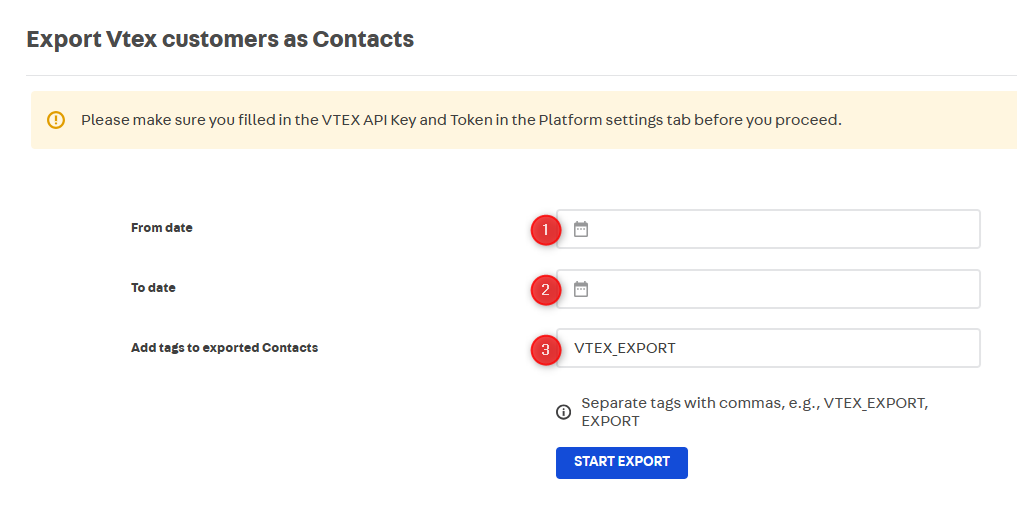
[1] From date and [2] To date—Specify the time range for the export.
[3] Add tags to exported Contacts—Specify one or more tags that will be added to the exported Contacts in SALESmanago.
5. External Event data fields
CART
The following data is transferred in CART External Events:
- Type—External Event type: CART.
- External ID—the ID assigned to the specific External Event by the VTEX platform.
- Value—the total value of the products added to the cart.
- Date—the date of the event’s occurrence.
- Products—the products added to the cart, designated according to the selection made in Platform Settings (Product IDs/Variant IDs/SKUs), separated by commas.
- Location—Your e-store’s ID. It must be identical to the Location of the Product Catalog/XML Product Feed associated with this e-store.
- Description—this field is empty.
- Detail 1—product IDs.
- Detail 2—product names.
- Detail 3—variant IDs.
- Detail 4—the quantities of the products added to the cart.
- Detail 6—the main categories of the products added to the cart.
- Detail 7—product SKUs.
PURCHASE
The following data is transferred in PURCHASE External Events:
- Type—External Event type: PURCHASE.
- External ID—the ID assigned to the specific External Event by the VTEX platform.
- Value—the total value of the purchased products.
- Date—the date of the event’s occurrence.
- Products—the purchased products, designated according to the selection made in Platform Settings (Product IDs/Variant IDs/SKUs), separated by commas.
- Location—Your e-store’s ID. It must be identical to the Location of the Product Catalog/XML Product Feed associated with this e-store.
- Description—this field is empty.
- Detail 1—product IDs.
- Detail 2—product names.
- Detail 3—variant IDs.
- Detail 4—the quantities of the purchased products.
- Detail 5—the currency of the External Event.
- Detail 6—the main categories of the purchased products.
- Detail 7—product SKUs.