SALESmanago Live Chat tool enables effective communication with the client on the website. This functionality not only facilitates contact with the customer but also provides necessary data to support marketing processes, sales development and also the process of generating new leads. Creating a consultant is a necessary step to use Live Chat. This process consists of assigning the role of a consultant with selected privileges to the SALESmanago user. Assigning an appropriate role to a consultant, allows you to manage his permissions of using particular Live Chat functions.
SALESmanago Live Chat also provides access to the Consultants Panel, which allows you to manage consultants and create and manage groups of consultants.
Contents
- The process of creating a consultant
- Consultant
- Settings
- Consultants panel
- Consultant
- Groups of consultants
THE PROCESS OF CREATING A CONSULTANT
If you haven’t used live chat before, you need to create a consultant in order to be able to proceed with further Live Chat configuration. In case you want to have more consultants, then you can create as many of them as you’d like to.
To create a consultant, go to Live Chat → Consultants panel → Add new consultant
1.1. Consultant
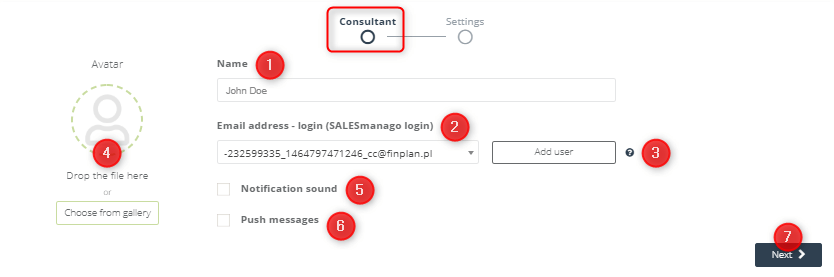
[1] Name – type the name identifying the consultant; This name can be used during chatting with clients (if such permission is given in a live chat).
[2] Email address – log in (SALESmanago login) – type the email address which is the login of the SALESmanago user you want to make consultant with; The login must be the name of the account created in the SALESmanago system.
[3] Add user – this option allows you to create a user when you don’t have a previously created user, or when you want to create a new user, to create a consultant
IMPORTANT: One consultant can be assigned to one user in the system.
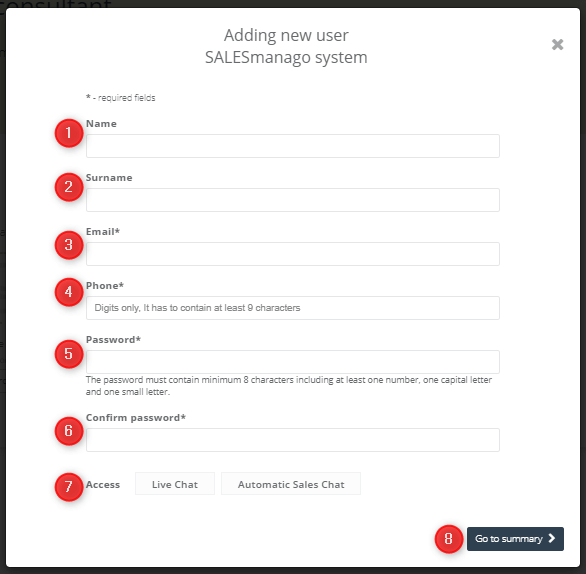
[1] Name – enter the user’s first name
[2] Surname – type user’s surname
[3] Email – enter the user’s email address
[4] Phone – enter the user’s phone number
[5] Password – enter the login password for the new user
[6] Confirm password – re-enter the password to confirm your selection
[7] Access – shows the functionalities that a newly created user will have access to (in this case: Live Chat and Automatic Sales Chat)
[8] Go to summary – selecting this option will save the changes made and then return to the process of creating a consultant
[4] Avatar – here you can add graphics to your avatar, in the way you choose – by selecting from the gallery or dropping the file in the indicated place
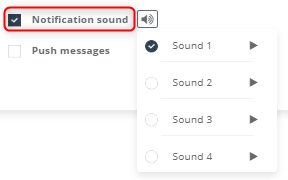
[5] Notification sound – Selecting this option will set the selected notification sound for this consultant. This sound will notify the consultant while chatting in the chat, of a new message. When you select a checkbox, a window with available sounds will appear on the screen. You can also change it from the conversation window after logging in to the chat.
[6] Push Notifications – if this option is checked, web push notifications will be displayed when the consultant receives a new message while chatting on the chat
[7] Next – selecting this option takes you to the next stage of creating a consultant
1.2 Settings
Depending on the user’s status, different options will be available in the settings panel.
If the user you want to appoint as a consultant and the person creating the consultant has the status of a manager, system administrator or both, it is possible to assign a role to a given consultant. In this case, additional options appear on the settings panel, allowing you to manage access to content and functions available on the Live Chat.
IMPORTANT: If the user does not have any of the above-mentioned statuses (manager, admin), the consultant will be assigned a User role by default.
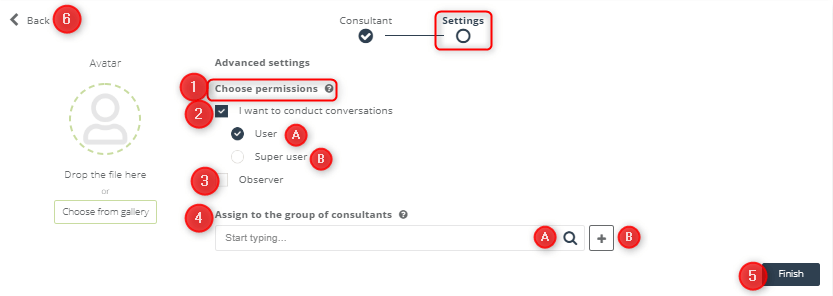
[1] Choose permissions – allows you to grant permissions to a given consultant
[2] I want to conduct conversations – checking this option gives the consultant the opportunity to talk
[A] User – a consultant with user privileges can only operate the chat, have access to the consultant’s card, view the list of conversations, however, on the list of conversations he has access only to those that were conducted personally.
IMPORTANT: A consultant with these privileges will not be able to create/edit or manage Live Chats
[B] Superuser – can both operate the chat and have access to all chat conversations, and can also assign roles to consultants
IMPORTANT: The superuser has access to all the features in the Live Chat section; he can create, manage, and view Live Chat analytics – access to all features.
[3] Observer – sees all conversations and can browse them, but does not write anything back and the way he previews conversations to take place does not take them; this is an additional role where, when logging in to a chat, the user can log in as an observer, a kind of “super viewer” who can watch as others are having conversations.
IMPORTANT: Superuser or observer permissions can only be given and assigned to a person who has manager, system admin or both. In this case, it is possible to assign superuser or observer privileges (or both) to a selected consultant. For the consultant to be appointed a superuser, he must have one of the above-mentioned statuses.
Example:
A user with an admin or a manager status, during the process of creating a new consultant, can assign himself the role of a regular user. In this case, the possibility of changing his role to e.g. superuser has only other superuser.
[4] Assign to the group of consultants – it is possible to create groups and then assign consultants to them. Managing groups is possible from the level of a consultant’s panel.
[A] Here you can search for existing consultant groups
[B] Selecting this option allows you to create a new group. When you click the + icon, the following window appears on the screen
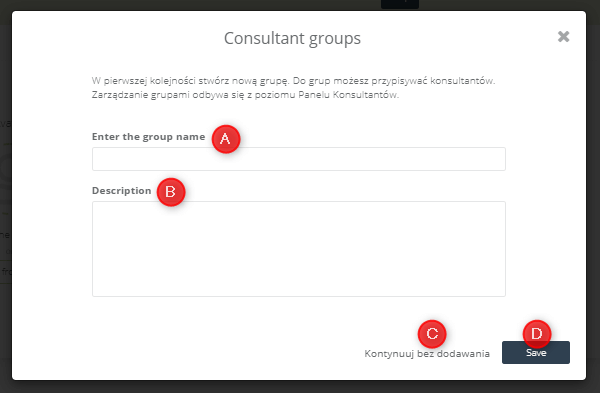
[A] Enter the name of the group – enter any group name here
[B] Description – enter here the description of the group
[C] Continue without adding – selecting this option cancels the group creation process, allowing you to continue the consultant creation process
[D] Save – when this option is selected, the group will be created
[5] Finish – selecting this option will complete the process of creating a consultant, thus saving the entered data in the SALESmanago system
[6] Back – selecting this option allows you to return to the previous step of creating a consultant
When you select the end option, the following window appears on the screen:
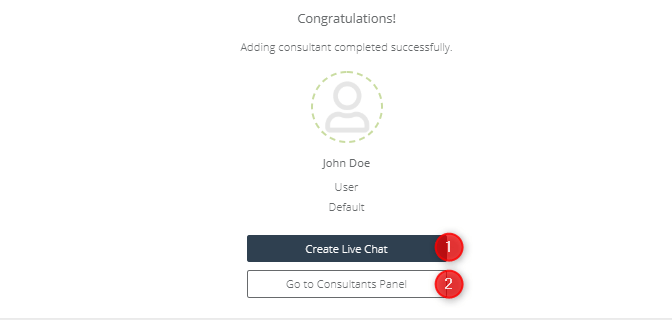
[1] Create Live Chat – if you select this feature, you will be redirected to the Live Chat wizard. More information about how to create a Live Chat can be found here.
IMPORTANT: This feature is only available if the person creating the consultant has superuser status.
[2] Go to Consultants Panel – selecting this option will redirect to consultants panel, from which level it is possible to manage consultants and groups of consultants
IMPORTANT: For a regular user will only the option [2] Go to consultant panel be available on the screen.
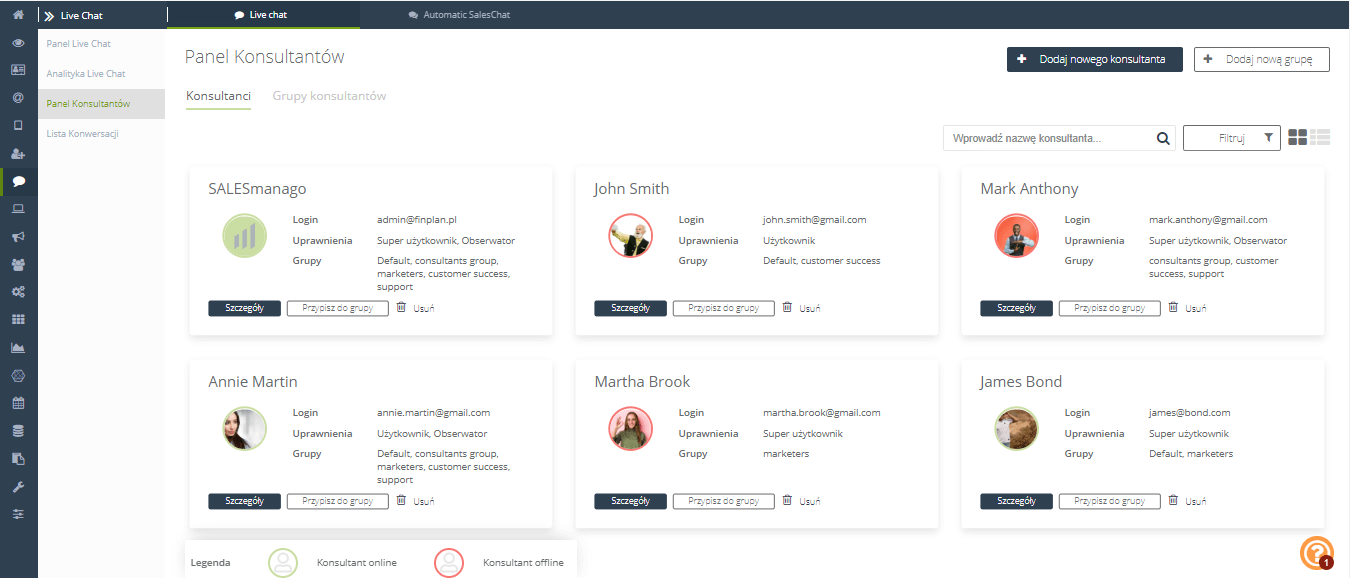
2. CONSULTANT PANEL
2.1 Consultants

[1] Consultant’s card – from this level, the following actions can be performed for the selected consultant
[A] Details – selecting this feature will move you to a card containing details of the selected consultant and a list of his or her calls
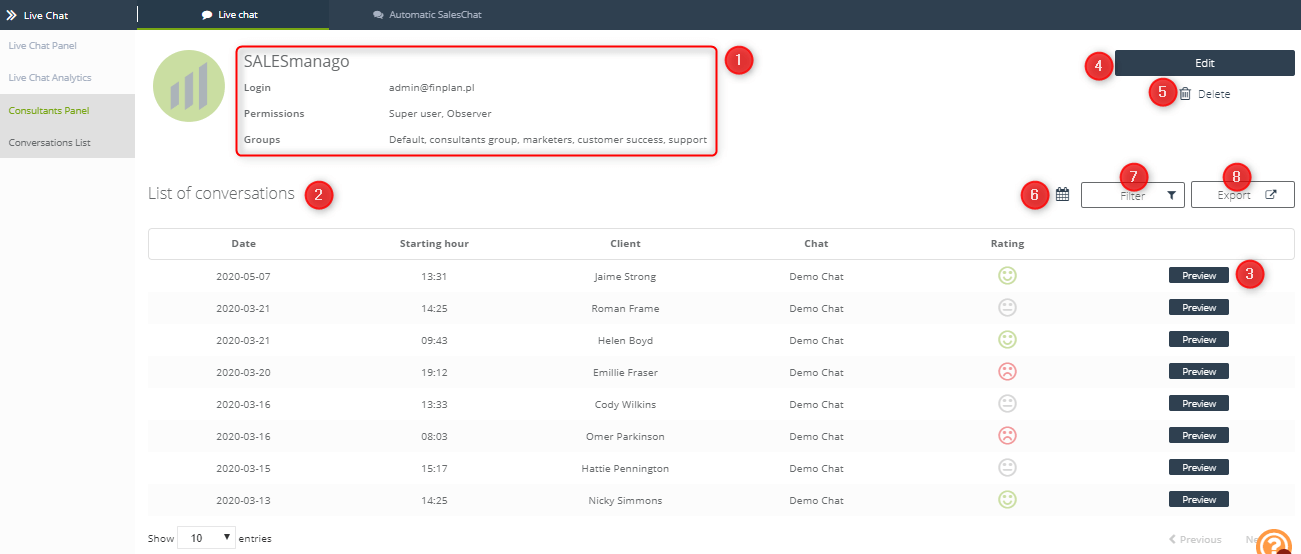
[1] Contains the details of the consultant in a question, such as a name, login, permissions, and information about the groups to which he has been assigned
[2] Conversation list – a list of conversations conducted by a given consultant;
[3] Preview – this option allows you to view the conversations conducted by the user.

[1] Rating – conversation rating
[2] Export – allows you to export a conversation
[3] Search Engine – allows you to search in a conversation by typing in the selected phrase or selecting a particular date
[4] Preview of the conversation
IMPORTANT: Only a person with a superuser status has access to the preview of all the conversions conducted by the given consultant. An ordinary user can see a list of conducted conversations, but the preview is available only for the conversations he has personally conducted.
[4] Edit – selecting this option allows you to edit selected elements. Only consultants with an assigned Superuser role have access to the function.
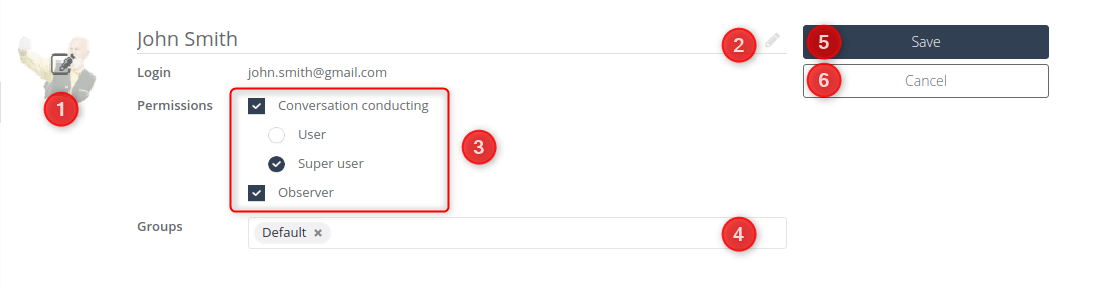
[1] Allows you to change the avatar icon
[2] Allows you to change the name of the consultant
[3] This option allows you to change the permissions of the consultant
IMPORTANT: This option is only available if the consultant we edit has manager or admin status.
[4] Allows you to delete or assign a new group to a consultant
[5] Save – if this option is selected, the applied changes will be saved
[6] Cancel – selecting this option will cause deleting the applied changes
[5] Delete – Choosing this option will permanently delete the consultant
[6] This option allows you to select the conversation according to the selected time range in which the conversation was conducted
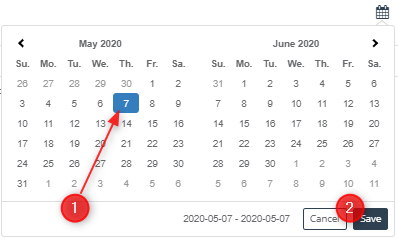
[1] Clicking on the selected date will display only those conversions that took place on that day
[2] Cancel, Save – click Cancel to cancel the new settings or Save to confirm.
[7] Filter – allows you to filter the conversation list based on the consultant’s ratings

[1] Selecting the relevant checkbox results selecting in the given filter
[2] Selecting this option will delete previously selected filters
[8] Export – allows you to export selected conversations

[1] Selecting this option will take into account when exporting only those conversations that have been searched after applying the selected filters
[2] Choosing this option will ignore the applied search filters and will result in exporting conversations taking into account the chosen time range
[3] Select Folder – allows you to select a folder in the repository to which conversations will be exported
[4] Export – selecting this option will export the selected conversations
[B] Assign to a group – allows you to assign a consultant to a group
[C] Delete – choosing this option will delete the selected consultant
[2] Search Engine – allows you to search for contacts using the chosen phrase
[3] Filter – allows the selection of consultants using filters
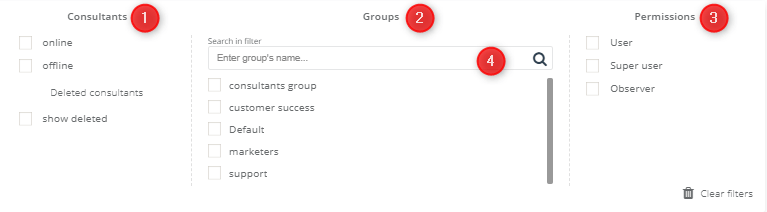
[1] Consultants – allows selection of consultants based on their status; to choose: online, offline, show deleted
[2] Groups – allows the selection of consultants based on the group to which they belong
[3] Search engine – allows you to search for a given group by entering its name
[4] Permissions – allows the selection of consultants based on the permissions they have, to choose: User, Superuser, Observer
[4] Customize the view – allows you to customize the way your consultants are displayed; choose between a list or a tiled layout
[5] Add new consultant – selecting this option will take you to the consultant wizard
[6] Add a new group – after selecting this option a window will appear on the screen to create a new group of consultants
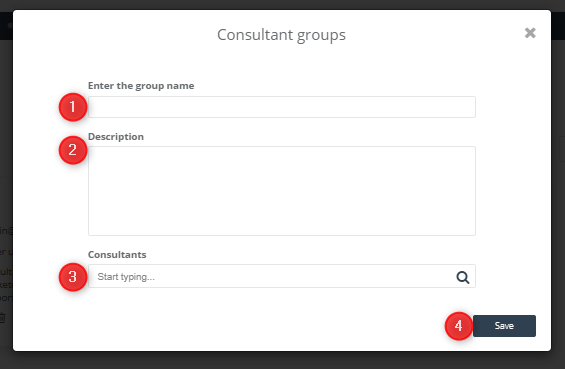
[1] Enter the name of the group – enter any group name here
[2] Description – enter here the description of the group
[3] Consultants – Here you can search for consultants we want to add to the group, by entering their name.
[4] Save – when this option is selected, the group will be created
2.2. Group of consultants
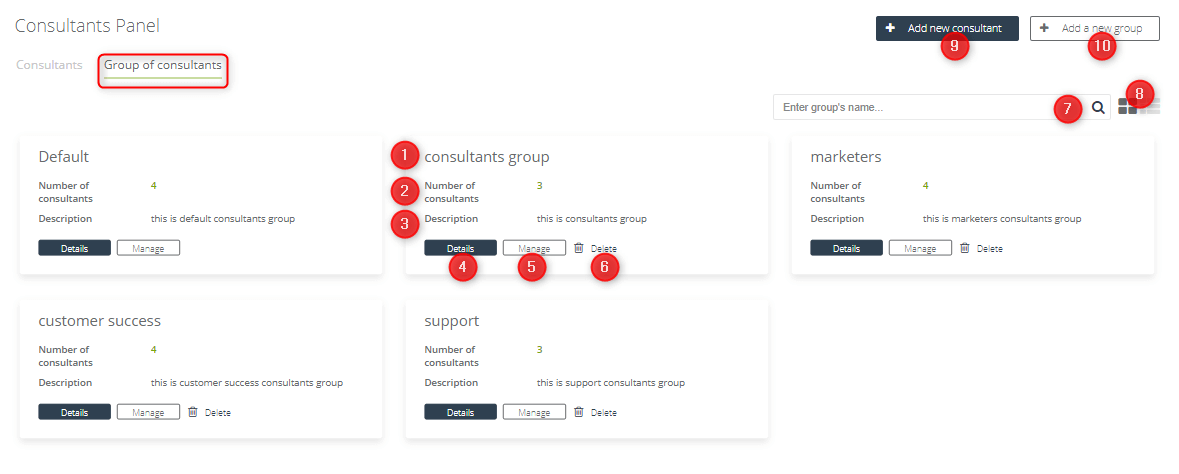
[1] Name of the group of consultants
[2] Number of consultants in the group – a numerical value representing the number of consultants assigned to a given group
[3] Description – description of the group of consultants
[4] Details – selecting this option, will display a view showing details of the selected group
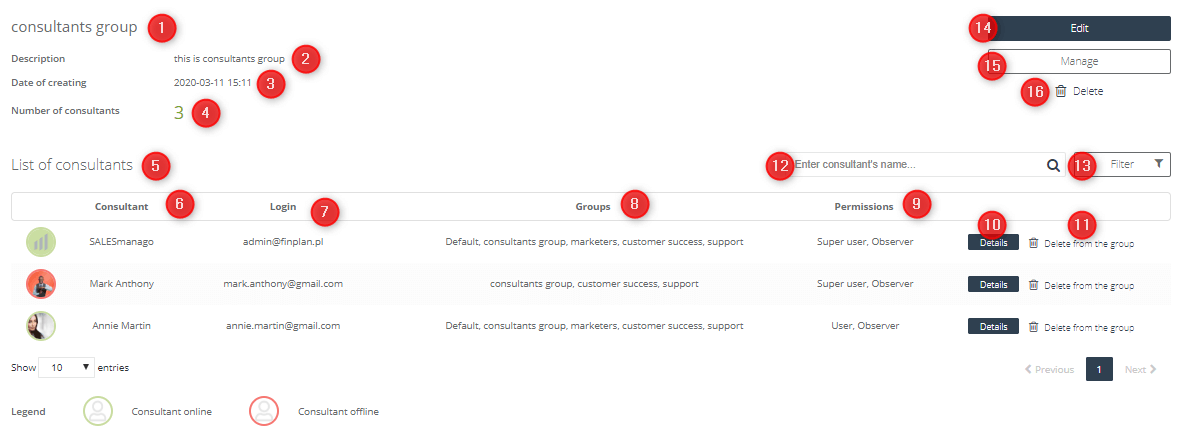
[1] Name of the group
[2] Description
[3] Date of a group creation
[4] Number of consultants – number of consultants assigned to a given group
[5] List of consultants – list of consultants assigned to the group
[6] Consultant – the name of the consultant
[7] Login – a consultant login
[8] Groups – groups to which the consultant belongs
[9] Permissions – displays the permissions given to the user
[10] Details – when this option is selected, the contact details will be displayed on the screen
[11] Remove from group – selecting this option will remove the consultant from the group
[12] Search engine – allows you to search the list of consultants belonging to the group by entering its name in the search engine
[13] Filter – allows you to search the list of consultants within the group using available filters
[A] Consultants – allows you to filter out consultants based on their status, either online or offline
[B] Permissions – allows you to filter consultants on the basis of the permissions given to them, to choose: user, superuser, observer
[C] Clear filters – selecting this option will clear the previously selected filters
[14] Edit – when this option is selected, it is possible to change or edit information such as description and group name
[15] Manage – allows you to remove and add new consultants to the group
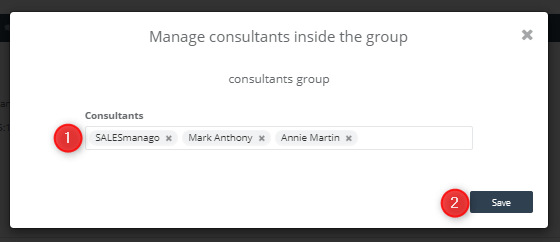
[1] Consultants
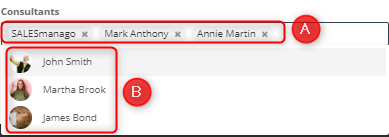
[A] List of contacts added to the group – clicking on the icon x next to the name of selected consultant will remove him from the group
[B] List of created consultants, not added to this group – after clicking the cursor in the empty space highlighted in point [A], below you will see a list of consultants not included in this group. Clicking on a selected consultant will add him to the group.
[2] Save – after selecting this option, the introduced changes will be saved
[16] Delete – selecting this option will delete the given group of consultants
[5] Manage – allows you to remove and add new consultants to a given group; after selecting this option, a window described in point [15] will appear on the screen
[6] Delete – selecting this option will remove the consultant from the group
[7] Search engine – allows you to search for consultants within the group
[8] Customize View – allows you to customize the way your consultants are displayed; choose between a list or tiled layout
[9] Add a new consultant – selecting this option will take you to the consultant wizard
[10] Add a new group – after selecting this option a window will appear on the screen to create a new group of consultants