The easy-to-use Social Proof Wizard for eCommerce allows you to display interactive notifications on your website that illustrate the degree of interest of other visitors in a specific product. Thanks to this functionality it is possible to show the activity of other users related to the viewed product, and thus improve their trust and encourage them to make a purchase.
The interest in a given product may be presented by displaying data about:
- the number of people who view the product;
- the number of people who purchased this product;
- the number of people who just added this product to the cart.
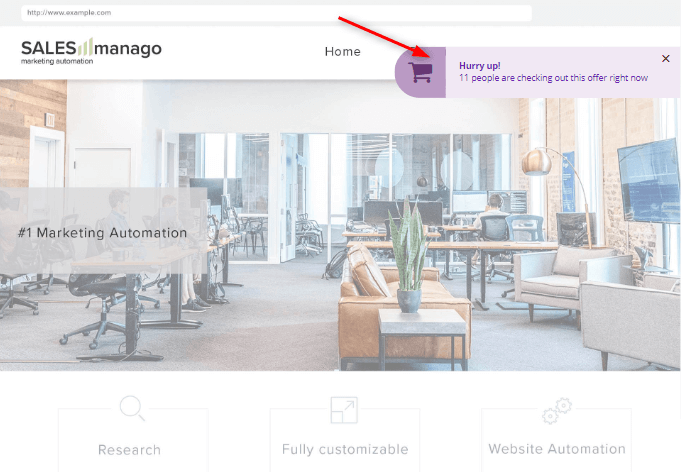
Below you can find the appearance of an exemplary Social Proof widget on the website:
CONTENTS
- Social Proof widgets list
- Social Proof widget wizard
2.1. Choose widget type
2.2. Device
2.3. Design
2.4. Settings
- Analytics
To create Social Proof widget, go to Web Tools → Website Personalization → Social Proof → + New widget
1. SOCIAL PROOF WIDGET LIST
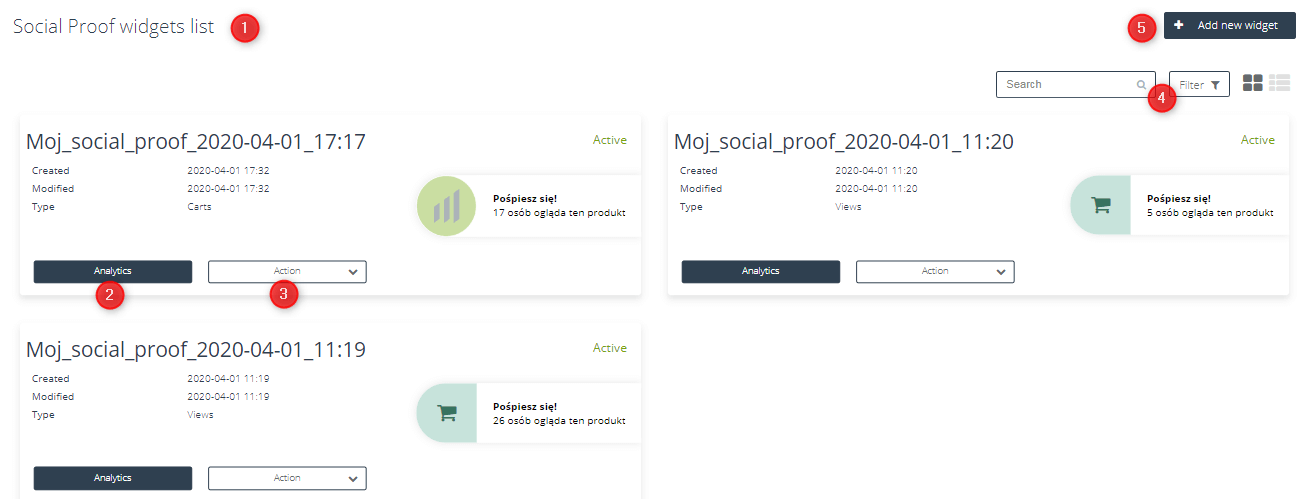
[1] Social Proof widgets list – here you can find already created Social Proof widgets
[2] Analytics – after clicking this field, on the screen will appear analytical data for a specific widget. The detailed information about analytics, you can find in paragraph 3. Analytics.
[3] Action – clicking this feature allows choosing the action which you want to perform on a given Social Proof widget
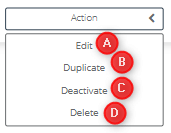
[A] Edit – choosing this feature results in moving to Social Proof wizard, in order to edit the previously created widget
[B] Duplicate – choosing this option will duplicate the selected Social Proof widget
[C] Deactivate – selecting this option will deactivate the currently active widget
[D] Delete – selecting this option will permanently delete the widget from the list
[4] Search/filter – here you can find the specific widget by entering the appropriate phrase in the search engine or using the selected filters
[5] Add new widget – by selecting this feature you will be taken to the Social Proof widget wizard, where you will be able to create a new widget
2. SOCIAL PROOF WIDGET WIZARD
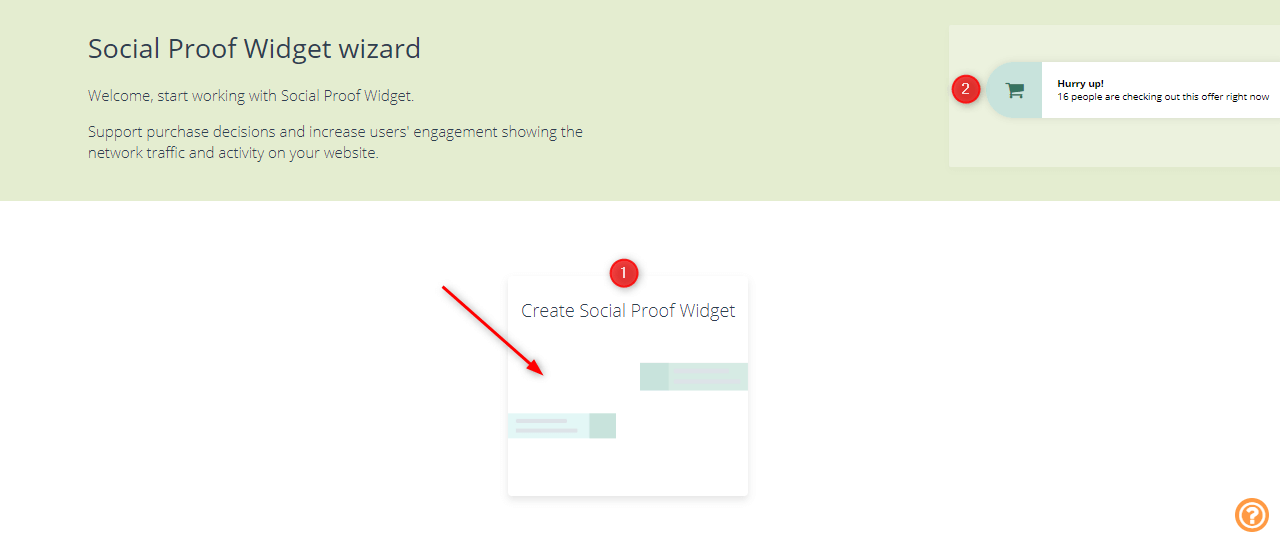
[1] Create Social Proof Widget – click to start the process of creating a widget
[2] Exemplary appearance of Social Proof widget
2.1. CHOOSE WIDGET TYPE
Here you can choose the type of widget depending on the information you want to present. Available to choose between: Views, Carts, and Transactions, in detail described below

[1] Views – choosing this feature the values corresponding to the number of people who view the product will be displayed on the Social Proof widget;
[2] Carts – choosing this feature the values corresponding to the number of people who have added the product to the cart, will be displayed on the Social Proof widget;
[3] Transactions – choosing this feature the values corresponding to the number of people who bought the product, will be displayed on the Social Proof widget;
2.2. DEVICE
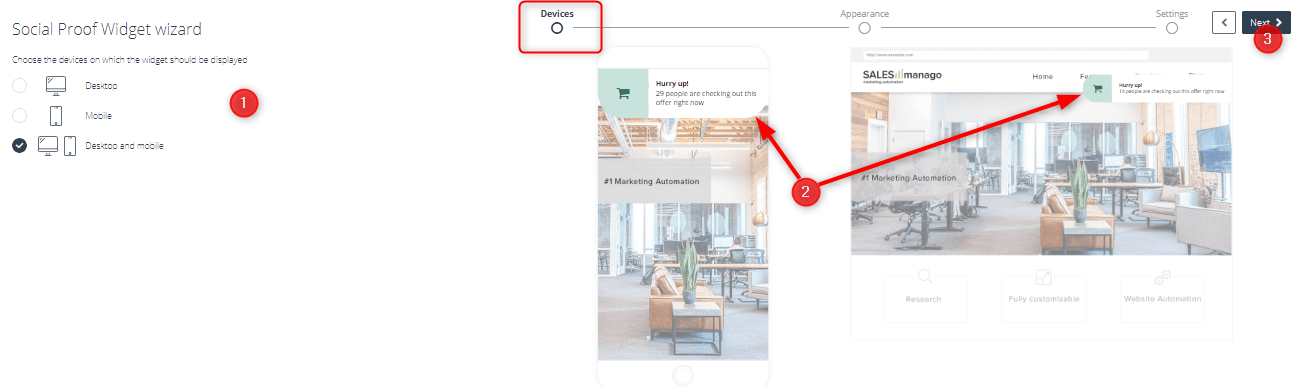
[1] Select devices on which should be displayed – here you can choose whether you want your widget to be displayed on your computer, phone or both devices; Depending on your choice, the further configuration step will be slightly different.
[2] Preview of the Social Proof widget appearance on chosen devices, where all the applied changes will be automatically displayed
[3] Next – selecting next will take you to the next step of editing the Social Proof widget
2.3. DESIGN
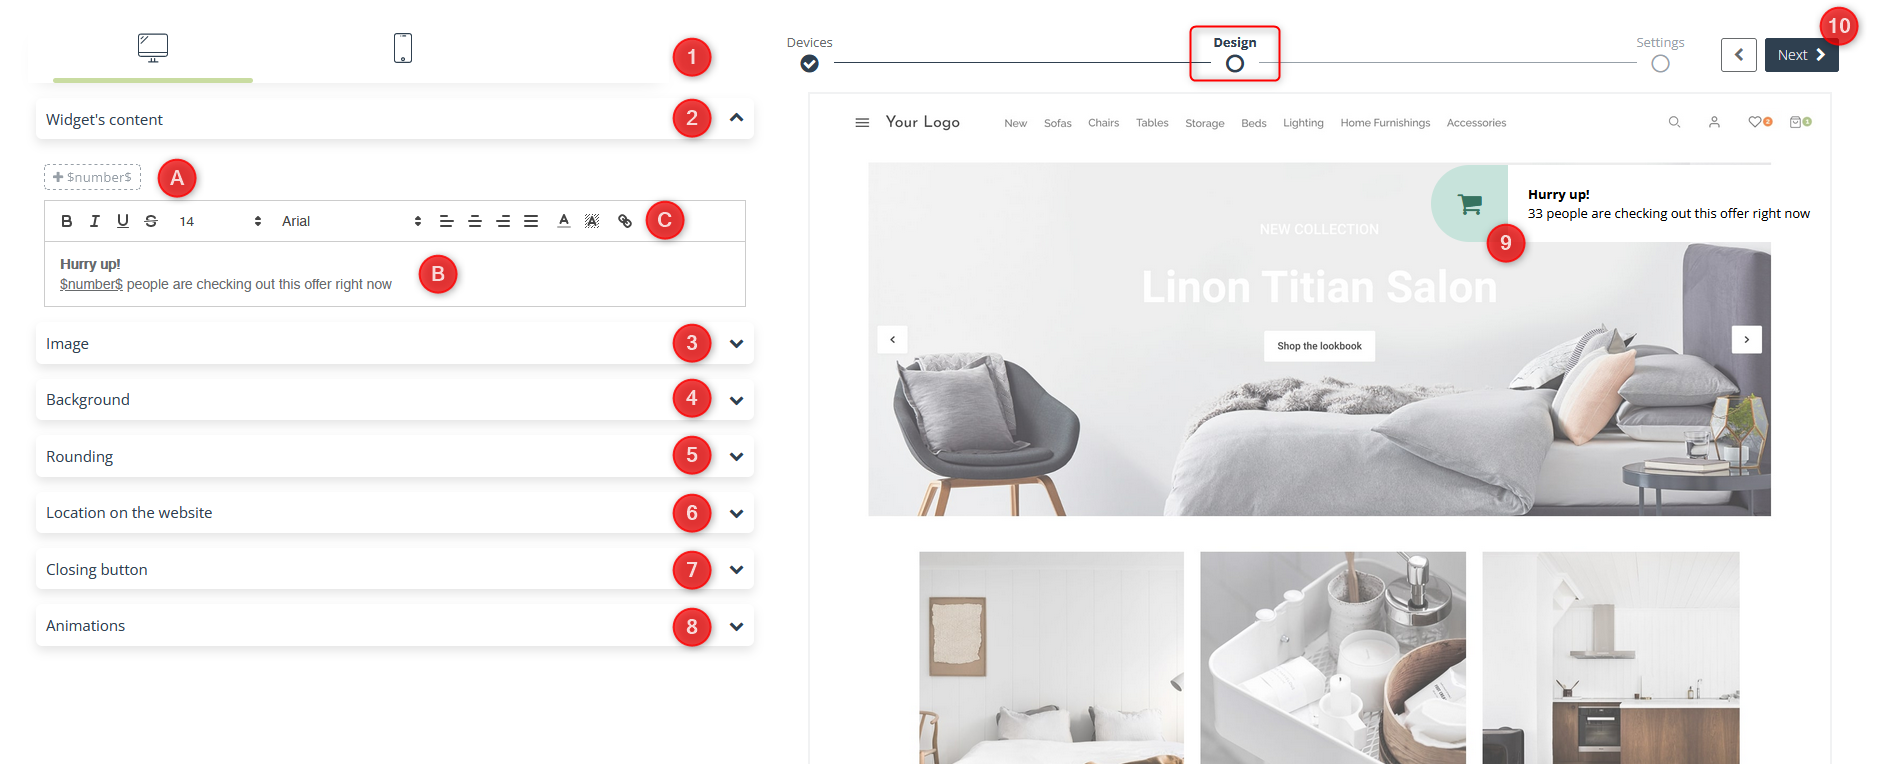
[1] Device selection – available, while selecting the “computer and mobile device” option in the first step (device selection) – depending on the selected icon (computer/mobile device), it will be possible to edit the pop-up details of the selected device
[2] Widget content – allows adding the widget content
[A] Displaying $number$ – determines the place where the number of impressions will be presented. The insertion of the formula $number$ is necessary to display numeric data. If there is no formula, no value will be shown on the widget. Clicking on the icon highlighted in the graphic will add the formula to the text field.
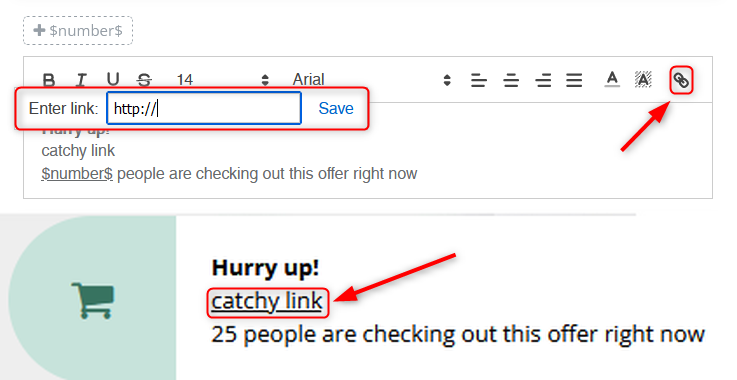
[B] Type the text you want to contain on the widget.
[C] You can also format the typed text, giving it a specific style or linking the content.
[3] Image – Social Proof wizard allows creating widgets both with and without graphics. If you decide to add a graphic to your widget, there are 2 options available: icon or image.

[1] Icon – selecting this option will set an icon as a graphic on your widget
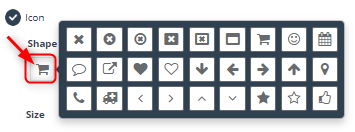
[A] Shape – allows you to choose the shape; clicking on the icon marked below will display a window with available icons to choose
[B] Color – allows you to select the color of the icon
[C] Size – allows you to adjust the size of the icon (to choose: small, medium, large)
[2] Image – checking this feature allows you to set the image as a graphic on your widget
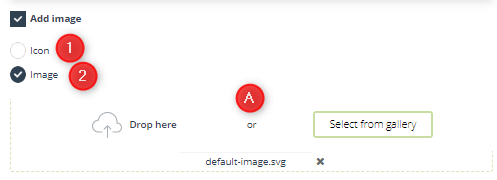
[A] Drop the file here or select from the gallery – here you can upload the picture in the chosen way
[4] Background – allows you to customize the background and image background colour
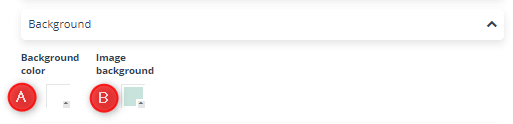
[A] Background color – allows customizing the background colour of your widget
[B] Image background – allows customizing a color of the background, on which the image is placed
[5] Rounding – allows choosing the type of widget edges – rounded or sharp
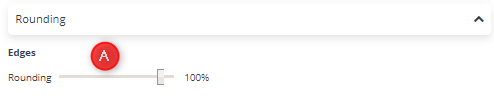
[A] Borders – allows you to adjust the edge roundness
[6] Location on the website – allows you to adjust the position of your widget on the website
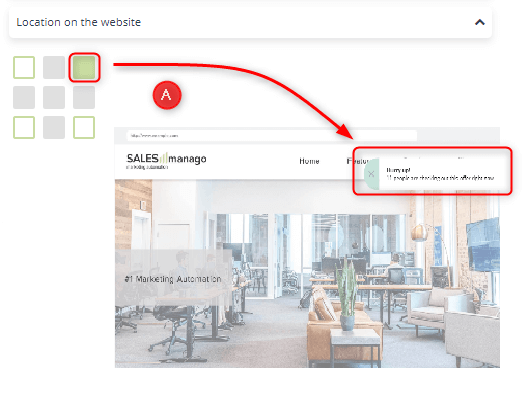
[A] Selecting a given field corresponds to the location of the Social Proof widget (in this case – right upper corner of the website)
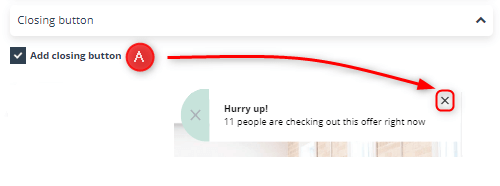
[7] Closing button – marking this checkbox allows adding a closing button to your widget
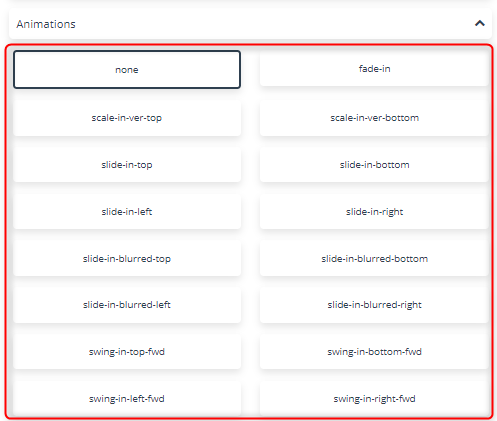
[8] Animations – allows you to add one of the available display effects of the widget on the website
[9] Preview of the pop-up appearance, where all the applied changes are automatically displayed
[10] Next – selecting next will take you to the next step of editing the widget
2.4. SETTINGS

[1] Widget name – enter the name of the pop-up, which will later facilitate its identification
[2] Display rule – marking the option Do not show identified contacts will cause that the Social Proof widget will be displayed only to the contacts that have not been previously monitored by SALESmanago
[3] Display moment – allows you to adjust the time from entering the website after which the Social Proof widget will be displayed to a user
[A] Immediately – the Social Proof widget will be immediately in the moment of entering the website
[B] After scrolling x% of the page – the Social Proof widget will be displayed after the user scrolls the page by the selected percentage
[C] After x seconds since entering – the widget will be displayed after a selected number of seconds have elapsed since the user entered the site
[4] Location – allows you to determine the location of the Social Proof widget
[A] On every page of the chosen domain – We recommend setting it if you have a blog and want each page to display information about how many people are reading the article at the moment.
[B] On every product page of the chosen domain – If you choose this option, the notification will not be displayed, e.g. on the main page – only on those where individual products are displayed.
[C] URL contains the phrase – the Social Proof widget will be displayed on all pages whose URL contains the selected phrase.
[D] URL does not contain – the Social Proof widget will be displayed only on pages whose URL does not contain the selected phrase.
[5] An update of the data displayed in the Social Proof
[A] Allows choosing the period of time, of which the data displayed on the widget should be counted e.g. in case of setting 2h, as the period of data counting for the phrase “Just now, 15 people are checking out this product”, the correct marking “Over the last 2h 15 people have watched this product”.
[B] Choice of time unit
[6] Displayed data – marking this checkbox allows adjusting the display settings of your widget, depending on chosen criteria
[A] Do not show the notification – the Social Proof widget will not be displayed, if the value to display is smaller than x
[B] Show the random value in the range – if the value to display is smaller than x, the random value from the range chosen by you will be displayed on the Social Proof widget
[C] Set the range
[7] Preview of the Social Proof widget appearance on a mobile device and computer
[8] Finish – choosing this option will finish the process of creating the Social Proof widget; clicking the button finish, the following window will appear on the screen:
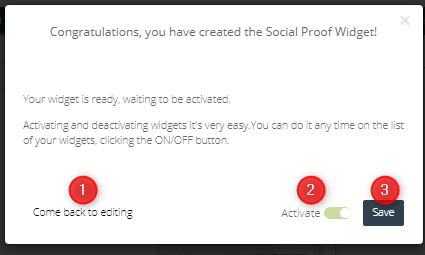
[1] Return to editing – after selecting this option you will be able to continue editing the Social Proof widget
[2] Activate – by clicking the activation button ON / OFF, you can decide whether to activate or deactivate the widget (ON – active; OFF– inactive)
[3] Save – choosing this feature will save the Social Proof widget created by you
IMPORTANT: The Social Proof widget is displayed automatically – you only need to have the tracking code on your website.
3. ANALYTICS
In this tab you will find detailed analytical data regarding a given Social Proof widget. They allow you to verify the number of views in the specified range of time.

[A] Name – allows you to identify the previously created widget
[B] Views – represents the number of views of a given Social Proof widget
[C] Preview of the Social Proof widget
[D] The time range, from which the data for analytics are taken into account
[E] A chart presenting the number of views in time