This article is a compendium of knowledge about the Web Push channel—a modern, effective marketing tool that allows you to reach both Contacts and anonymous website visitors. Integrate Web Push notifications into your marketing strategy, open up new possibilities for your communication, and boost your sales results.

To start using the Web Push module, go to
Channels → Web Push
Contents
- Getting started
- Anatomy of a Web Push notification
- Technical limitations
- Collecting Web Push consents
- Creating Web Push notifications in SALESmanago
- Sending Web Push notifications
- Web Push analytics
1. Getting started
Web Push notifications are brief messages sent from websites to recipients’ devices through web browsers. They appear on the screen even when the associated website is not opened, and even if the browser is not opened, which provides a direct way to engage with your audience. Web Push notifications are supported by both desktop and mobile devices.
The Web Push channel is particularly valuable to marketers because it allows them to reach not only Contacts, but also anonymous visitors. You can send Web Push notifications even to those website visitors who have never shared their email address or phone number with you. However, to receive notifications, users must opt-in by granting permission to your website.
Importantly, sending Web Push notifications comes at no additional costs—you can send them in unlimited numbers.
Another advantage of the Web Push channel is that it maximizes your chances of real-time engagement. Web Push notifications are likely to be displayed and seen very shortly or even immediately after they are sent, provided that the recipient has Internet connection. For desktop devices, all it takes is that the recipient turns on their device. On mobile devices, Web Push notifications appear just as any other notification, even before unlocking the device. The mechanism behind Web Push notifications makes them much faster than emails and as direct as text messages.
By configuring a Workflow or a WebFlow containing the Action: Send Web Push notification, you can dynamically respond to the behaviors of your website visitors, targeting them with great precision and at exactly the right time.
How are Web Push notifications sent?
The whole sending process is handled by SALESmanago and the recipient’s browser.
When a website visitor subscribes to your notifications by granting permission, a dedicated secret key is generated by their browser and stored in SALESmanago. This allows the SALESmanago system to securely send your message directly to the recipient’s browser.
When you send a notification, SALESmanago transfers the notification data to a background service provided by the browser, which in turn displays the notification on the recipient’s device.
Read on to learn more about Web Push notifications and how you can integrate them into your marketing strategy.
2. Anatomy of a Web Push notification
There are two types of Web Push notifications: simple and Rich.
A simple Web Push notification consists of the following elements:
- Title—A heading introducing the topic (max. 48 characters).
- Main content—A short message below the title (max. 100 characters).
- Icon—A small image accompanying the text.
- Buttons (optional)—Elements providing a space for additional CTAs and redirecting the recipient to specified URLs.
A Rich Web Push will also contain an additional banner, which can be displayed at the top or at the bottom of a notification. Rich Web Push notifications are only supported by Google Chrome and Opera—other browsers will display it as a simple notification, without the additional banner.
All the elements listed above can be customized during the design process. Additionally, a notification will include the logo and the name of the browser through which the recipient gave their consent and which handled the delivery process. The sending domain (your website) will also be indicated.

Additionally, SALESmanago allows you to specify a redirection URL for the clickable area—the entire area of a Web Push notification except for buttons and the close/expand icon.
IMPORTANT: A Web Push notification will look different depending on the browser that handles it and the device on which it is displayed. Some elements may not be displayed at all (see Limitations below).
3. Technical limitations
The visual presentation of a Web Push notification varies across different browsers and systems. The table below presents the current level of support offered for Web Push notifications by combinations of systems and browsers.
| System/Browser | Chrome | Firefox | Opera |
|---|---|---|---|
| iOS | None | None | None |
| MacOS | Simple | Simple | Simple |
| Android | Rich | Simple | Rich |
| Windows | Rich | Simple | Rich |
| Linux | Simple | Simple | Simple |
IMPORTANT:
- SALESmanago does not support Web Push notifications for Edge and Safari.
- In accordance with Apple’s policy, iOS does not support third-party Web Push notifications unless they are handled by a Progressive Web App. As the installation of a PWA is not straightforward for the recipient, SALESmanago does not support sending Web Push notifications to such applications.
- Only Chrome and Opera support action buttons in Web Push notifications. In the case of Firefox, any buttons will be replaced with a “close” button in the language of the browser.
It is important to remember that a Web Push notification will look different depending on the browser that handles it and the device on which it appears.
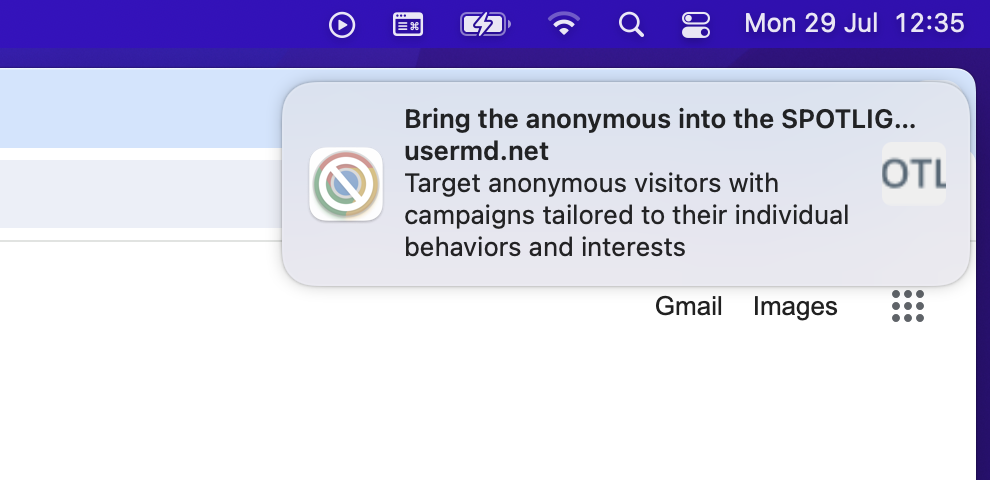
Here is an example of a Web Push notification displayed by Chrome on Windows:
Here is what the same notification will look like when displayed by Chrome on MacOS:
Therefore, it is important to always test your notifications on various devices, systems, and browsers to ensure the best user experience.
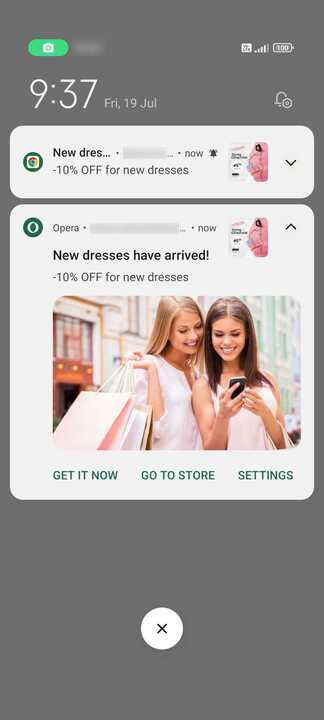
Note that on mobile devices, Web Push notifications are likely to be initially displayed in a collapsed format. This means that the recipient may need to expand them to see all the contents. For example, the screenshot below shows the same notification (sent through two different browsers) in the collapsed and expanded format.
4. Collecting Web Push consents
Web Push consents are collected by individual browsers, for individual domains and for individual devices.
If a recipient has two browsers on the same device and consents to receive your notifications through one of them, your notifications will be sent only through this specific browser. If the recipient gives the same consent through both browsers and you send the same mass notification to users of both these browsers, this recipient will receive this notification twice.
If you have more than one monitored website, you need to collect consents separately for each of them.
Web Push notifications are displayed only on the device on which the associated consent was given. If a user has more than one device but subscribes only on one of them, your notifications will only be delivered to that one device.
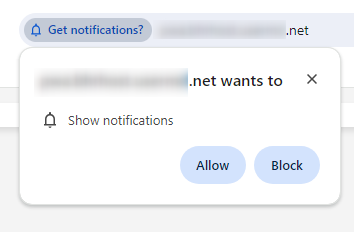
As Web Push notifications are handled and delivered by browsers, Web Push consents are also collected by browsers, by means of native (browser-based) prompts. The screenshot below shows the consent prompt for desktops from Google Chrome.
The browser-based prompt must always be displayed for consent to be collected—there is no workaround. However, this browser-based prompt can be preceded by your own custom prompt. This is strongly recommended.
Before creating your first Web Push notification, make sure that you have created and implemented a consent prompt. A consent prompt can be used for any type of Web Push notification (static and dynamic, simple and Rich). A single consent prompt can be associated with many Web Push templates.
To create a consent prompt, go to Menu → Channels → Web Push → Consent prompts → + New consent prompt.
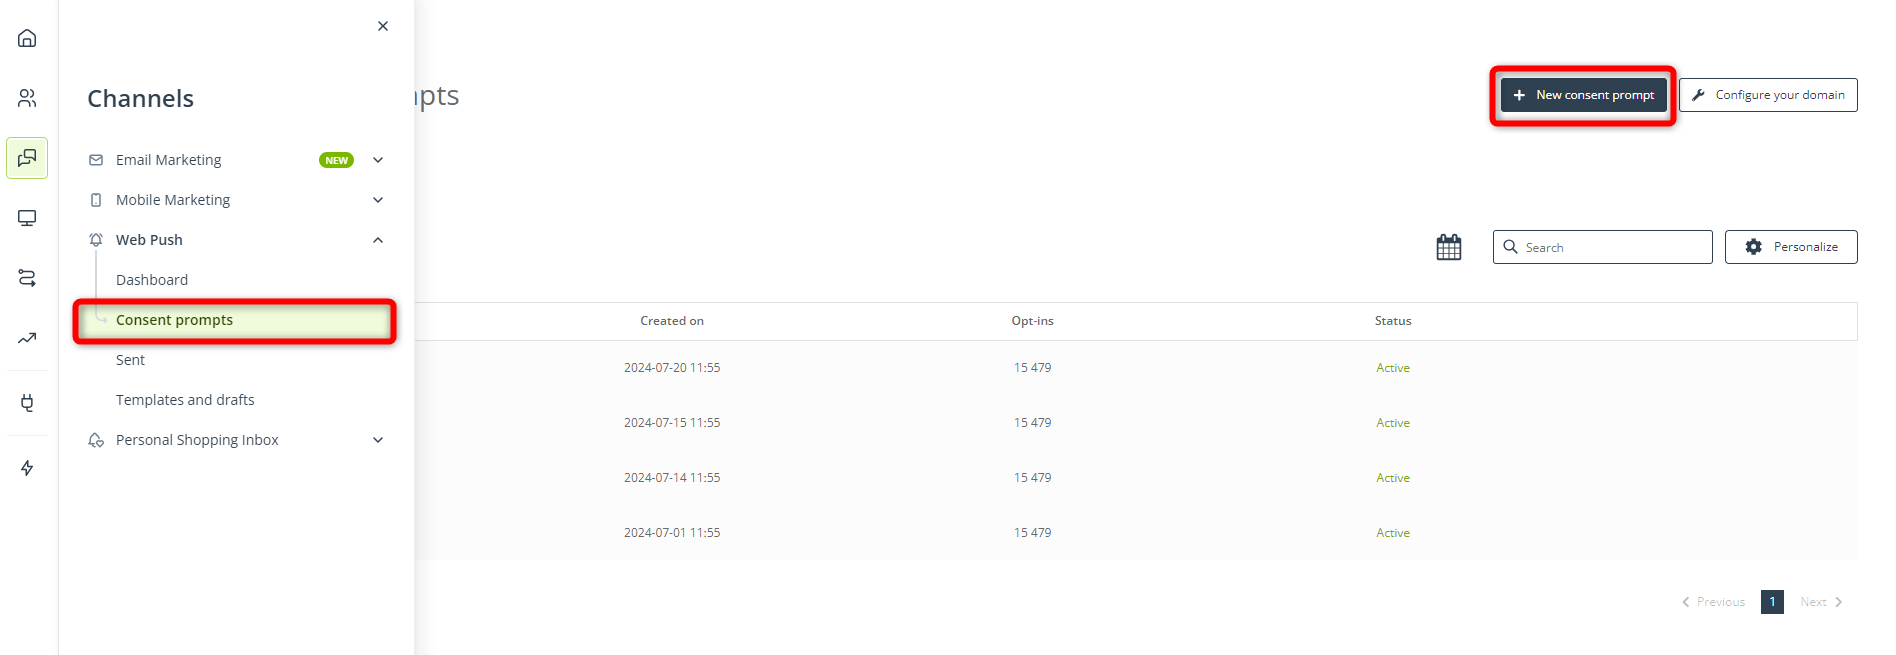
SALESmanago offers two wizards: one for creating a website-based prompt (whose design and display settings are configurable) and one for configuring the browser-based prompt (whose display moment is customizable to a certain extent).
Read more about collecting Web Push consents >>
Irrespective of how you collect Web Push consents, by default, they will be assigned to a SALESmanago domain: salesmanagopush.com. The default configuration may not be optimal because the domain displayed on both your consent prompts and your notifications will be “salesmanagopush.com” and not your own domain. This may affect the credibility of your consent prompts, resulting in lower opt-in rates.
If you want to collect Web Push consents for your own domain, read the article about domain configuration for Web Push notifications >>
NOTE: Due to the strict policy of Shopify, this domain configuration is not possible for e-stores based on this eCommerce platform.
Web Push consent and cookies
Web Push consent is not associated with any cookies. If a website visitor consents to Web Push notifications through the browser-based prompt and then deletes their cookies, the consent will not be withdrawn.
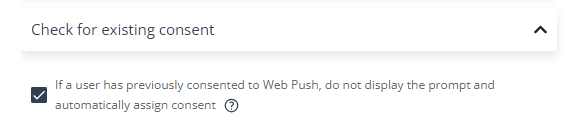
However, the display of your custom (website-based) consent prompt does depend on SALESmanago cookies. By default, if someone visits your website and the custom prompt is displayed to them, and if afterwards they clear SALESmanago cookies, then irrespective of their decision (Allow/Block) or your configuration, the custom prompt will be displayed to them again. Still, it will not be followed by the browser-based prompt, and even if the visitor clicks “No, thank you” on your custom prompt, the consent will not be withdrawn.
If you want to prevent the custom prompt from reappearing for website visitors who have already consented to your Web Push notifications, check this option when configuring your custom prompt:
5. Creating Web Push notifications in SALESmanago
In terms of content, there are two types of Web Push notifications:
- Static—This type of notification has fixed content: all elements will look the same to all recipients. The only exception are placeholders for Contact data, which can be included in the title and/or the main content.
Learn more about personalization using placeholders >>
- Dynamic—This type of notification can include dynamic product recommendations. This means that each recipient will see different content, depending on your configuration.
The following elements of a dynamic notification can be personalized:
- title,
- main content,
- icon,
- banner (Rich Web Push only).
The title and the main content can simultaneously include both static and dynamic elements.
Note that all these elements can, but do not need to be dynamically personalized. For example, you can create a dynamic Web Push notification in which the title and the banner will be static (the same for all recipients), whereas the icon and the main text content will be dynamically personalized.
Remember that only one product can be displayed in a single Web Push notification. If both the icon and the banner are configured as dynamic content, they will show the same picture of the same product.
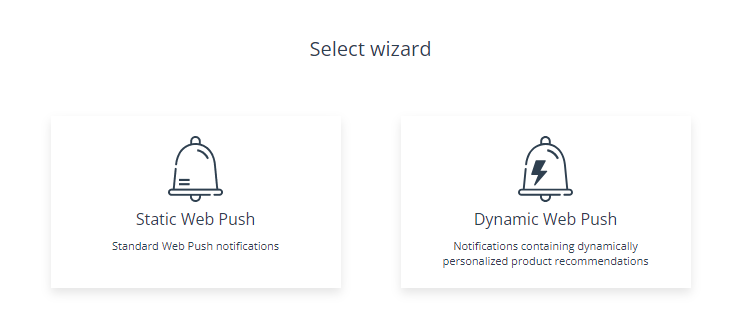
When creating a Web Push notification in SALESmanago, first, you select whether this will be a static or a dynamic one.
Then, in Step 1 of the creation process, you select whether you want to create a Web Push [1]; a Rich Web Push [2]; or both of them [3] at once.
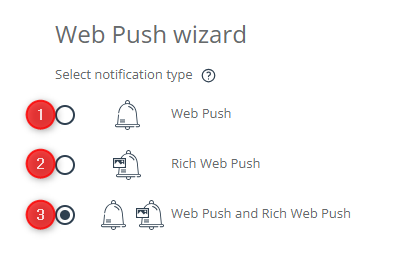
Option [3] is more recommended than option [2] because certain devices and systems support only Web Push, but not Rich Web Push. If you select option [3], whenever the Rich Web Push notification cannot be displayed, the simple notification will be displayed instead.
Read more about creating a static Web Push notification >>
Read more about creating a dynamic Web Push notification >>
6. Sending Web Push notifications
When you have finished designing your Web Push template, you can send it using the same wizard in which it was designed.
In Step 4 of the wizard (either static or dynamic), you can select:
- The consent prompt(s) based on which the Web Push notification will be sent.
- The recipients of your Web Push notification—monitored Contacts and/or anonymous visitors. You can use SALESmanago selectors and filters to target Contacts, for example, based on tags, interactions with your website, or the systems and devices they use. If you have the Spotlight feature activated for your account, you can also precisely target anonymous visitors based on their visits and interactions with your Web Push notifications.
NOTE: After specifying all criteria, you can click “Count” to check the number of Contacts and/or anonymous visitors that meet these criteria and will be included in your audience. Remember, however, that this is only an approximate number based on the current number of opt-ins. Some people may opt out before they receive the notification, and others may opt in. Also, even if a notification is sent, it may not be displayed (if the recipient does not turn on their device, is offline, or has blocked notifications on their device). - (Dynamic notifications only) The source of your recommendations (e-store) and the recommendation scenario.
- The sending time. You can choose to send the notification “now” or schedule it for a later time. These settings will be applied when you click Save and then Save and send. For example, if you select “Send now”, the notification will be sent as soon as you click Save and send.
- Time to Live—the lifespan of the notification, i.e., the period for which it can be actually displayed. The TTL is counted from the moment of sending. If the TTL expires before a recipient turns on their device or connects to the internet, the notification will not be displayed to this recipient at all.
7. Web Push analytics
SALESmanago offers three types of Web Push analytics:
- Consent prompt analytics
Check how many times a consent prompt was displayed, how many subscriptions were obtained through it, how many subscribers subsequently opted out, and more.
- Sent notification analytics
See the number of notifications sent, viewed, and clicked in a given campaign. Check the number of clicks on links and products, individual sales analytics, and more.
- Web Push analytics
Go to the Web Push dashboard to see your sales analytics for the entire Web Push module, monitor the engagement levels (sent/opened/clicked), and more.