SALESmanago offers an integration with WhatsApp, based on the latest version of the Bird platform. The integration allows you to target your Contacts with personalized WhatsApp messages and thus increase customer engagement and effectively drive your sales.
This article describes how to perform the integration, how to send WhatsApp invitations that will open the door to impactful marketing campaigns, and how to follow with standard messages.
NOTE:The Bird and MessageBird platforms are different tools and cannot be used interchangeably. This article describes the integration via Bird, which is the latest version of MessageBird.
To integrate WhatsApp with SALESmanago via Bird, go to
Channels → Mobile Marketing → Integrations → WhatsApp
Contents
1. Getting started
WhatsApp is a popular mobile application for smartphones that functions as an instant messenger, enabling users to send messages (both text and images) to other mobile devices. With over 3 billion users worldwide, it is a powerful platform for communication.
In SALESmanago, you can integrate with WhatsApp via Bird, which functions as the messaging service provider. To integrate your SALESmanago account with WhatsApp, you need to have a Bird account. You can integrate multiple Bird accounts with a single SALESmanago account. However, a single Whatsapp channel can be integrated only with one SALESmanago account. If you integrate the Whatsapp channel with another SALESmanago account, callbacks and marketing consent synchronization will stop functioning for the previous SALESmanago account.
The integration allows you to create message templates in SALESmanago or import them from Bird to SALESmanago. These messages can later be sent to the selected SALESmanago Contacts, increasing your targeting and personalization capabilities.
To be able to send messages to your Contacts via WhatsApp, first, you need to obtain their permission. For this purpose, you need to send them an invitation via email or WhatsApp. There is no limit on the number of sent invitations. Note, however, that invitation templates need to be created in Bird and approved by WhatsApp; only then can they be imported into SALESmanago. Moreover, they cannot be edited (modified) in SALESmanago afterwards. If a user responds to your invitation message (thereby granting consent to receiving your communications through this channel), you can send them messages (individual, mass, and birthday messages) for 24 hours. This is a basic WhatsApp requirement and this period cannot be changed.
2. Integration process
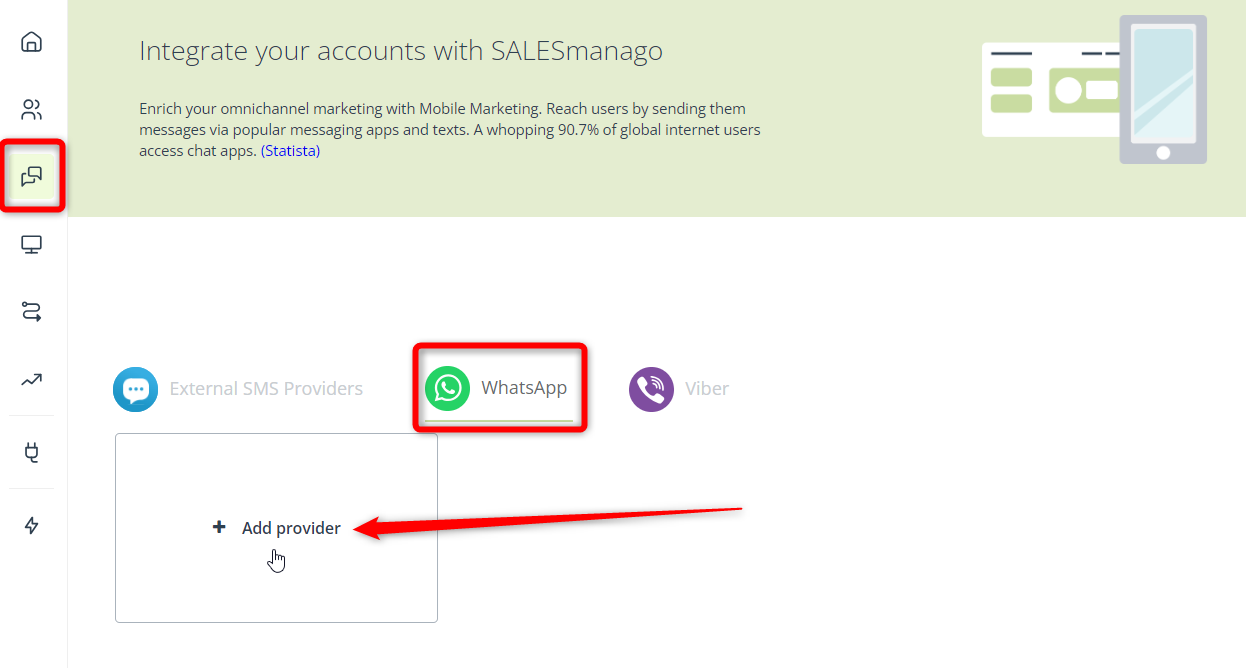
To integrate your SALESmanago account with WhatsApp, go to Menu → Channels → Mobile Marketing → Integrations → WhatsApp and click + Add provider.
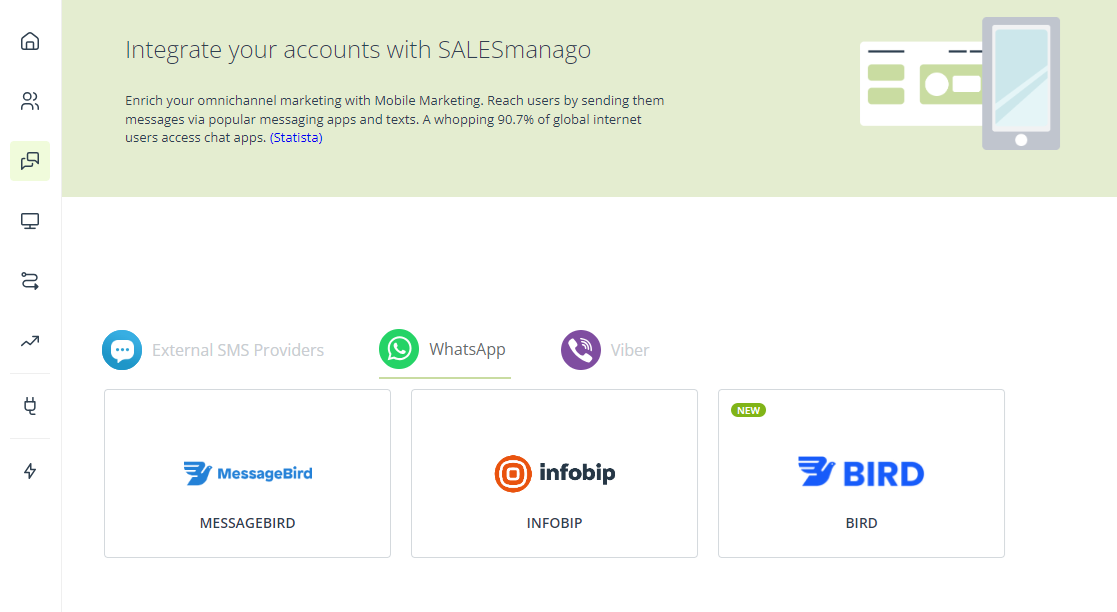
Select Bird from the list of available service providers.
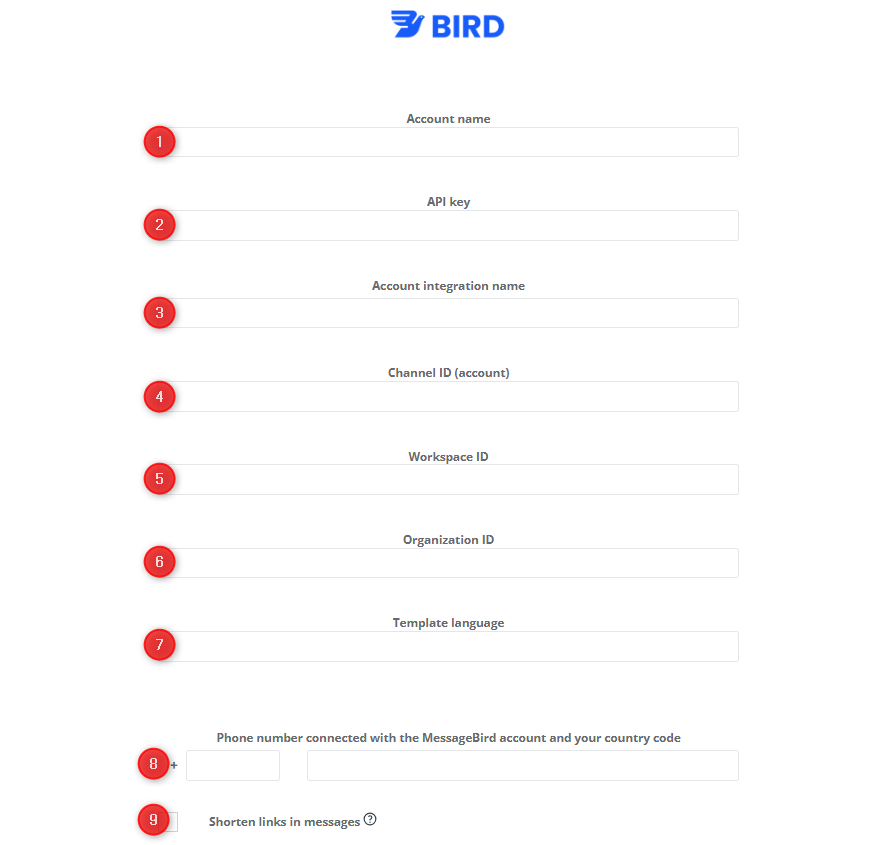
At this stage, you need to provide a number of details.
[1] Account name—Enter a name that will allow you to easily identify this integration in the system.
This name refers to the integration with a specific Bird account, which can have a number of WhatsApp channels. The channel name is provided in field [3] below.
[2] API key—Enter a unique identifier generated for your account by Bird. If you have no existing API key, or if you are no longer able to view or copy it, you need to create a new one.
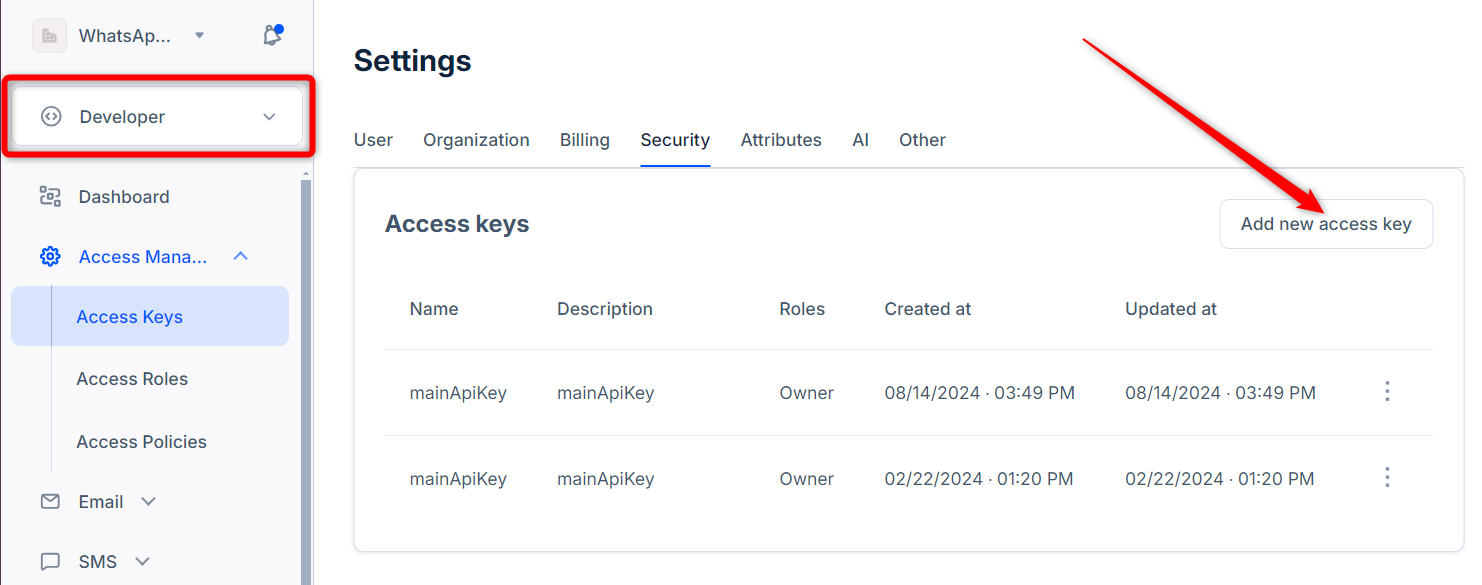
To create a new API Key, log in to your Bird account, go to the Developer section → Access Management → Access Keys. Click Add new access key.
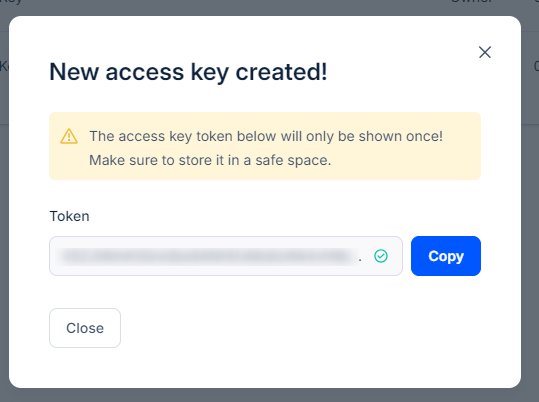
After creating a new API key, copy the token and paste it into SALESmanago.
[3] Account integration name—Enter a name for the WhatsApp channel that you want to integrate.
You can integrate multiple WhatsApp channels existing within one Bird account, so this name allows you to identify the integrations with individual channels.
IMPORTANT: A single WhatsApp channel can be integrated with SALESmanago only once, meaning you cannot integrate the same channel with two or more SALESmanago accounts.
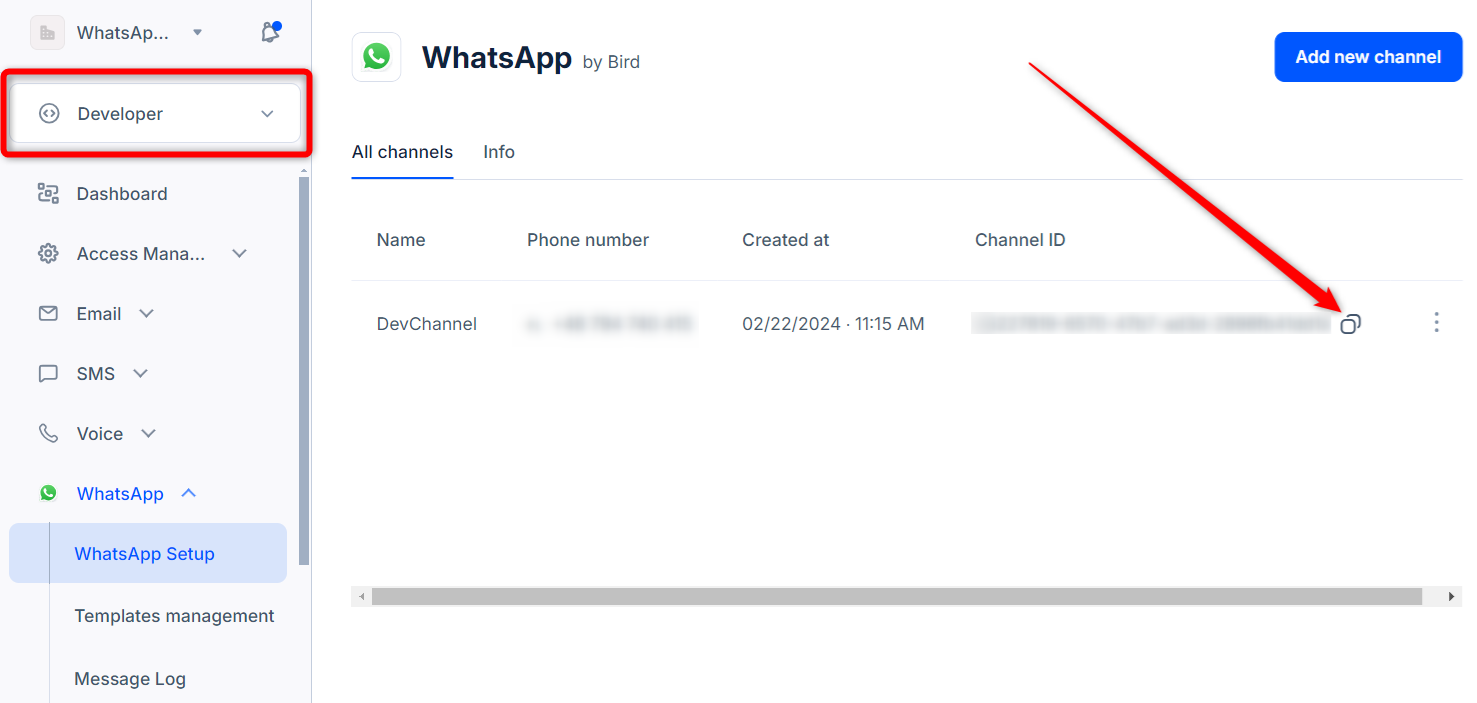
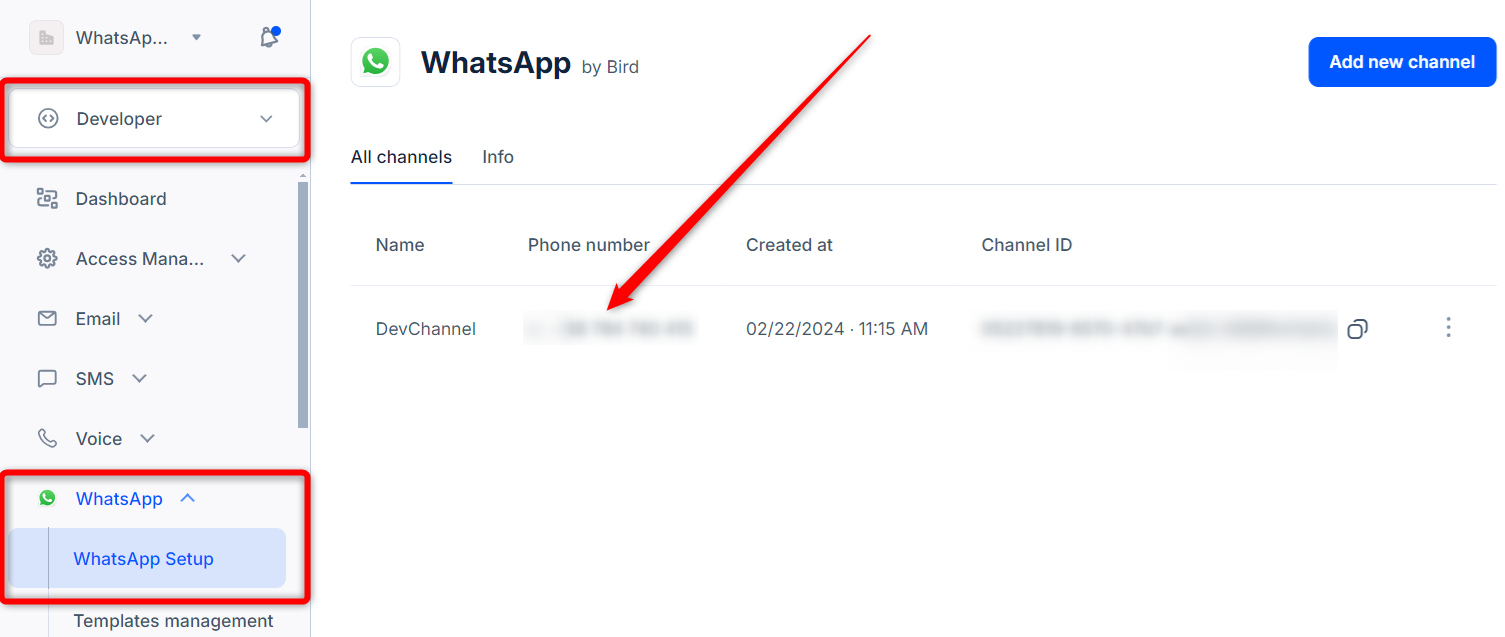
[4] Channel ID (account)—Here, enter the unique ID for the WhatsApp channel you want to integrate. You can find it on the Bird platform, by going to the Developer section → WhatsApp → WhatsApp Setup. Copy the ID for the selected channel from the table and paste it into SALESmanago.
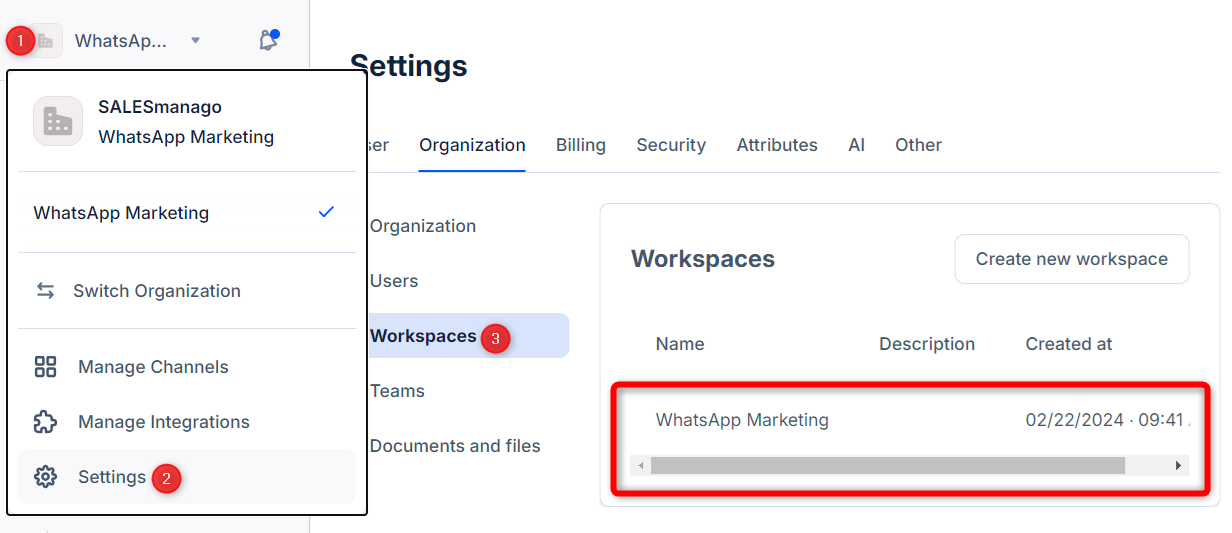
[5] Workspace ID—Enter the unique ID for the Bird Workspace you want to integrate with SALESmanago. You can find this ID on the Bird platform, by clicking the organization icon [1] in the top left corner and going to Settings [2] → Workspaces tab [3]. When you click an existing Workspace, a pop-up with its details will open. Copy the Workspace ID and paste into SALESmanago.
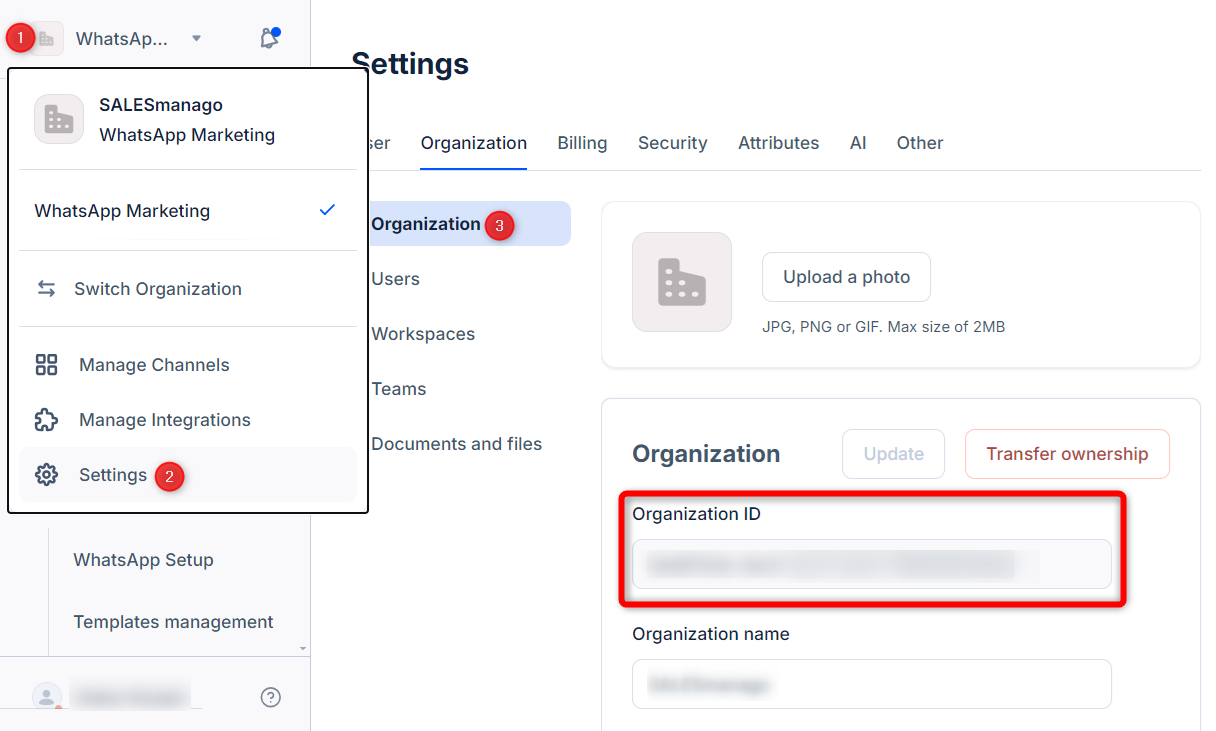
[6] Organization ID—Enter the unique ID assigned to your organization by Bird. You can find it on the Bird platform, by clicking the organization icon [1] in the top left-hand corner and selecting Settings [2] → Organization tab [3].
Copy the Organization ID and paste it into SALESmanago.
[7] Template language—Specify the language in which your message templates will be created on this Bird account. Provide the country abbreviation, for example, en for English, de for German.
You can specify only one language here. If you want to send messages in more than one language, you need to integrate more WhatsApp channels.
[8] Phone number connected with the Bird account and your country code—Enter the phone number associated with your Bird account, specified when creating the Bird account. The phone number format should be the plus character followed by the country code and the individual number, for example, for Germany: +49123456789.
To verify this number, log in to your Bird account and go to the Developer section → WhatsApp → WhatApp Setup. You will find the associated phone number, including the country code, in the table.
[9] Shorten links in messages—Enable this option if you want to send shortened links in your WhatsApp messages. This option is recommended because shortened links are more user-friendly and can be tracked by SALESmanago.
IMPORTANT: Non-shortened links lead directly to your website and therefore clicks on such links cannot be tracked by SALESmanago.
When you have provided all the required information, click Save. If the integration is successful, you will see the following message:
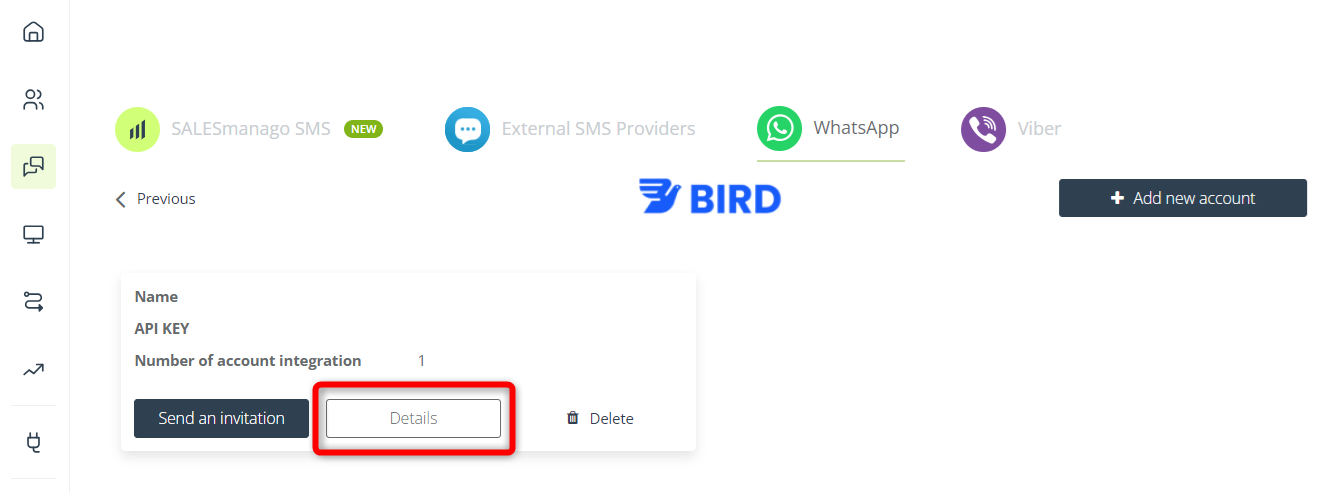
The integration will now become visible on the list in SALESmanago. You can view or edit its details by clicking the Details button:
3. Inviting Contacts
To send WhatsApp messages to your Contacts, first, you need to send them invitations. An invitation will be accepted when a Contact responds to your invitation message.
To send an invitation to your Contacts, go to Menu → Channels → Mobile Marketing → Integrations → WhatsApp → Bird and click Send an invitation:
You have two options available for sending a welcome message to your Contacts:
[1] Send a welcome message with a special invitation link—This option allows you to generate an invitation link and include it in an email or SMS. By clicking this link, your Contacts agree to receive your messages via WhatApp.
[2] Send a welcome message by using a template imported from WhatsApp—This option allows you to send an invitation created in Bird directly to Contacts’ WhatsApp accounts.
IMPORTANT: When sending invitations via WhatsApp, you can only use templates that were created in Bird and approved by WhatsApp. You will find more information below.
A. Creating an invitation template
Templates for invitations need to be created in Bird and approved by WhatsApp. Only then can they be imported into SALESmanago and actually sent to Contacts.
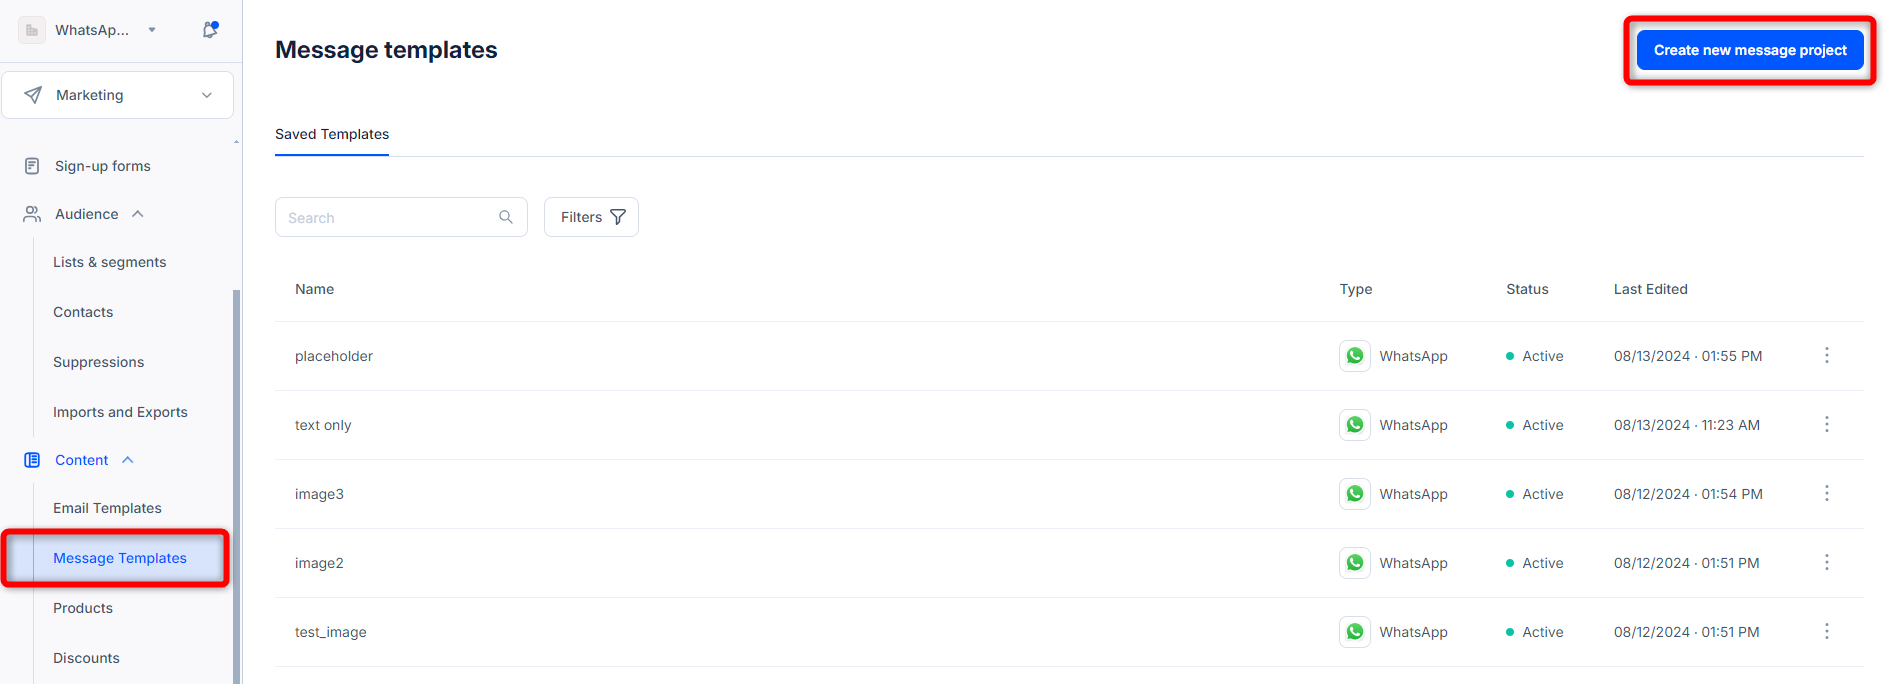
To create a new template, log in to your Bird account, go to the Marketing section → Content → Message templates and click Create new message project.
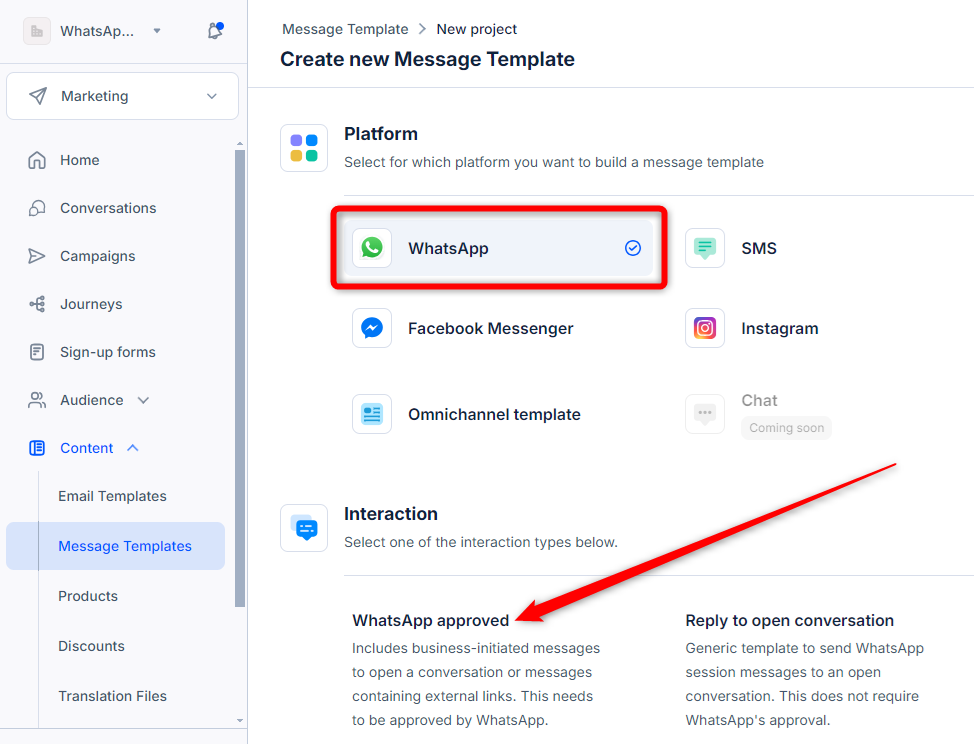
Select WhatsApp as the platform for which you want to create a template. You will be asked to select the interaction type. If you want to create an invitation, select WhatsApp approved.
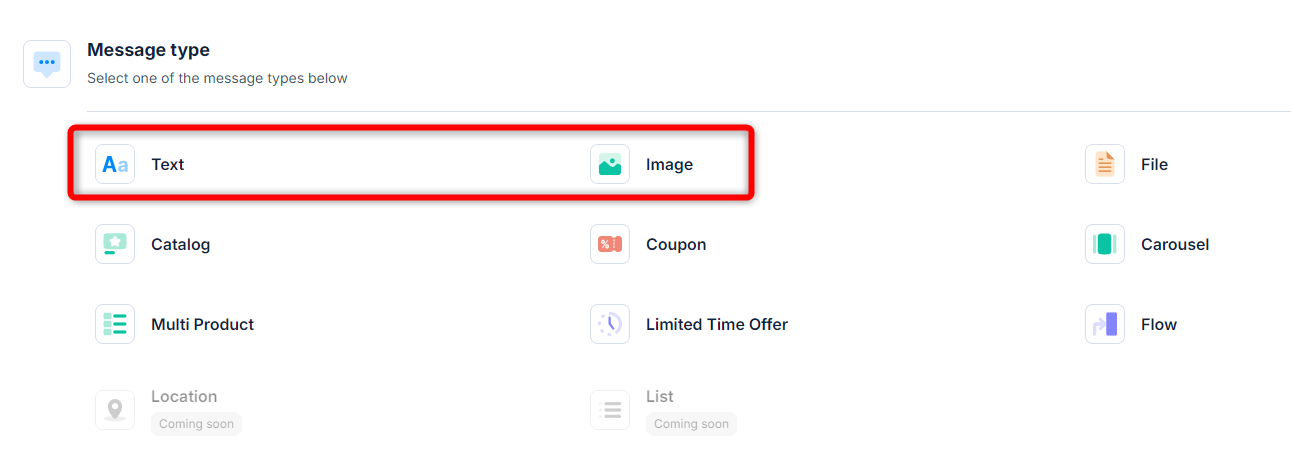
Configure the new invitation template. Note that in the Message type step, you can only select Text or Image. SALESmanago does not support other message types.
After filling in the details for your new template, click Get started now to access the template editor. When you have finished editing your template, click Publish to save it.
Read more about creating a message template on Bird’s support portal >>
B. Importing an invitation template to SALESmanago
When your invitation template created in Bird has been approved by WhatsApp, you can import it into SALESmanago.
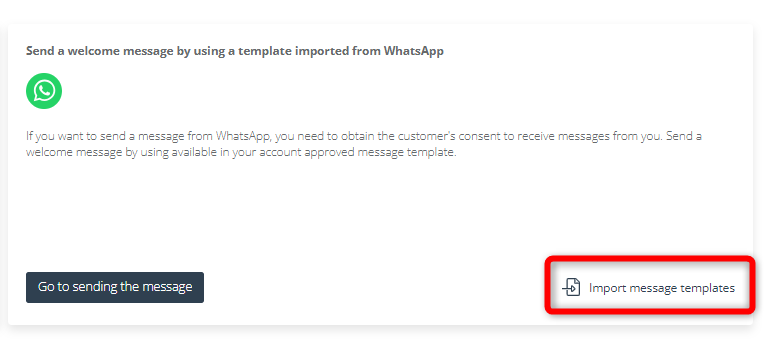
In SALESmanago, go to Menu → Channels → Mobile Marketing → Integrations → WhatsApp → Bird. Click Send an invitation. In the section: Send a welcome message by using a template imported from WhatsApp, click Import message templates.
A new window will open. You can import templates with and without placeholders. If you decide to import a template containing placeholders, you need to configure the placeholders during the import. This configuration cannot be changed later.
IMPORTANT:
- If you edit a template that has already been imported into SALESmanago on the Bird platform, the changes will not be automatically reflected in SALESmanago. If you want to send the edited version from SALESmanago, you need to delete the old template from SALESmanago and then import the new version.
- If a template imported into SALESmanago is edited in Bird by adding or removing placeholders, it may fail to be sent from SALESmanago.
- If a template imported into SALESmanago is deleted in Bird, you will not be able to send it from SALESmanago.
- Importing a template without placeholders
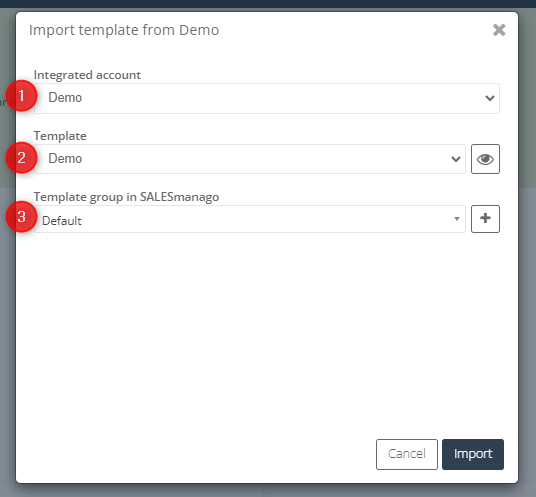
During the import, you will see the following window:
Select the integrated account from which you want to import a template [1]. Then, select an existing template from the list [2]. Specify the template group to which you want to add this template in SALESmanago [3]. Finally, click Import.
- Importing a template with placeholders
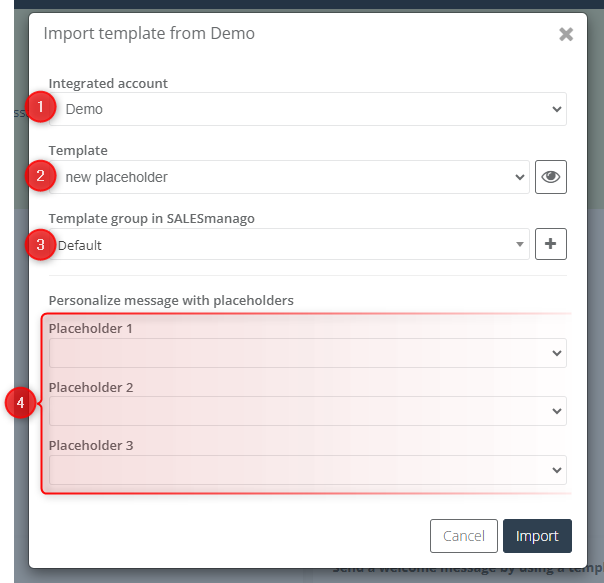
During the import, you will see the following window:
Select the integrated account from which you want to import a template [1]. Then, select an existing template from the list [2]. Specify the template group to which you want to add this template in SALESmanago [3].
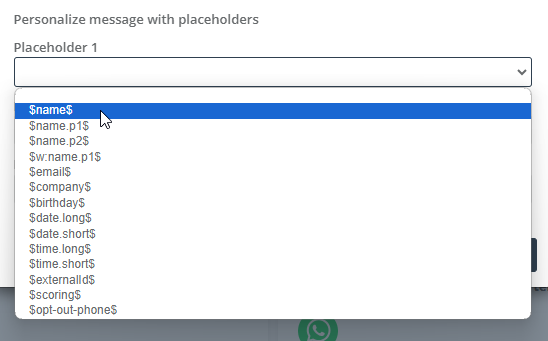
Next, match the placeholders included in the template to the corresponding SALESmanago placeholders. The placeholders are listed in the order in which they appear in the template.
IMPORTANT:
- Remember that this configuration (placeholder mapping) cannot be edited later.
- If you do not match the Bird placeholders to SALESmanago placeholders, or if a Bird placeholder has no equivalent in SALESmanago, the placeholder will be replaced with a space (“ “) in your message.
When the configuration is complete, click Import.
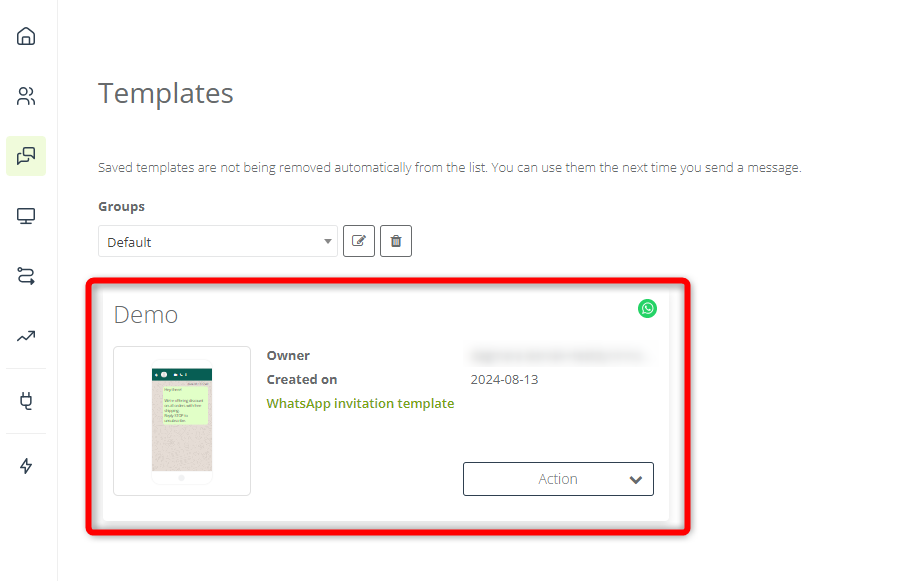
You will find your newly imported template in Menu → Channels → Mobile Marketing → Messages → Templates. It will be labeled as “WhatsApp invitation template”.
C. Sending an invitation
When your invitation template is successfully imported into SALESmanago, you can proceed to send invitations to your Contacts. There are two ways to do this: through the Templates list or via the Bird integration.
- Sending invitations from the Templates list
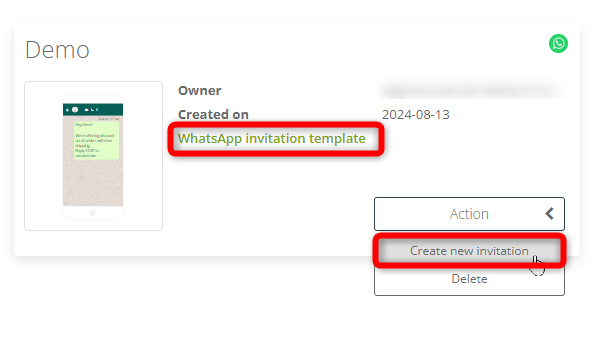
Go to Menu → Channels → Mobile Marketing → Messages → Templates. Find your imported template on the list and click Action → Create new invitation.
NOTE: The template must be a WhatsApp invitation template.
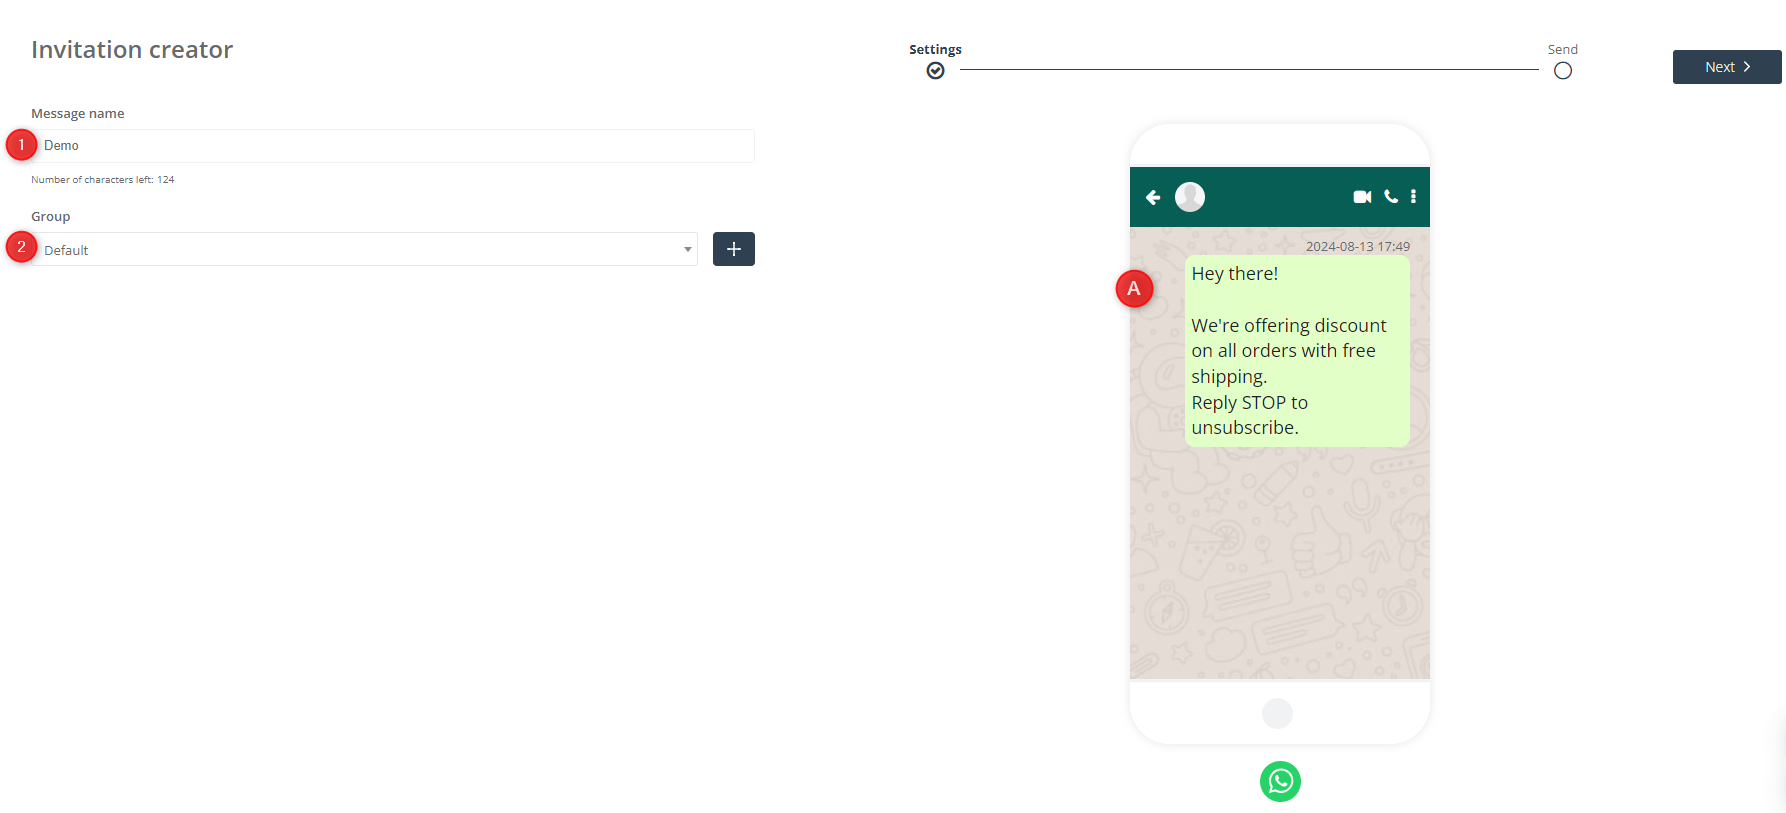
An invitation wizard will open, which consists of two steps.
In Step 1, name the template [1] and select the template group [2] to which you want to assign it.
You can see a preview [A] of the message on the right. Note that you cannot edit anything in the template.
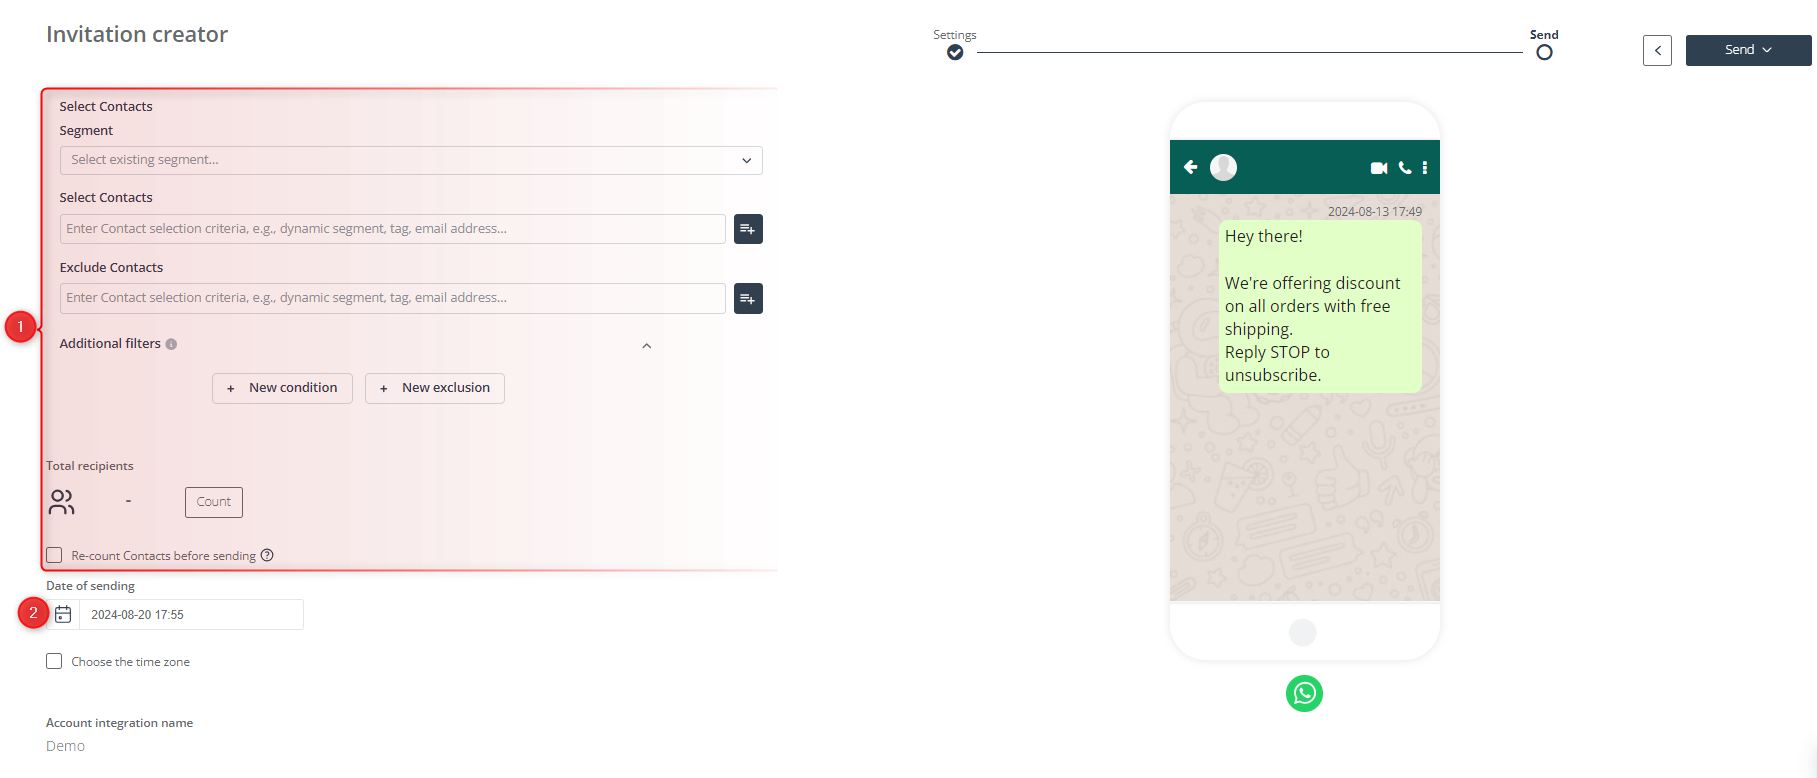
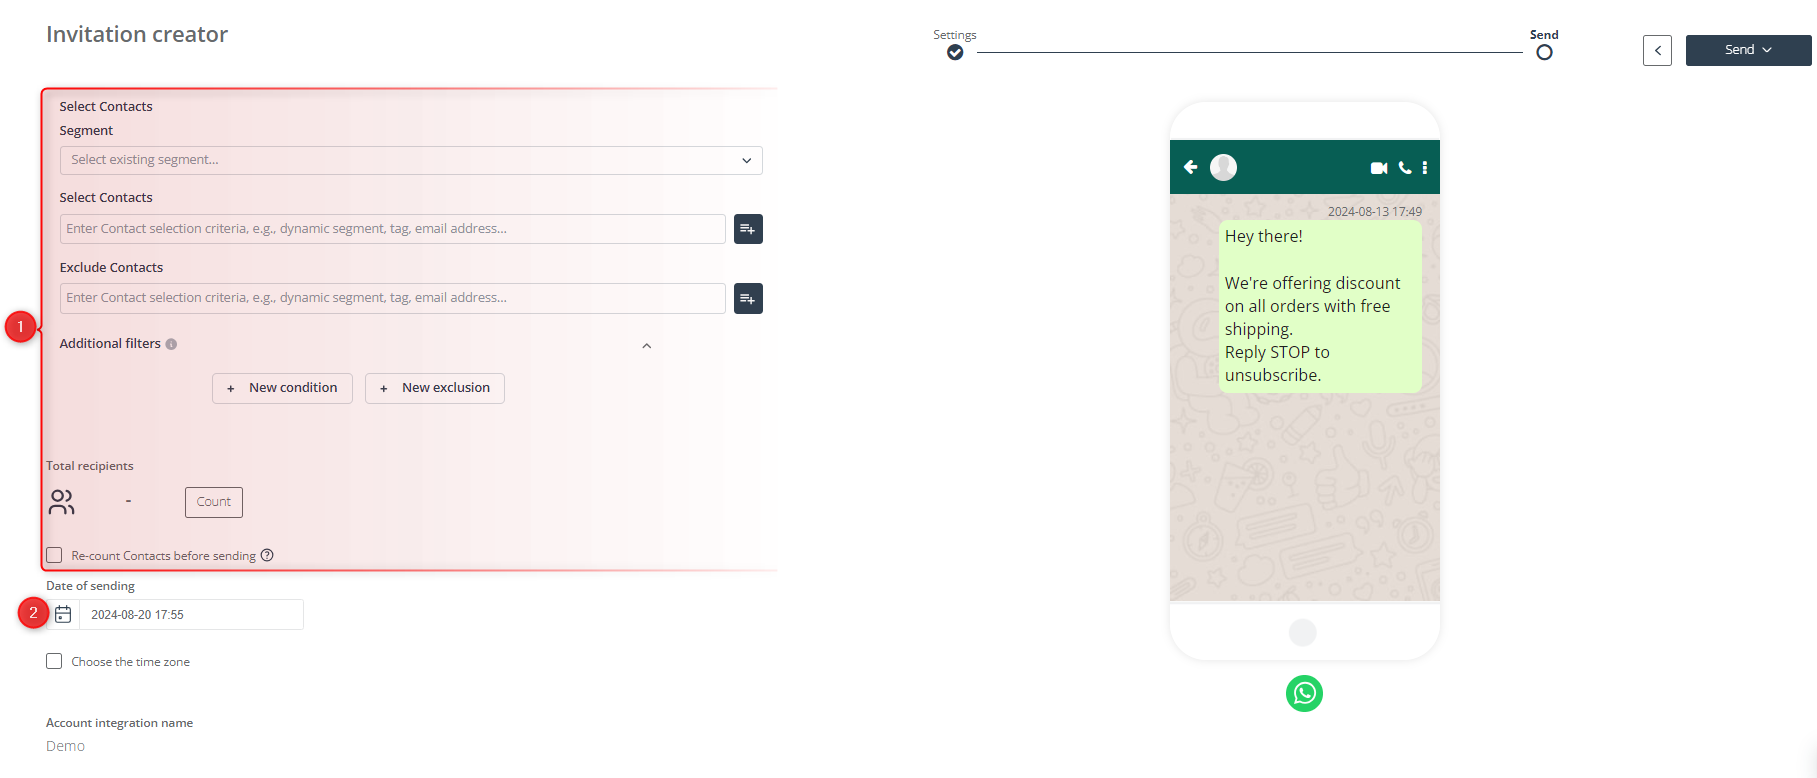
In Step 2, you need to define your audience, using the standard Contact selectors and filters used across SALESmanago [1]. Then, specify the sending time [2].
Click Send and choose whether you want to send your invitation immediately, send a test, or save your work as a draft and exit.
- Sending invitations from the Bird integration panel
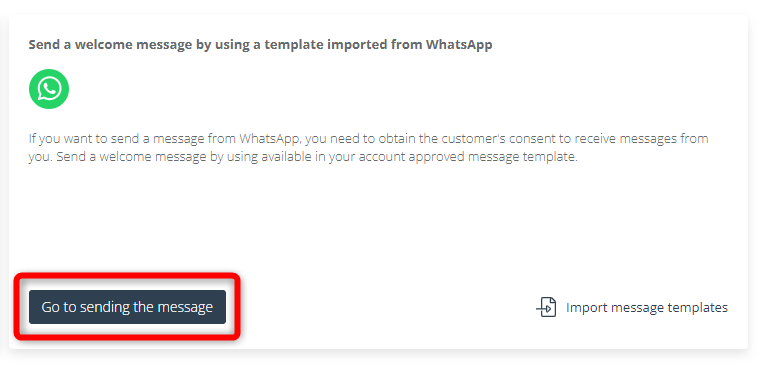
Go to Menu → Channels → Mobile Marketing → Integrations → WhatsApp → Bird. ClickSend an invitation. In the section: Send a welcome message by using a template imported from WhatsApp, click Go to sending the message.
A message wizard, consisting of three steps, will open.
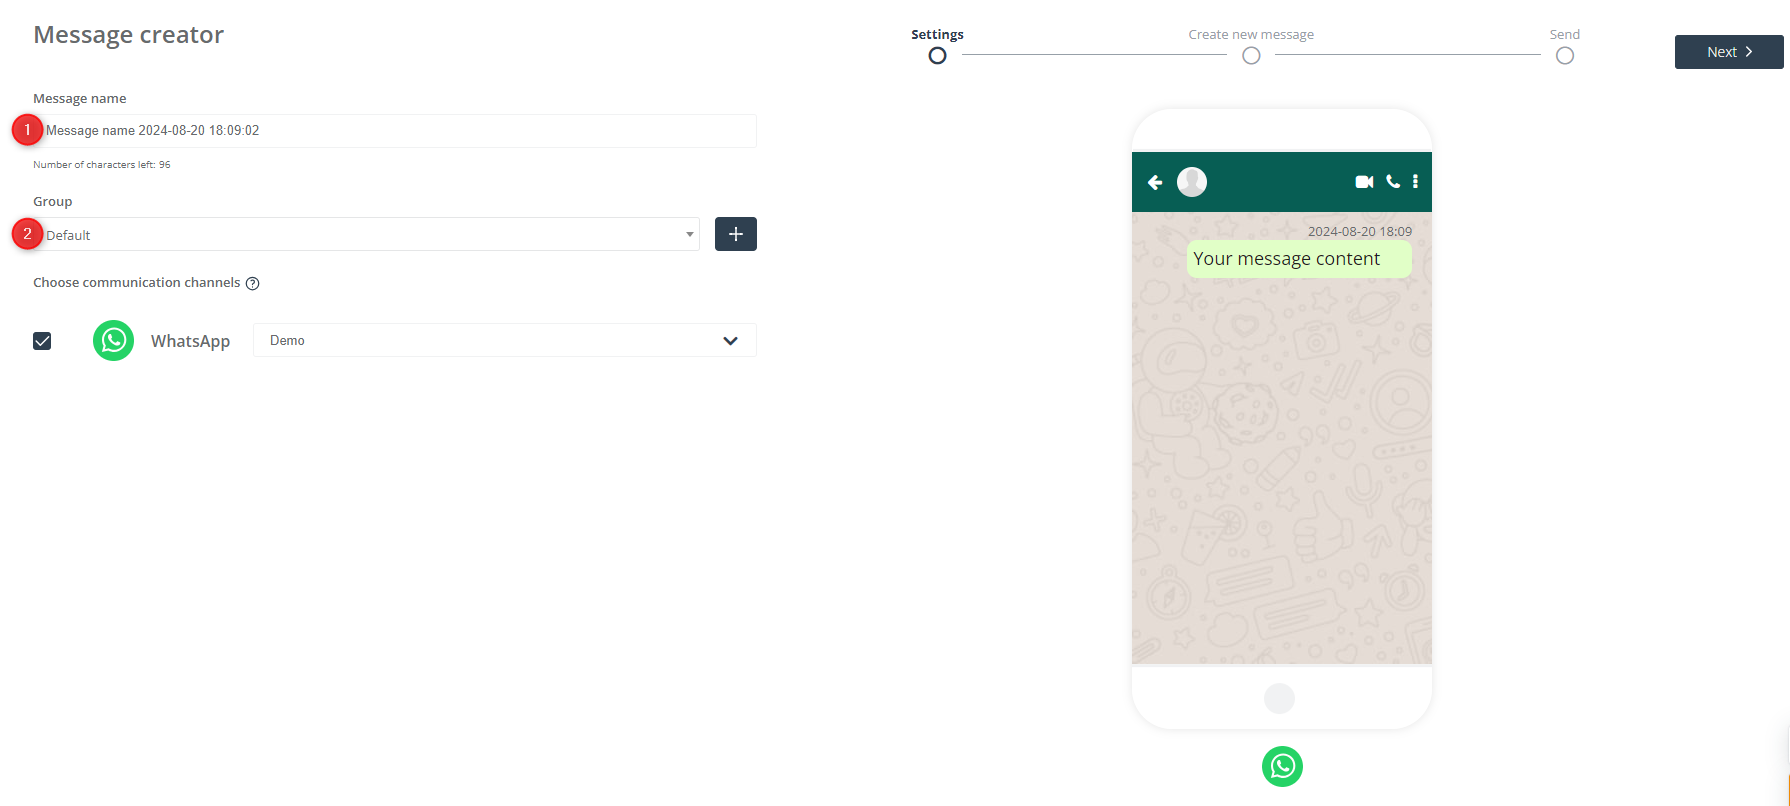
In Step 1, name the template [1] and select the template group [2] to which you want to assign it.
You can see a preview [A] of the message on the right. Note that you cannot edit anything in the template.
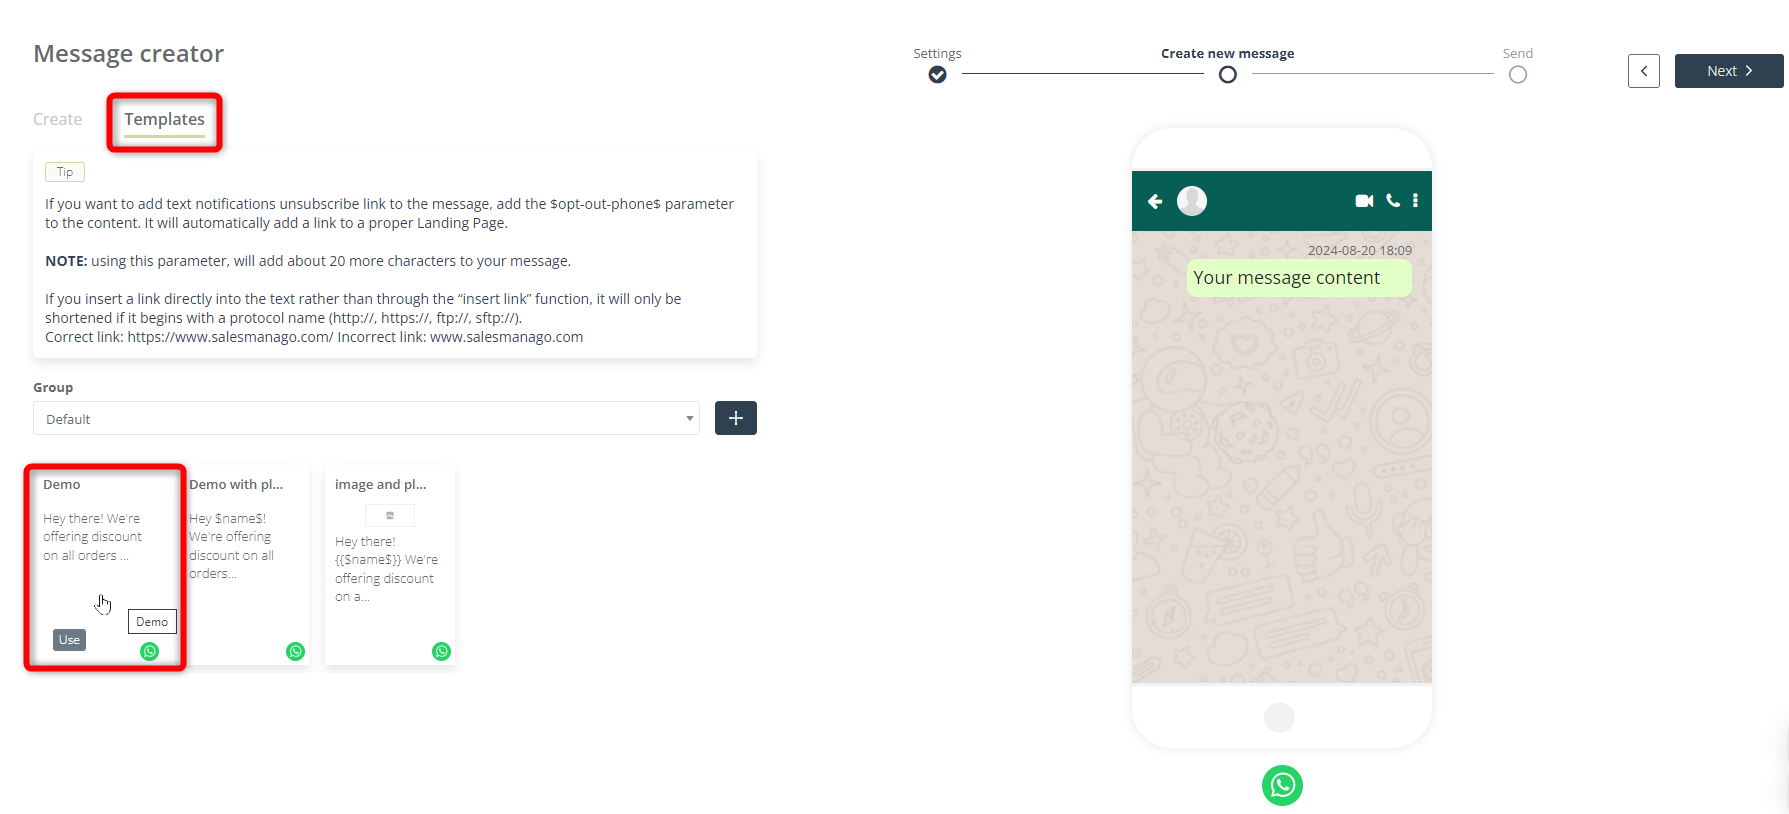
In Step 2, open the Templates tab, find the template imported from your Bird account, and click Use.
IMPORTANT: Remember to select an invitation template that was created in Bird, approved by WhatsApp, and imported into SALESmanago. If you select another template or create your message in this wizard, your invitation will not be delivered.
When the template has been successfully loaded, the wizard will be reduced to two steps.
In the final step, you need to define the recipients using the standard Contact selectors and filters user across SALESmanago [1]. Then, specify the sending time [2].
Click Send and choose whether you want to send your invitation immediately, send a test, or save your work as a draft and exit.
4. Sending messages to Contacts
Responding to your invitation by a Contact is equivalent to giving you permission to send them messages. This consent is valid for 24 hours (which is the standard period established by WhatsApp). With each response, the consent is extended for an additional 24 hours.
Unlike invitations, these follow-up messages can be freely created in SALESmanago and do not require approval by WhatsApp. You can send individual, mass, and birthday messages.
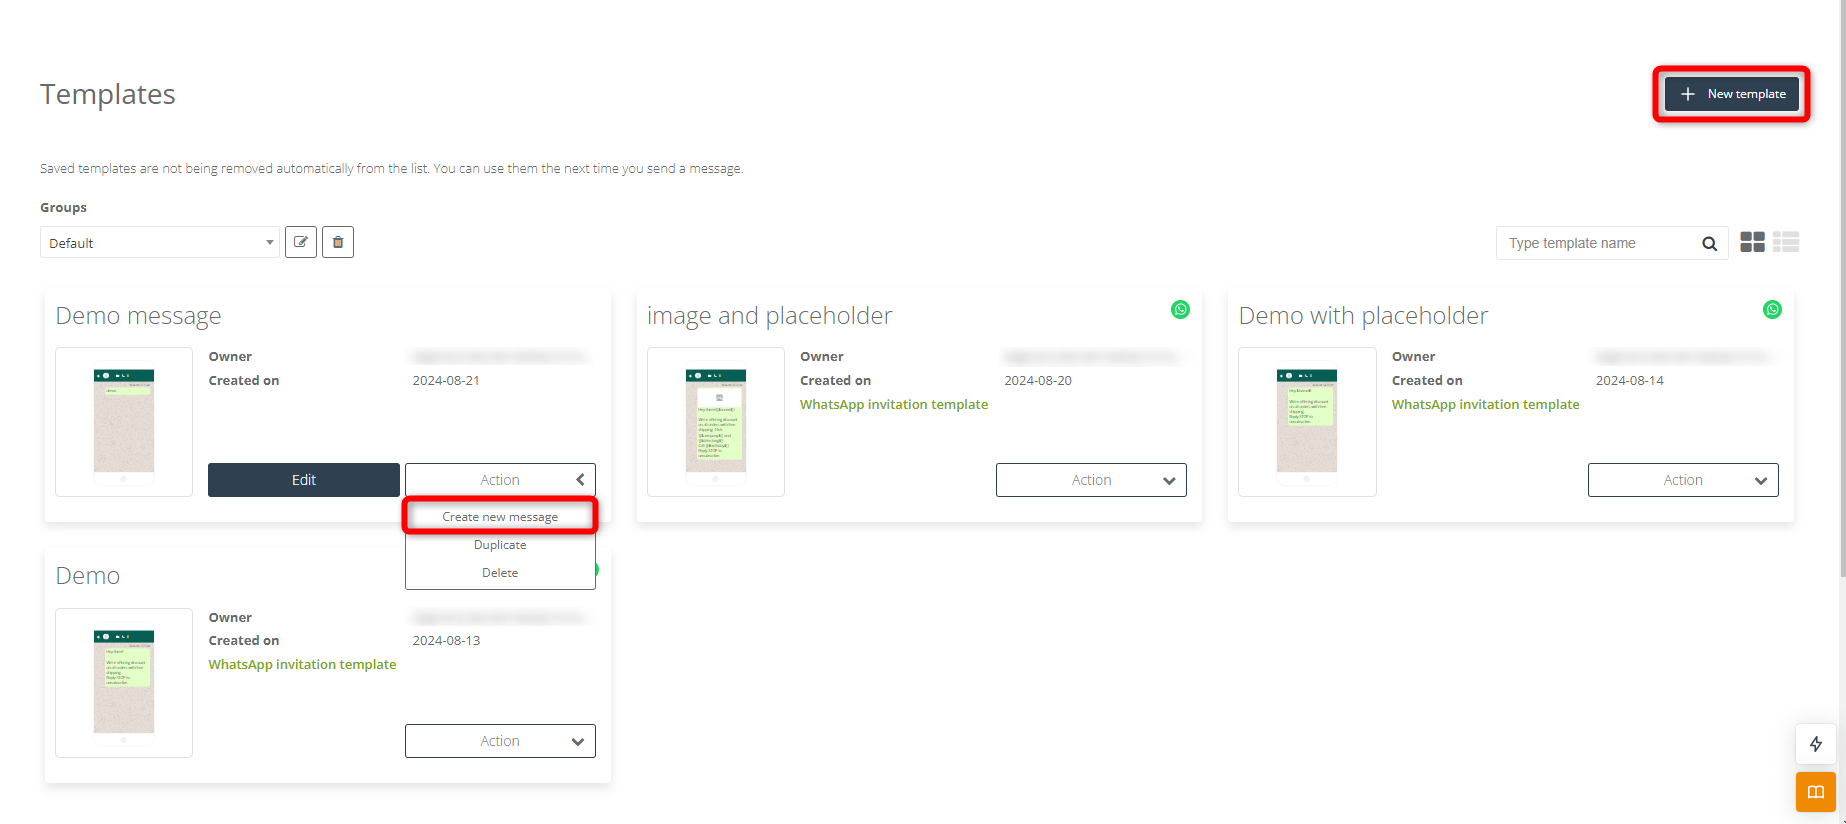
To send a standard (non-invitation) notification, go to Menu → Channels → Mobile Marketing → Messages → Templates.
If you have no existing template, click + New template.
If you already have existing templates, find the one you want to send on the list and click Actions → Create new message.
IMPORTANT: Remember that your messages will only reach those Contacts who have accepted your invitation or responded to your message within the last 24 hours.
Read more about creating a new text message >>
