In SALESmanago system you can use automation rules to create advanced processes of marketing and sales activities. You can use them to:
- send 1-to-1 emails and SMS s an answer to the defined contact’s behavior,
- set lead nurturing – educate new contacts automatically as soon as they enter your database,
- save abandoned cart,
- react quickly to the purchase to increase customers loyalty,
- customize discount coupons for the most active contacts,
- segment automatically contacts database according to interest on a website,
- improve sales process with the automatic flow of the contacts through marketing campaigns and sales funnels,
- increase the effects of the sales team members through automatic alerts about contact’s activity on a website,
- personalize a website content to, for example, the gender of contacts who visit such website,
- manage custom audiences, and then target Facebook ads to contacts that you store in your database.
To add a new automation rule go to
Automations → Automation Processes → Automation Rules → + New Rule
Contents
- Automation rules settings
a) settings
b) activate rule
c) saving the rule - Categories: Events, conditions, and actions
a) events
b) conditions
c) actions
1. Automation rules settings
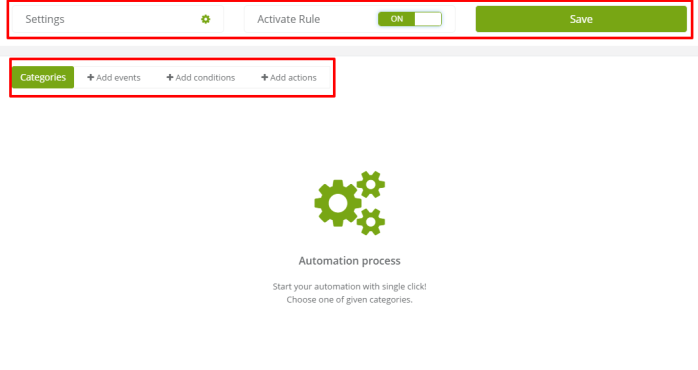
The screen is divided into two parts.
- The first one consists of SETTINGS, ACTIVATE RULE, SAVE.
- In the second one, you can create rules, that will consist of CATEGORIES: EVENTS, CONDITIONS and ACTIONS.
[A] Settings

Click on settings and you will see a pop-up with the following settings:
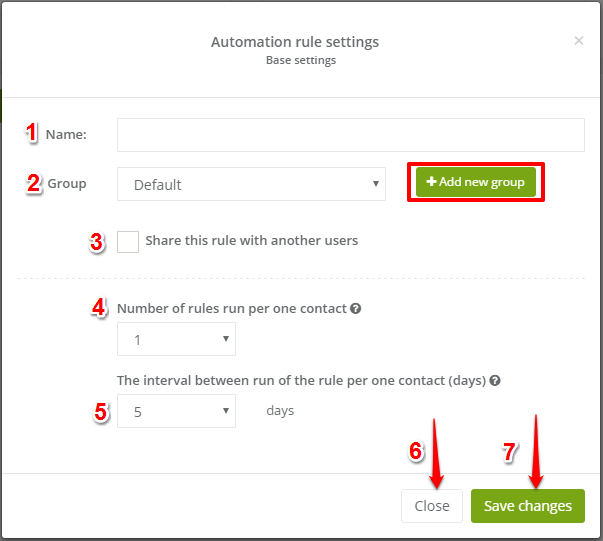
[1] Name – provide the name that will help you to identify the rule in the system. The name will also help you find the rule on a list.
[2] Group – a group will help you to keep your rules in order in Menu → Automations → Automation Processes → Automation Rules tab. You can add a new group or choose any of the previously created.
[3] Share this rule with another users – if you check this option, the rule will be available on all users accounts and will be triggered for all of them (for contacts who will fulfill conditions set in the rule). This option is recommended for manager status accounts.
[4] Number of rules run per one contact – choose, how many times one rule can be triggered for a contact. One rule triggering will happen when a contact fulfills the necessary elements of the rules – events. The number of rule triggers are counted for a contact manually or automatically. If the number of rules running per one contact will be used up, you will not be able to trigger a rule again, unless you change the number of rules that run per one contact.
[5] The interval between run of the rule per one contact (days) – if you set more than one triggering of the rule for a contact, you will be able to set how many days need to pass to trigger it again, when a contact fulfill the conditions. This option will help you to avoid situations when the same rule will be running for a contact a few times during a day.
EXAMPLE: If you prepare a rule that starts with the event Contact visited URL and you set 5 days of interval between running the rule for a contact, then if a contact visits a website for the first time at 3 P.M. and several times during the same day, then the rule will be activated for this contact once again after 5 days at 3 P.M.
[6] Close – click here to close the setting screen.
[7] Save changes – click here to save changes.
TIP: You can add a note to each automation rule. A short description might help you find rules faster and remember the way they work easily.
[B] Activate rule
When all the elements of the rule will be set (events, conditions, actions) change the button from OFF to ON to activate the rule. You will be able to deactivate in at any time.
Note: You can save a rule that is not active and then activate it later.

[C] Save

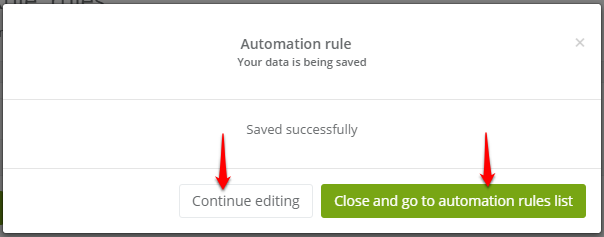
If you click Save, the rule will be saved and the screen below will appear. You can choose from the following:
- continue editing – you will go back to the edition of the rule,
- close and go to automation rules list – the rule will be saved and you will be automatically redirected to Menu → Automations → Automation Processes → Automation Rules.
2. Categories: Events, conditions, actions
In order to create an automation process, you need to provide details for the rule. The mechanism of the rule is very simple. It will be explained in the section about EVENTS, but the same rule applies to CONDITIONS, ACTIONS IF YES/NO.
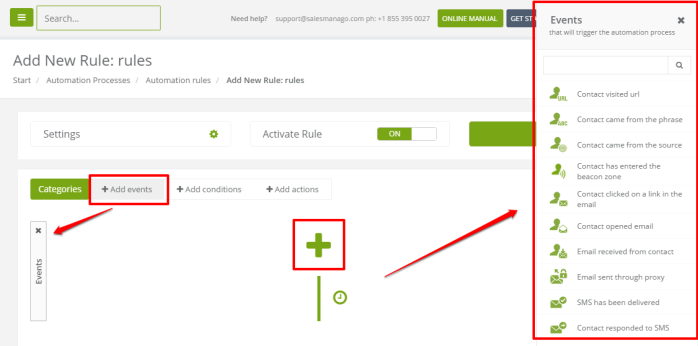
From CATEGORIES choose + ADD EVENTS, then click “+” . On a right side of the screen, a list of events will be displayed. Choose from that list an event that you want to add to the rule.
When elements are chosen, go to individual settings. To go to such settings click on the gear icon.
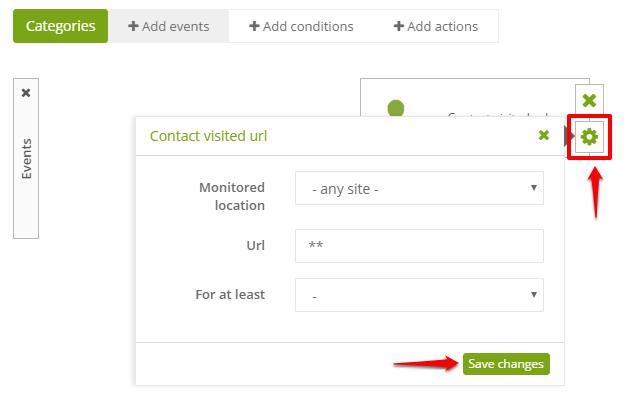
[A] Events
Use them to trigger an automation rule for a contact. A contact needs to perform such event to make the rule triggered for him.

- a couple of events can be set within a rule,
- an event if necessary to trigger a rule (if you trigger a rule manually on a contact card, on Manage Contacts tab or action: run another rule – events will be omitted),
- choose an event from the list – the list will show up if you click “+”,
- events are based on the „OR” rule -> it is enough for only one event to be performed by a contact to run a rule (unless you set conditions).
Find out more about events available in SALESmanago system
[B] Conditions
Conditions are not mandatory to run a rule. To verify whether a contact fulfills conditions an entire contact card is checked by the system.

- if you decide to add conditions you can add more than just one,
- choose condition from the list – the list will show up if you click “+”,
- conditions are based on the “AND“ -> if you set more than just one, all of them need to be fulfilled by a contact,
- you can also use the negative version of the condition – check the NOT option in the individual settings. For example, if you chose the condition “contact visited URL”, then if you check the “NOT” option, the condition will be fulfilled if the contact did NOT visit URL.
Find out more about conditions available in SALESmanago system here >>
Condition settings
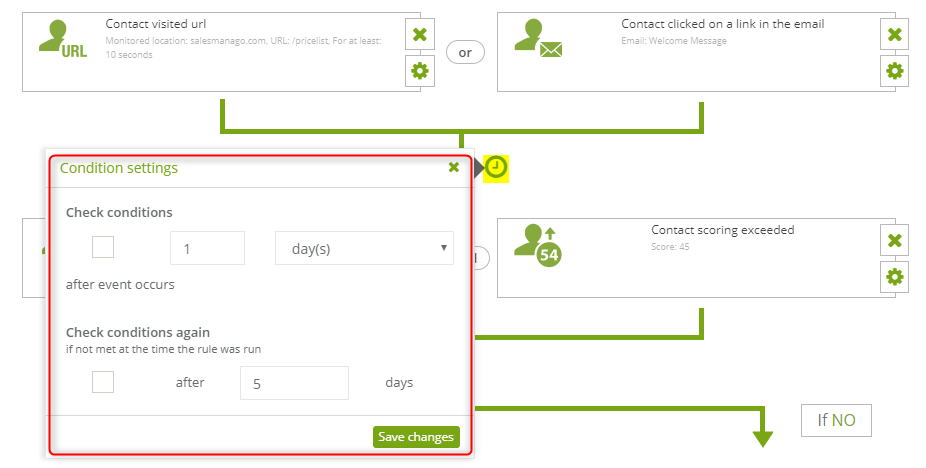
- Check conditions after event occurs – if you set both events and conditions in the rule when the event will be done the system will automatically check whether a contact fulfills elements of the tule. If you check this option you can set the time period, for example, 1 hour, then from the moment contact performs an event the system will check conditions after one hour.
- Check conditions again if not met at the time the rule was run (in days) – if you check this option, and a contact did not fulfill conditions, the system will keep checking it after the set period of time.
[C] Actions

Actions If YES
If YES actions will be triggered for a contact at the moment when all conditions and events will be fulfilled.
- a rule can consist of one or more If YES actions,
- choose an action from the list – the list will show up if you click “+”.
Actions If NOT
If NOT actions will be available when a rule conditions are set and “checking conditions again” option if not included. If any of those elements will not be fulfilled, you will see the following screen:

If NOT actions will be performed for a contact for who a rule has been triggered (events performed) but conditions were not fulfilled.
- a rule can consist of one or more If NO actions,
- choose an action from the list – the list will show up if you click “+”.
IMPORTANT: Set rules (Contact visited URL, Contact came from the phrase, Contact came from the source) are going to work just for monitored contacts.
Find out more about actions available in SALESmanago;