Useful links
Automation rules make creating automated marketing campaigns possible; moreover, it allows optimizing eCommerce sales and makes working with B2B easier. List of Automation Rules provides you with a preview of all rules, which have been created in the system. It is also a place from which you can quickly access the analytics of the rules, you can go to editing mode and activate rules.
To display the list of automation rules go to
AUTOMATION PROCESSES => AUTOMATION RULES
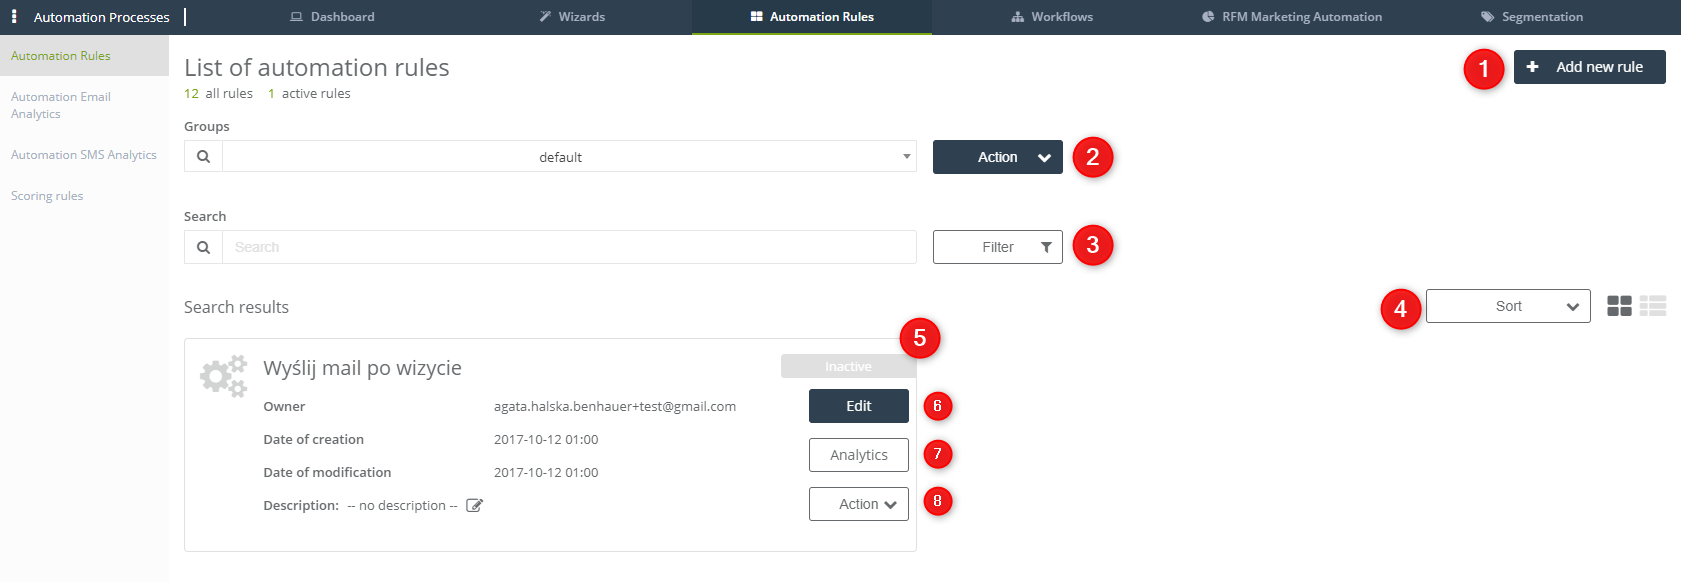
[1] + Add new rule – click the button if you want to create a new automation rule.
[2] Action – choose a group of automation rules and choose an action that will be directed towards the group. You can choose from:
-
Activate – switch on the group of rules.
-
Deactivate – switch off the group of rules.
-
Export – you can send the statistics about the group of rules to the Content Repository.
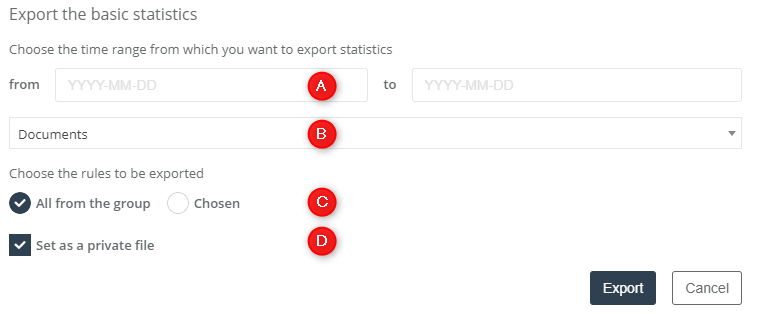
- [A] Choose the time range from which you want to export statistics – specify the time.
- [B] Choose the file from the Content Repository to which the file with statistics will be sent.
- [C] Choose the rules to be exported – you can choose either all rules from the group or select particular rules from the group.
- [D] Set as a private file – once you mark this option, only the user who exports the file will have access to it.
[3] Searching
- Search – you can search rules that you have already saved in the system. Just type in the name of the rule or a phrase it contains.
- Filter – advanced searching on the list. You can search through the whole number of groups of rules or you can search within one group.
[4] Sort – you can display the rules according to names, date of creation or date of modification. You can also choose how you want to display the rules – either in the form of list or icons.
[5] Automation rule – this is how looks like on the list displayed as an icon. In the right corner of the icon, there is a ribbon that indicates the status of the rule. It can be either active or inactive.
[6] Edit – click the button and you will be redirected to the view from which you can edit the automation rule.
[7] Analytics – the button redirects to the statistics about the chosen rule. The statistics include the number of activations and contacts for which the rule was activated.
[8] Action – from the dropdown list choose the action for the rule:
- Duplicate – copy the rule. Once you click the button, you will be redirected to the editing mode.
- Cancel planned emails – you can cancel the emails that are meant to be sent to the contacts which fulfilled the conditions specified in the rule.
- Activate – switch on the rule.
- Delete – delete the rule from the system.