Efficient Contact management is essential for maintaining database hygiene and optimizing your marketing strategies. Accurate and up-to-date data ensures that your marketing messages reach the right audience, reducing spend wasted on irrelevant or outdated Contacts.
SALESmanago’s Contact manager is a useful tool that enables you to perform specific actions on precisely defined groups of Contacts. This article outlines all actions available in the Contact manager and explains how to use it.
To access the Contact manager, go to
Audiences → Contacts → Contact management → Contact manager
Contents
- Getting started
- Selecting Contacts
- Specifying the execution time
-
Selecting actions
- Change Email Marketing status
- Mark/Unmark as invalid
- Change Mobile Marketing status
- Add/Delete Contact tag(s)
- Add/Delete standard detail
- Set Contact scoring
- Add/Remove owner
- Change Contact state
- Add to/Remove from sales funnel stage
- Generate coupon
- Run Automation Rule
- Run Workflow
- Generate URLs with monitoring parameters
- Add note
- Identify gender
- Delete Contact
1. Getting started
Contact management is a crucial aspect of marketing. A well-structured database provides valuable insights into customer behaviors, preferences, and buying patterns. This, in turn, enables precise segmentation, allowing marketers to deliver highly relevant content while minimizing unnecessary spending.
The Contact manager is an intuitive tool that allows you to perform selected actions on a group of Contacts. The process consists of a few simple steps:
- Define a group of Contacts by selecting an existing Contact segment and/or specifying selection and exclusion criteria. You can also apply additional filters.
- Specify the execution time.
- Select the action(s) you want to execute for the selected Contacts. All available actions are explained in Section 3 below.
- Click Execute actions to implement the changes.
Read on for more detailed explanations.
IMPORTANT: Most Contact manager actions do not trigger Workflow processes. The only exceptions are:
- Change Mobile Marketing status to opt-out
- Assign owner
- Add to specific stage in selected sales funnel
2. Selecting Contacts
You can specify the group of Contacts for whom you want to execute specific actions using the same Contact selection criteria that are used throughout the SALESmanago platform (for example, when defining email recipients).
Read more about Contact segments and selectors >>
Read more about Contact filters >>
After specifying all the criteria, you can use the Count button to see how many Contacts will be affected by the selected actions.
3. Specifying the execution time

Choose whether you want to execute the specified actions immediately after clicking Execute actions or whether you want to schedule them for a later time.
4. Selecting actions
NOTE:
- By default, no action is selected.
- You can execute multiple actions at the same time.
You can perform different actions on a Contact group defined in the Contact selection section (Section 2). All available actions are described below.
A. Change Email Marketing status
The Email Marketing status (opt-in/opt-out) determines whether a Contact can receive your marketing emails. The opt-in status should only be assigned to Contacts who have explicitly consented to receive this type of communication.

By default, the option No changes is enabled. To change the Email Marketing status for the selected Contacts to opt-out, select Change to opt-out [1].
NOTE:
- There is no option to change the Email Marketing status to opt-in using the Contact manager. You can do this by editing the status on individual Contact Cards, setting up a Workflow process including the Action: Change Email Marketing consent status to opt-in, and via Contact import.
- This Contact manager action does not trigger Workflow processes.
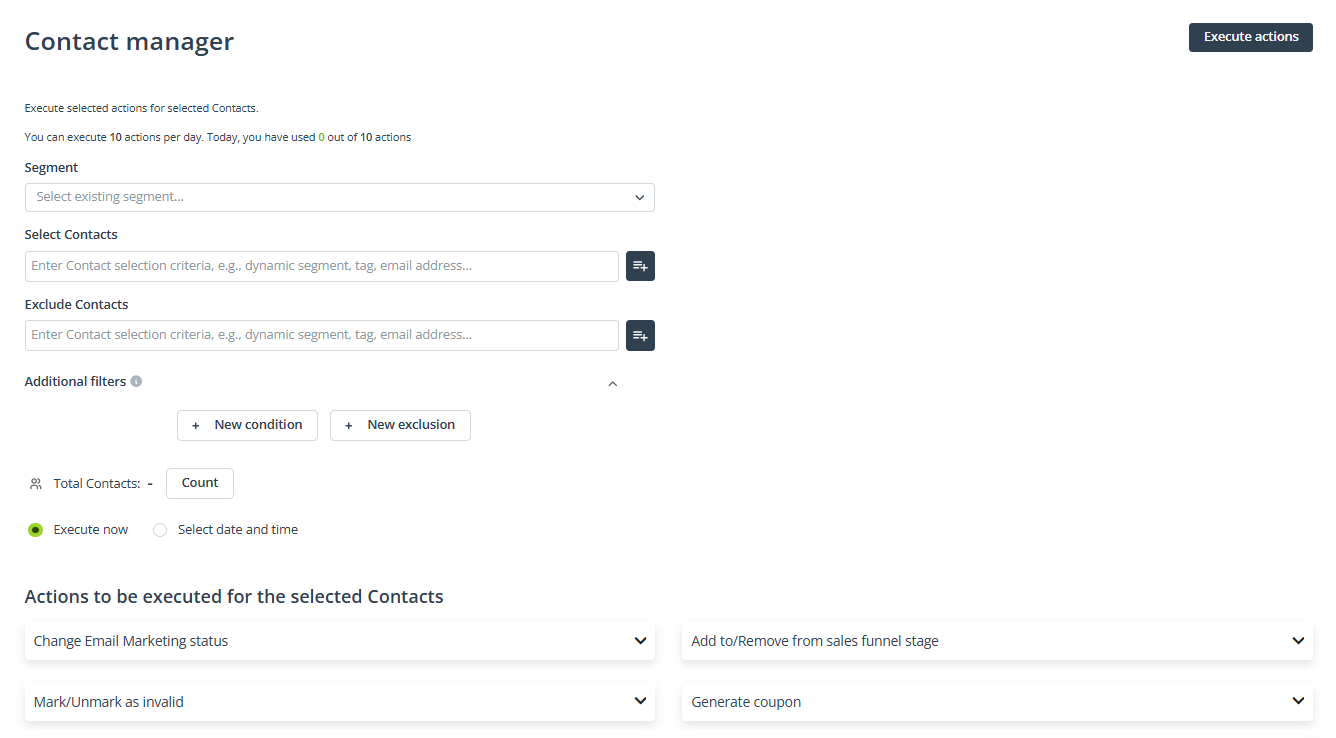
B. Mark/Unmark as invalid
“Invalid” is an Email Marketing status indicating that the Contact’s email address is non-existent or incorrect (hard bounce). Invalid Contacts cannot receive your email messages.
[1] Change Email Marketing status to invalid—Select this option to mark the selected Contacts as invalid.
[2] For Contacts marked as invalid, restore the previous status (opt-in/opt-out)—If you execute this action, the Email Marketing status of any selected invalid Contacts will change to either opt-in or opt-out, based on the status they had directly before being marked as invalid.
By default, the option No changes is enabled.
NOTE: The restoration of the previous status does not trigger Workflow processes.
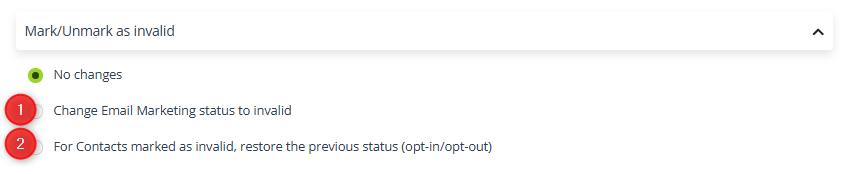
C. Change Mobile Marketing status
The Mobile Marketing status (opt-in/opt-out) determines whether a Contact can receive your text messages, including SMS messages. The opt-in status should only be assigned to Contacts who have explicitly consented to receive this type of communication.
[1] Change to opt-in—Select this option to change the Mobile Marketing status for the selected Contacts to opt-in.
[2] Change to opt-out—Select this option to change the Mobile Marketing status for the selected Contacts to opt-out.
By default, the option No changes is enabled.
NOTE:
- Changing the status to opt-out triggers Workflow processes based on the Event: Mobile Marketing consent status changed to opt-out.
- Changing the status to opt-in does not trigger Workflow processes.
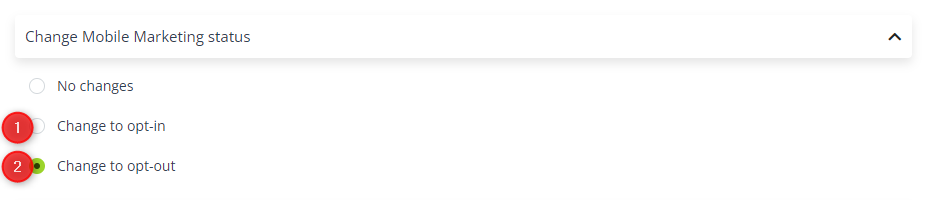
D. Add/Delete Contact tag(s)
Tags are labels assigned to Contacts to help categorize, segment, and manage them efficiently.
[1] Add tag(s)—Check this box if you want to add one or more tag(s) to the selected Contacts.
NOTE: Tags added using the Contact manager do not trigger Workflow processes.
First, decide whether you want to enter fixed tag names [A] or create tag names based on the individual values of a selected standard detail [B].
If you choose option [A], specify the tag(s) to be added and define their initial scoring.
If you choose option [B], the name of the added tag will consist of two parts: a prefix, which can be defined in field [ii] below, and the value of the standard detail specified in field [i].
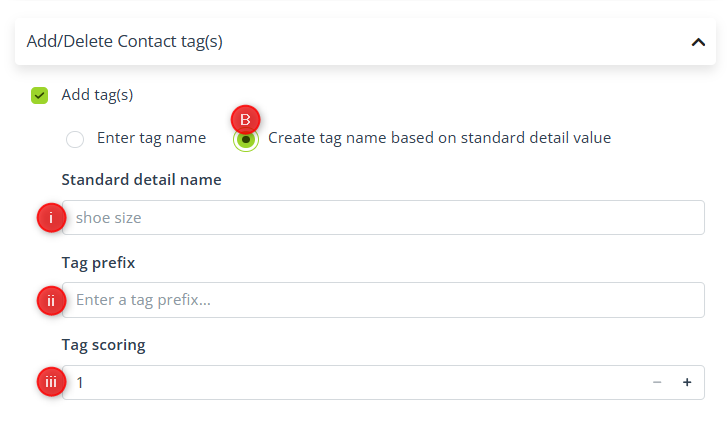
You can also specify the tag scoring [iii].
EXAMPLE: You store your Contacts’ shoe sizes in a standard detail called “shoe_size”. You want to create a tag based on the value of this detail, preceded by the prefix “SHOESIZE_”. Complete fields [i] and [ii] as follows:
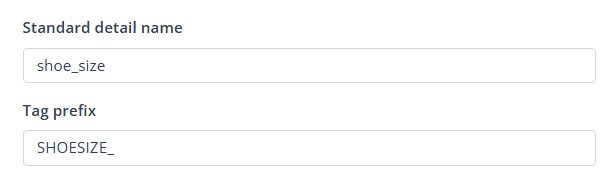
The value of the standard detail “shoe_size” for the Contact John Doe is “43”. Therefore, the following tag will be assigned to John Doe: SHOESIZE_43.
You can also enter more than one standard detail in field [i], separating them with commas, for example:
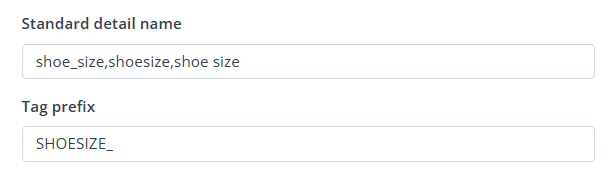
However, you can enter only one prefix in field [ii]. This means that the same prefix will be added to the values of all standard details listed in field [i].
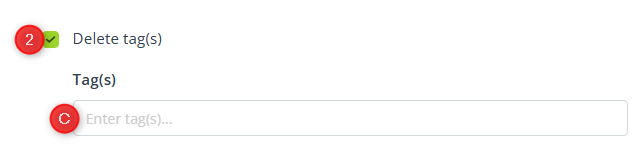
[2] Delete tag(s)—Check this box if you want to remove one or more tag(s) from the selected Contacts. Specify the tag(s) to be deleted in field [C].
NOTE: Before entering another tag, press Enter or the comma key to confirm and select the previous one.
Read more about assigning and using tags in SALESmanago >>
E. Add/Delete standard detail
Standard details allow you to store specific information (of any type) about your Contacts. A standard detail has a name (which can be common to many Contacts) and a value (which can be different for each Contact).
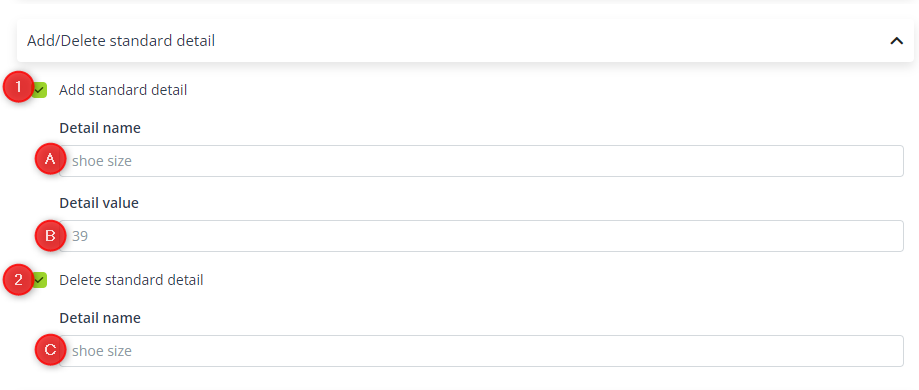
[1] Add standard detail—Check this box if you want to add a standard detail with a specific value to the selected Contacts. Provide the detail’s name [A] and value [B].
IMPORTANT: You can add only one standard detail at a time. To add more standard details, repeat the whole process as many times as you need.
[2] Delete standard detail—Check this box if you want to remove a standard detail from the selected Contacts. Provide the name [C] of the detail you want to remove.
IMPORTANT:
- You can delete only one standard detail at a time. To delete more details, repeat the whole process as many times as you need.
- This Contact manager action does not trigger Workflow processes.
F. Set Contact scoring
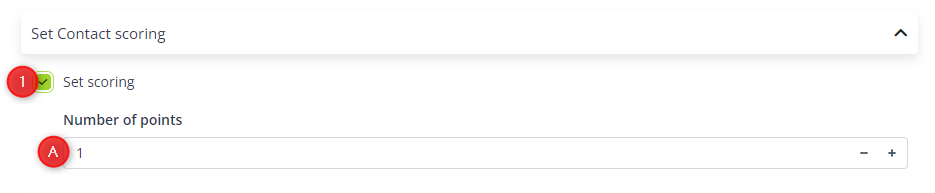
[1] Set scoring—Check this box if you want to assign a specific score to the selected Contacts. Enter the number of points [A] that will be set as the new scoring value.
Read more about Contact scoring >>
NOTE: Setting the Contact scoring via the Contact manager does not trigger Workflow Processes.
G. Add/Remove owner
In SALESmanago, users can be “owners” of specific Contact groups. There are three ownership levels:
- Main owner (has full rights and permissions)
- Owner (has limited rights and permissions)
- Read-only owner (can access the Contacts’ data but cannot perform any actions in relation to them)
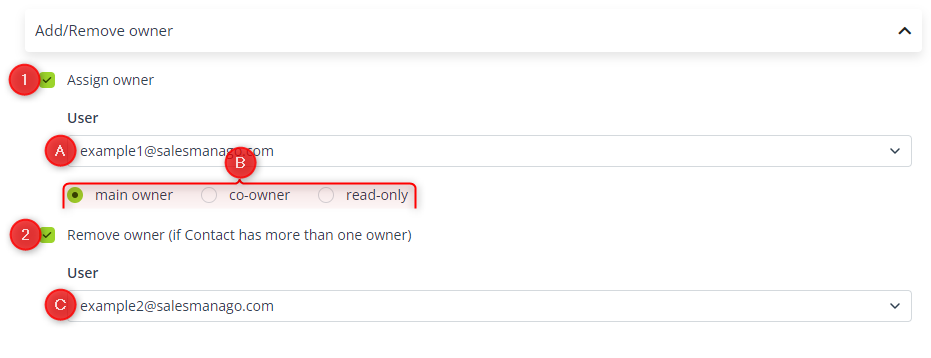
[1] Assign owner—Check this option if you want to assign a new owner to the selected Contacts. First, select the owner from the list [A]. Next, define the ownership level [B].
[2] Remove owner—Check this option if you want to remove an owner from a selected Contact group. Provide their email address [C].
IMPORTANT:
- You can remove a Contact’s owner only if they have more than one owner.
- Adding a Contact owner via the Contact manager does not trigger Workflow processes.
H. Change Contact state
The Contact state is a data field on the Contact Card that indicates the business relationship status. It can be defined during Contact import or via the API (e.g., when a Contact subscribes to your newsletter through a form). By default, newly imported Contacts are marked as prospects, unless stated otherwise in the import file.
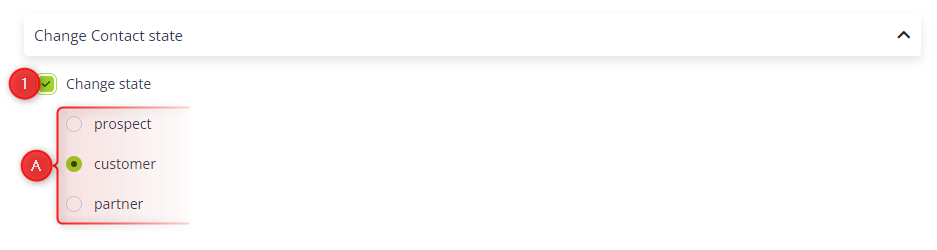
[1] Change state—Check this box if you want to change the business relationship status for the selected Contacts. You can select only one state—prospect, customer, or partner [A]—for all the selected Contacts.
I. Add to/Remove from sales funnel stage
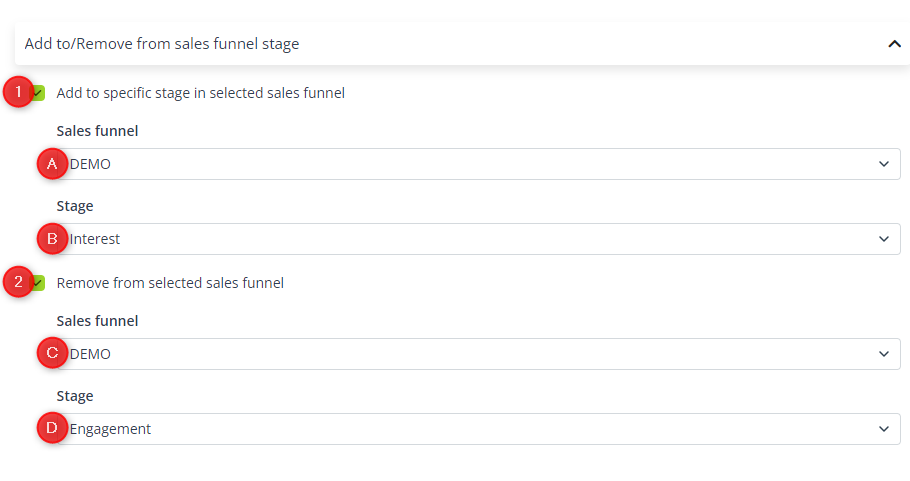
[1] Add to specific stage in selected sales funnel—Check this box if you want to add the selected Contacts to a specific stage in a sales funnel. Select the sales funnel [A] and the stage [B].
[2] Remove from selected sales funnel—Check this box to remove the selected Contacts from a specific stage or from all stages of a sales funnel. First, select the sales funnel [C]. Then, select a specific stage or “all” stages [D].
Read more about sales funnels >>
NOTE: Adding a Contact to a stage in a sales funnel triggers Workflow processes based on the Event: Contact added to stage in funnel.
J. Generate coupon
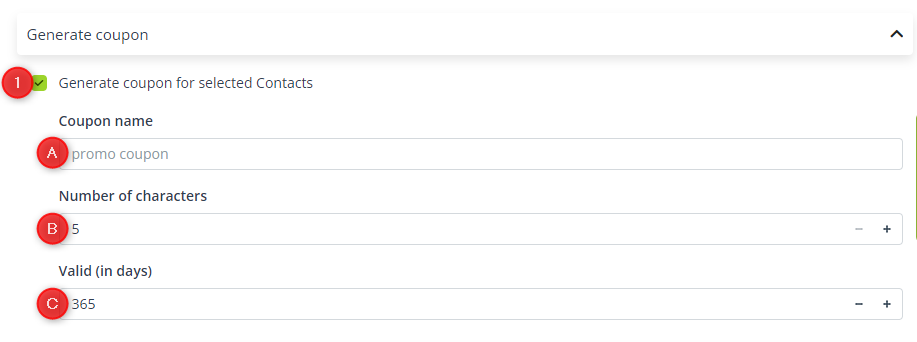
[1] Generate coupon for selected Contacts—Check this box to generate coupons for the selected Contacts. Define the coupon’s name [A], the number of characters in the coupon’s value [B], and the coupon’s validity period [C].
When this action is executed, the system will generate a unique coupon value for each Contact. The coupon will be immediately assigned to the Contacts and will be visible on the Contact Card.
K. Run Automation Rule
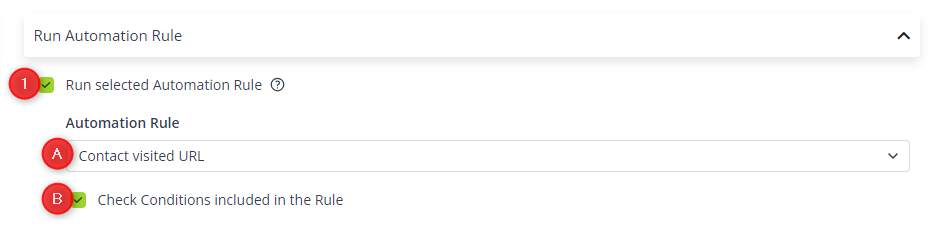
[1] Run selected Automation Rule—Check this box if you want to trigger an Automation Rule for the selected Contacts. Then, select the Rule you want to run [A].
When this Contact manager action is executed, the Event triggering the Automation Rule will be “skipped” for the selected Contacts and they will immediately proceed to the next stage of the Rule.
If you enable the option: Check Conditions included in the Rule [B], the system will verify whether the selected Contacts meet any Conditions being part of the selected Automation Rule. Otherwise, the system will execute the Rule while ignoring Conditions.
IMPORTANT:
- Any delays preceding the Condition or configured in the Action’s settings will be respected.
- The triggering of the selected Automation Rule for individual Contacts is subject to the limit on the number of Rule runs per Contact and the interval between Rule runs per Contact, as defined in the Rule’s settings.
L. Run Workflow
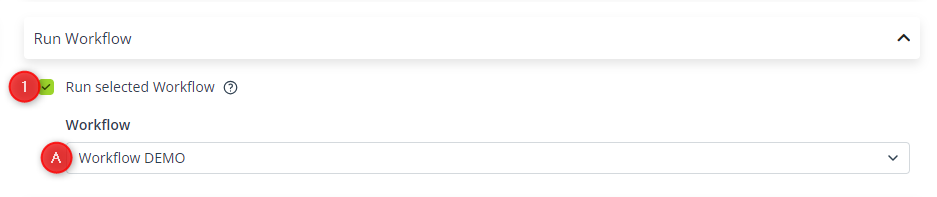
[1] Run selected Workflow—Check this box to trigger a selected Workflow process for the selected Contacts. Indicate the Workflow you want to run [A].
When this Contact manager action is executed, the triggering Event will be “skipped” for the selected Contacts and they will immediately proceed to the next stage of the Workflow.
IMPORTANT:
- When a Workflow is triggered via the Contact manager, the limits set in the Workflow’s settings—Maximum number of launches per Contact and Interval between launches for individual Contacts—are not respected.
- This action should only be used for Workflows that contain a single triggering Event.
- Any delays configured using the “Wait” element will be respected.
M. Generate URLs with monitoring parameters
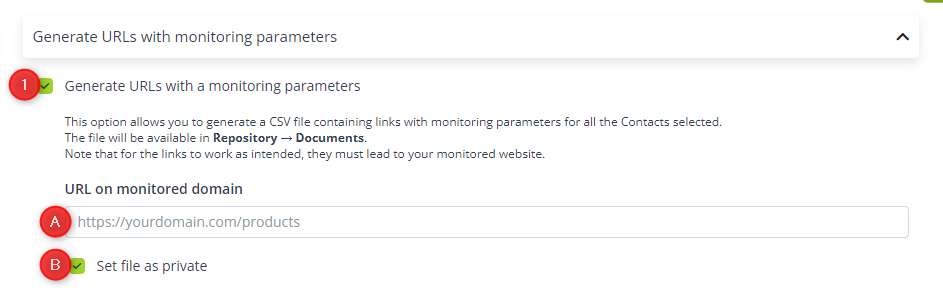
[1] Generate URLs with monitoring parameters—Check this box if you want to export a CSV file containing links with unique monitoring parameters for the selected Contacts.
The file will be available in Repository → Documents.
Provide the URL address of a page on a monitored website [A]. The system will add a monitoring parameter to this URL. The parameter includes the value of the SALESmanago monitoring cookie, which is unique for every Contact.
If you want the export file to be accessible only by the user who executed this action, check box [B].
TIP: You can export up to 10 000 personalized links. However, this action can be repeated every few hours to export any number of Contacts.
N. Add note
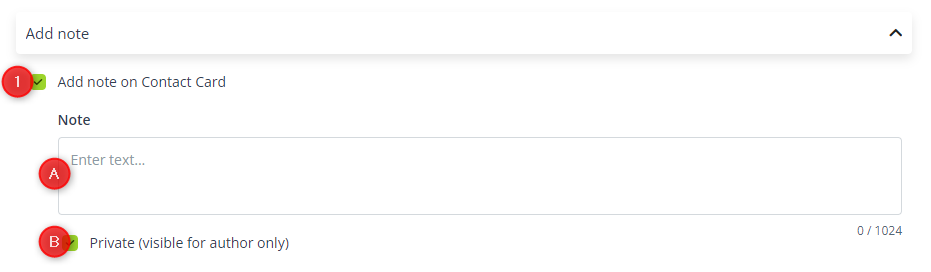
[1] Add note on Contact Card—Check this box if you want to add a note to the Contact Cards of the selected Contacts. Enter the note’s text content [A] (maximum 1024 characters).
If you want the note to be visible only to the user who adds it, use the option: Private (visible for author only) [B].
NOTE: Adding a note via the Contact manager triggers Workflow processes based on the Event: Note added to Contact.
O. Identify sex
This action allows you to identify the gender of the selected Contacts based on their names.
IMPORTANT: This action works only for Polish, Hungarian, and Czech names.
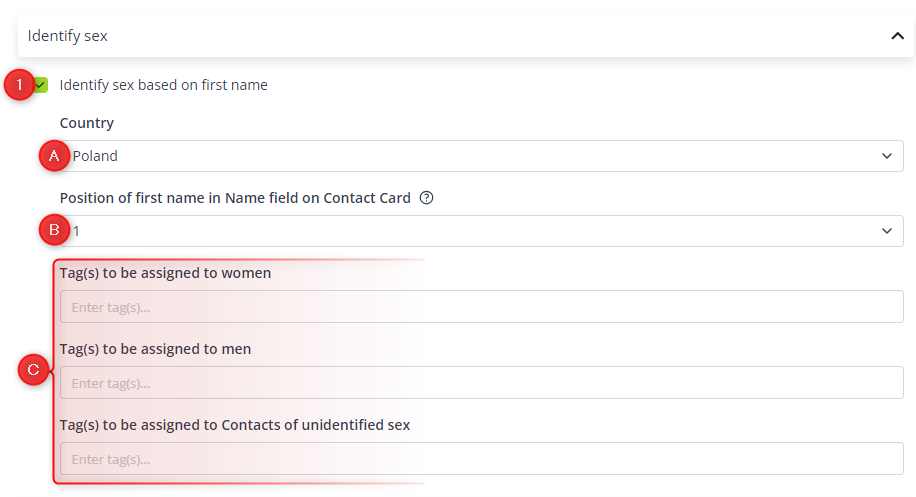
[1] Identify sex based on first name—Check this box if you want to identify the gender of the selected Contacts based on the Name field value on their Contact Cards. The system will recognize feminine and masculine names and tag the Contacts accordingly.
First, select the country from which the Contacts originate [A]. The available options are: Poland, Hungary, and the Czech Republic.
Next, specify whether, according to your company’s convention, the first name precedes (“1”) or follows (“2”) the last name in the Name field on the Contact Card [B].
Finally, define the tags that will be assigned to Contacts identified as women, men, as well as Contacts whose gender could not be identified [C].
P. Delete Contact

By default, the option No changes is enabled. To permanently delete the selected Contacts from your database, along with all their data, select Delete Contacts from database [1].
IMPORTANT: This action is irreversible, and the deleted data cannot be recovered unless you reimport it.