Useful links
This article describes the SALESmanago integration with Google Analytics 4.
Google Analytics is a powerful web analytics tool that provides website owners with valuable insights into their online performance. By tracking visitor behaviors and interactions, it offers a concrete understanding of user engagement, traffic sources, and conversion rates.
The platform’s benefits include real-time data updates, allowing users to monitor site traffic as it happens, and customizable dashboards that visualize key metrics. With features such as goal tracking, it enables businesses to measure specific actions, like completed purchases or form submissions. Additionally, Google Analytics provides detailed reports on users’ demographics and behaviors and aids in pinpointing the geographical locations of visitors, uncovering the devices they use, and in identifying the most popular pages on a website.
You can integrate your SALESmanago and Google Analytics 4 accounts to combine the power of customer data with web analytics. This provides a concrete understanding of customer interactions across your website and marketing campaigns, enhancing decision-making through comprehensive insights into the customer journey.
Contents:
1. Getting started
Google Analytics can provide your company with concrete data that can help you optimize your online strategies and enhance user experience on your website, resulting in improved engagement and increased conversions. This data-driven approach ensures informed decisions that align with user preferences, enhancing overall online strategies.
By integrating SALESmanago with Google Analytics 4, you can gain access to your Google Analytics data concerning sessions, transaction revenue, Average Order Value, Ecommerce conversion rates, and per session value on the SALESmanago platform.
Following the integration, data transferred from Google Analytics will be displayed on the Google Analytics Dashboard in SALESmanago.
NOTE: To perform the integration, use a Google account for which Google Analytics has been configured.
2. Integration process
The integration process consists of several stages and includes steps performed in Google Cloud, Google Analytics, and SALESmanago.
Carefully follow the instructions below to ensure that the integration is successful.
A. Google Cloud configuration
1. Open Google Cloud >> and log into your Google account connected to your Google Analytics account.
TIP: If at any stage you are informed that you are not authorized to perform the necessary configuration in Google Cloud, contact your company’s internal Google Cloud administrator.
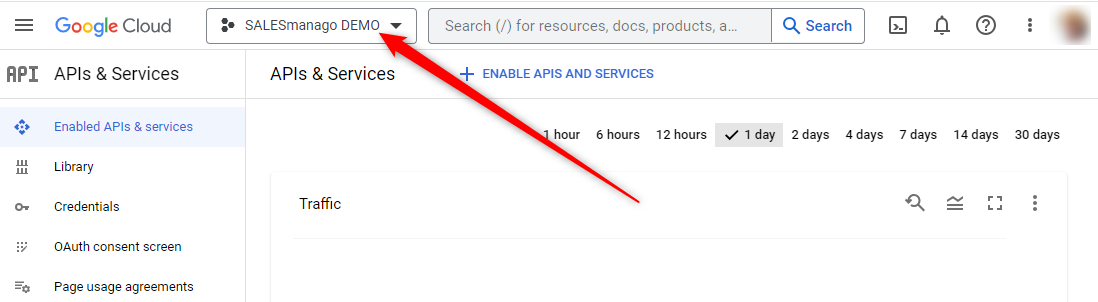
2. If you already have an existing project connected to Google Analytics, select it by clicking Select a project on the top bar.
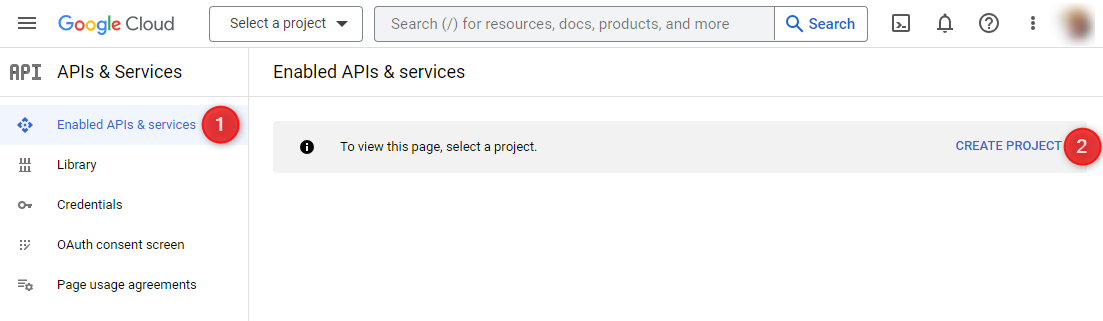
If you do not have any existing projects, go to Enabled APIs & services [1] and click on Create Project [2].
You will see the following screen:
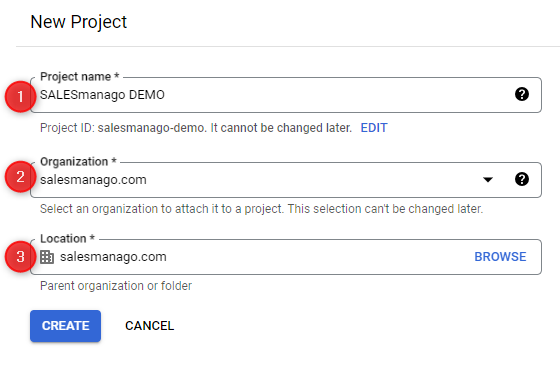
[1] Project name—Enter a project name. This can be any combination of characters, preferably consistent with your naming convention.
[2] Organization—Select the organization to which you want to attach your project.
[3] Location—This field will be completed automatically based on your selection in point [2]. You can change it by clicking on BROWSE.
3. When you have selected or created a project, enable Google Analytics API and Google Analytics Data API for your project, to be able to transfer data from Google Analytics to SALESmanago.
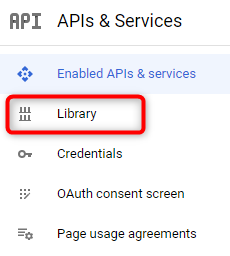
Go to the left-side menu and open the Library tab.
In the Library, search for Google Analytics API, and open it.
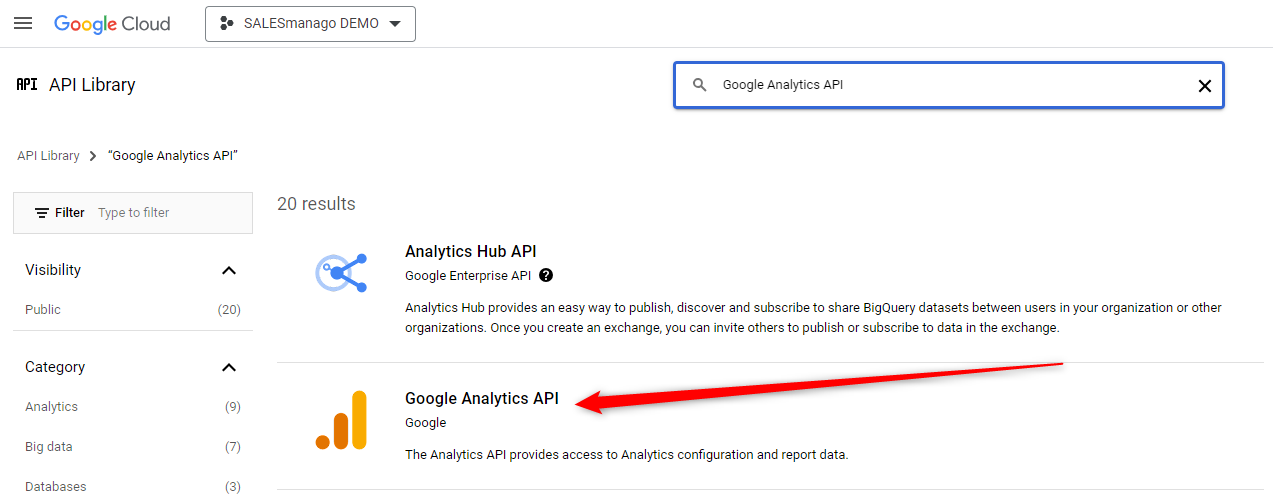
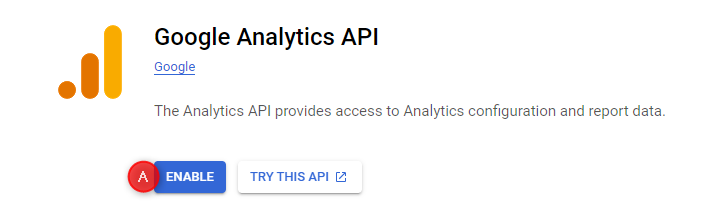
On the new screen, enable the Google Analytics API by clicking on Enable [A].
Go back to the Library, search for Google Analytics Data API, and open it.
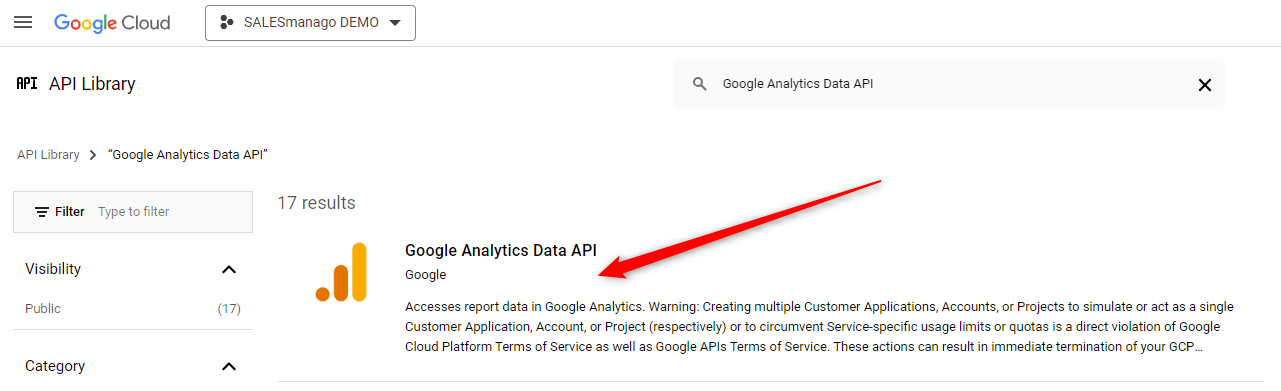
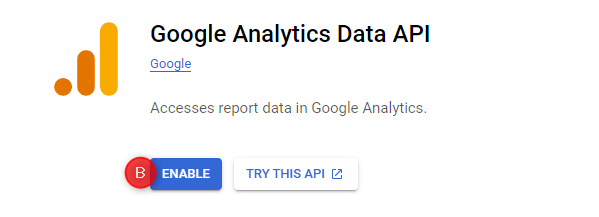
On the new screen, enable the Google Analytics Data API by clicking on Enable [B].
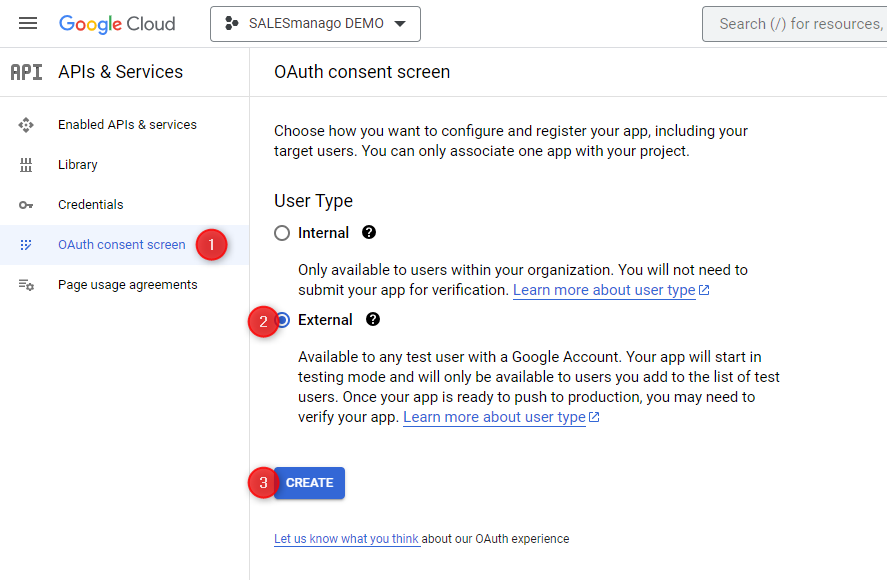
4. At this stage, configure your OAuth consent screen.
The OAuth protocol is responsible for data authorization and needs to be configured due to the fact that the integration involves the transfer of data from Google Analytics to SALESmanago.
On the left-side menu, go to OAuth consent screen [1]. Select the User type: External [2] and click Create [3].
5. On the new screen, provide the essential details.

[1] App name—Enter an application name that will make it easy to identify it on the list of your applications. This can be any name, preferably consistent with your naming convention.
[2] User support email—Provide an email address to which questions or support requests can be sent.
[3] App logo (optional)—If you want, you can upload your app logo. Click Browse to select an image.
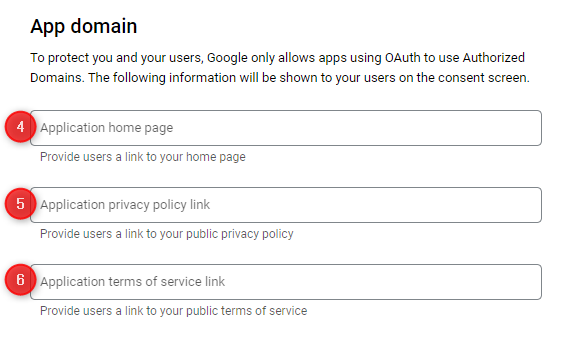
[4] Application home page—Enter the address of your website’s home page, including the protocol (http:// or https://).
EXAMPLE: https://www.salesmanago.com
[5] Application privacy policy link (optional)—Here, you can provide a link to your privacy policy that will be included on the consent screen.
[6] Application terms of service link (optional)—Here, you can provide a link to your terms of service that will be included on the consent screen.
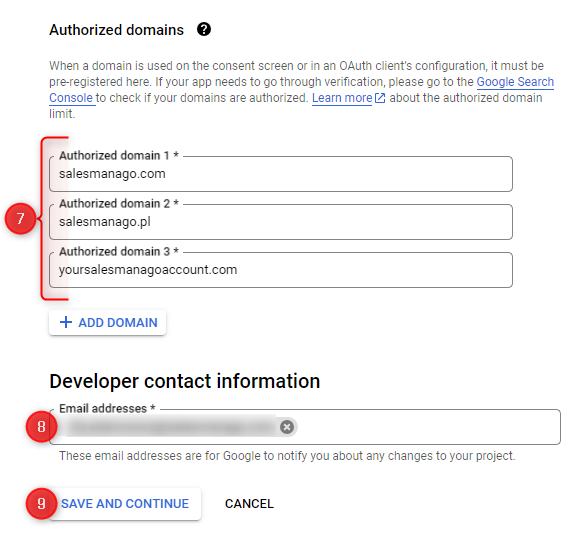
[7] Authorized domains—Here, add the following authorized domains: salesmanago.com and salesmanago.pl. Additionally, list any other SALESmanago domains you may use, e.g., salesmanago.de, salesmanago.es, etc.
[8] Developer contact information—Provide an email address of your developer.
Click Save and Continue [9].
The two next steps: Scopes and Test users [A] are optional.

You can skip them by immediately clicking Save and Continue.
In the last step—Summary [B]—click on Back to Dashboard to finish registering your app.
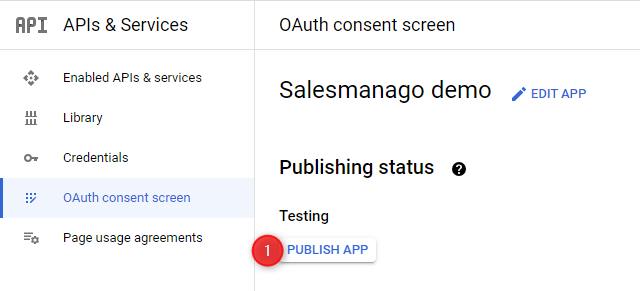
6. On the OAuth Dashboard, click on Publish app [1] and confirm.
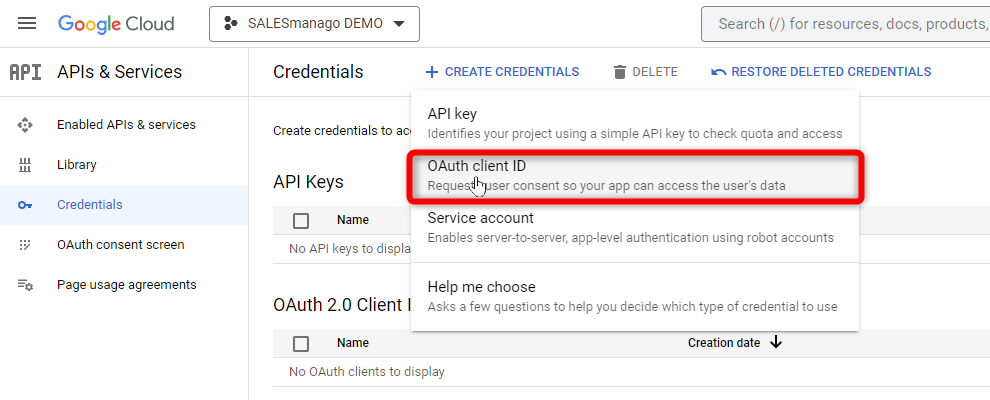
7. On the left-side menu, go to Credentials [1] and click on Create credentials [2].
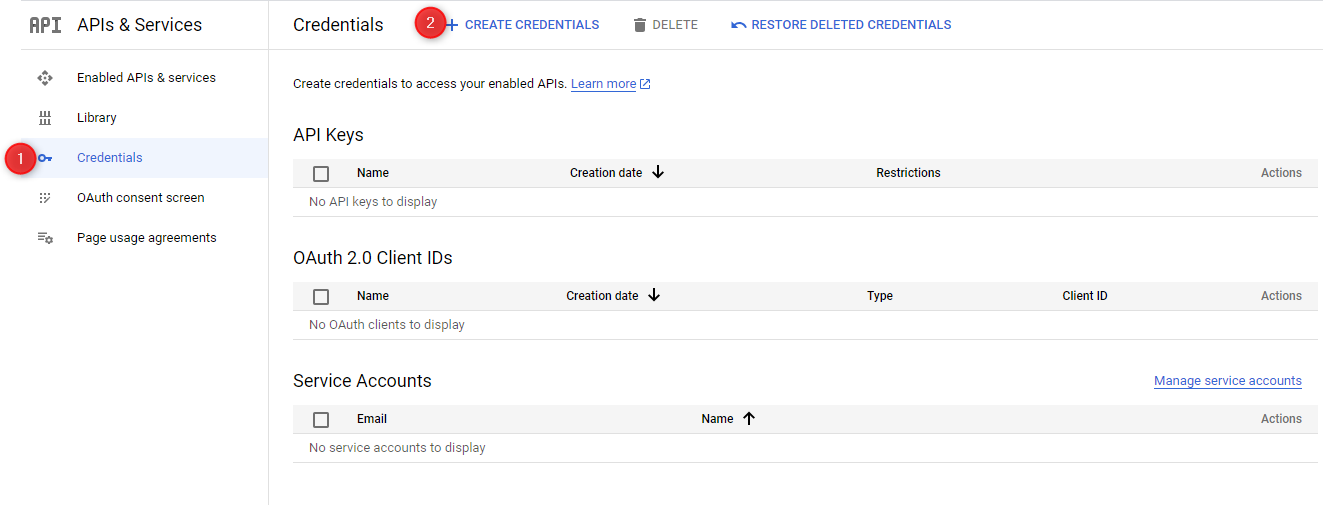
From the drop-down list, select OAuth client ID.
8. At this stage, you will be asked to create an OAuth client ID. Start by selecting the application type: Web application.
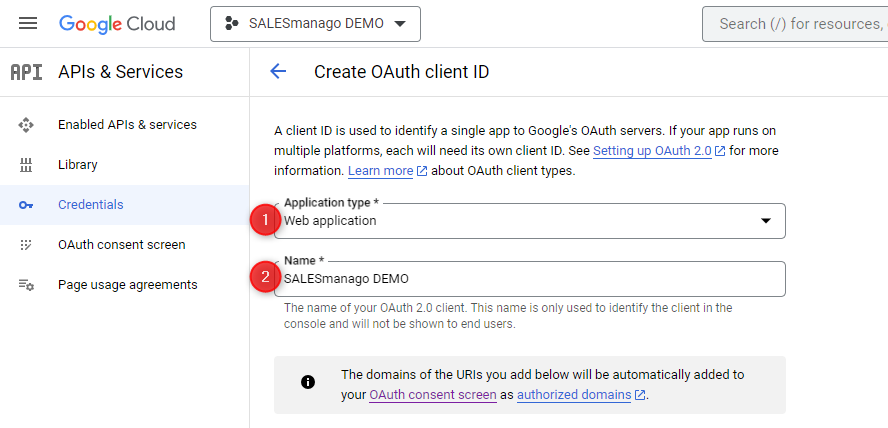
[1] Application type—Select Web application.
[2] Name—Provide a name for your application. This can be any combination of characters, preferably consistent with your naming convention. This name will not be visible to end users.
[3] Authorized JavaScript origins—Enter the location of your SALESmanago account.
To check what you should enter in this field, log in to your SALESmanago account and click on the address bar. Delete the path and copy the remaining part of the address (including the protocol), for example:

EXAMPLES: https://app2.salesmanago.com, https://app3.salesmanago.de, https://yourcompany.salesmanago.com
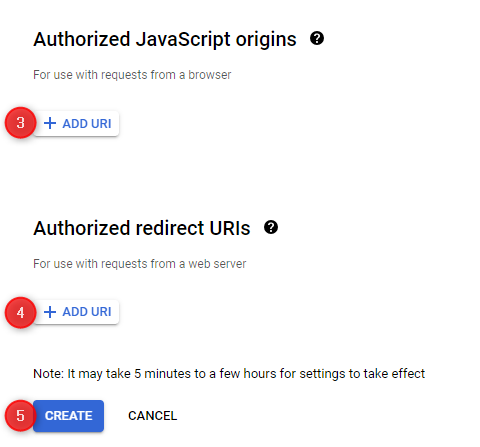
[4] Authorized redirect URIs—For the purposes of this integration, this field must be left empty.
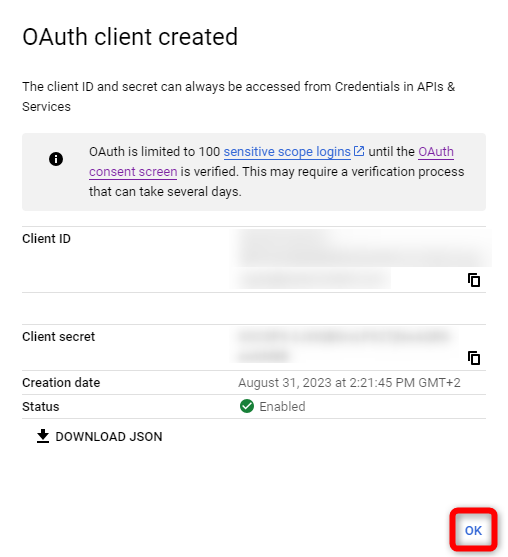
Click Create [5] to save your settings.
You will be informed that your OAuth client has been created. Click OK to close the pop-up window.
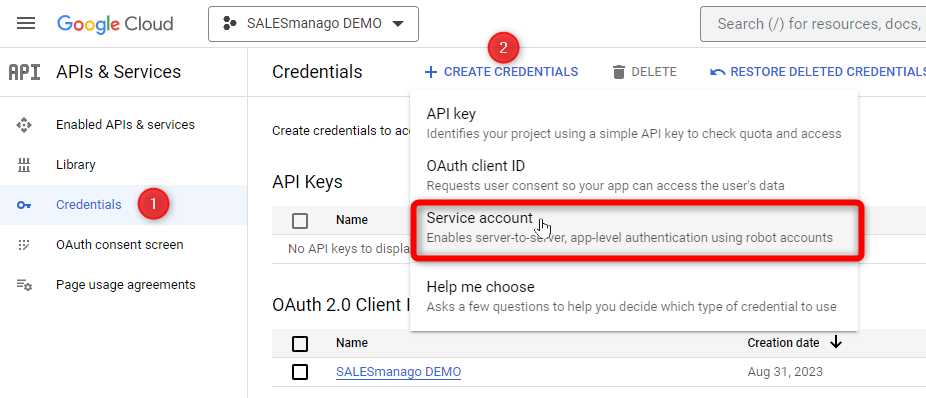
9. On the left-side menu, go to Credentials [1]. Click on Create credentials [2] and select Service Account.
10. Fill in the service account details.
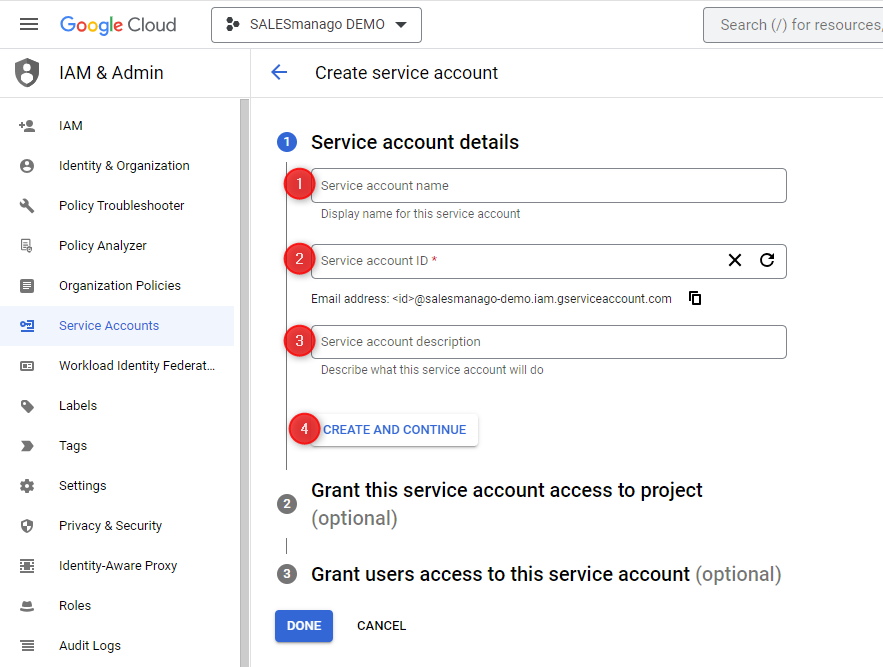
[1] Service account name—Provide a name for your service account. This can be any combination of characters, preferably consistent with your naming convention. This name will not be visible to end users.
The service account ID and email address will be generated automatically based on the name entered.
[2] Service account ID—This field will be completed automatically based on the name entered in point [1].
[3] Service account description—This field is optional.
Click Create and continue [4] to enable the next step: Grant this service account access to project.
In this step, select the Owner role [5].
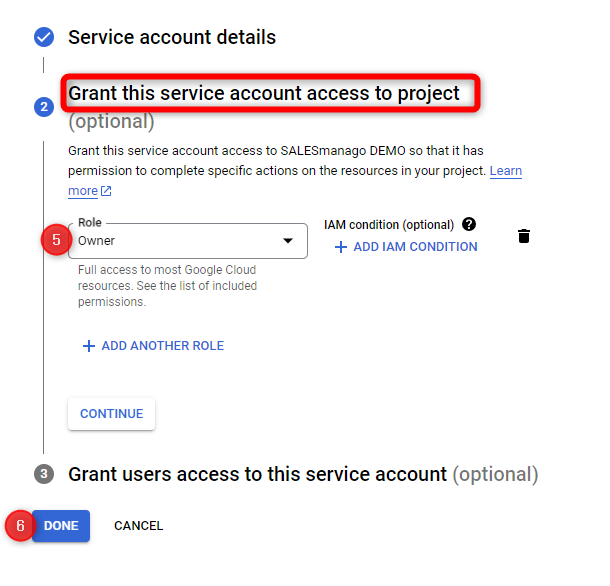
Click Done [6] to finish creating the service account.
11. You will be redirected to the Credentials screen, where you will see both the OAuth Client ID and the Service Account you have just created.
Copy the Service Account email [1].

To continue the integration process, go to Google Analytics.
B. Google Analytics configuration
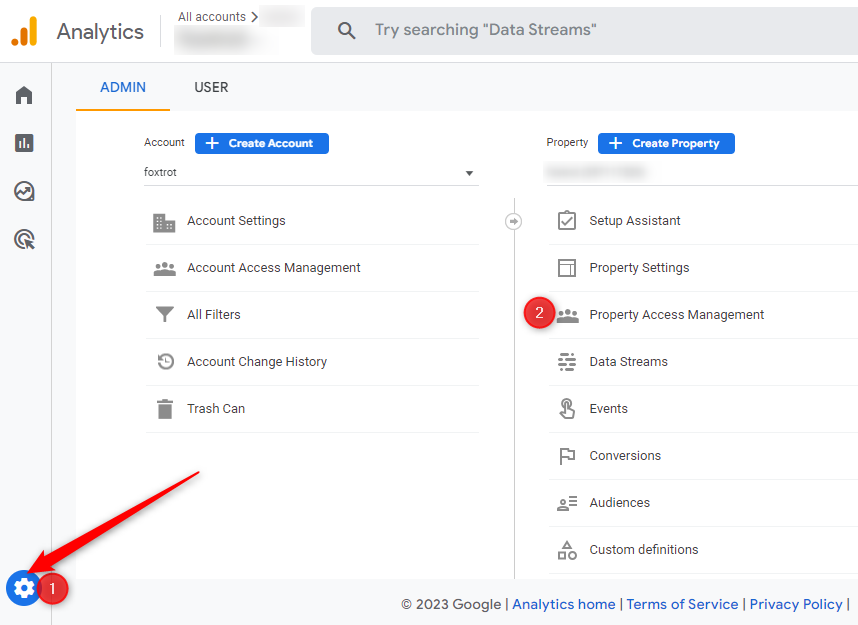
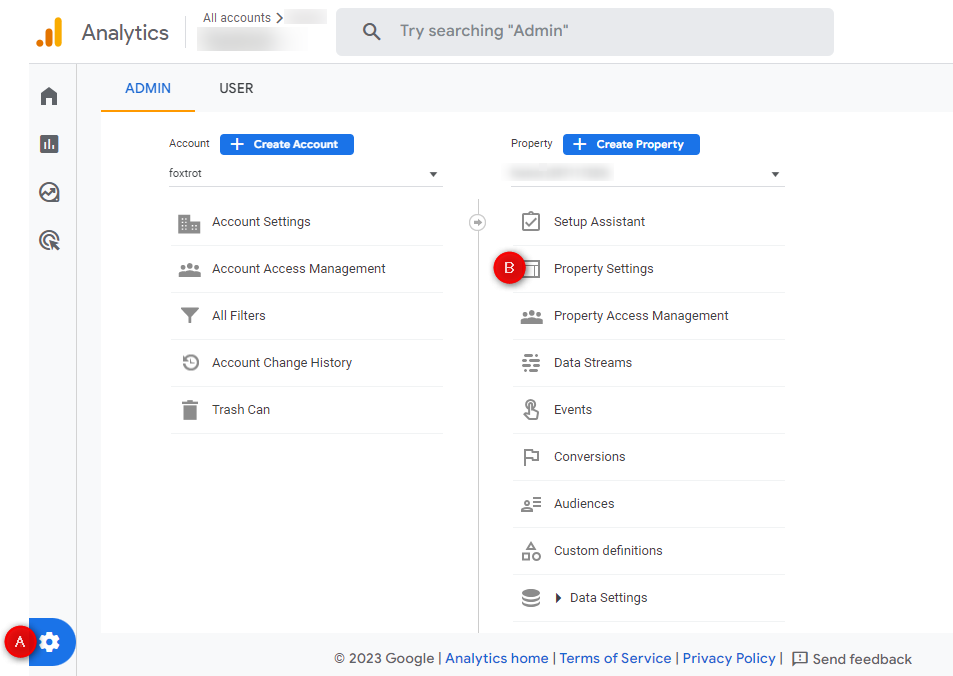
1. In Google Analytics, click on the Admin icon [1] and select Property Access Management [2].
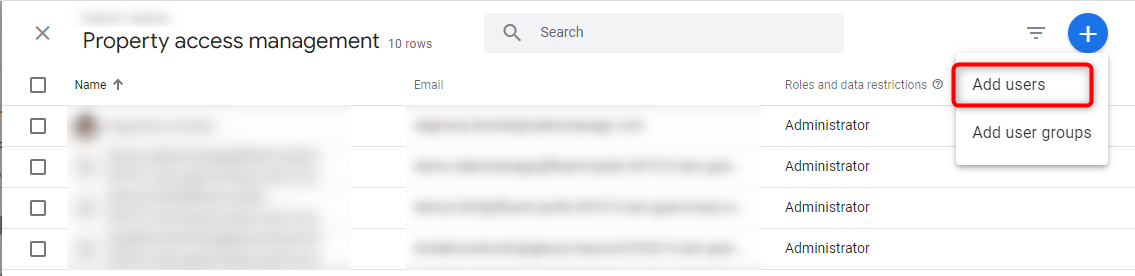
2. You will see a user list. Click on the plus icon and select Add users.
3. You will see the following screen:
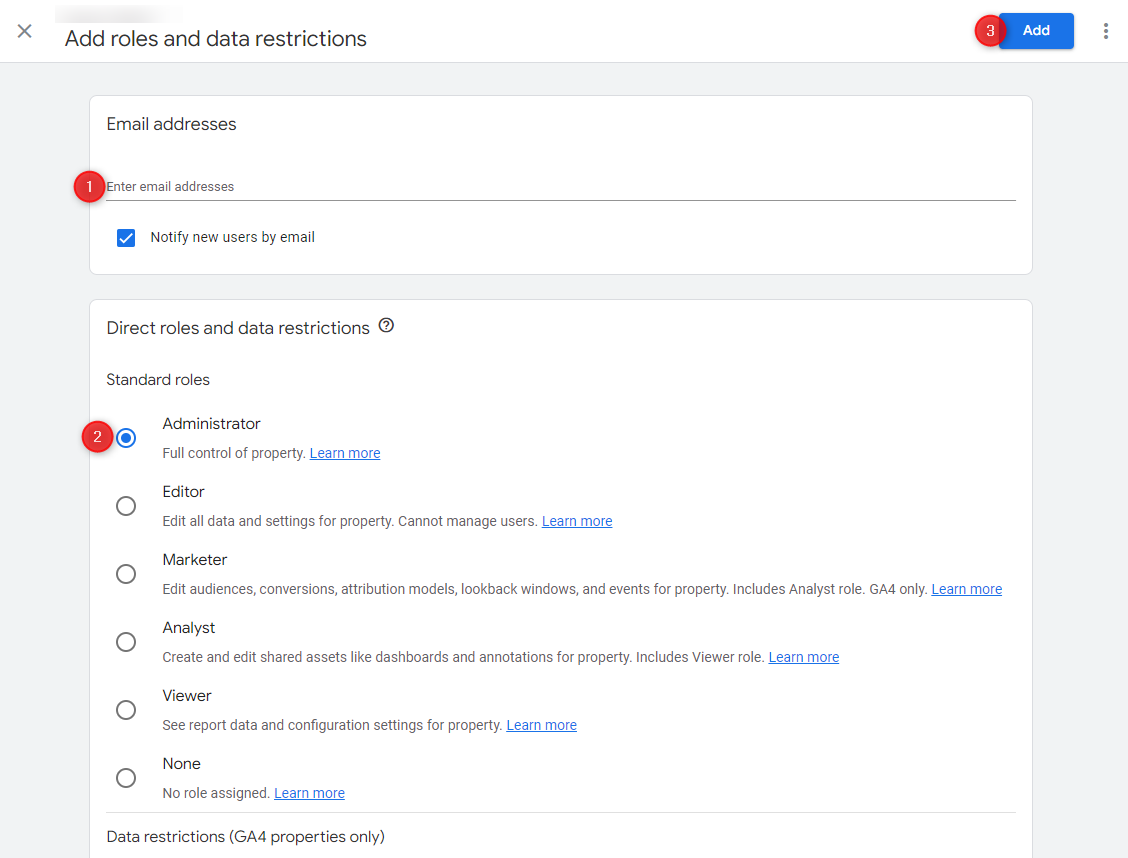
In field [1], paste the Google Cloud Service account email you copied in the last step of the previous section.
Assign the Administrator role to this email address [2].
Click Add [3] to add the email address to the user list.
4. Find the user you have just added on the list, click on the three dots icon on the right hand of the screen, and select View user’s account details.

5. Make sure that the user has the Administrator role assigned to them. If you see None, click on the pencil icon and grant the Administrator role again.

At this stage, the integration process moves back to Google Cloud.
C. Creating the Service Account key
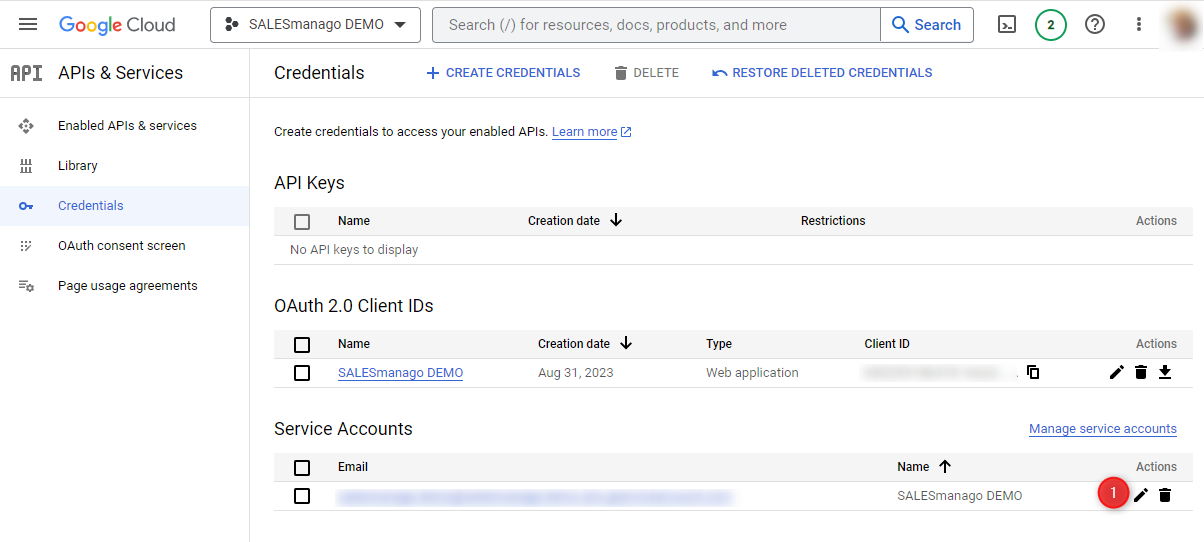
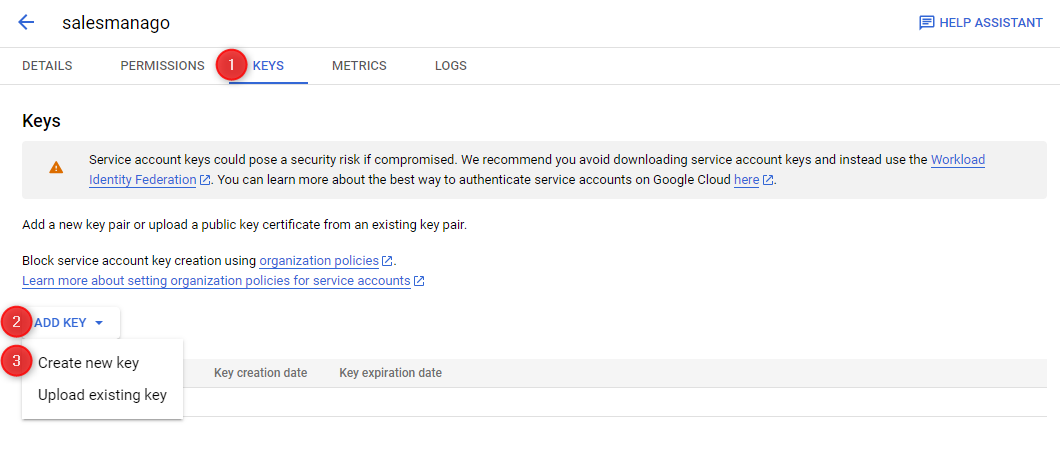
1. In Google Cloud, open the Credentials tab. Find the service account you want to use for the purposes of the integration and click on the pencil icon [1].
2. You will see the details of the selected service account. Go to Keys [1], click on Add key [2] and select Create new key [3] from the drop-down list.
3. The following pop-up window will appear:
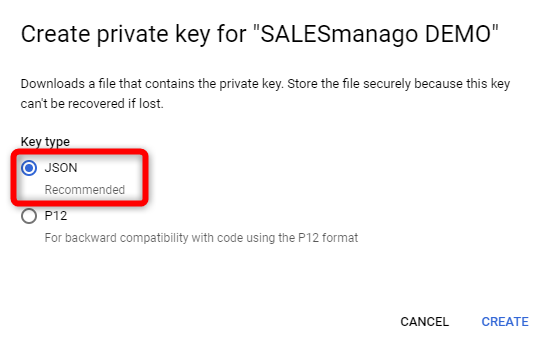
Select the JSON key type and click Create.
The newly created key will automatically be downloaded onto your computer. You can open the file using Notepad or drag and drop it into your browser (as a new tab).
The downloaded JSON file will have the following structure:
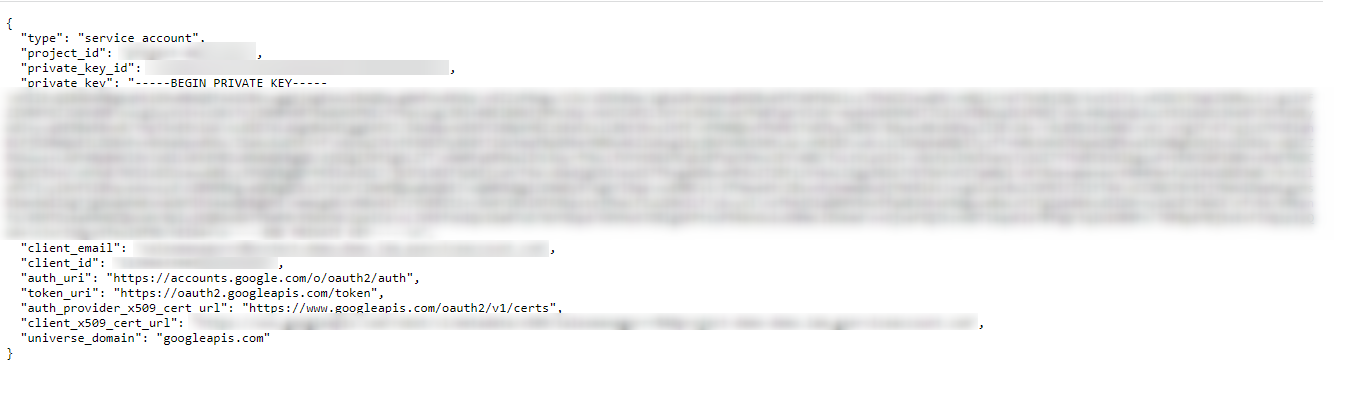
Later on, you will need to copy the contents of this file and paste them in the SALESmanago system (see Section D below).
To complete the integration process, go to the SALESmanago account you want to integrate with Google Analytics.
D. Steps inside SALESmanago
In SALESmanago, go to Menu → Integrations → Integration Center → Integrations and find Google Analytics on the list.
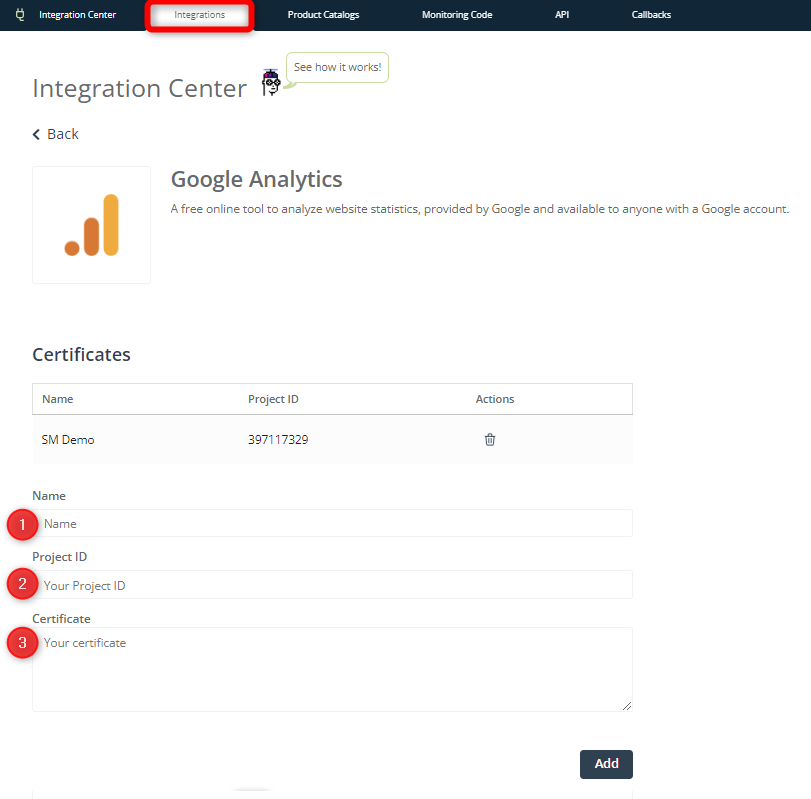
[1] Name—Provide a name for the new integration certificate. This can be any name that will allow you to easily identify the certificate on the list.
[2] Project ID—Enter the Google Analytics Project ID. You can find it in Google Analytics.
Click on the Admin icon [A] and select Property Settings [B].
You will find the Project ID on the right side of the screen.
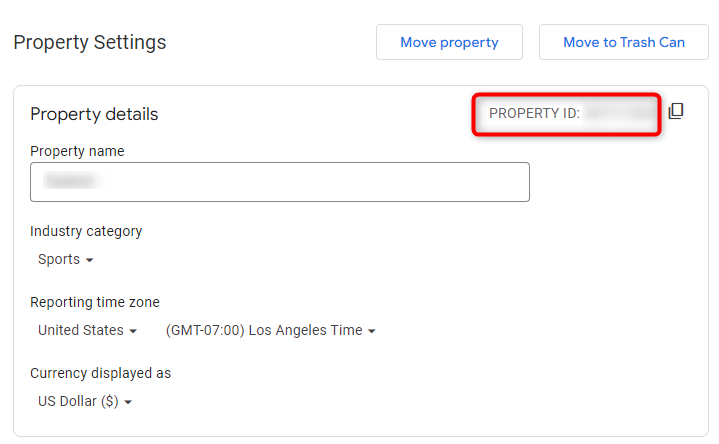
Copy it and paste it into the Project ID field in SALESmanago.
[3] Certificate—Here, paste the contents of the downloaded JSON file. Make sure to copy all the contents (Ctrl + A followed by Ctrl + C).
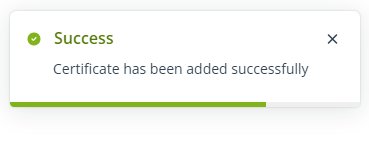
That’s it! If your certificate has been added successfully, you will see the following notification:
Note that in this way, you have added a single certificate related to one of your Google Analytics services (e.g., one of your many websites). If you want, you can add further certificates for your other services (e.g., if you have a number of online stores). On the Google Analytics Dashboard in SALESmanago, you will be able to select the service (certificate) for which you want to display data.
3. Google Analytics Dashboard
To access the Google Analytics Dashboard in SALESmanago, go to Menu → Insights → Analytics Panels → Google Analytics.
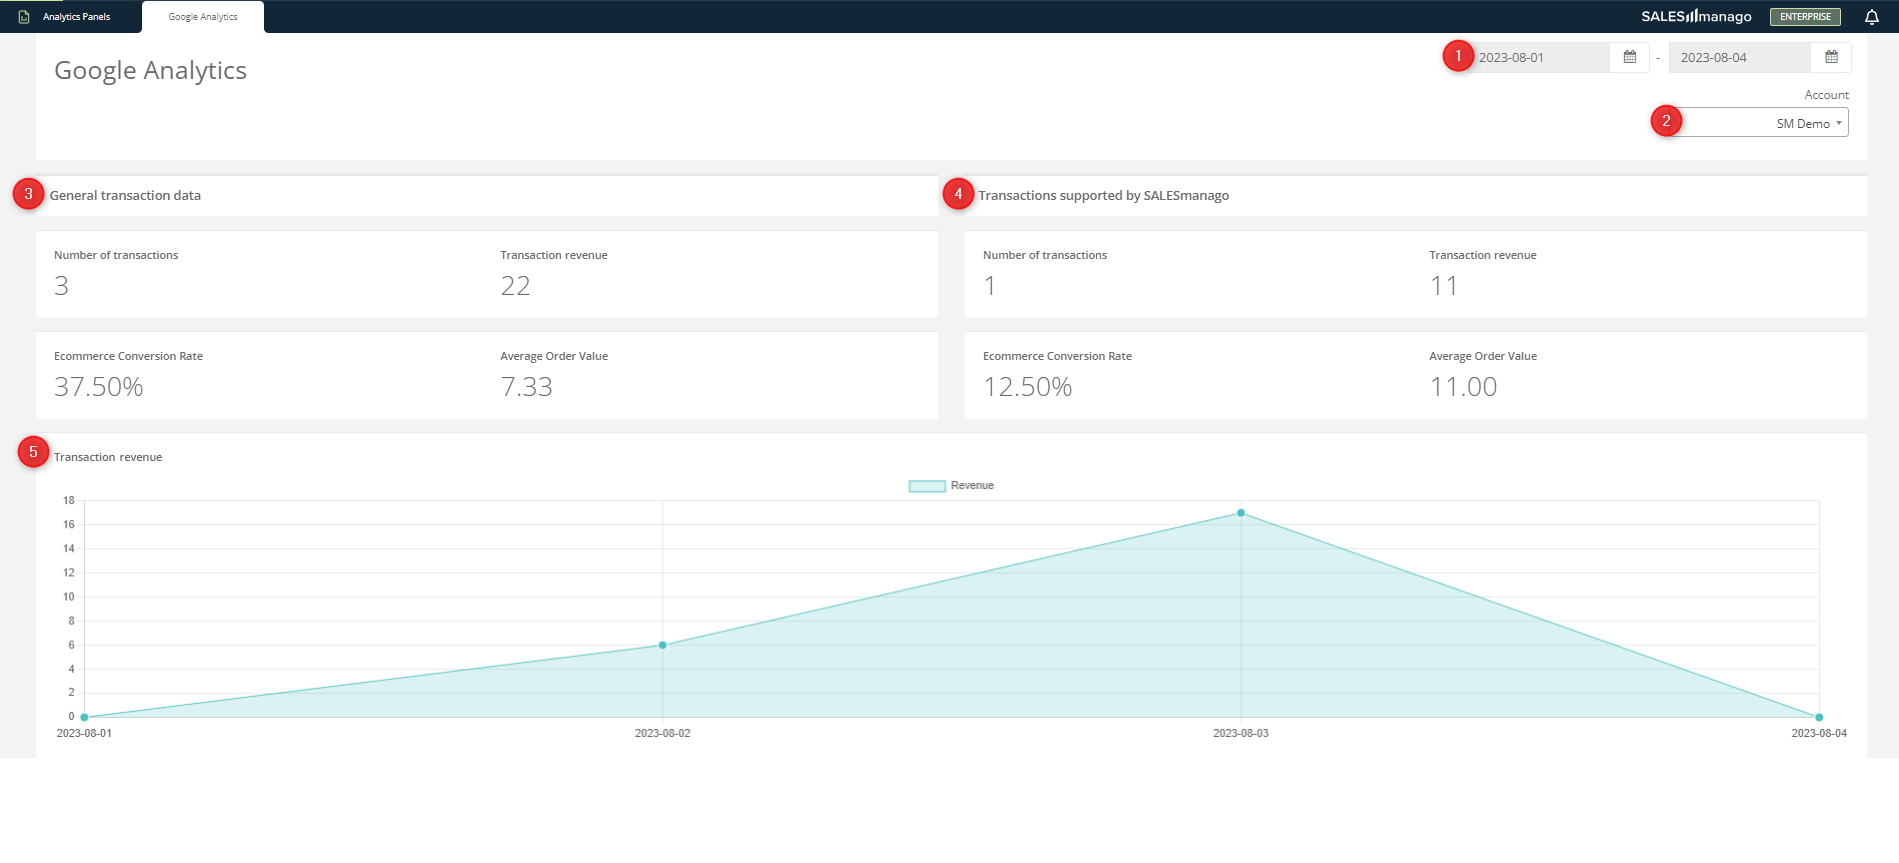
[1] Time range—Select the period for which you want to display data.
[2] Account—If you have integrated more than one Google Analytics account, select the one for which you want to display data.
The Google accounts on this list correspond to the names of your certificates (which you can view in Menu → Integrations → Integration Center → Integrations → Google Analytics).
[3] General transaction data—Here, you can see the total number of transactions recorded on your Google Analytics account, the transaction revenue, the conversion rate, and the Average Order Value (AOV) for the selected Google Analytics account.
[4] Transactions supported by SALESmanago—Here, you can see how many of the transactions recorded on your Google Analytics account were supported by SALESmanago (both as touchpoint and last click). You can also check the total revenue from these transactions, the Conversion Rate, and the Average Order Value (AOV).
[5] Transaction revenue diagram—Here, you can see your revenue data for the selected period in the form of a diagram.

[6] UTM-based analytics—Here, you can see analytics for source and medium parameters. The table shows the following data types:
- Sessions,
- Transaction revenue,
- Average Order Value,
- Ecommerce Conversion Rate,
- Per Session Value.
You can display data for Medium/source combinations; for Source only; or for Medium only [A].