Dynamic Segments are advanced tools allowing you to create and update in the real-time, the groups of contacts, meeting has given set of criteria including CRM data, behavioral and transactional data, at the given moment.
Creating dynamic segments allows:
- automatic update of target groups without the need to manually generate data reports each time to select the appropriate contacts
- managing multivariate data without external BI systems, IT support and analytics
- immediate and precise determination of the target group size for mass or automatic campaigns
- detailed analytics showing changes in the size of selected segments over time
To create a Dynamic Segment go to
Audiences → Segmentation → Dynamic Segments → + Add new segment
Table of contents:
1. How do dynamic segments work?
- general operation
- counting and limits
2. How to create a dynamic segment
- creator and settings description
- data implementation
3. Lists of dynamic segments
4. How to use dynamic segments
1 HOW DO DYNAMIC SEGMENTS WORK?
General operation
Dynamic segments creator allows creating advanced segments of contacts from given sources. It also allows you to combine with each one any elements defining:
- visit source (UTM, referral, search, advert, email, direct)
- transactions data (products, amounts, dates),
- transaction source,
- transaction statistics (spent amount, number of transactions in time).
The number of criteria is unlimited and you can combine them using connectors and/or.
After saving criteria, the system analyzes collected on the account data and counts the number of contacts meeting indicated criteria, giving a result immediately.
Counting of the number of contacts in a dynamic segment can be done:
- manually – using feature “count”, or “save and count”,
- automatically – in the moment of sending the campaign or running the automation rule, the system will automatically count the segment.
IMPORTANT: Every use of segments, automatically counts the number of contacts meeting segment’s criteria. If the segment had been counted during the last hour before the use, this segment won’t be counted again.
Following an example:
- Let’s assume you want to carry out a dispatch at 12:00 PM using the dynamic segment. Its last counting took place at 11:45 AM – this segment won’t be counted again.
- If you want to carry out the contacts export at 12:00 PM using the dynamic segment and its last counting took place at 10:24 AM – this segment will be counted automatically.
Counting limits
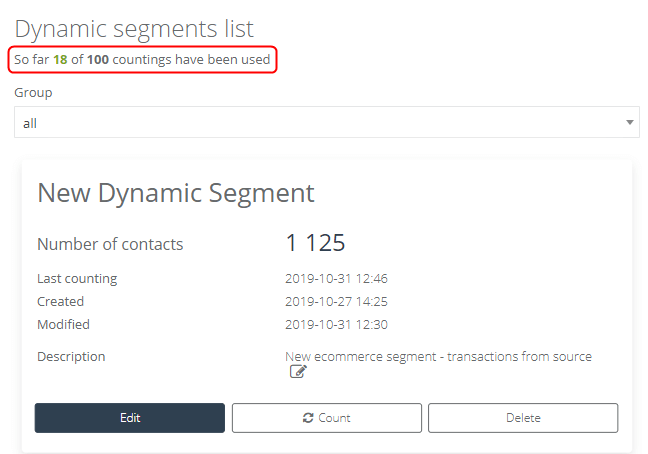
Every account, for which the dynamic segments feature has been activated, has got a defined number of countings per month, depending on the chosen package. Information about the number of counting is placed on the list of dynamic segments.
IMPORTANT: the number of countings is a sum of all the counting of the set segments on the account. According to an example below, in the calendar month, 18 from 100 available countings had been done.
Every counting is subtracted from the monthly amount of countings, regardless of whether the counting is manual or automatic:
- manually – clicking the button “count” in the segments creator or on the list
- automatic – before every use of segments
In case of not using the limit, the number of unused counting is forfeited. There is a possibility to increase the limits of counting. To do it, contact support@salesmanago.com.
2. HOW TO CREATE DYNAMIC SEGMENT
Creator and settings description
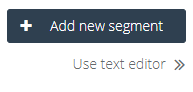
To create a new dynamic segment go to Menu → Audiences → Segmentation → Dynamic Segments and choose Add new segment.
In the right upper corner, there are two features, which allow you to create the dynamic segment:
- add new segment – this feature allows you to create the dynamic segment using simply drag & drop segments creator
- use text editor – here you can create the dynamic segment using SQL queries.
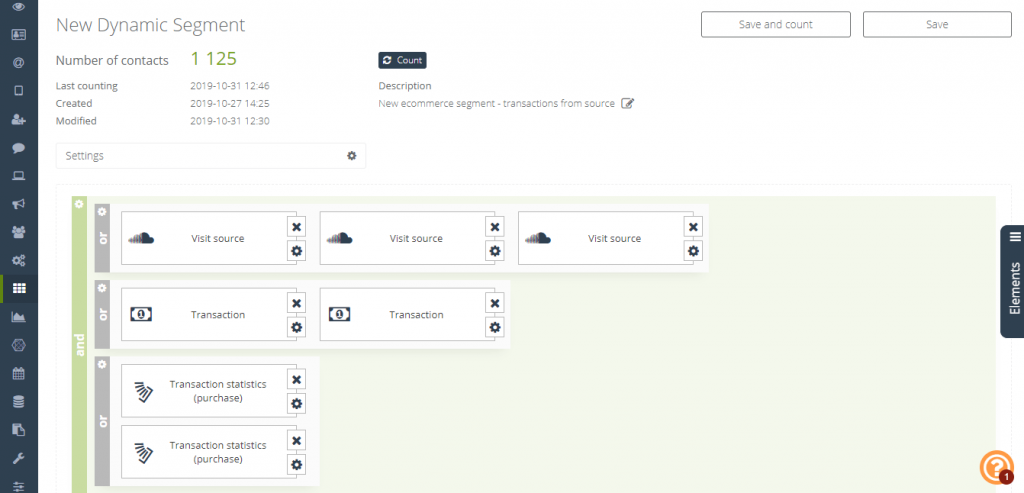
Simply wizard creator allows you to create clients’ segmentation using a drag & drop system. To create segments move interesting you parameters from elements section on the right side to the lower field with already existing rule and/or. The tiles can be placed freely.
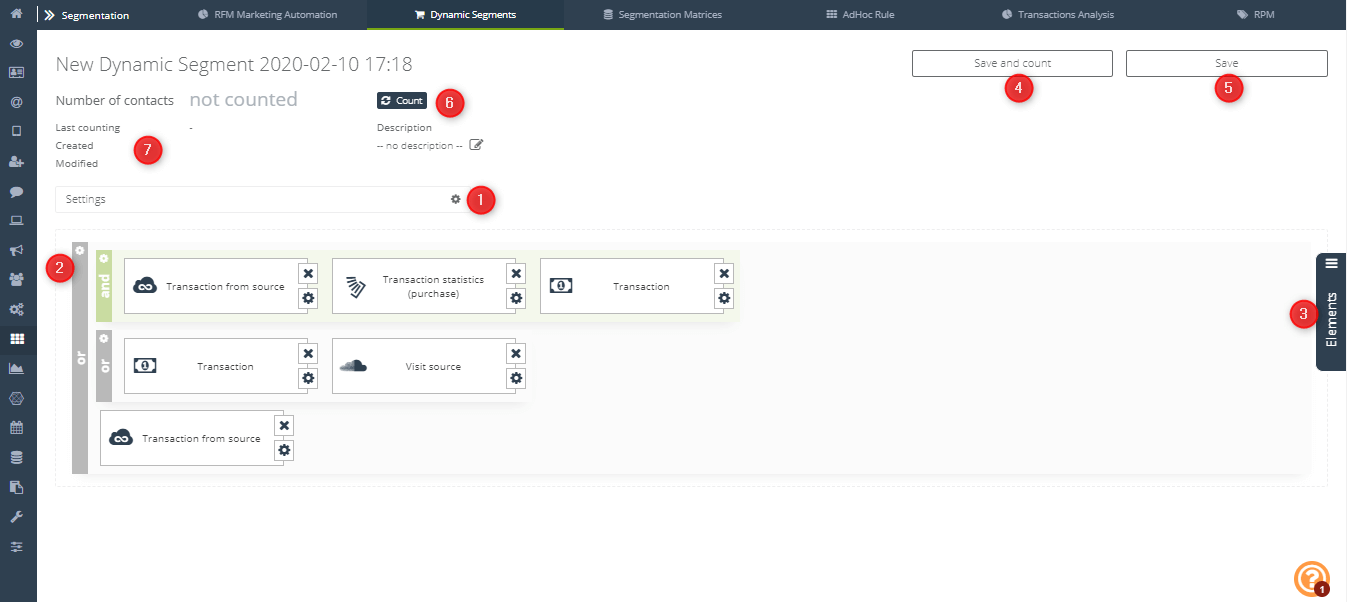
[1] Settings – clicking on the gear next to settings, you can choose and fill the following fields:
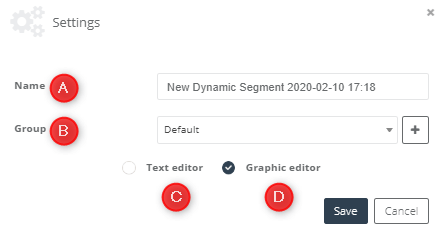
[A] name – type the name of the dynamic segment, which allows you to identify it later
[B] group – you can add the segment to the default group or create a new group. The groups allow you to manage the list of segments better.
[C] text editor, allowing to create the segment using SQL language – marking this feature will cause switching the visual editor to the text one.
[D] graphic editor, allowing to create the segment using simple wizard editor
IMPORTANT: If your dynamic segment was created in a graphic editor, you can switch it to the text editor any time you want. However, if you create your dynamic segment using the text editor, you won’t be able to switch it to the visual one.
The changes will be applied after clicking the button “save”.
[2] Rule and/or – Using this rule you can define the segmentation condition. Choosing feature ”and”, all the chosen by you elements will have to be fulfilled by the contact to classify it to this segment. If you choose feature “or”, only one of those elements will have to be fulfilled by the contact. Under the gear, there is a notification, where you can choose and/or. There is also a feature (checkbox) horizontal – that refers to the placement of the tiles in the segment.
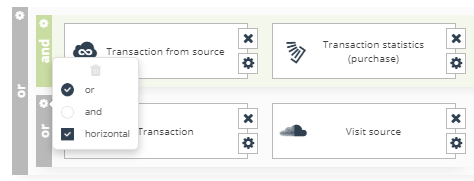
In one dynamic segment, there can be an infinite number of elements with the choice and/or and an unlimited number of elements in general. These criteria can be changed at any time.
[3] Elements – all the possible components of the sedimentation to choose and also the rule and/or, which you can assign to any element.
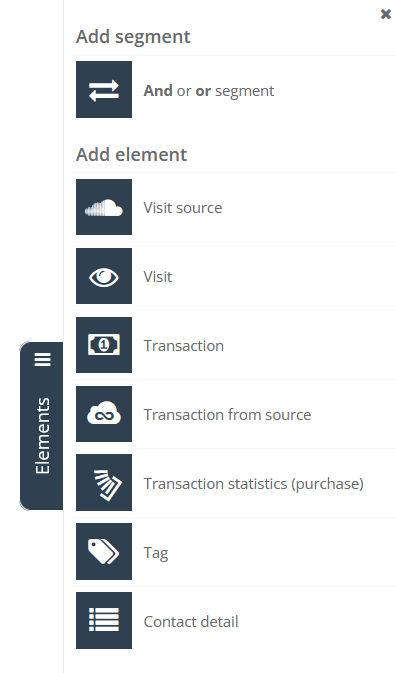
The chosen element should be dragged and dropped to the main screen, and then you should go to the tile settings. There are no limits determining the number of elements.
List of all the available elements:
IMPORTANT: In the wizard editor, one tile is one setting with implied data. You can’t define dependencies and/or inside the tile.
[4] Save and count – save and count segment allow you to save created segment and its automatic counting. After using this feature you will be moved to the list of segments.
[5] Save – save dynamic segment – this feature allows you to save segments’ setting without its counting. After using this feature you will be moved to the list of segments.
[6] Count – count the segment – this option allows you to count the segment. After using this feature you will stay in the creator section.
[7] Data in segment – these are information about the date of creating, modifying, and the last counting of the segment.
[8] Number of contacts – shows the number of contacts, which have been categorized in the segment based on criteria chosen by you.
3. List of dynamic segments
To see created dynamic segments, go to Menu → Audiences → Segmentation → Dynamic Segments

[1] Used – the number of all the countings of the month.
[2] Group – a group of the lists of the segmentations. To choose: all or default;
[3] Name – the name of the segment given while editing
[4] Number of contacts – the number of contacts, which have been categorized and implied to the segment after counting.
[5] Segment’s data – these are information about the date of the segment’s creating, the last modification, the last counting, and also the description is given while editing.
[6] Edit – allows segment editing
[7] Count – manual segment counting
[8] Delete – deletes the segments permanently
4. HOW TO USE DYNAMIC SEGMENTS
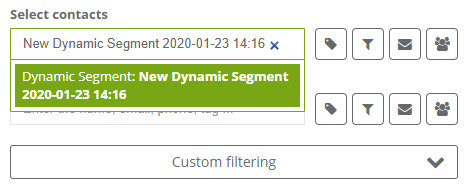
Every time, when the group of contacts should be chosen, type the name of the dynamic segment and select from given suggestions interesting your segment. Through this choice, the segment will be automatically counted and the latest actions will be taken on the contacts placed in the given segment.