Useful links
An SMS gateway is an interface that allows you to send text messages without using a cell phone. SMS gateways enable the mass sending of various marketing messages, including birthday SMS, discount codes, order confirmations, and information about sales and special offers. SMS gateways can be integrated with various platforms, including SALESmanago.
The incorporation of mobile marketing into your strategy can bring you many benefits. For instance, sending text messages is easy and relatively inexpensive compared to outdoor campaigns or TV advertising. SMS messages have a high open rate (OR) because smartphone communication is more personal in character. This channel is especially valued by local businesses, because they can use it to easily inform loyal consumer groups of news, deals, and special offers.

To integrate an SMS gateway with SALESmanago, go to
Channels → Mobile Marketing → Integrations → External SMS Providers
TIP: Some account types offer two different Mobile Marketing features. If you see two Mobile Marketing tiles in the SALESmanago menu, to integrate an SMS gateway, select the one with the cell phone icon:

Contents
- Getting started
- List of available SMS gateway integrations
- Integrating an SMS gateway
- Settings of an Integrated SMS gateway
1. Getting started
An SMS gateway allows you to quickly and cost-effectively send single or bulk text messages that can contain links, discount codes, and a variety of other marketing information. Personalized bulk text messages can help you reach customers via the fast-growing mobile channel.
By integrating an SMS gateway with SALESmanago, you can complement your omnichannel communication. SALESmanago allows precise message targeting to appropriate Contact segments. Text messages can also be included in Automation Processes (Automation Rules and Workflows).
NOTE: If you want the SALESmanago system to receive information about the delivery of your text messages to Contacts, copy the appropriate callback address on the SALESmanago platform and paste it on the website of the SMS gateway operator (see Section 4 – Settings of an Integrated SMS gateway).
2. List of available SMS gateway integrations
Below you can find an alphabetical list of SMS gateways that can be integrated with SALESmanago. Click on an item to go to the provider’s website.
IMPORTANT: Please bear in mind that some gateways only allow messaging within a given country (or messaging abroad is charged differently). Make sure to familiarize yourself with the conditions offered by individual service providers.
- 360NRS >>
- ADVANCED_TELECOM >>
- AMD >>
- APIFONICA >>
- ASSECO >>
- BBL_SMS >>
- BULKER >>
- CELLFIND >>
- CELLSYNT >>
- DYNMARK
- ENVOI >>
- ESENDEX >>
- EURO_SMS >>
- EUROCOM
- GSMS >>
- GUPSHUP >>
- IKONO >>
- IMOBIS >>
- INFOBIP >>
- INSTASENT >>
- KARIX >>
- LABYRINTTI >>
- LIBONET >>
- LIFECELL >>
- LINK_MOBILITY >>
- LOX24 >>
- MASIVIAN >>
- MPROFI >>
- MEGAFON >>
- MESSENTE >>
- MITTO >>
- MOBYT >>
- MODICA >>
- MOVISTAR >>
- MOVISTAR_COSTA_RICA >>
- MTARGET >>
- OCTAPUSH (YUBOTO) >>
- POLKOMTEL >>
- POSTA_GUVERCINI >>
- PUBLI >>
- RAPPORTO >>
- REDLINK >>
- SALES_TRAFFIC >>
- SEND_RO >>
- SERWERSMS >>
- SINHRO >>
- SITMOBILE >>
- SKEBBY >>
- SMS_MESSENGER (BLUE MEDIA) >>
- SMS_PLANET >>
- SMSAPI >>
- SMSC
- SMSSERVICE >>
- SOPRANO >>
- SPRYNG >>
- TCG >>
- TELIA >>
- TEXT_MARKETER >>
- TIDE >>
- TOKY_DIGITAL >>
- TOKY_DIGITAL_SMSC >>
- TOTAL_CONNECT >>
- TWILIO >>
- UNICELL >>
- UNIFONIC >>
- UNIFONIC_NEXTGEN >>
- VERTEX >>
- VIA_NETT >>
- VODAFONE_MALTA (EPIC) >>
- VOICE_COM >>
- WHIZZ_SMS >>
3. Integrating an SMS gateway
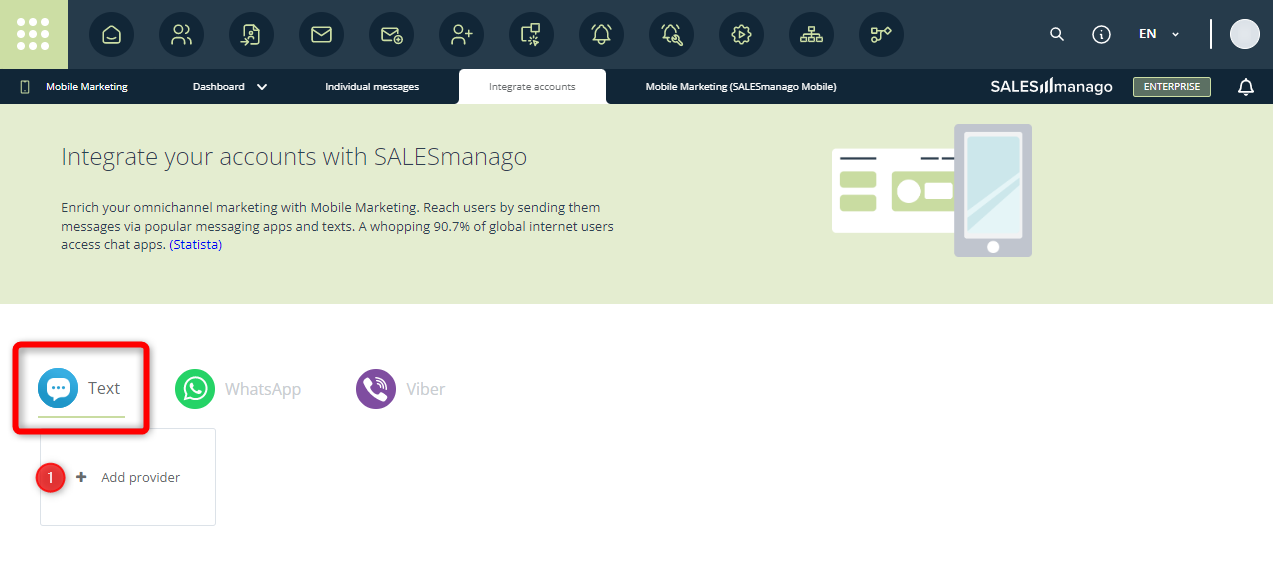
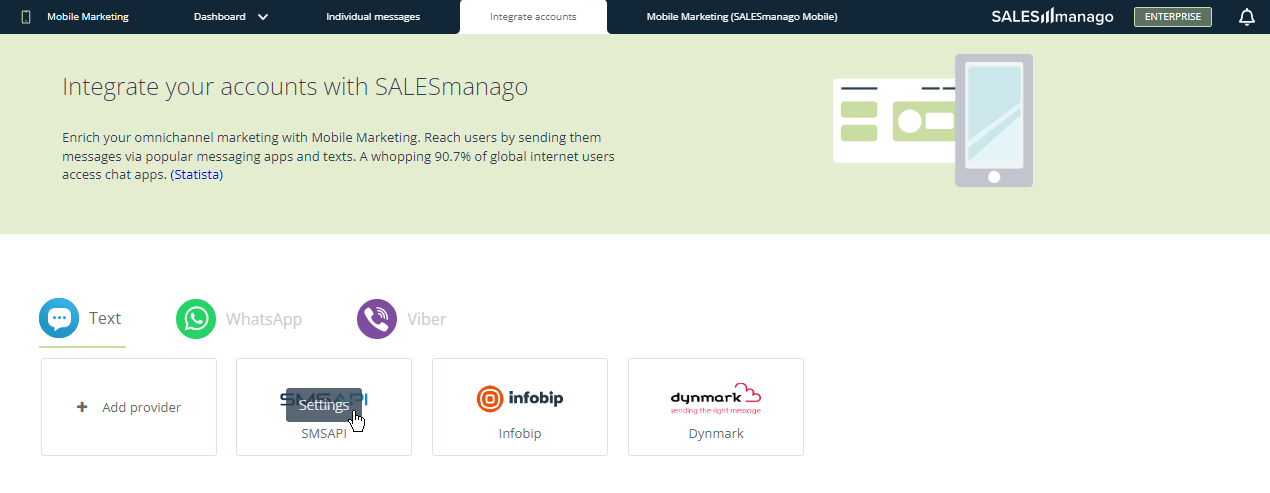
To integrate an SMS gateway with SALESmanago, go to Menu → Channels → Mobile Marketing → Integrations.
Select the Text tab and click + Add provider [1]:
You will see the list of all available SMS gateways. Select the one you want to integrate.
TIP: You can integrate more than one SMS gateway.
The integration process usually involves the provision of the login and password used to log in on the gateway operator’s website, or of an API key. In some cases, additional settings must be defined.
You can find examples of SMS gateway integration processes below.
A. Example: Infobip
After selecting Infobip from the list of available SMS gateway integrations, you will see the following screen:
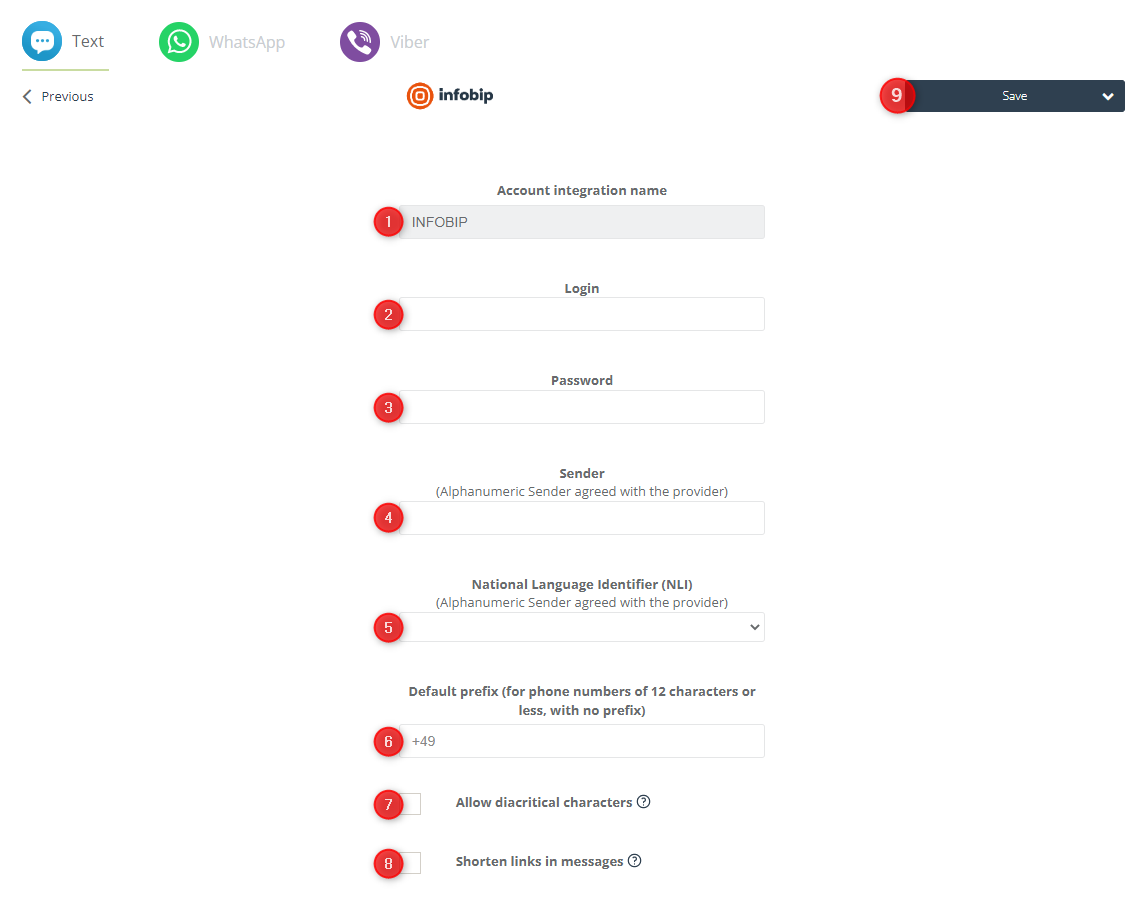
[1] Account integration name—name of the SMS gateway. This field is completed automatically by the system.
[2] Login—enter the user name that you provide when logging into the Infobip system.
[3] Password—enter the password you use to log into Infobip.
[4] Sender—enter the sender name registered for you by the Infobip operator. The name provided in this field must be identical to that defined in the Infobip system.
[5] National Language Identifier (NLI)—if you want to use the NLI technology in your text messages for one of the following languages: Turkish, Spanish, or Portuguese, select the appropriate option from the drop-down list.
Read more about National Language Identifiers (NLI) in the Infobip Product Documentation >>
[6] Default prefix—enter a prefix (e.g., +1) that will be added by default to phone numbers that have no country code.
[7] Allow diacritical characters—check this option if you want diacritics (such as ă, á, é, í, ó, and ú) and emoticons to be displayed in your text messages.
[8] Shorten links in messages—check this box if you want the SALESmanago system to automatically shorten links included in your text messages.
Short links are more user-friendly and visually attractive. Shortened links take on the following format: esm.to/ + 9 random characters (e.g., esm.to/a1b2c3d4e).
IMPORTANT: Remember that both original and shortened links contribute to the character limit. Bear this in mind when creating text messages.
[9] Save—When you have defined all the settings, click on this button to complete the integration. You have two options:

Decide whether the integration should be active immediately after you save it or whether you want to activate it at a later time.
When you have saved your settings, the icon for the Infobip integration will appear in the Integrate accounts panel, under the Text tab.
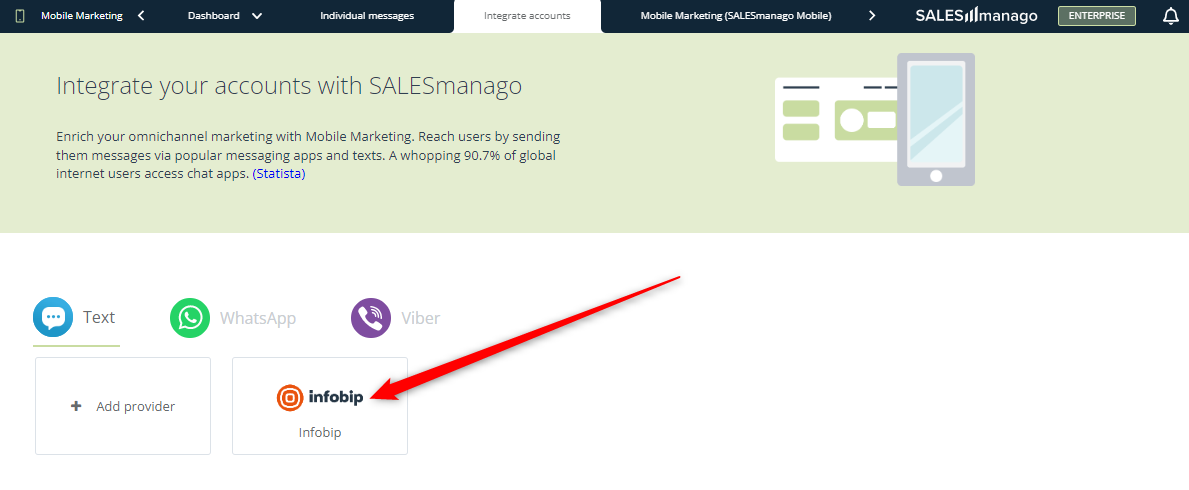
You can click on this icon to review or edit the integration settings (see Section 4 of this article for more details).
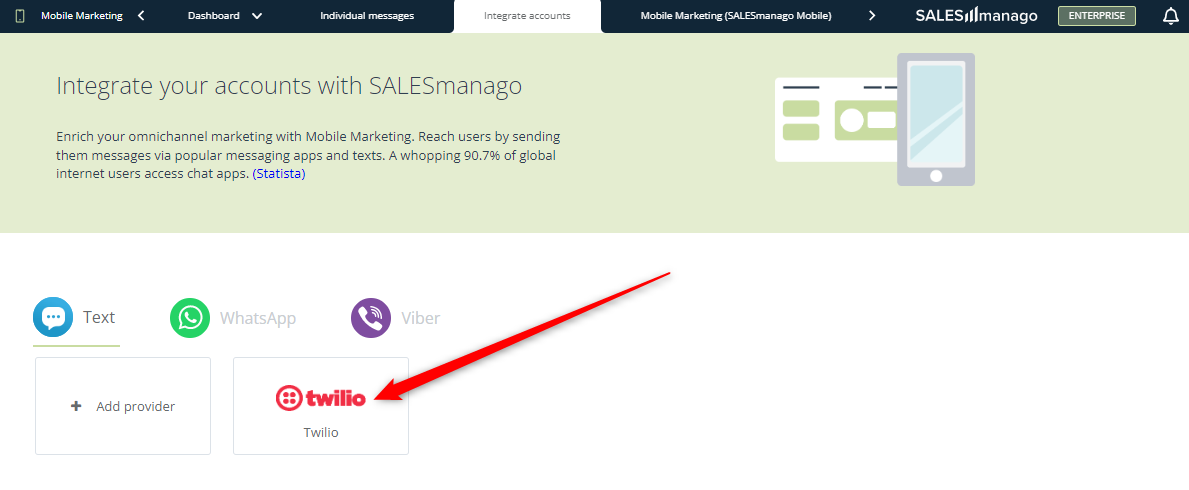
B. Example: Twilio
After selecting Twilio from the list of available SMS gateway integrations, you will see the following screen:
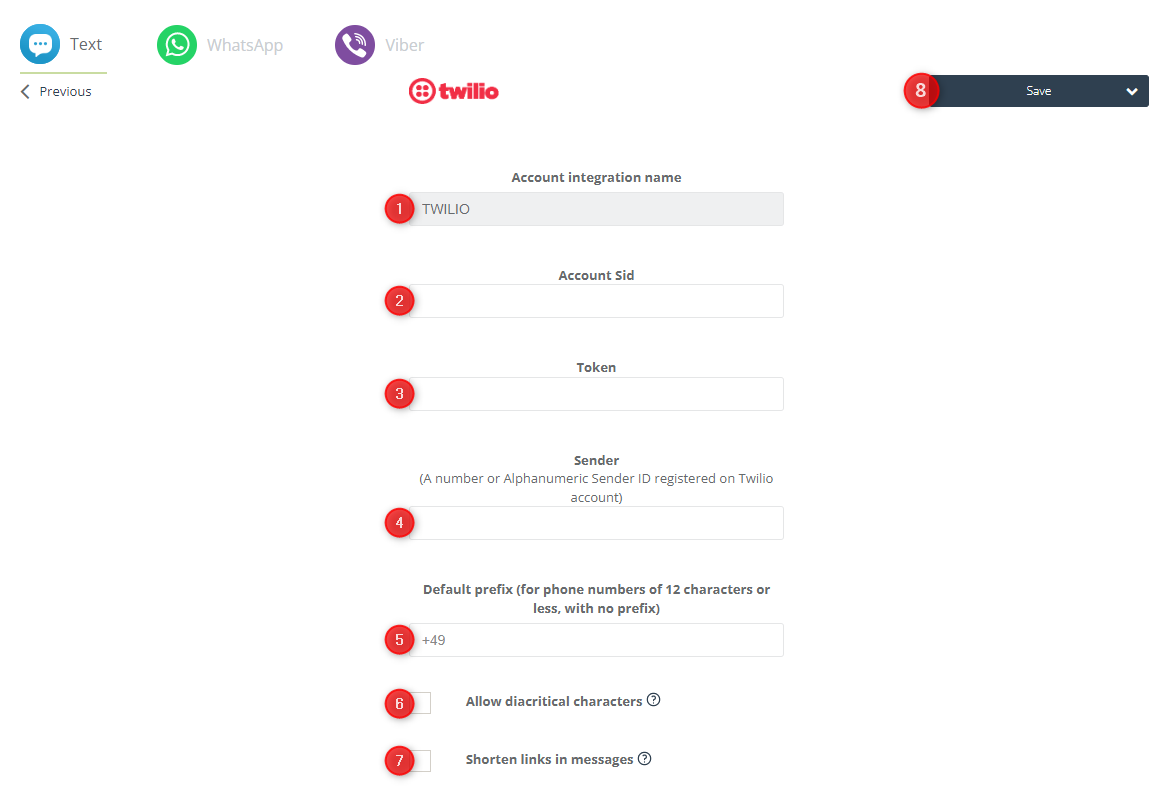
[1] Account integration name—name of the SMS gateway. This field is completed automatically by the system.
[2] Account Sid—enter the SID for your account, which can be found on the Twilio platform’s dashboard page, under the Account Info tab.
[3] Token—enter the token that you can find on the Twilio platform’s dashboard page, under the Account Info tab.
[4] Sender—enter the Number or Alphanumeric Sender ID registered for your Twilio account.
[5] Default prefix—enter a prefix (e.g., +1) that will be added by default to phone numbers that have no country code.
[6] Allow diacritical characters—check this option if you want diacritics (such as ă, á, é, í, ó, and ú) and emoticons to be displayed in your text messages.
[7] Shorten links in messages—check this box if you want the SALESmanago system to automatically shorten links included in your text messages.
Short links are more user-friendly and visually attractive. Shortened links take on the following format: esm.to/ + 9 random characters (e.g., esm.to/a1b2c3d4e).
IMPORTANT: Remember that both original and shortened links contribute to the character limit. Bear this in mind when creating text messages.
[8] Save—When you have defined all the settings, click on this button to complete the integration. You have two options:

Decide whether the integration should be active immediately after you save it or whether you want to activate it at a later time.
When you have saved your settings, the icon for the Twilio integration will appear in the Integrate accounts panel, under the Text tab.
You can click on this icon to review or edit the integration settings (see Section 4 of this article for more details).
C. Example: SMSAPI
IMPORTANT: For the integration to succeed, you need to turn off API filters on the SMSAPI platform. To do this, go to the side panel, find the API settings [1], and select IP address filtering [2]. Then, disable IP filters [3].
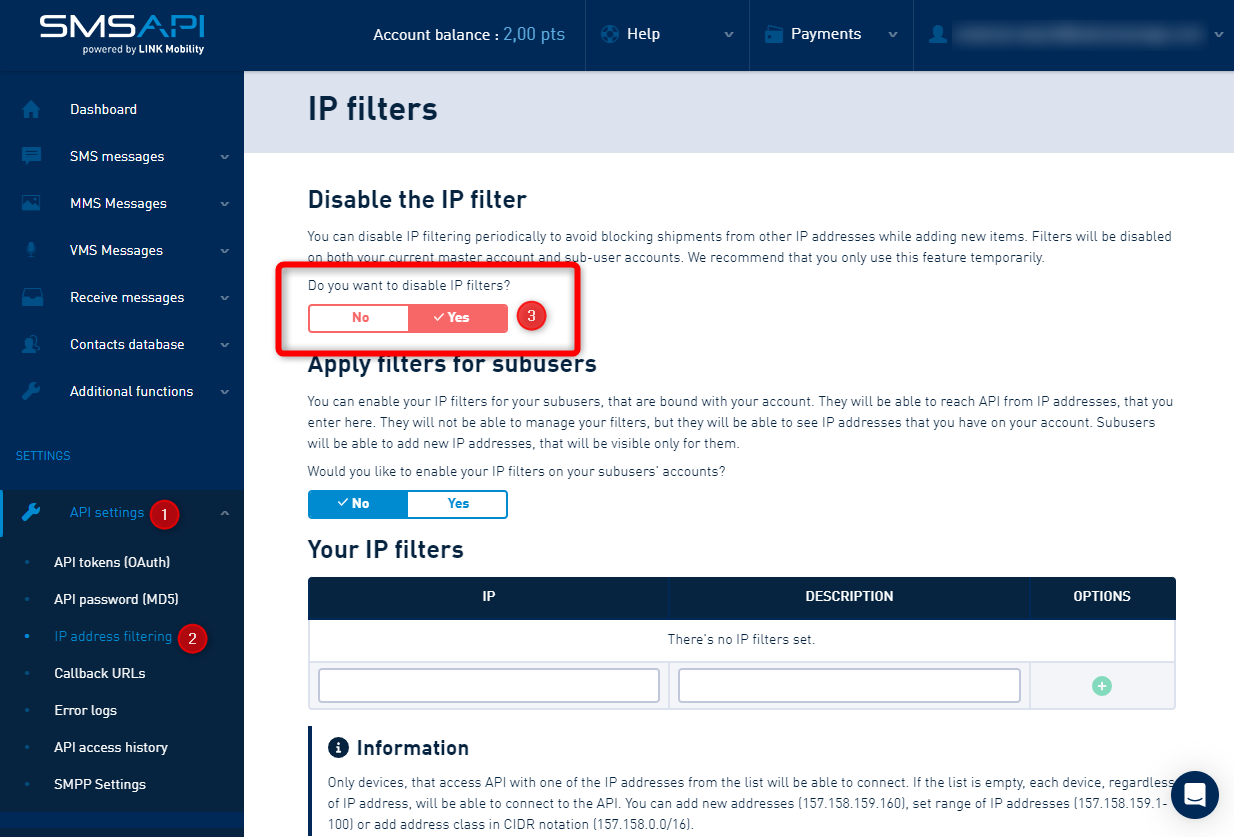
IMPORTANT: For the integration between SALESmanago and SMSAPI to function correctly, IP filters must remain disabled.
On the SALESmanago platform, after selecting SMSAPI from the list of available SMS gateway integrations, you will see the following screen:
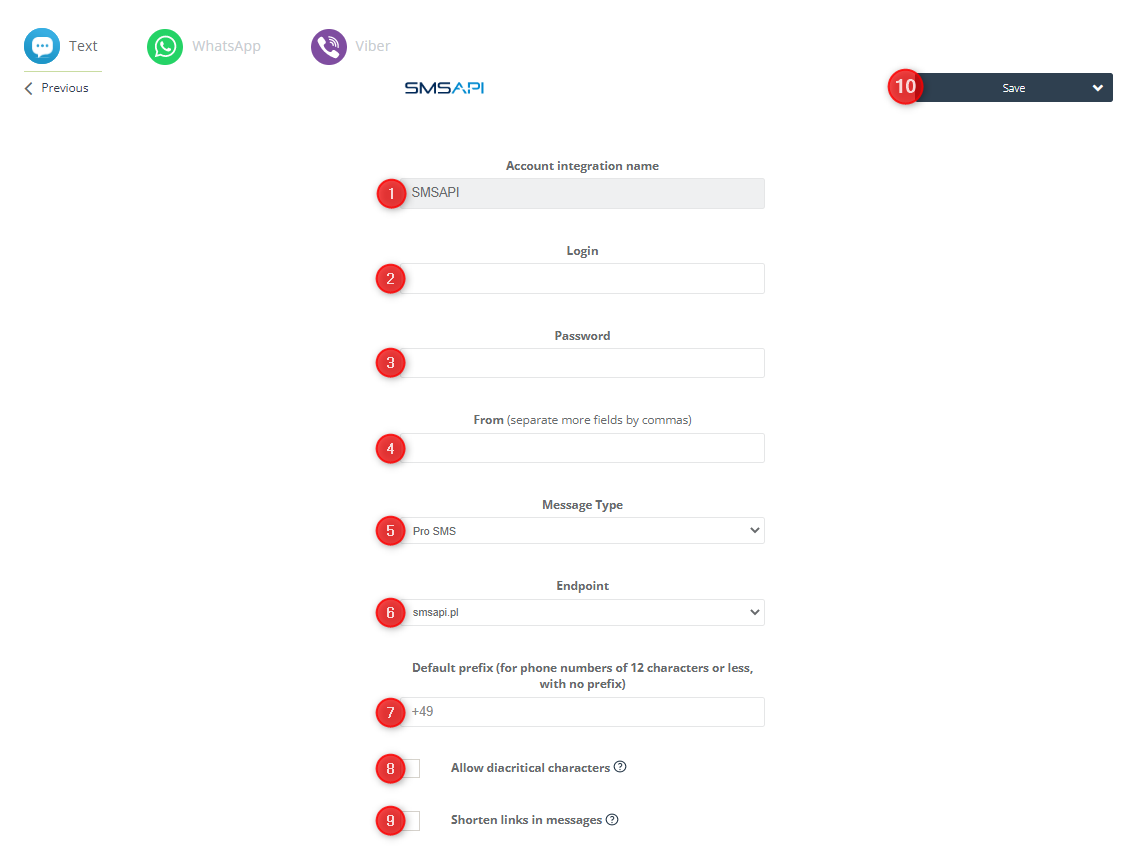
[1] Account integration name—name of the SMS gateway. This field is completed automatically by the system.
[2] Login—enter the user name or email address that you provide when logging into the SMSAPI system:
[3] Password—enter a password generated on the SMSAPI platform for the purposes of integration with SALESmanago.
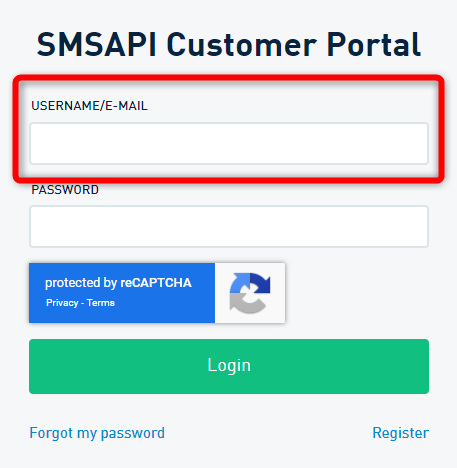
To obtain a password, on the SMSAPI platform, go to the side panel and unfold the API settings [1] section. Select API password (MD5) [2] and click on I want to use MD5 API password anyway [3]:

You will see two new options:
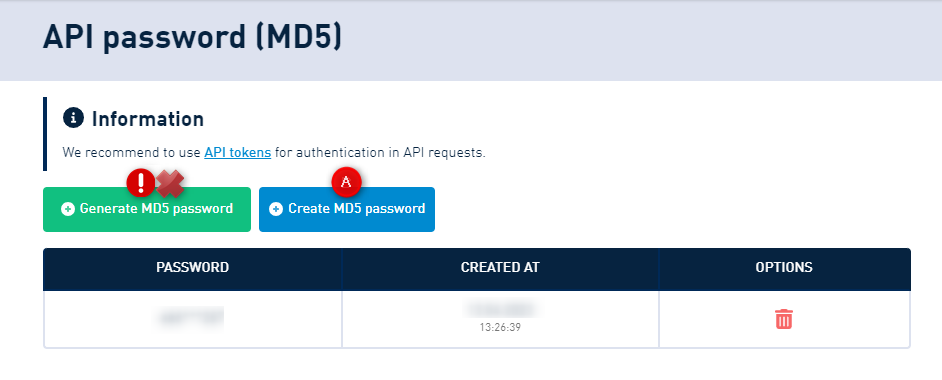
Click on Create MD5 password [A] to create a new password by yourself. The password must be at least 8 characters long and must contain at least one uppercase letter, one lowercase letter, and one digit.
IMPORTANT: Do not use the “Generate MD5 password” button. A password created in this way may not work, preventing successful integration with SALESmanago.
Enter the password you created on the SALESmanago platform.
[4] From—enter the sender name defined in the SMSAPI system (Dashboard → SMS messages → Senders). The name provided in this field must be identical to that configured in the SMSAPI system.
If you have more than one configured sender, you can enter additional sender names separated by commas. Each time you send a text message, you will be able to select the sender.
[5] Message type—select the message type provided in your SMSAPI package.
[6] Endpoint—specify the address at which your SMSAPI account is located. Select one of the two available options:
- smsapi.pl,
- smsapi.com.
[7] Default prefix—enter a prefix (e.g., +1) that will be added by default to phone numbers that have no country code.
[8] Allow diacritical characters—check this option if you want diacritics (such as ă, á, é, í, ó, and ú) and emoticons to be displayed in your text messages.
[9] Shorten links in messages—check this box if you want the SALESmanago system to automatically shorten links included in your text messages.
Short links are more user-friendly and visually attractive. Shortened links take on the following format: esm.to/ + 9 random characters (e.g., esm.to/a1b2c3d4e).
IMPORTANT: Remember that both original and shortened links contribute to the character limit. Bear this in mind when creating text messages.
[10] Save—When you have defined all the settings, click on this button to complete the integration. You have two options:
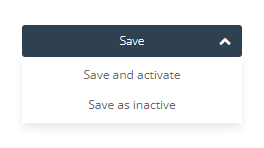
Decide whether the integration should be active immediately after you save it or whether you want to activate it at a later time.
When you have saved your settings, the icon for the SMSAPI integration will appear in the Integrate accounts panel, under the Text tab.

You can click on this icon to review or edit the integration settings (see Section 4 of this article for more details).
4. Settings of an integrated SMS gateway
To see the list of all your SMS gateways integrated with SALESmanago, go to Menu → Channels → Mobile Marketing → Integrations → External SMS Providers.
To access the settings of an SMS gateway, move your cursor over a selected tile:
After clicking on Settings, you will see the following screen:

[1] Current integration settings – here you can review the current settings of the integration with the selected SMS gateway.
[2] Integration status – here you can check whether the integration is active (functional).
The integration must be active for you to be able to send text messages from the SMS gateway.
[3] Callback addresses – Callbacks are essential for the SALESmanago system to be able to verify whether a message was delivered and, potentially, whether a recipient responded.
Copy the callback addresses and paste them on the SMS gateway’s platform (if you have trouble finding the place where the callback addresses should be pasted, contact the SMS gateway operator or write us at support@salesmanago.com).
IMPORTANT: If you do not configure callbacks (i.e., do not paste the callback addresses in the appropriate places in the gateway’s settings), SALESmanago will not be able to provide SMS delivery statistics.
[4] Edit – click here to go to the integration settings and potentially modify them.
After clicking on this button, you will see the same screen that you saw when integrating the SMS gateway. If you introduce any changes, remember to apply them by clicking on Save.
[5] Test SMS – click here to send a test text message from this SMS gateway. This way you can make sure that the integration works as intended.
After clicking on this button, a new window will appear.
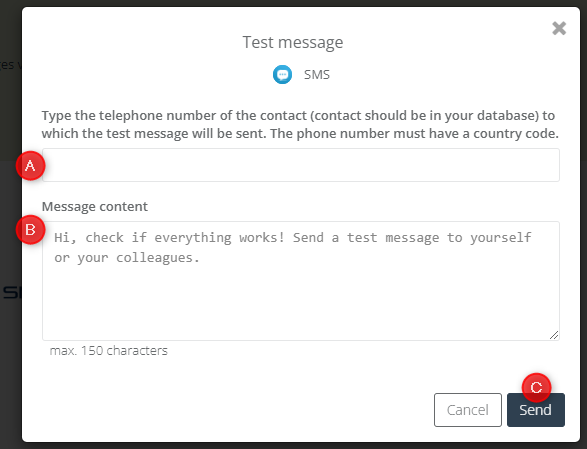
Provide the phone number [A] (including the prefix) of a test Contact that has the opt-in status for Mobile Marketing. Then enter the test message content [B] and click on Send [C].
[6] Action – here you can activate/deactivate the integration or delete it altogether.