Useful links

Google Sheets is the biggest net editor that enables creating spreadsheets, using in-built formulas, tables, charts and numerous options of formatting absolutely for free. It is a popular tool used by companies but also individuals who share data and changes in the document.
Advantages:
- Your contacts will be transferred to SALESmanago in an easy way
- The way how data is transferred from the sheet enables the creation of a contact database together with details
- It is a convenient way to keep the division into categories and make sure that after each transfer of data this division will be kept
Below you can see the instruction on how to make the integration step-by-step. Study our instruction and integrate SALESmanago with Google Sheets.
Content:
- STEP 1. Preparation of Google Sheet
- STEP 2. Login to LeadsBridge platform
- STEP 3. Selection of integration
- STEP 4. Settings
- STEP 5. Addition of Bridge
- STEP 6. Bridge – settings
- STEP 7. Source
- STEP 8. Destination
- STEP 9. Fields Mapping
- STEP 10. Test
STEP 1. PREPARATION OF GOOGLE SHEET
In the first step, you have to prepare Google Sheet and name it in a way that you can find it easily after that.
IMPORTANT: Remember to prepare Google Sheet according to the standard of the files that can be imported. More information on how to prepare such a file you can find here.
An exemplary excerpt of the file can look as follows:

STEP 2. LOGIN TO LeadsBridge PLATFORM
Next, log in to your account on the LeadsBridge platform.
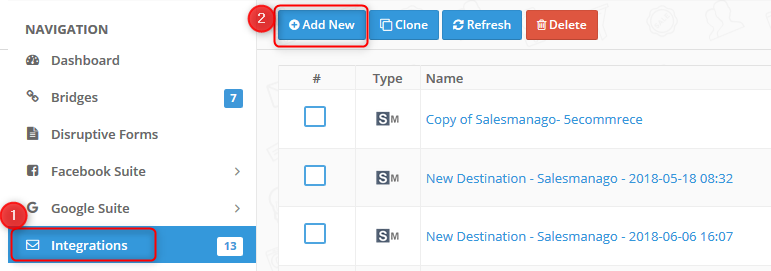
In the main menu on the left select: Integrations → +Add New.
STEP 3. SELECTION OF INTEGRATION
You are redirected to such a view.
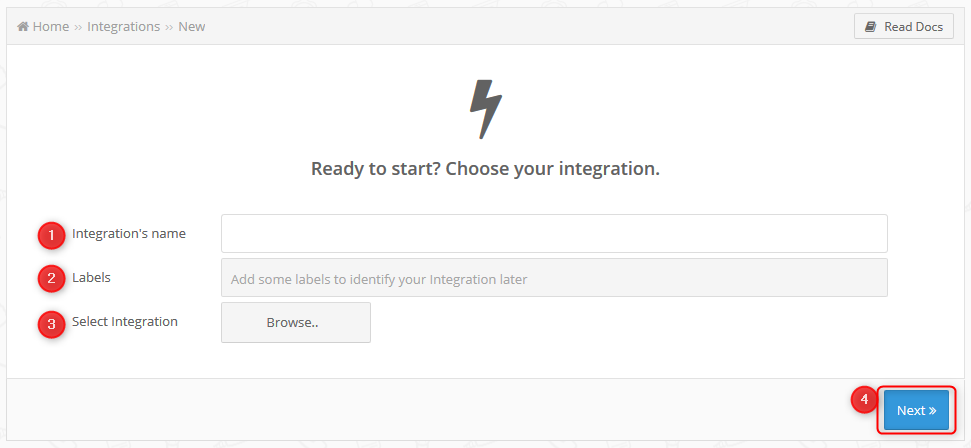
[1] Integration’s name – name your integration in a way that enables finding it on the list of all integrations after that
[2] Labels – add labels, tags that enable finding the integration on the list of all integrations after that. It is not an obligatory field. However, labels are useful when filtering.
[3] Select integration – click Browse and find SALESmanago.

[4] Next – click it to go forward.
This is the end of the first stage where you selected two elements which will be integrated together.
STEP 4. SETTINGS
You are automatically redirected to such a view. Here you can decide about settings.
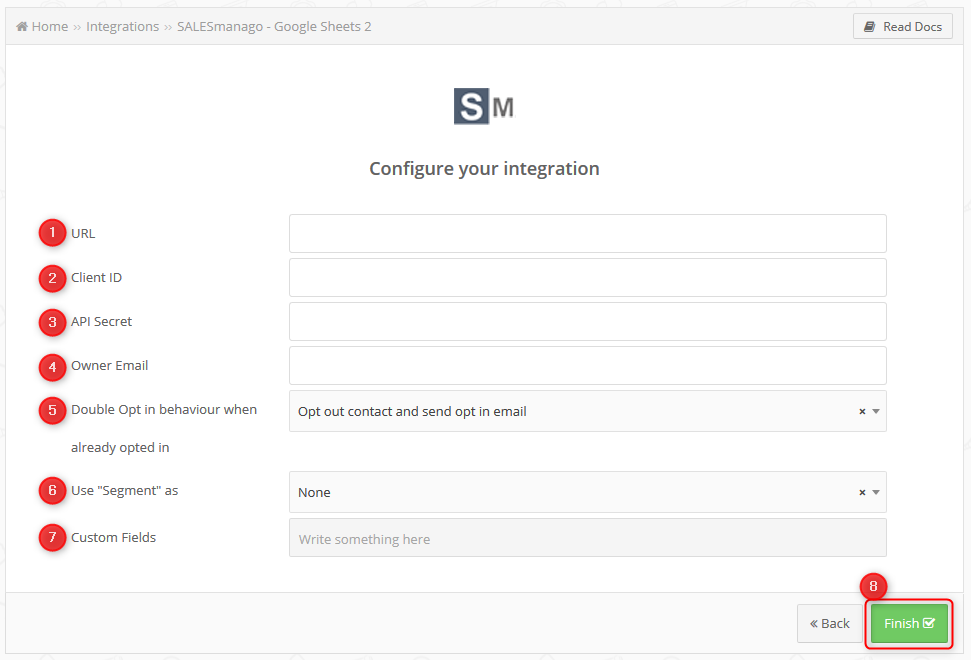
[1] URL – type in the URL address
[2] Client ID – type in the individual Client ID
[3] API Secret – type in API Secret
[4] Owner Email – type in the Owner, that is which account in SALESmanago system is the owner of the contact
[5] Double Opt in behaviour when already opted in – select one of the scenarios in the situation that a contact already has opt in status. Available scenarios:
- Keep contact opted in and don’t send opt in email – leave the opt in status for a contact and do not send email to confirm this status
- Keep contact opted in and send opt in email – leave the opt in status for a contact and send email to confirm this status
- Opt out contact and send opt in email – assign the opt out status to the contact and send email with the consent to get mailing
[6] Use “Segment” as – select stage of the funnel from the drop-down list
[7] Custom Fields – provide non-standard details on the contact card
STEP 5. ADDITION OF BRIDGE
When you finish the integration of SALESmanago and Google Sheets, you are automatically redirected to the home page.
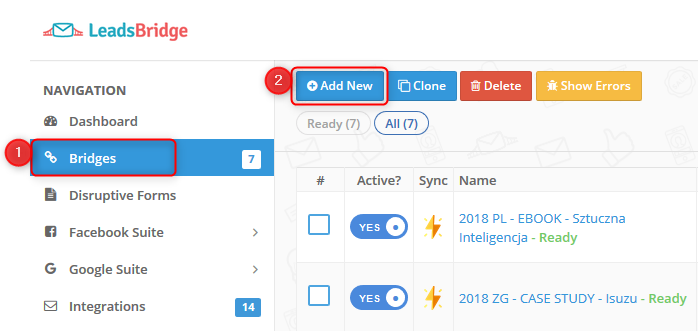
In the main menu on the left, select Bridges → +Add new.
STEP 6. BRIDGE – SETTINGS
In the next step, you are automatically redirected to such a view – tab Let’s start.
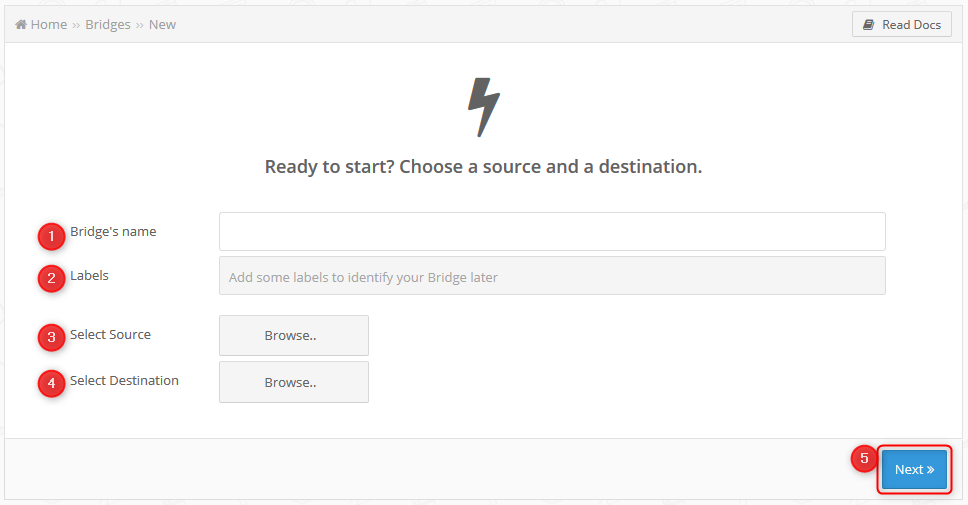
[1] Bridge’s name – provide the name of the Bridge
[2] Labels – add labels, tags that enable finding the integration on the list of all integrations after that. It is not an obligatory field. However, labels are useful when filtering.
[3] Select Source – select your Google Sheet from the drop-down list
[4] Select Destination – select SALESmanago from the drop-down list

[5] Next – click to continue
STEP 7. SOURCE
In the next step, you are automatically redirected to such a view – tab Source.
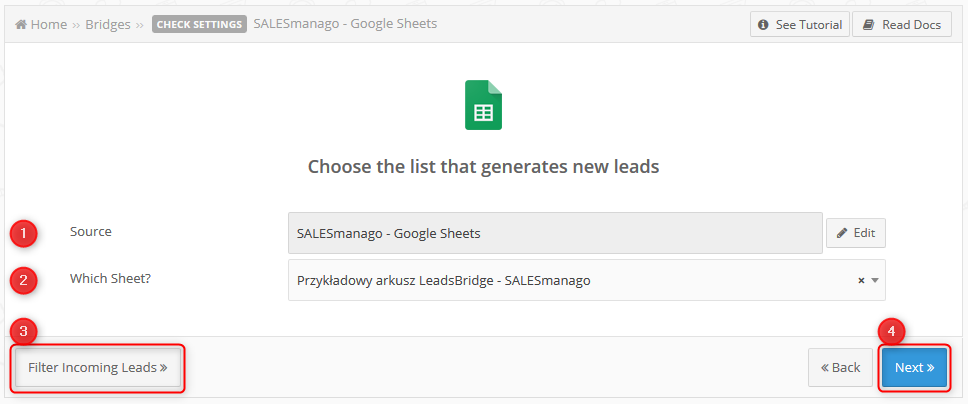
[1] Source – type in: SALESmanago – Google Sheets
[2] Which Sheet? – find the sheet that you have created
[3] Filter Incoming Leads – click it to filter the leads that are taken from the sheet
[4] Next – click it to continue
STEP 8. DESTINATION
You are automatically redirected to such a view – tab Destination.
[1] Destination – the value here which is the name of the integration appears automatically; you can select a different value from the drop-down list or edit
[2] Which segment? – the value here appears automatically with the option Send contacts to SALESmanago
[3] Double optin? – decide whether you want your contacts to receive an email which confirms that your contacts signed in for a newsletter
[4] Do you also want to receive an email receipt each lead coming? – select whether you want to receive an email each time new leads are transferred to SALESmanago (YES and NO options).
Step 9. FIELDS MAPPING
You are automatically redirected to such a view – tab Fields Mapping.

[1] – these are elements that you have on the contact card. You can add elements when you click the drop-down list [2] and confirm by clicking the button Map this field.
STEP 10. TEST
You are automatically redirected to such a view – Test.
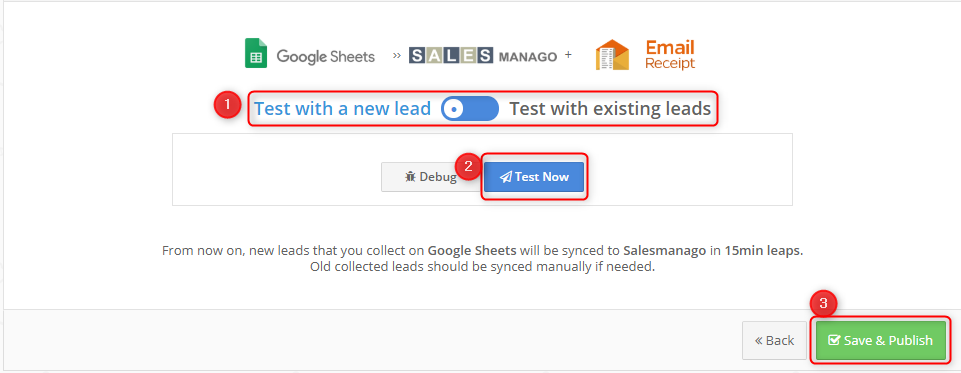
In this step, you can test your integration.
[1] – you can decide whether you want to test your integration on the new lead (Test with a new lead) or the existing ones (Test with existing leads). Click the slider to select one of the options.
[2] Test now – click it to start testing
[3] Save & Publish – click it to save changes
Remember that integration of SALESmanago and Google Sheets by means of LeadsBridge enables automatic transfer of contacts from the sheet to the system in a quick and easy way.