Useful links
Google Ads is the Google advertising platform that enables you to display sponsored links in search engine results and on websites that participate in the Google AdSense program. This means that your ads will appear in Google when users search for products or services similar to yours.
By integrating Google Ads with your SALESmanago account, you can use your customers’ behavioral, demographic, and transactional data, which is stored on their Contact Cards, to create and manage specific Google Ads audiences and target them with your advertisements.
The integration enables you to automatically add or remove Contacts to/from Google Ads audiences using Automation Processes. This way, you can create a Workflow through which you will retarget Contacts who have been added to a Google Ads audience.
You can also select groups of Contacts (based on their properties) that will be added to/removed from a Google Ads audience.
Both monitored and non-monitored Contacts can be added to/removed from a Google Ads audience.
Read the Google requirements for using Customer Match >>
To access the Google Ads panel in SALESmanago, go to
Audiences → Social Media → Google Ads
Contents
- Integration process
- Google Ads—Main panel
- Managing Contacts in Google Ads audiences
- Marketing uses: Examples
1. Integration process
To integrate Google Ads with your SALESmanago account, go to Menu → Audiences → Social Media → Google Ads and click on Sign in with Google.
A new window will appear. You will be asked to choose a Google account and provide your Google login credentials. Click Continue [A] to proceed.
That’s it! You have successfully integrated your Google Ads account with SALESmanago.
2. Google Ads—Main panel
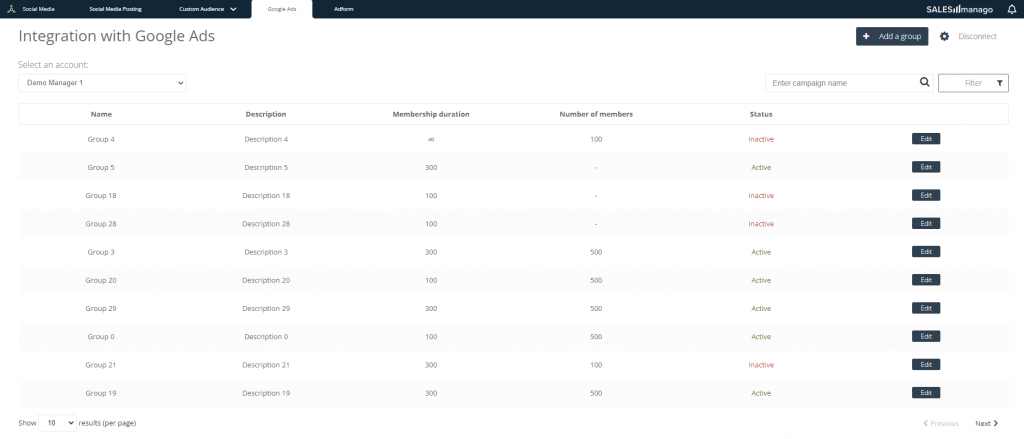
Following the integration of Google Ads with SALESmanago, you will see audience data from the Google Ads platform on the main integration panel:
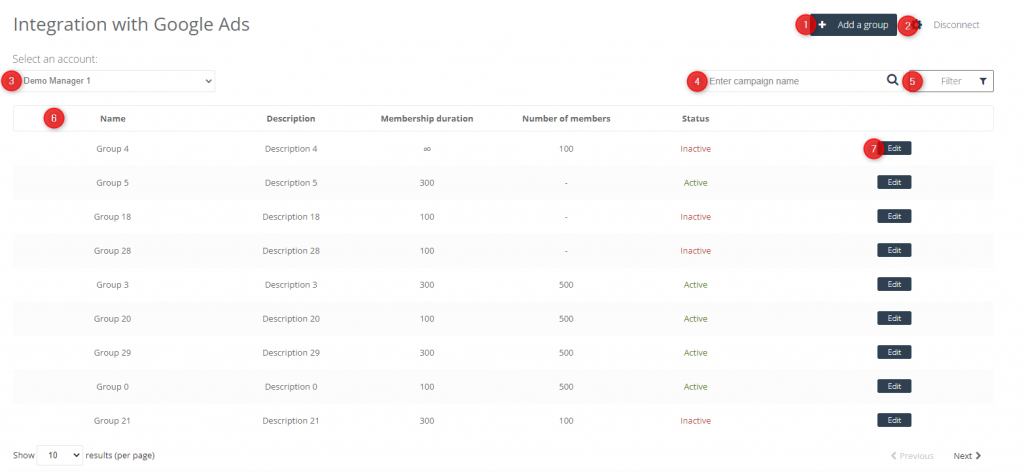
[1] Add a group—click here to create a new Contact group to which you can add (or remove) Contacts through Automation Processes or Contacts segmentation (see Section 3 for more details).
[2] Disconnect—click here to disconnect the integration. Remember that if you do this, all previously configured elements will become inactive.
[3] Select an account—choose the subaccount for which Google Ads data is to be displayed.
[4] Search—enter an audience name in the search box to quickly find it on the list.
[5] Filter—apply a filter to display only active or inactive audiences.
[6] Data from Google Ads—data transferred from Google Ads to SALESmanago. The list includes all audiences existing on your Google Ads account (not only those created in SALESmanago).
[7] Edit—click here to edit an existing Contact group (e.g., by adding or removing Contacts). Note that the account to which the audience is assigned cannot be modified.
3. Managing Contacts in Google Ads groups
Following the successful integration with Google Ads, you can create a Contact group which you can target with highly personalized ads.
To create a group, click on Add a group:
The Managing Contacts in Google Ads wizard comprises two steps: Data and Contact management.
In the first step, define the basic details of your new audience.
In the second step, specify which Contacts should be added to (or removed from) your group.
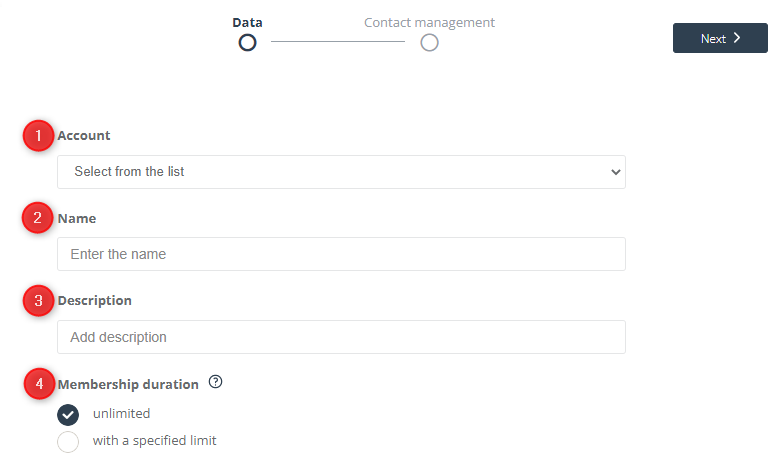
A. Data
[1] Account—select the subaccount that will be the owner of the new Google Ads audience.
[2] Name—enter a name for your new audience that will allow you to easily identify it on the list.
[3] Description—enter a description that will help you classify the new audience.
[4] Membership duration—decide how long a Contact added to this audience will remain its member (i.e., after what time a Contact will be removed from the audience).
Membership duration can be unlimited or limited to a specific number of days.
Click Next to proceed to the second step.
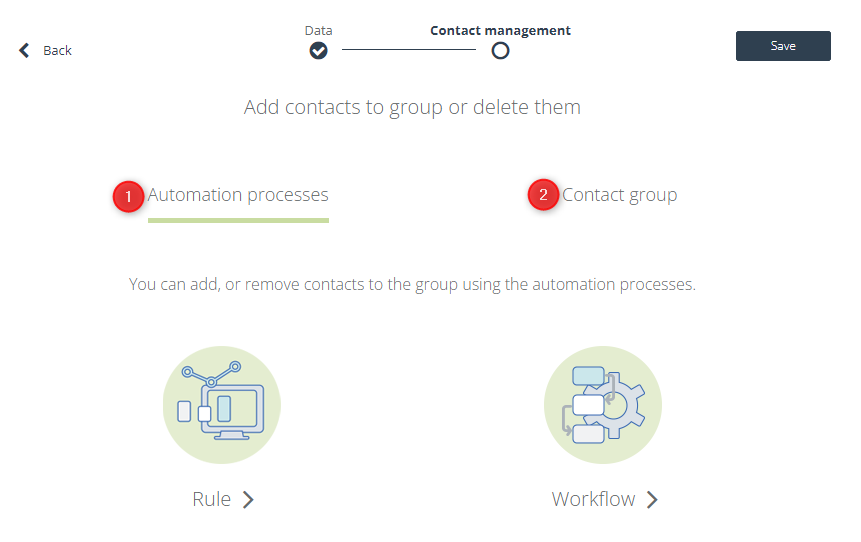
B. Contact management
There are two ways to add or remove Contacts to/from a Google Ads audience:
[1] Automation processes—use an Automation Rule or a Workflow to automatically add/remove Contacts to/from the new audience by using the Action: Add/remove a Contact to a Google Ads group.
NOTE: If you select Rule or Workflow, you will be informed that in order to use the new group in an Automation Process, first you have to save it [A]. The new group will be immediately added to the list of Google Ads groups (you can always edit it later).
If you create an Automation Process including the Action: Add/remove a Contact to a Google Ads group, following the occurrence of the triggering Event for a Contact (and provided that any specified Conditions are met), SALESmanago will automatically send a request to Google Ads for that Contact to be added to/removed from the selected audience.
See how the Action: Add/remove a contact to a Google Ads group works in Automation Rules >>
See how the Action: Add/remove a contact to a Google Ads group works in Workflow processes >>
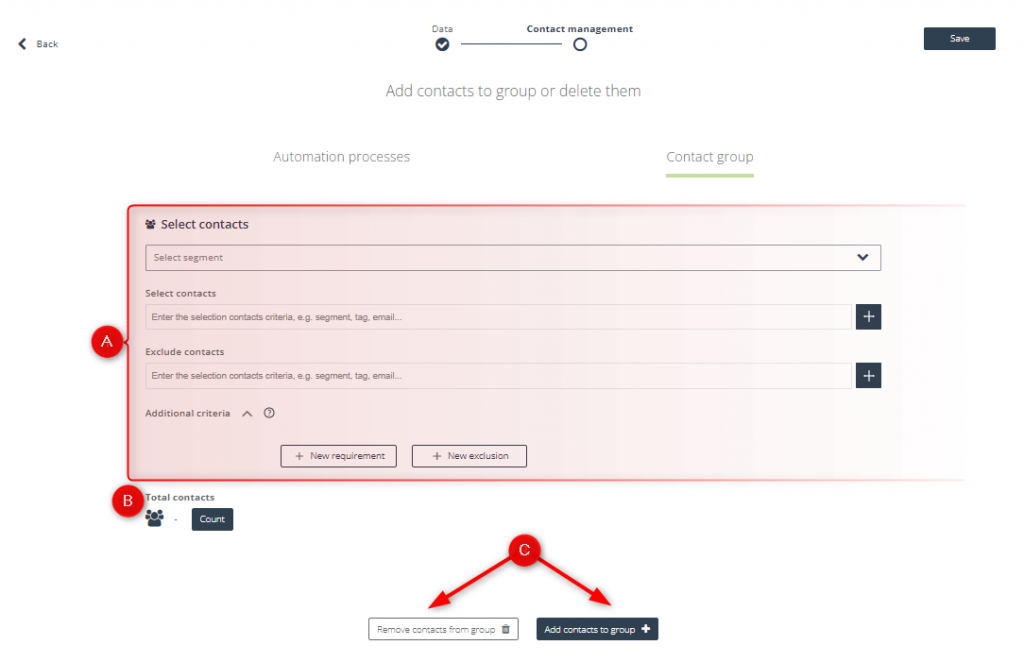
[2] Contact group—use Contact segments, selectors, and additional filters to precisely define the criteria based on which Contacts will be included in (or excluded from) the new audience.
[A] Select Contacts—here you can provide detailed Contact selection criteria. These fields are the same as the ones you use when sending emails from SALESmanago.
Learn more about the Contact selection process >>
Learn more about predefined Contact segments and selectors >>
[B] Total Contacts—click here to calculate the number of selected Contacts, i.e., the number of Contacts that will be added to or removed from the new audience. It is recommended to click this button whenever a change has been made to the selection criteria.
Finally, choose whether you want to remove or add Contacts [C] from/to the audience based on the criteria specified above.
Click Save to complete the audience creation process.
4. Marketing uses: Examples
The SALESmanago integration with Google Ads allows you to create audiences that can later be configured on the Google Ads platform for the purposes of displaying your advertisements on third-party websites.
EXAMPLE 1. You want to encourage Contacts who have expressed interest in your offer by clicking on a banner to actually make a purchase.
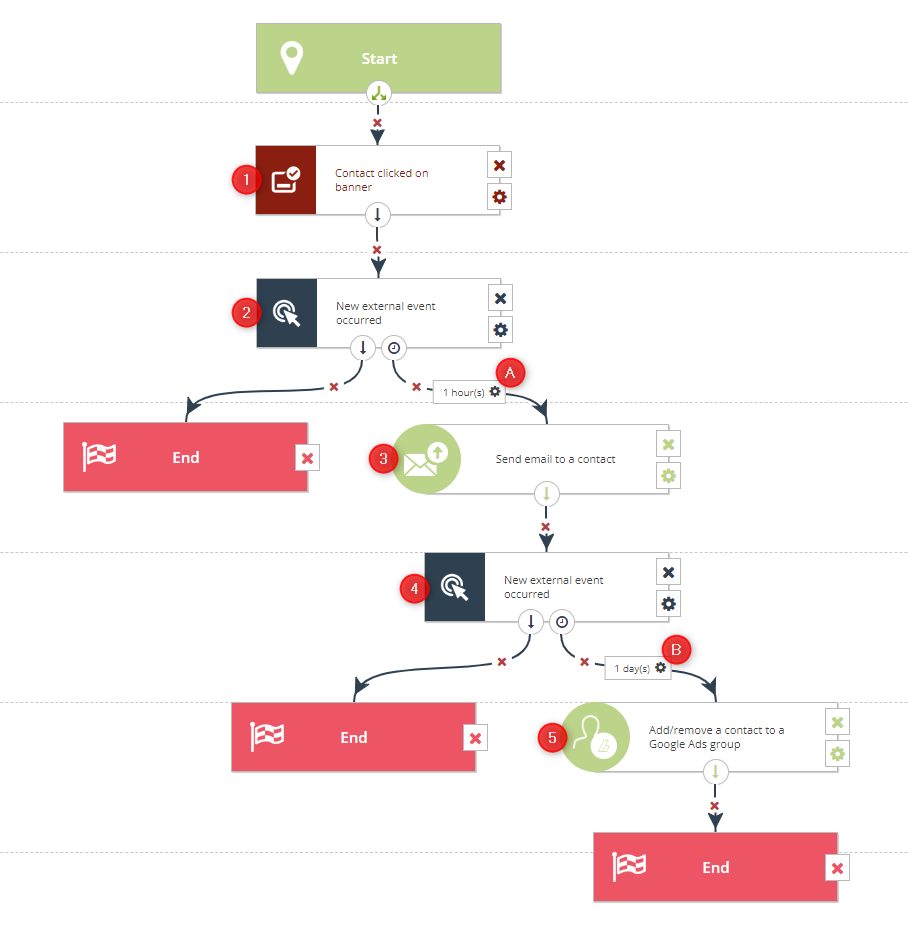
Create the following Workflow:
The Workflow starts when a Contact clicks on the banner [1]. If the Contact makes a purchase [2], the Workflow will end. If the Contact does not make a purchase, the system will wait 1 hour [A] and then send an email [3] to that Contact (possibly including a Product Block with recently viewed products).
Note that using a free channel (email) may help you reduce your costs.
If the Contact makes a purchase [4], the Workflow will end. If the Contact does not make a purchase, the system will wait 1 day [B] and then add the Contact to a Google Ads audience of your choice [5].
Next, configure your Google Ads advertisements to be displayed to the audience selected in the Workflow.
Creating a Workflow of this or a similar structure maximizes your chances of cart recovery in a cost-effective manner.
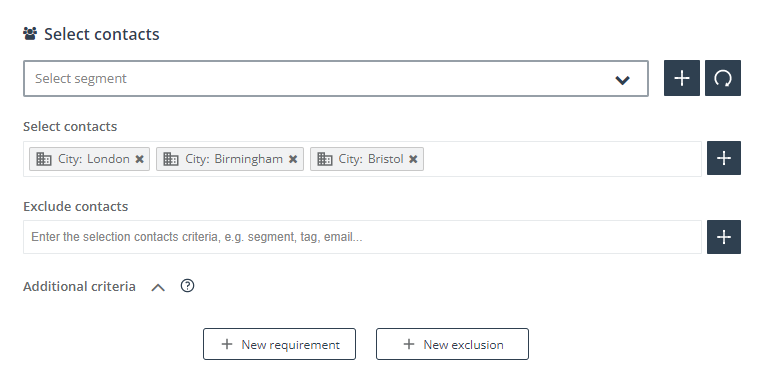
EXAMPLE 2. You are organizing an exhibition that will be staged in three cities and you want to inform Contacts from these cities about the upcoming event.
Create a Google Ads audience using the following Contact selectors:
Then, configure your Google Ads advertisements for the event to be displayed to the new audience.
