OpenCart is a popular eCommerce platform that allows you to sell products online. Integrating OpenCart with your SALESmanago account will enable you to transfer relevant contact and transaction data between platforms. You can use this information to automate marketing activities and thus boost your sales in the e-store.
To download the plugin, click here.
Contents
- Basic information
- Scope of integration
- Installation
A. Integration settings - Configuration
A. Account settings
B. Platform settings
C. Monitoring Code
D. Data export
E. About - Technical description
A. Events
B. Database
C. Monitoring Code
1. Basic information
In this article, you will find detailed information about the integration with the OpenCart platform. The plugin is constantly being improved and available for free to our customers.
The integration allows you to track events (such as cart additions or purchases) from all your stores within the multistore. Automatic location detail assignment makes it easier and more convenient to analyze and use these data.
Check the current version of the plugin >>
2. Scope of integration
The scope of integration includes:
- Sending external events (CART, PURCHASE) for contacts who are logged in and contacts who are not logged in but have a previously created smclient cookie.
- Exporting of archival data (customers, orders).
- Automatically adding a Monitoring Code to a website.
- Option to assign tags when a contact registers, logs in, signs up for a newsletter or makes a purchase.
- Adding a monitoring parameter to users that filled in a contact form.
- Sending contact data, including the tags assigned to them in the store.
- Updating a contact’s opt-in status to, and optionally from, SALESmanago.
3. Installation
Start by downloading the plugin >>
After downloading the plugin, log in to the panel of your OpenCart store and go to the Extension Installer in the side menu: Extensions → Installer.
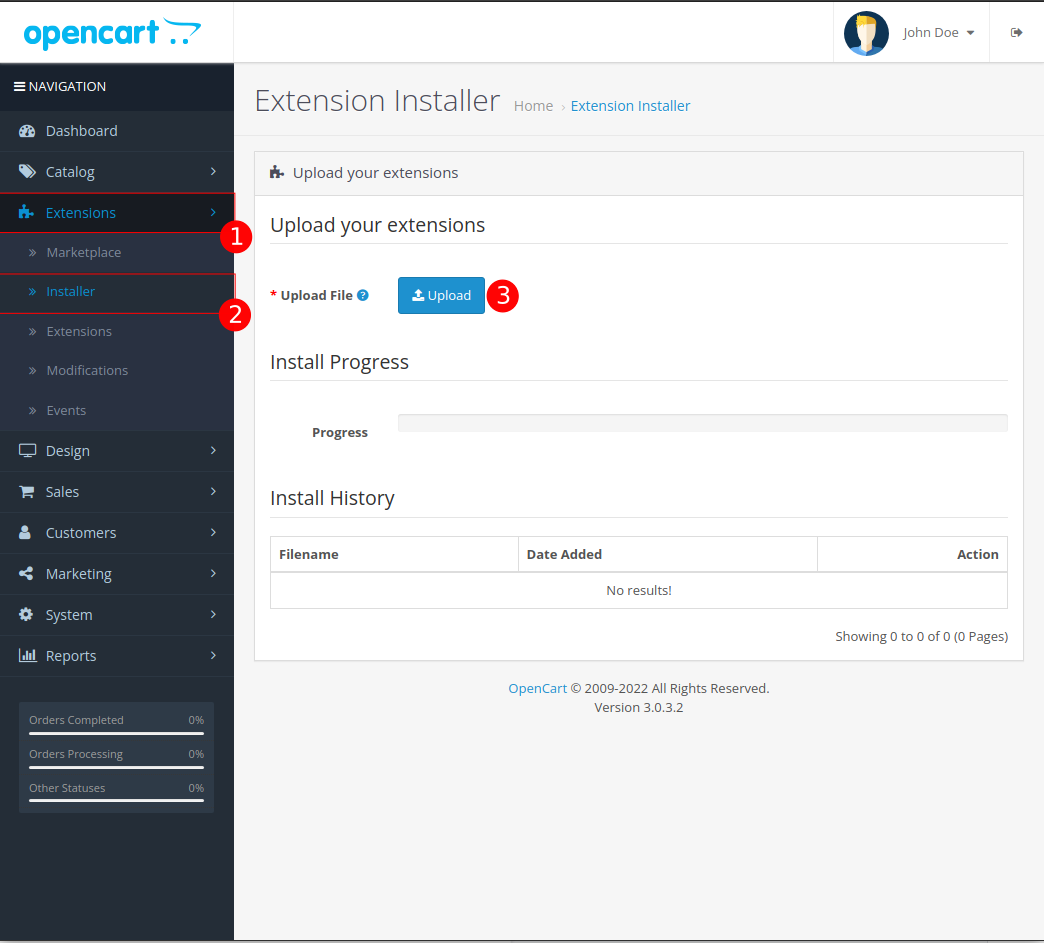
On this screen, click Upload [3] and upload the previously downloaded file.
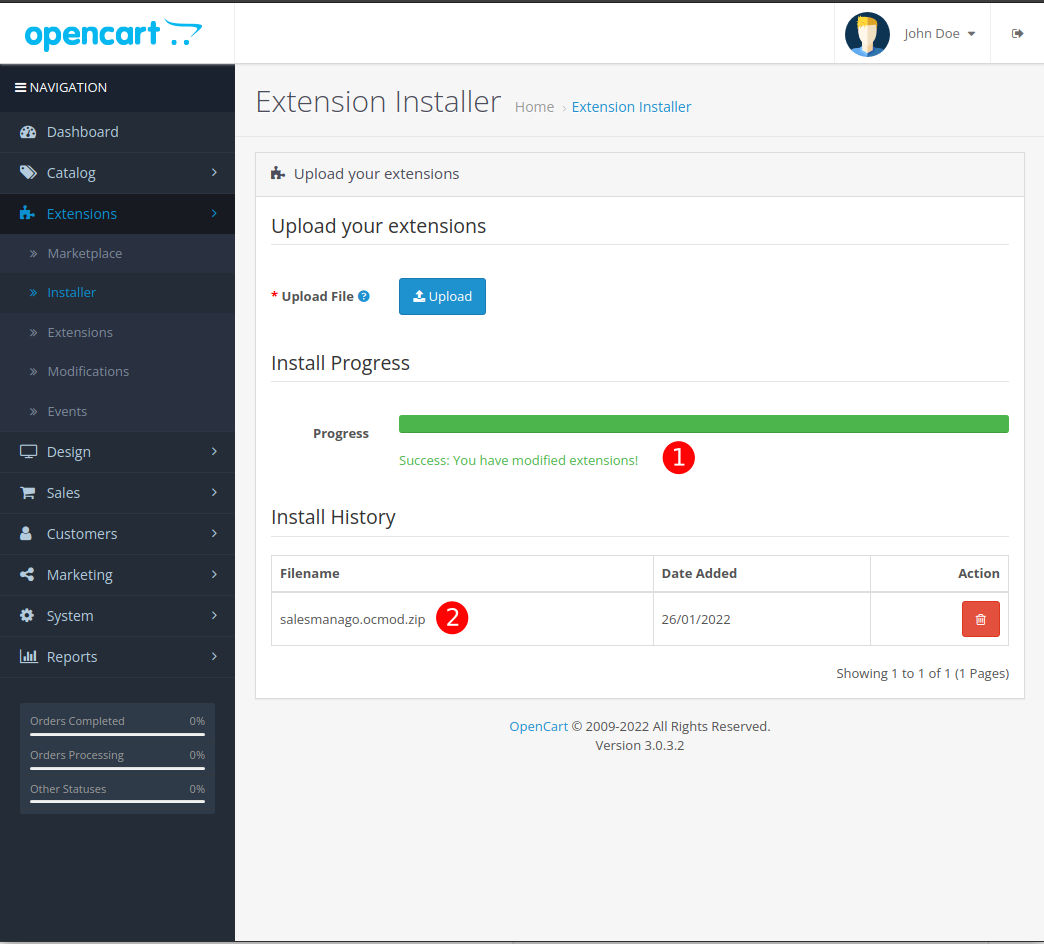
After the installation, you will see a green progress bar [1], information about the plugin that was successfully uploaded, and a new entry in the install history [2].
A. Integration settings
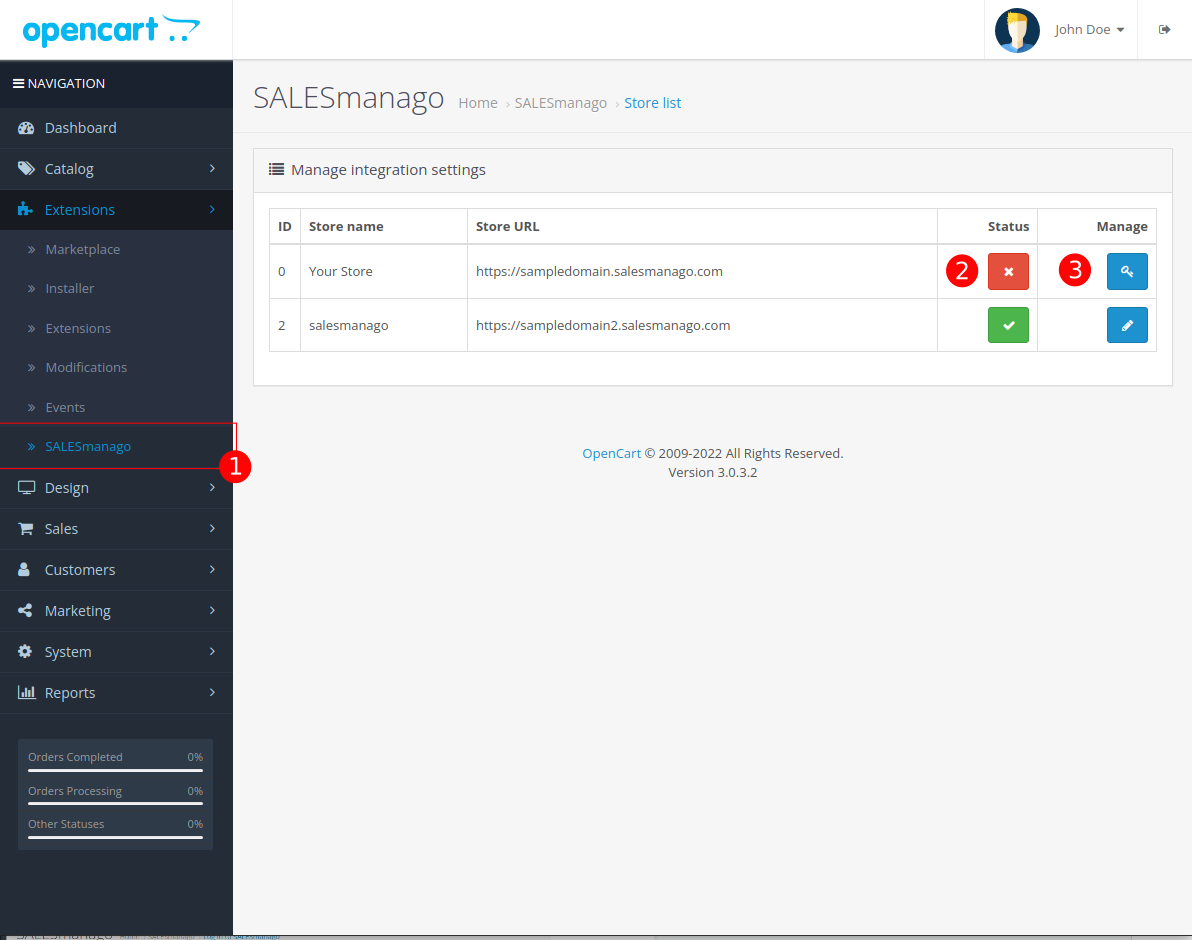
After the installation you can access the plugin in the side menu (Extensions → SALESmanago) [1]. There is a list of all stores ready to be configured. You can also see their integration status (active/inactive) [2]. To enable integration with a given store, click the key icon [3].
4. Configuration
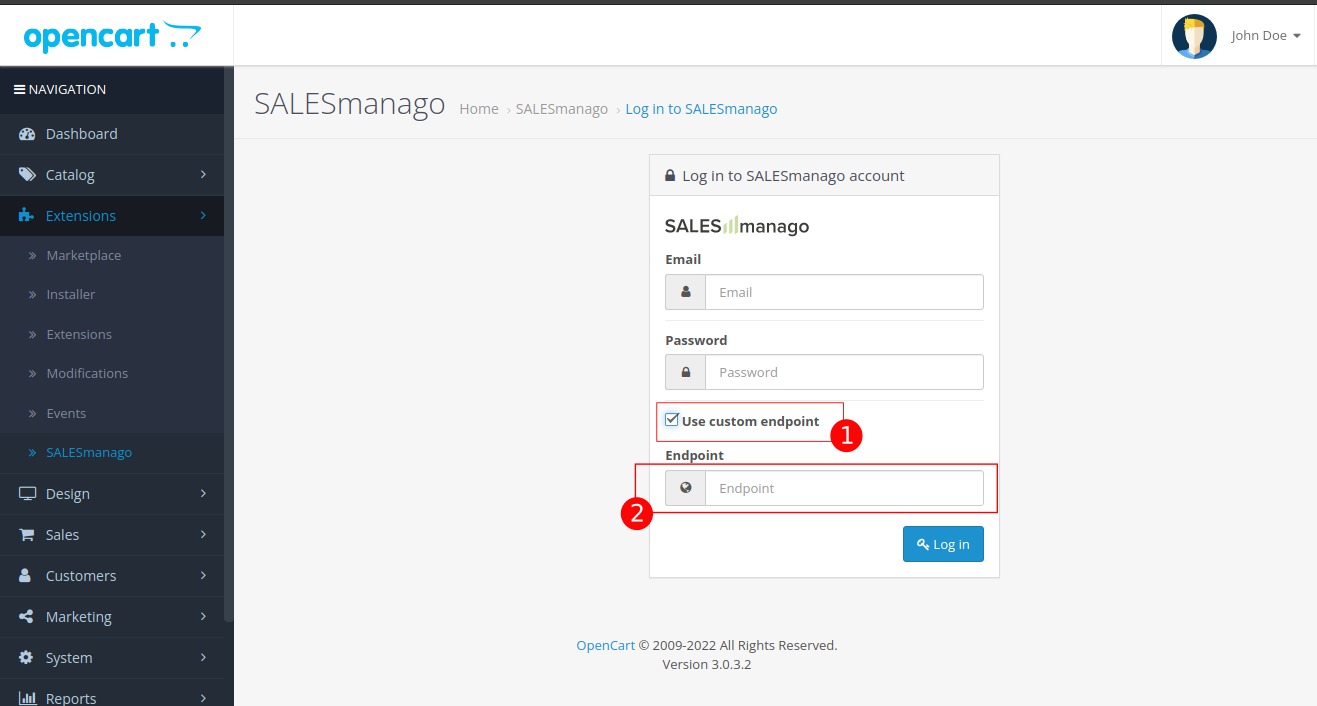
Next you will see a login screen. Enter the data you use when logging into SALESmanago. On this screen, you will also find the option to modify the endpoint. If your SALESmanago account is on a different (custom) endpoint, check Use custom endpoint [1] and enter the appropriate address in the field below [2].
Sometimes, you may experience some minor difficulties when logging in. Possible reasons include:
- Incorrect login data – to solve this problem, check your data by logging in to the SALESmanago admin panel.
- Two-Factor Authentication (2FA) – if you use this login method, please contact Customer Success for more information.
- Incorrect endpoint – if your SALESmanago account is on a different (custom) endpoint, use the Change endpoint option.
IMPORTANT: You can check the endpoint assigned to your account in the SALESmanago system (Menu → Integrations → Integration Center → API). If the endpoint starts with anything other than “www”, “app2” or “app3”, contact Customer Success.
A. Account settings
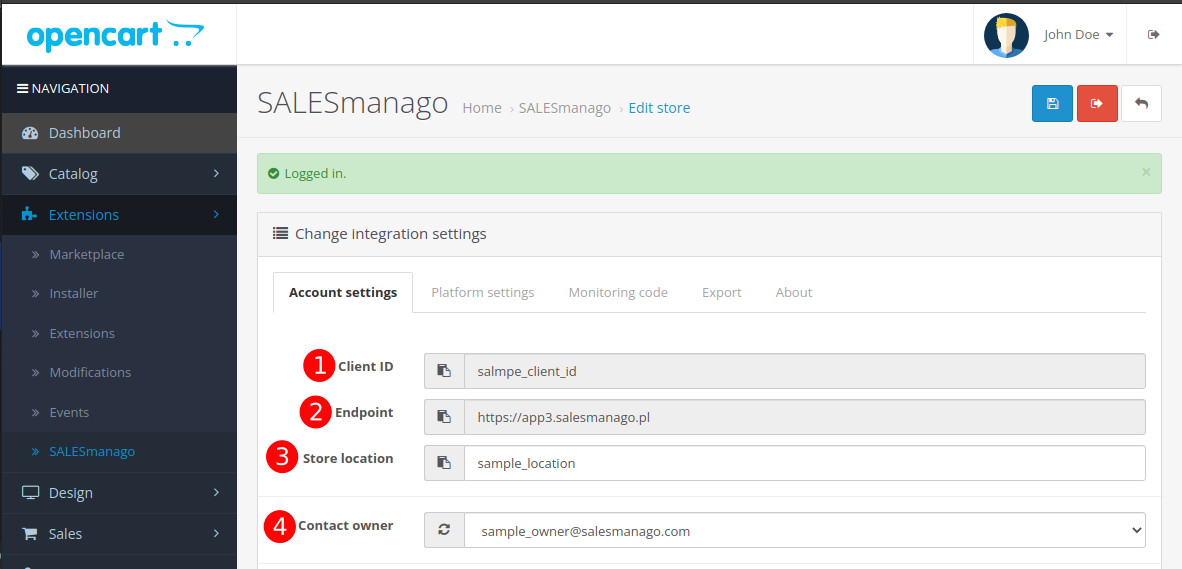
[1] Client ID – this is the identifier of your SALESmanago account. Once you are logged in, you can find it in Menu → Integrations → Integration Center → API. This information is added automatically, so you do not need to edit it.
[2] Endpoint – indicates the location of your SALESmanago account. This information is added automatically, so you do not need to edit it.
[3] Store location – is the Product Feed ID that allows you to match orders and transactions from your OpenCart store to the Product Feed added in SALESmanago. The value of this field should match the location field configured in the SALESmanago system (Menu → Integrations → Integration Center → Product Catalogs). It is important to make any necessary edits so that they both have the same value. This data will be used to display products in the recommendation frames, newsletters, and Web Push notifications.
[4] Contact Owner – in this drop-down list, you will find email addresses of those in SALESmanago that have the contact owner role. Select the email address to which new contacts sent from your store will be assigned.
IMPORTANT: If the email address you are searching for is not on the drop-down list, click on the refresh button to synchronize the current list of contact owners from SALESmanago.
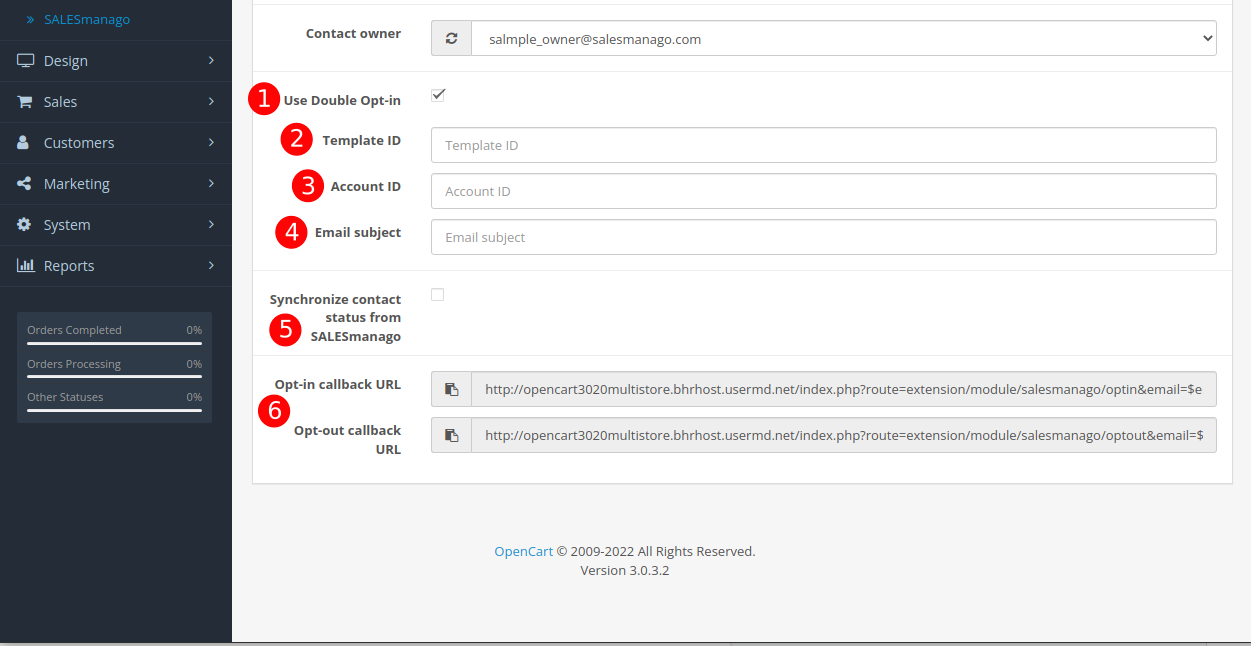
[1] Use Double Opt-in – check if you want to activate the Double Opt-in option. This is a mechanism where a user must confirm their email address through another link after subscription. This action is in line with the best practices of consent-based marketing. At the same time, it increases the chances of high deliverability, Open Rate, and conversion rates in the indicated channel.
By default, a confirmation email will be sent in the language version corresponding to that of the user’s browser. If you have configured the sending of confirmation emails in SALESmanago, leave these fields blank so that the data can be downloaded directly from the system. If you want to choose a specific template, complete all 3 fields [2, 3, 4].
[2] Template ID (optional) – use the confirmation email template created in the SALESmanago system.
[3] Account ID (optional) – indicate the email account in the SALESmanago system from which a confirmation message will be sent.
[4] Email subject (optional) – enter the subject of the confirmation email.
Read more about enabling Double Opt-in on eCommerce platforms >>
[5] Synchronize contact status from SALESmanago – choose this option if you want to check whether the contacts who registered on your platform are already included in the SALESmanago database. If an opt-in contact omits the consent when registering, they will keep the opt-in status both in the SALESmanago system and the OpenCart platform.
[6] Callbacks are links that allow you to synchronize the opt-in and opt-out status between SALESmanago and your eCommerce platform. Callback URLs should be copied and pasted into the appropriate fields in the SALESmanago system settings (Menu → Integrations → Integration Center → Callbacks).
EXAMPLE: If a contact unsubscribes from the newsletter via email (opt-out link), the information will be sent to the plugin through callbacks, resulting in the status on the OpenCart platform being changed.
B. Platform settings
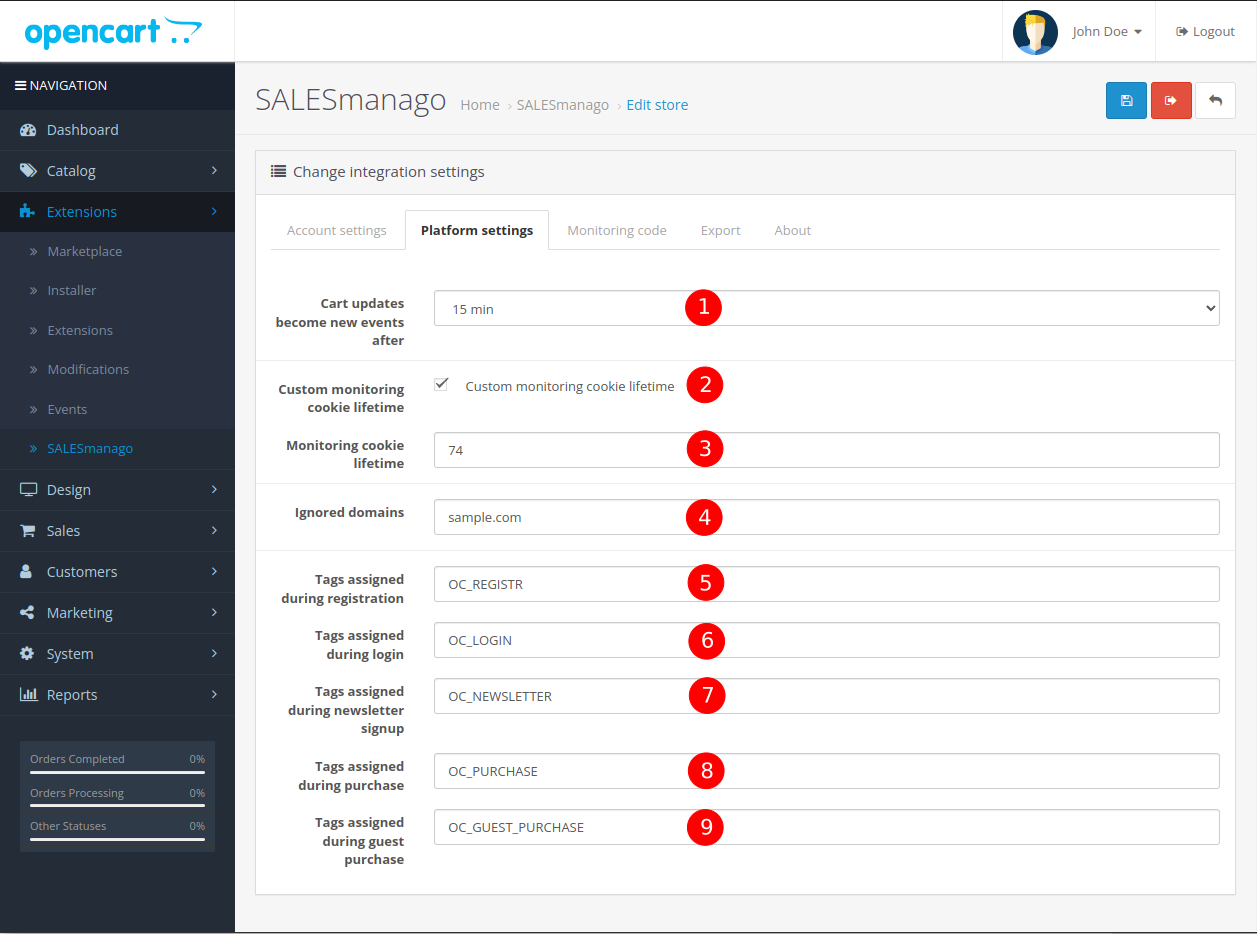
[1] CART updates become new events after – select the time after which the CART event will no longer be updated. Whenever a customer adds a product to the cart, this creates a CART event in SALESmanago and a smevent cookie in your e-store. The selected cookie lifetime is the period over which the CART event is updated.
EXAMPLE: If you select a 12h cookie lifetime, the CART event keeps updating for 12 hours from the time of adding the product to the cart. After this cookie expires, the event is no longer updated and a new CART event is created for the contact.
[2] Custom monitoring cookie lifetime – allows you to set the time for which cookies are kept in the user’s browser. This option helps you ensure that the configuration complies with the GDPR rules. After selecting this checkbox, a text field [3] appears.
[3] Monitoring cookie lifetime – specify (in days) the lifetime of the smclient cookie. The default period is 3652 days (10 years). You can also enter a fraction value, e.g., 2.5.
[4] Ignored domains – contacts whose email addresses contain the domains entered in this field will not be transferred to SALESmanago. In particular, you can enter temporary emails and indirect emails domains, e.g., randomized email addresses used by Marketplace providers.
IMPORTANT: Separate particular domains with commas, without spaces (e.g., example.com, domain.com).
[5] Tags assigned during registration – these tags will be assigned to contacts after registration.
[6] Tags assigned during login – these tags will be assigned to contacts after logging in.
[7] Tags assigned during newsletter sign-up – these tags will be assigned to contacts after signing up for a newsletter.
[8] Tags assigned during purchase – these tags will be assigned to contacts after making a purchase.
[9] Tags assigned during guest purchase – these tags will be assigned to contacts after making a purchase as a guest.
IMPORTANT: Separate tags with commas without spaces. After saving the settings, all tag names are automatically processed: lowercase letters are converted to uppercase and spaces will be changed to underscores (_).
C. Monitoring Code
[1] Disable Monitoring Code – check if you do not want the module to add the Monitoring Code to your website automatically. This option is useful when the script loading order causes technical problems or when you do not want contacts to be monitored on all pages.
[2] smcustom – add the var _smcustom=true flag to the Monitoring Code. It is required for the use of dynamic scripts in SALESmanago.
[3] smbanners – add var _smbanners=true flag to the Monitoring Code. It allows you to display personalized banners created in SALESmanago on the website.
IMPORTANT: Checking Disable Monitoring Code [1] makes it impossible to change the other two options in the module settings. If you want to use them, configure the flags manually in the Monitoring Code.
[4] Currently used JavaScript – a preview of the current Monitoring Code on your platform. This field cannot be edited.
IMPORTANT: The changes to the code preview are not visible until they have been saved.
D. Export
The export of contacts and external events allows you to easily transfer the data collected before installing the plugin.
Before you start exporting, there are three things to note:
- You can export contacts multiple times, i.e. the contact data will be updated in SALESmanago during each transfer.
- You should export contacts before exporting external events. Make sure your contacts are in the SALESmanago database before transferring orders.
- You should export external events only once, otherwise the data sent to SALESmanago will be duplicated.
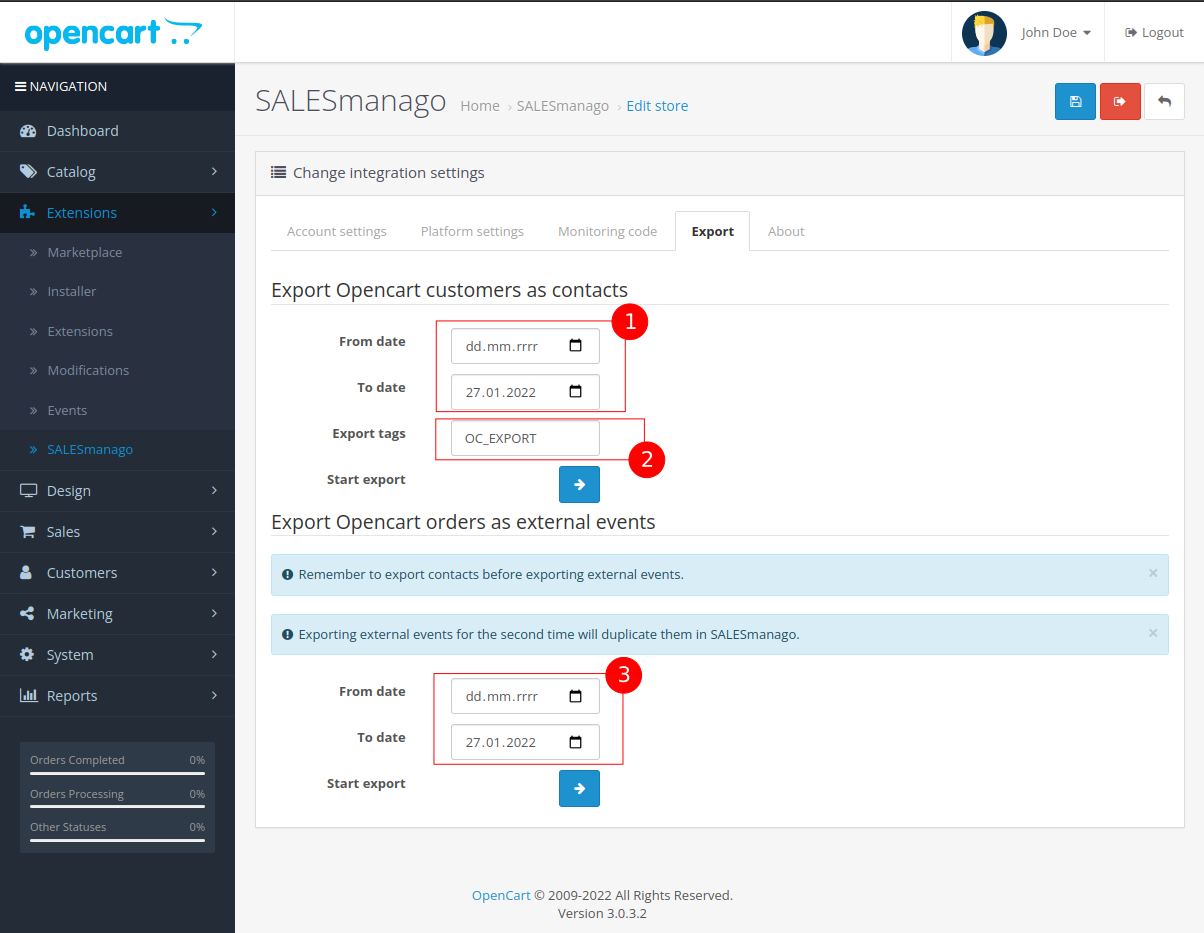
Export OpenCart customers as contacts allows you to export contacts registered on the platform, with their newsletter status being maintained.
[1] Time range – select the time range from which contacts should be exported.
[2] Export tags – enter the tags that will be assigned to the contacts following the export to SALESmanago. Separate them using commas with no spaces.
Export OpenCart orders as external events – allows you to export customer purchases. If the SALESmanago plugin has been installed for some time, the export of external events should be limited to the plugin installation date.
[3] Time range – select the time range from which orders should be exported.
E. About
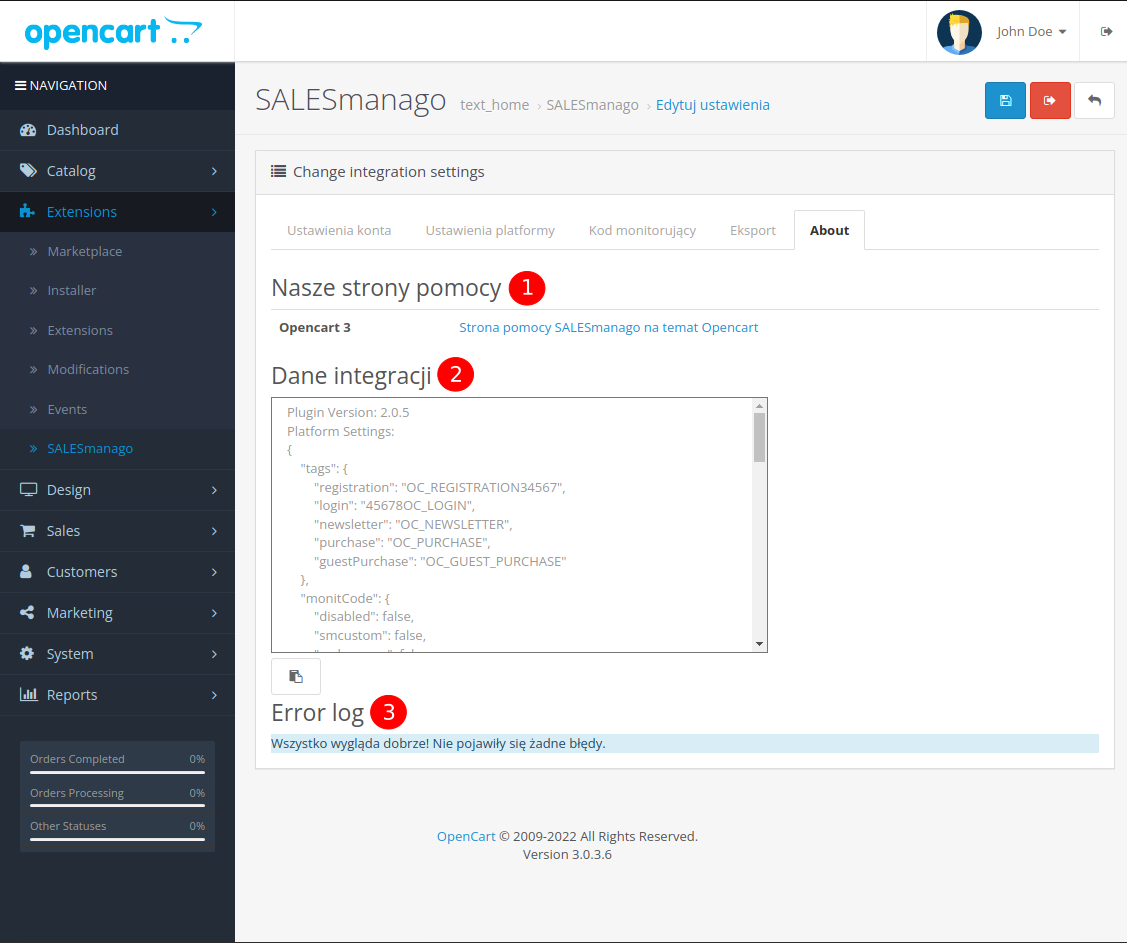
This screen contains all plugin data to help you solve any integration problems.
[1] Nasze strony pomocy – SALESmanago support articles related to the plugin integration.
[2] Dane integracji – information about the PHP server version, the version of the OpenCart plugin itself, those versions that can be integrated with SALESmanago, as well as plugin settings and configuration.
[3] Error log – list of application errors related to the SALESmanago plugin.
5. Technical description
A. Events
The plugin uses the following events:
Admin:
- admin/view/common/column_left/before.
- admin/model/customer/customer/editCustomer/after.
- admin/model/customer/customer/addCustomer/after.
Catalog:
- catalog/model/account/customer/addCustomer/after.
- catalog/model/account/customer/editCustomer/after.
- catalog/model/account/customer/editNewsletter/after.
- catalog/model/account/address/editAddress/after.
- catalog/model/account/address/addAddress/after.
- catalog/model/checkout/order/addOrder/after.
- catalog/model/checkout/order/addOrderHistory/after.
- catalog/controller/common/footer/before.
- catalog/controller/checkout/cart/add/after.
- catalog/controller/checkout/cart/edit/before.
- catalog/controller/checkout/cart/remove/after.
- catalog/controller/account/login/after.
- catalog/controller/checkout/guest/save/after.
B. Database
The plugin uses the prefix_setting table. For each logged-in store, it creates two entries:
|
setting_id |
store_id |
code |
key |
value |
serialized |
|
1 |
1 |
salesmanago |
platform_settings |
json_value* |
0 |
|
2 |
1 |
salesmanago |
configuration |
json_value* |
0 |
*Settings are saved in JSON format.
C. Monitoring Code
The SALESmanago plugin adds the Monitoring Code during the catalog/controller/common/footer/before action. Due to its specific mechanics, OpenCart creates a file in catalog/view/javascript named sm_monit_{client_id}_{store_id}.js and then adds it to each page using the $this->document->addScript() method.