PrestaShop is a popular platform that offers support in building and scaling eCommerce businesses. If you have a shop on the PrestaShop 1.7 platform, you can integrate it with the SALESmanago platform and transfer Contact and transaction data between the two. You can use this information in your Marketing Automation activities and thus boost your sales.
To download the latest version of the plugin, click here.
Contents
- 1. Basic information
- 2. Scope of integration
- 3. Installation
- 4. Configuration
- 5. Technical description
- 6. Information for developers
1. Basic information
In this article, you will find detailed information about integration between SALESmanago and the PrestaShop 1.7 platform. The plugin is available for free for our customers and is constantly being improved.
The integration allows you to transfer relevant Contact and transaction data between the two platforms. You can use this information to automate your marketing activities and thus boost your e-store sales.
The plugin supports all stores created on a given PrestaShop 1.7 instance under the multistore functionality. After you have installed the plugin, you need to activate the integration by logging in to your SALESmanago account individually for each store you want to integrate. To achieve this, select the store, go to the SALESmanago module and type in your login data (see section 4.—Configuration).
IMPORTANT: A single store can be integrated with only one SALESmanago account at a time (whereas a single SALESmanago account can be integrated with a number of stores).
NOTE: The SALESmanago module requires PHP version 7.0 or higher.
If you use the previous version of the PrestaShop platform, see the article dedicated to integration with PrestaShop 1.6 >>
2. Scope of integration
After logging in to the plugin, synchronization and data transfer are performed automatically.
The scope of integration includes the transfer of the following data to SALESmanago:
- Contacts obtained as a result of registration and purchase
- Newsletter subscribers
- External Events: CART and PURCHASE
- Newsletter subscription status (opt-in/opt-out)
- Archival data (export of archival Contact and transactional data)
Additionally, data enabling the synchronization of the opt-in/opt-out status are transferred from SALESmanago to PrestaShop.
As a result of the integration, the SALESmanago Monitoring Code is automatically added to all pages of the integrated shop.
3. Installation
Click here to download the latest version of the plugin >>
After downloading the plugin, go to the PrestaShop platform and on the sidebar menu, in the Improve section, select Modules [1] → Module Manager [2].

On the next screen, click Upload a module [3] and upload the previously downloaded file.

If the upload is successful, you will see the following message:

Click Configure [4] to go to the next stage of the integration process.
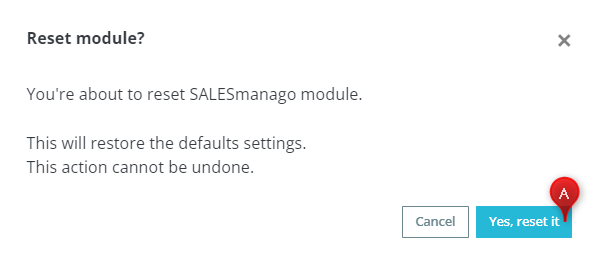
NOTE: In case any issues with the plugin occur (no possibility of logging in, improperly functioning integration) go back to the Module Manager, find SALESmanago on the list of modules and select Reset from the drop-down list to restore the default settings. When you see the confirmation screen, click Yes, reset it.
This way you can continue the configuration without having to re-install the plugin.
4. Configuration
A. Logging in
After opening the SALESmanago module you will see a login screen. First select the shop you want to integrate with SALESmanago. On the PrestaShop platform, in the top right corner, select the shop from the drop-down list:
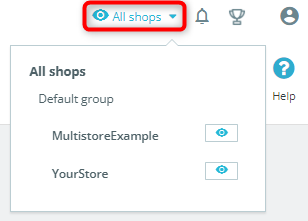
IMPORTANT: If you use the multistore functionality, you must integrate each shop individually.
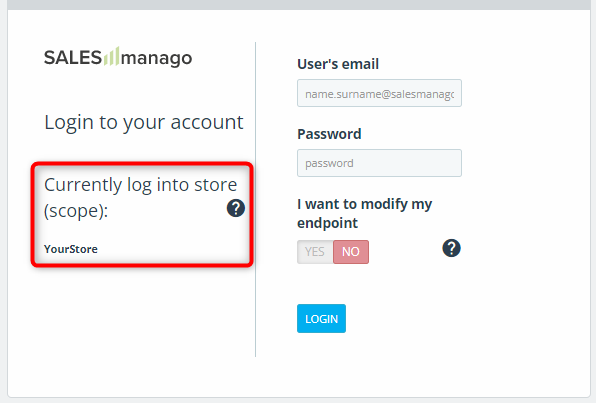
The shop you are logging into (i.e. the shop to be integrated with SALESmanago) will be indicated on the left side of the login panel.
IMPORTANT: A single store can be integrated with only one SALESmanago account at a time (whereas a single SALESmanago account can be integrated with a number of stores).
Having selected the correct shop, enter the data you use to log in to the SALESmanago system in fields [1] and [2].
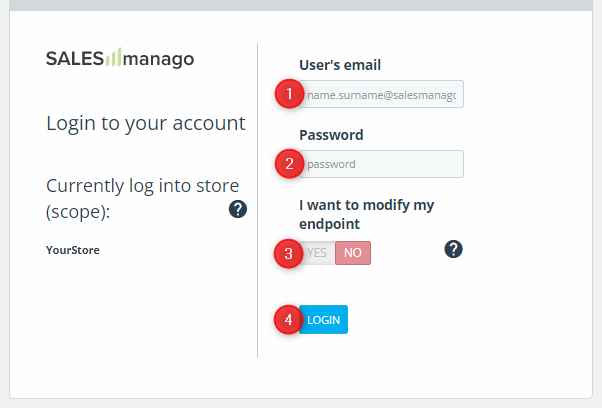
If your SALESmanago account uses a non-standard endpoint (i.e. an endpoint other than www.salesmanago.com, app2.salesmanago.com or app3.salesmanago.com), enable the option I want to modify my endpoint by clicking on the toggle button [3]. Then enter the address in field [A]—Set your endpoint
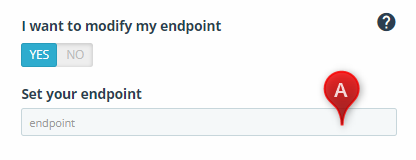
NOTE: Do not add „http://”, „https://” or a trailing slash (/) to the URL address of your endpoint. Example: domain.salesmanago.com
When you have entered the required data, click LOGIN [4].
NOTE: The login method described above does not apply if you use two-factor authentication (2FA). This is due to the specific nature of this method. For more information, please contact the Customer Success Department.
After logging in, you will see the Start dashboard, which contains information about the latest changes and plugin versions.
NOTE: Following the authorization and connection with the SALESmanago system, the integration will be active, meaning that Contacts and External Events will be transferred to SALESmanago automatically. In the top menu bar, the Disconnect button can be found, which allows you to disable the integration. Following the disconnection, Contacts and External Events will no longer be transferred from PrestaShop to SALESmanago.
To configure the plugin, use the top menu bar:

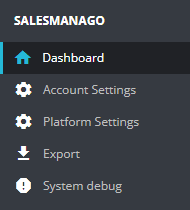
You can also go to PrestaShop’s side menu, where you will see a SALESmanago section:
B. Account Settings
On this tab you can define integration settings related to your SALESmanago account.
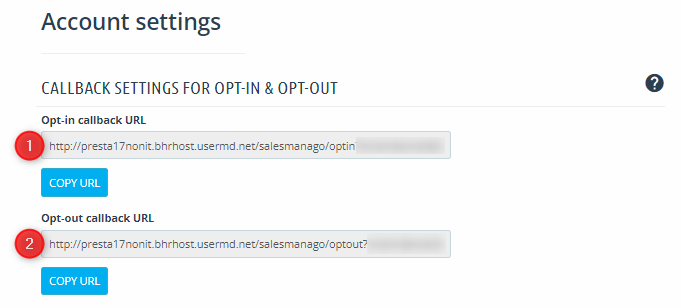
[1] Opt-in callback URL and [2] Opt-out callback URL—Callbacks allow you to synchronize the newsletter subscription status from SALESmanago to PrestaShop 1.7. If a Contact’s opt-in/opt-out status changes in the SALESmanago system, this information will also be updated on the PrestaShop platform.
To set callbacks, copy the automatically generated URL addresses provided in fields [1] and [2]. Then go to Menu → Integrations → Integration Center → Callbacks and paste them in the corresponding fields ([A] and [B], respectively). Click Save.
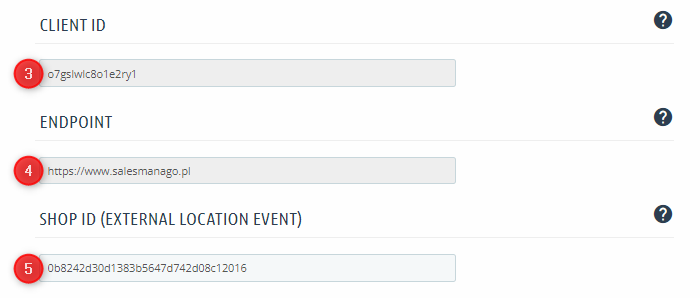
[3] Client ID—your Client ID in the SALESmanago system. This field is non-editable as its value is automatically loaded from SALESmanago.
[4] Endpoint—the endpoint of your SALESmanago account. This field is non-editable as its value is automatically loaded from SALESmanago.
[5] Shop ID—your shop identifier. The value of the Shop ID field is transferred as location in External Events. If you use a Product Catalog / XML Product Feed, change the default Shop ID value so that it is identical to the value of the location field in the Catalog/Feed.
NOTE: The Shop ID must contain 3 to 36 characters and must not start with a digit. The only special character allowed is “_”.
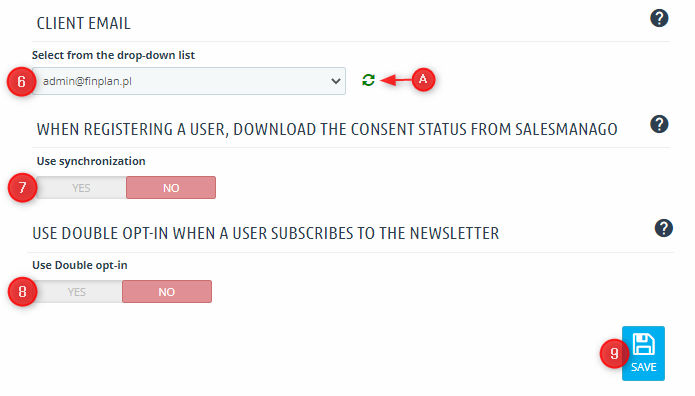
[6] Client email—select the Contact owner to whom Contacts obtained through the given shop will be assigned.
NOTE: The owner list is sent by SALESmanago to PrestaShop when you log in to the plugin. If there have been any changes to the owner list since then, click the Refresh button [A] to update it.
[7] When registering a user, download the consent status from SALESmanago—select YES if you want the system to automatically check if a Contact registering to your shop already exists in your SALESmanago database. If the Contact exists in the database and has the opt-in status but has not given newsletter consent during the registration process, they will have the opt-in status on both the SALESmanago and PrestaShop platforms.
[8] Use Double opt-in when a user subscribes to the newsletter—select YES if you want Contacts that subscribe to your newsletter to confirm their subscription in a separate email message.
Learn more about the double opt-in (double consent) mechanism >>
IMPORTANT: For the double opt-in mechanism to work, the option Send email with confirmation to added user on the SALESmanago platform (Menu → Channels → Email Marketing → Settings) must be checked.

Otherwise each new Contact that subscribes to the newsletter will be assigned the opt-in status immediately, without additional confirmation.
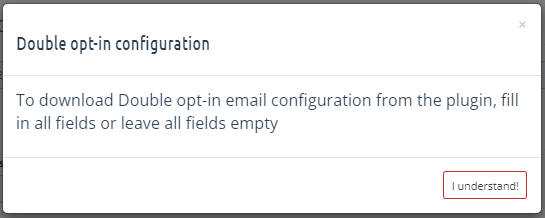
After selecting “YES”, you will see three fields [A, B, C] concerning double opt-in settings:

Complete the fields with data from the SALESmanago platform.
See where to find the required data >>
TIP: Before implementing the double opt-in mechanism, create an HTML subscription confirmation email (Menu → Channels → Email Marketing → Email List → Subscription confirmation). Enter its details in the SALESmanago system (Menu → Channels → Email Marketing → Settings) or in the SALESmanago module on the PrestaShop platform (see IMPORTANT below).
NOTE: Remember to either fill out all three fields or leave all of them blank. You will be instructed to do so by a message displayed after checking “YES”:
If you leave all fields empty, the data will automatically be loaded from the SALESmanago platform. In this case make sure that the double opt-in settings on the SALESmanago platform are appropriately defined (Menu → Channels → Email Marketing → Settings → Subscription confirmation languages).
NOTE: Make sure that the option Send email with confirmation to added user, available in the same location on the SALESmanago platform (Menu → Channels → Email Marketing → Settings), is checked:
When you have defined all settings, click Save [9].
C. Platform Settings
Here you can define integration settings related to the PrestaShop platform.
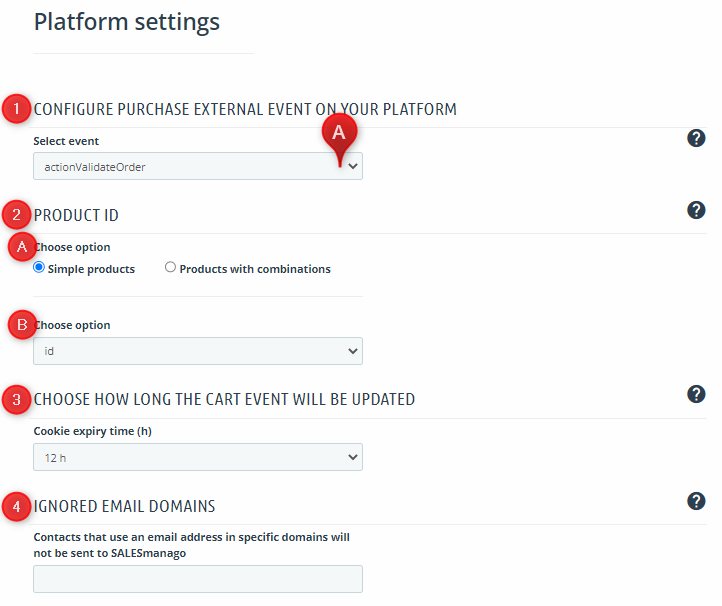
[1] Configure PURCHASE External Event on your platform
[A] Select event—select the hook that will trigger the transfer of PURCHASE External Events.
A hook is a mechanism that triggers a certain action (for the SALESmanago plugin, this may be the transferring of a Contact to SALESmanago) at a specific time. To ensure that this mechanism works correctly with various payment and order processing methods, our plugin allows you to select the hook responsible for the PURCHASE event.
The list contains the following options:
- actionValidateOrder,
- actionOrderStatusPostUpdate,
- actionPaymentConfirmation,
- actionOrderStatusUpdate.
You can find detailed descriptions of particular hooks in section 5.E. Purchase hook settings.
[2] Product ID—define the method for mapping (identifying) products in the Products field in External Events. You can choose from two options:
- Simple products—in External Events, in the Products field, products will be identified by a single variable, as selected from the drop-down list:
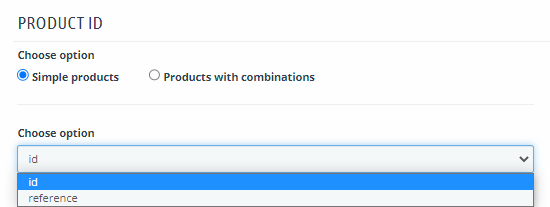
- ID—product designation created within your shop;
- Reference—trade product designation, i.e. the SKU.
- Products with combinations—in External Events, in the Products field, products will be identified by a set of two variables separated by a single delimiter. The first variable refers to the main product, while the second variable refers to the product variant. Each of these elements must be selected from a drop-down list.
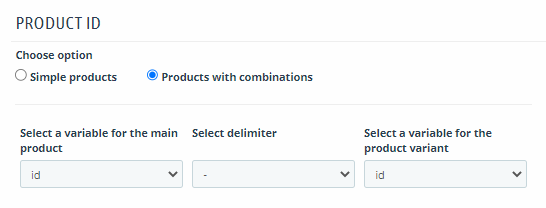
EXAMPLES:

Products will be transferred in External Events in the following form: id_reference.

Products will be transferred in External Events in the following form: reference&reference.
You can read more about product mapping in section 5. Technical description.
[3] Choose how long the CART event will be updated—specify the time after which a cart update will be treated as a new External Event. Any changes to the cart made before the expiry of this period will be treated as part of the same External Event. The available options are as follows:
- CART updates will always create new ext. events (CART events will never be updated; each CART change will be transferred to SALESmanago as a separate External Event),
- 15 min,
- 1 h,
- 4 h,
- 12 h (default),
- 7 days,
- CART update will always update ext. events (each change to a CART will be treated as an update and there will be a single External Event in the SALESmanago database).
EXAMPLES:
- If you want only the final contents of a cart to be transferred to SALESmanago, select “CART update will always update ext. events”.
- If you want a new CART event to be transferred to SALESmanago when a customer modifies the contents of a cart 4 hours after its creation, select “4 hours”.
- If you want the entire history of a cart to be transferred to SALESmanago (each addition, removal or change in quantity), select “CART updates will always create new ext. events”.
[4] Ignored email domains—specify the email domains to be ignored, i.e. domains for which no data will be transferred to SALESmanago.
It is particularly recommended to list single-use/disposable email domains used to protect customer privacy.
EXAMPLE: If you enter example.com in this field, Contacts using this email domain (i.e., having email addresses ending with: @example.com) will not be transferred to the SALESmanago platform.
IMPORTANT: Separate individual domains with commas, without spaces.
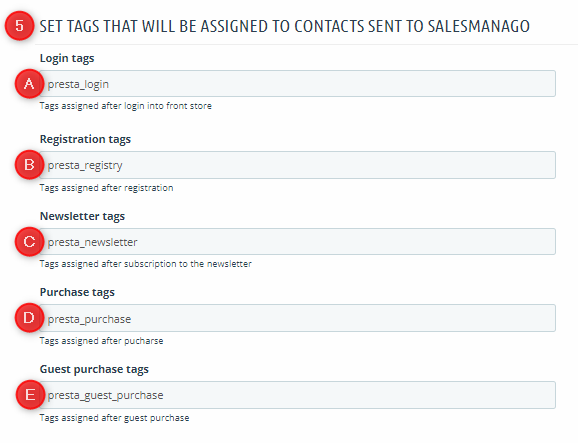
[5] Set tags that will be assigned to Contacts transferred to SALESmanago:
[A] Login tags—enter the tags to be assigned to users after they log in to your online shop.
[B] Registration tags—enter the tags to be assigned to users after they create a new account in your online shop.
[C] Newsletter tags—enter the tags to be assigned to users after they subscribe to your newsletter.
[D] Purchase tags—enter the tags to be assigned to registered users after they make a purchase in your online shop.
[E] Guest purchase tags—enter the tags to be assigned to non-registered users after they make a purchase as guests.
IMPORTANT: Separate individual tags with commas, without spaces.
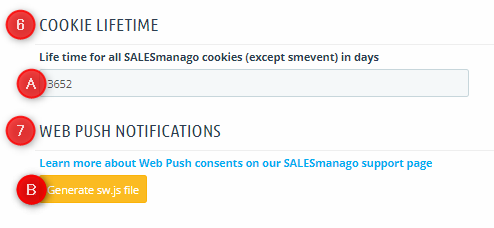
[6] Cookie lifetime—specify how long SALESmanago cookies (all except smevent) will be active, i.e. after what time they will expire. Enter the number of days in field [A].
The default setting is 3652 days, i.e. 10 years.
[7] Web Push notifications—you can display Web Push notifications created in SALESmanago directly from the domain of your shop. Click Generate sw.js file [B] to generate a service worker file responsible for the functioning of Web Push notifications.
NOTE: If the server access rights prevent the module from creating files, or if the module has no access to the root path of the domain, or if another sw.js file already exists, then no sw.js file will be generated by the plugin (an error message will be displayed).
NOTE: Without an sw.js file, Web Push notifications created in SALESmanago will be displayed on your website from a subdomain of SALESmanago.
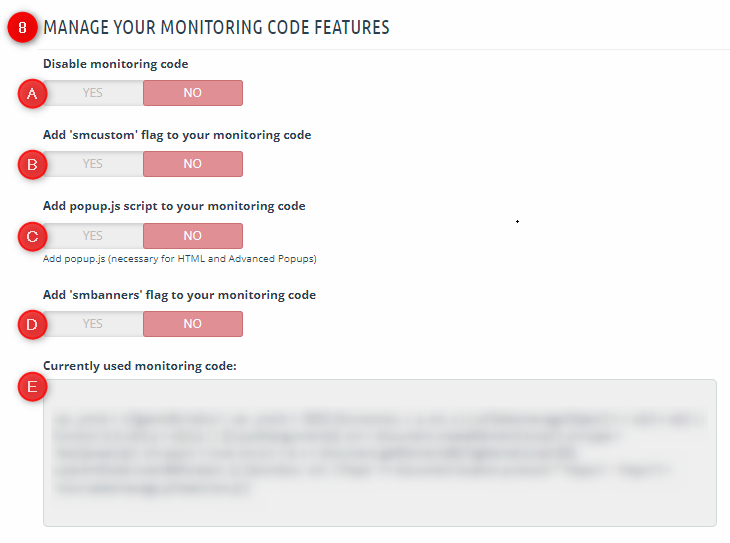
[8] Manage your Monitoring Code features
[A] Disable monitoring code—check “YES” if you do not want the SALESmanago Monitoring Code to be added to your website automatically. In this case you need to add the Monitoring Code to the platform code by yourself (e.g. in the footer).
IMPORTANT: Disabling the Monitoring Code means that it will be impossible to change any settings in this section using the plugin. Any changes will have to be introduced manually in the manually added script.
[B] Add ‘smcustom’ flag to your Monitoring Code—check YES if you want the Monitoring Code to include the _smcustom variable set to “true”, which enables the implementation of custom scripts created on the SALESmanago platform.
[C] Add popup.js script to your Monitoring Code—check YES if you want the Monitoring Code to include a script enabling the display of pop-ups on your website.
[D] Add ‘smbanners’ flag to your Monitoring Code—check YES if you want the Monitoring Code to include the _smbanners variable set to “true”, which enables the implementation of banners.
[E] Currently used Monitoring Code—a preview of the current SALESmanago Monitoring Code on your platform.
When you have made all necessary changes, click Save.
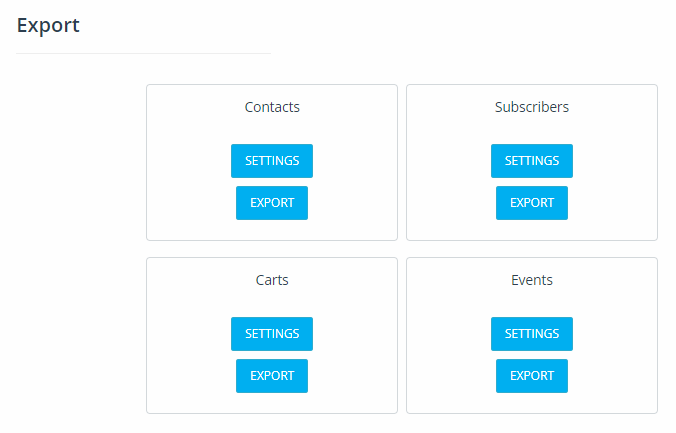
D. Export
Here you can export archival Contacts and External Events from your shop to the SALESmanago system.
NOTE: The export options are intended for data obtained before the installation and activation of the plugin. From the moment you log on to the plugin, Contacts and External Events are automatically transferred to SALESmanago.
NOTE: Exports of Contacts and Subscribers do not include any Contacts whose email addresses have domains listed as ignored domains on the Platform Settings tab (see section 4.B).
IMPORTANT: Make sure to export Contact data before exporting CART or PURCHASE events. The SALESmanago database needs to include Contacts to whom particular External Events can be assigned.
IMPORTANT: You can export Contacts any number of times as Contact data are updated in the SALESmanago database with each export. In the case of External Events, however, another export results in the duplication of the data on the SALESmanago platform.
IMPORTANT: Before performing an export, make sure that there are no active Automation Rules or Workflows on the SALESmanago platform, including the following Events (triggering specific Actions): Event: Contact has been added to the system or Event: New External Event occurred. Otherwise, an export of archival data to the SALESmanago system will trigger such an Automation Process for each exported Contact or each exported External Event.
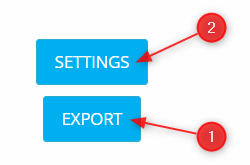
IMPORTANT: If you click EXPORT [1] for any of the four categories (Contacts, Subscribers, Carts, or Events), all existing data within the given category will be exported—with no filters or tags. To define precise parameters, select option [2]—SETTINGS.
D.1. Contacts
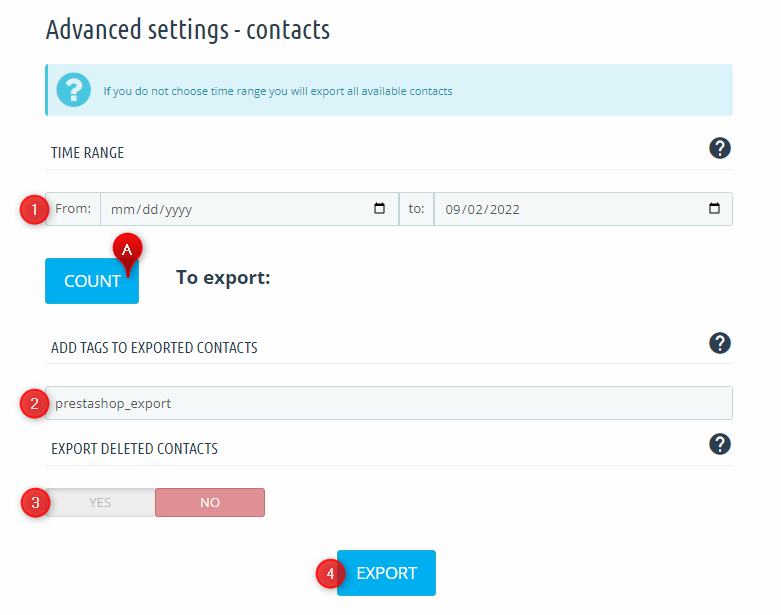
[1] Time range—specify the time range for which you want to export Contact data.
[A] Count—click this button to see how many Contacts will be included in the export based on the specified time range. This will make it easier to plan the data transfer process.
[2] Add tags to exported Contacts—here you can define the tags that will be assigned to the Contacts included in the export. Separate the tags with commas, with no spaces. The default tag is prestashop_export.
[3] Export deleted Contacts—here you can decide whether you want to export also those Contacts that have been deleted from the list of customers on the PrestaShop platform but still exist in the PrestaShop database. For more detailed information on this option, see section 6.B. Deleting users.
Having defined all parameters, click Export [4].
D.2. Subscribers
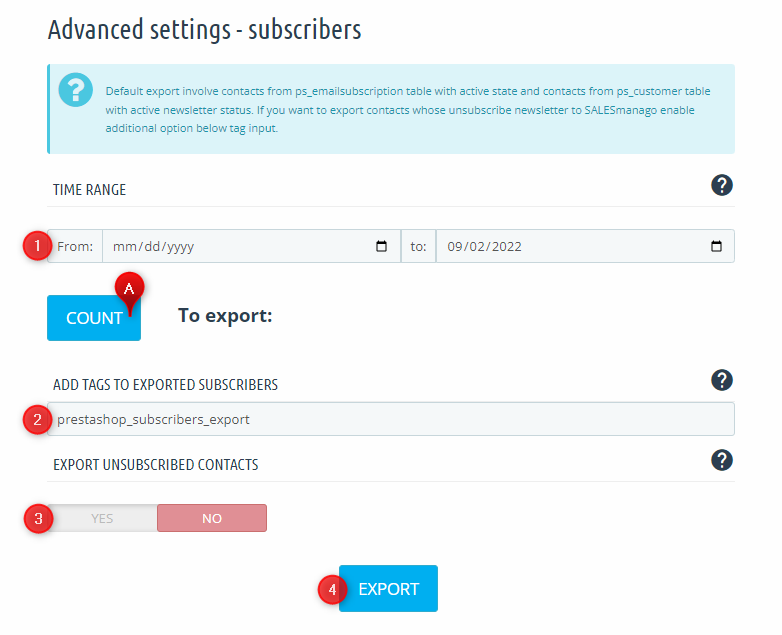
[1] Time range—specify the time range for which you want to export data on subscribers. Shop subscribers will be added to the SALESmanago database as Contacts.
[A] Count—click this button to see how many Subscribers will be included in the export based on the specified time range. This will make it easier to plan the data transfer process.
[2] Add tags to exported subscribers—here you can define the tags that will be assigned to the Subscribers included in the export. Separate the tags with commas, with no spaces. The default tag is prestashop_subscribers_export.
[3] Export unsubscribed Contacts—here you can decide whether you want to export also those Contacts who have unsubscribed from your newsletter. They will be transferred to the SALESmanago platform with the opt-out status.
Having defined all parameters, click Export [4].
D.3. Carts
IMPORTANT: Make sure to export Contact data before exporting CART events. The SALESmanago database needs to include Contacts to whom particular External Events can be assigned.

[1] Time range—specify the time range for which you want to export CART External Events.
[A] Count—click this button to see how many CART events will be included in the export based on the specified time range. This will make it easier to plan the data transfer process.
Having defined all parameters, click Export [2].
D.4. Events
IMPORTANT: Make sure to export Contact data before exporting PURCHASE events. The SALESmanago database needs to include Contacts to whom particular External Events can be assigned.
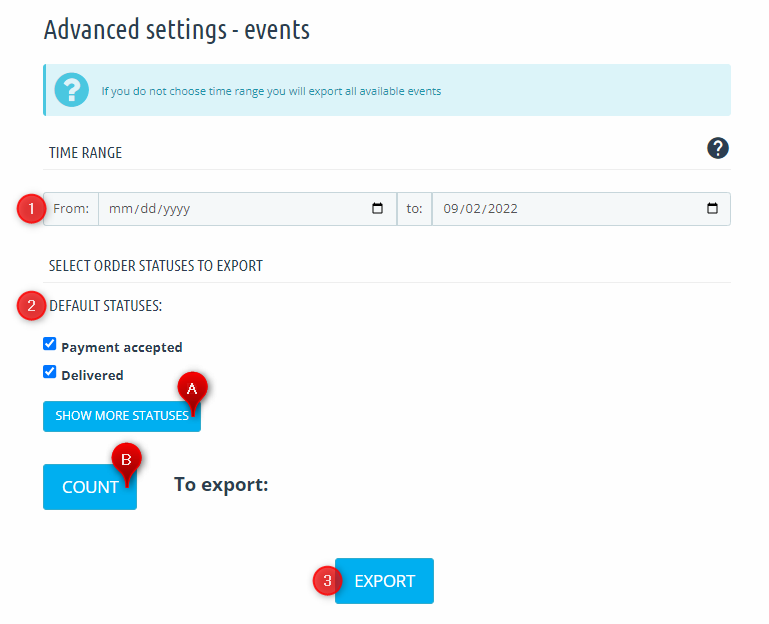
[1] Time range—specify the time range for which you want to export PURCHASE External Events.
[2] Select order statuses to export—here you can specify what order statuses are to be included in the export. The statuses: “Payment accepted” and “Delivered” are selected by default (you can uncheck these options if necessary).
If you want to export orders with other statuses, click Show more statuses [A] and check the appropriate options on the list.
[B] Count—click this button to see how many PURCHASE events will be included in the export based on the specified time range and the selected statuses. This will make it easier to plan the data transfer process.
IMPORTANT: If you are using the time range filter and the status filter simultaneously, only the Contacts that meet both specified conditions will be exported.
Having defined all parameters, click Export [3].
D.5. Exports archive
The exports archive stores up to 10 exports. If this number is exceeded, the oldest log will be removed from the database and replaced with a new one.
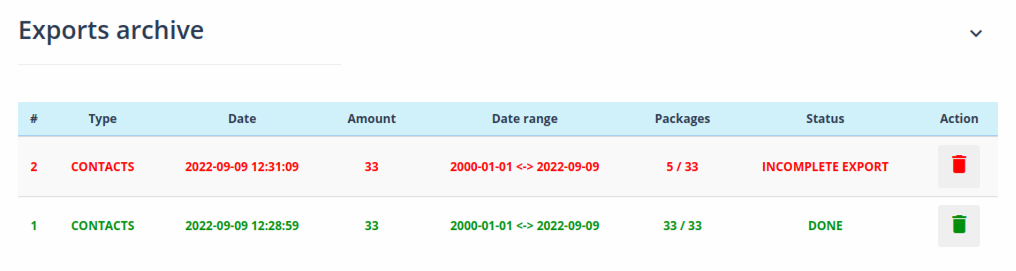
You can find the following information in the archive:
[1] #—the export’s identifier, which is a unique value (for example, “4” means that this is the 4th export in the history, i.e., since the installation of the plugin);
[2] Type—identifies whether the export type is Contacts or Events;
[3] Date—the date and time of the export;
[4] Amount—the number of data lines transferred as part of the given export;
[5] Date range—the time range for which the data were transferred to SALESmanago;
[6] Packages—takes the X/Y format; indicates the number of correctly exported packages within a given export (X) and the total number of packages in that export (Y);
[7] Status—the final export status;
[8] Action—here you can delete the data for a given export from the archive.
E. System Debug
Here you will find information concerning the SALESmanago plugin, the native newsletter subscription module and the PrestaShop platform. This data can be useful in case of any problems.
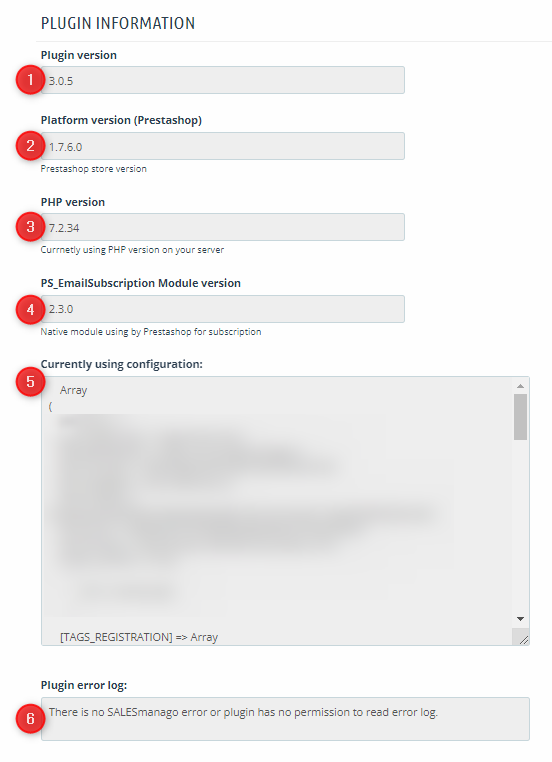
[1] Plugin version—the current version of the SALESmanago plugin.
[2] Platform version (PrestaShop)—the current version of the PrestaShop platform.
[3] PHP version—the PHP interpreter version currently used on your server.
[4] PS_EmailSubscription Module version—the current version of the native newsletter subscription module.
[5] Currently using configuration—complete configuration of all module settings presented as a table.
[6] Plugin error log—lines extracted from the error log file that contain the phrase “salesmanago”.
5. Technical description
A. Data fields in External Events
A.1 CART
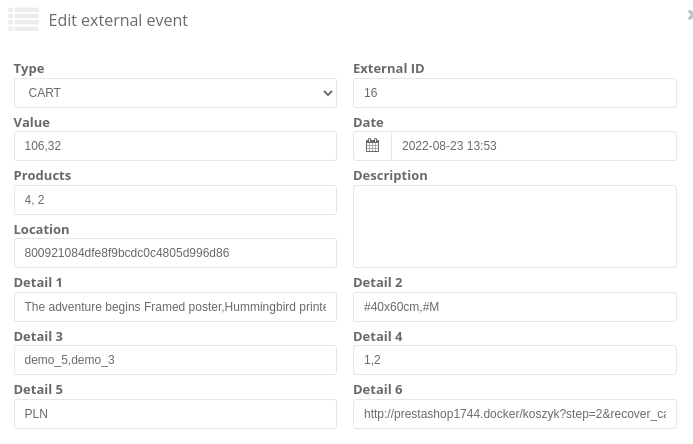
Data transferred in CART events:
- Type—External Event type: CART.
- External ID—he ID assigned to the specific External Event by the PrestaShop platform.
- Value—the total value of the products added to the cart.
- Date—the date of the event’s occurrence.
- Products—the products added to the cart, designated according to the mapping option selected in Platform Settings (see section 4.C Platform Settings—[2] Product ID), separated by commas.
- Location—Shop ID. The default value is generated by the SALESmanago plugin and consists of 32 characters preceded by the prefix sm_. You can also define your own Shop ID.
- IMPORTANT: The Shop ID must contain 3 to 36 characters and must not start with a digit. The only special character allowed is “_”.
- IMPORTANT: If you use a Product Catalog / XML Product Feed, change the Shop ID in the plugin settings so that it is identical to the value of the location field in the Catalog/Feed.
- Description—this field is empty.
- Detail 1—product names.
- Detail 2—variant names.
- Detail 3—additional product identification that depends on the mapping option selected for the main product in Platform Settings (i.e., what value is shown in the Products field). The following values are shown in Detail 3:
- product IDs (if the selected mapping is: reference, reference-delimiter-ID, or reference-delimiter-reference);
- product references (if the selected mapping option is: ID, ID-delimiter-ID, or ID-delimiter-reference).
- Detail 4—the quantities of the products added to the cart.
- Detail 5—the currency of the External Event.
- Detail 6—the URL for CART recovery.
A.2. PURCHASE
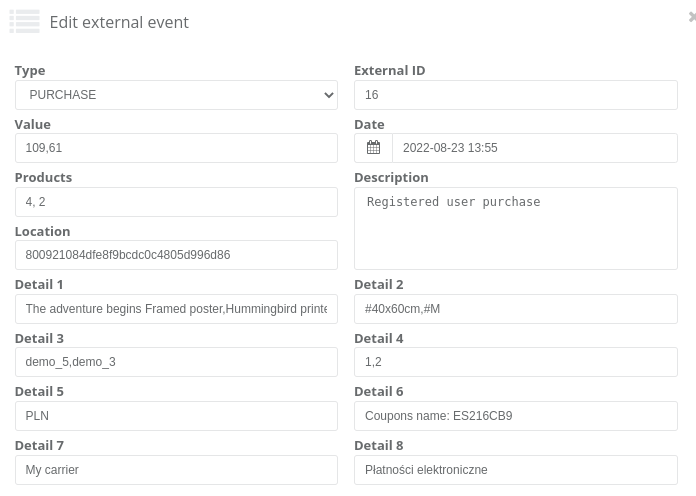
Data transferred in PURCHASE events:
- Type—External Event type: PURCHASE.
- External ID—the ID assigned to the specific External Event by the PrestaShop platform.
- Value—the total value of the purchased products.
- Date—the date of the event’s occurrence.
- Products—the purchased products, designated according to the mapping option selected in Platform Settings (see section 4. Configuration – B. Platform Settings–[2] Product ID), separated by commas.
- Location—Shop ID. The default value is generated by the SALESmanago plugin and consists of 32 characters preceded by the prefix sm_. In newer versions of the plugin, you can also define your own Shop ID.
- IMPORTANT: The Shop ID must contain 3 to 36 characters and must not start with a digit. The only special character allowed is “_”.
- IMPORTANT: If you use a Product Catalog / XML Product Feed, change the Shop ID in the plugin settings so that it is identical to the value of the location field in the Catalog/Feed.
- Description—information on the buyer: registered user/guest.
- Detail 1—product names.
- Detail 2—variant names.
- Detail 3—additional product identification that depends on the mapping option selected for the main product in Platform Settings (i.e., what value is shown in the Products field). The following values are shown in Detail 3:
- product IDs (if the selected mapping is: reference, reference-delimiter-ID or reference-delimiter-reference);
- product references (if the selected mapping option is: ID or ID-delimiter-ID or ID-delimiter-reference).
- Detail 4—the quantities of the purchased products.
Detail 5—the currency of the External Event. - Detail 6—information on the discount code (when applicable).
- Detail 7—delivery method.
- Detail 8—payment method.
B. Export
Contacts and External Events are transferred in packages of 400. Higher volumes of data require more packages and, consequently, longer execution times.
The export mechanism is based on the PHP/JavaScript connection. JavaScript—as the controller—monitors the package preparation process and records the current export status. PHP functions as a model that packs data and sends the packages to SALESmanago. As soon as a package has been correctly transferred to SALESmanago, the mechanism proceeds to another package. The mechanism solves the problem of exceeded server max_execution_time.
On the PrestaShop platform, a single Contact can have more than one delivery address (the platform enables the addition of more than one address). When making an order, a Contact selects the right address from a list. However, only the default account address is transferred to the SALESmanago database.
Sources of exported data:
- Export of Contacts—data are loaded from the customer and address tables.
- Export of Subscribers—data are loaded from the customers, address, and emailsubscription tables.
NOTE: Regarding the customer table, Contacts that have given consent to the receipt of newsletter emails are also loaded from it, whereas in the case of the emailsubscription table, either all subscribers (also opt-out) or only current subscribers are loaded, depending on the export settings.
- Export of CART events—data are loaded from the cart, customer, cart_product, product_lang, product, currency, orders, and shop tables.
- Export of PURCHASE events—data are loaded from the order_detail, orders, and customer tables.
C. Failed export
If a data export fails, the progress bar will stop and you will see a red error message in the top right corner.

You can access more information on the export status in the Network tab in the JavaScript console (Google Chrome: Ctrl + Shift + I) by selecting the appropriate request. In case of any problems, contact the Customer Success Department.
If an error occurs during the export process, after refreshing the page, you will see the following message:

If this is the case, only packages transferred before the occurrence of the error have been delivered to the SALESmanago system. To transfer the remaining data, click Resume Export [A].
D. Translations
In order to translate the plugin into another language, you can use the native PrestaShop functionality called Translations. In this tool, select the module translation option and then the SALESmanago plugin. Translate individual fields as necessary.
E. PURCHASE hook settings
In Platform Settings (see section 4.B) you can select the hook supporting PURCHASE events from a drop-down list. The hooks differ in terms of the time at which PURCHASE events are transferred to the SALESmanago platform:
- actionValidateOrder (classes/PaymentModule.php:535)—triggered when the order has been correctly validated.
- actionOrderStatusPostUpdate (classes/order/OrderHistory.php:411)—triggered after the order status changes.
IMPORTANT: This hook is triggered BEFORE the new order status is entered in the database.
- actionPaymentConfirmation (classes/order/OrderHistory.php:103)—triggered when the payment has been correctly validated.
- actionOrderStatusUpdate (classes/order/OrderHistory.php:107)—triggered after the order status changes.
6. Information for developers
A. Recommended PHP version on the server
Set the appropriate PHP interpreter version according to the PrestaShop platform version you use:
- PrestaShop 1.7.0–1.7.4.X – PHP 7.1;
- PrestaShop 1.7.5–1.7.6.X – PHP 7.2;
- PrestaShop 1.7.7.X – PHP 7.3;
- PrestaShop 1.7.8.X – PHP 7.4.
B. Deleting users
If you want to delete a user via the store panel, you have two options:
- Completely delete the user’s data from the database, which allows them to re-register using the same email address;
- Delete the user only from the customer list in the store panel while leaving their data in the PrestaShop database, which renders them unable to re-register using the same email address.
C. Use of hooks
In PrestaShop versions 1.7.0–1.7.6.X, newsletter subscriptions are supported by the hook displayFooter, and in versions 1.7.7 and higher, by the hook actionNewsletterRegistrationBefore.
IMPORTANT: actionNewsletterRegistrationBefore—a hook from a native PrestaShop module—is available in ps_emailsubscription module versions 2.6.0 and higher. If you use PrestaShop 1.7.7 or a newer version of the platform, you need to run the ps_emailsubscription native module in version 2.6.0 or higher.
The hook triggered upon user registration is ActionObjectCustomerAddBefore.
Hooks used in the integration:
- moduleRoutes,
- displayFooter,
- actionCartSave,
- backOfficeHeader,
- actionAuthentication,
- actionObjectAddressAddAfter,
- actionObjectAddressUpdateAfter,
- actionObjectCustomerAddBefore,
- actionObjectCustomerAddAfter,
- actionObjectCustomerUpdateBefore,
- actionObjectCustomerAddressAddAfter,
- actionObjectCustomerAddressUpdateAfter,
- actionValidateOrder,
- actionOrderStatusPostUpdate,
- actionPaymentConfirmation,
- actionOrderStatusUpdate,
- actionNewsletterRegistrationBefore,
- displayBeforeBodyClosingTag,
- displayCustomerAccountForm,
- displayAdminCustomersForm.
D. Database
When the SALESmanago plugin is being installed, the ps_sm_archive_export table is added to the PrestaShop platform database (in some cases the prefix can be different than “ps”). The table stores information concerning archival data exports. You can find more information on the export of archival data in section 5.C. Failed export.
Another table created in the PrestaShop database during the installation of the SALESmanago plugin is ps_sm_subscribers (in some cases the prefix can be different than “ps”). The addition of this table solves the following problem:
PROBLEM: A Contact subscribes to the newsletter through a form in the website’s footer. They are added to the (prefix)_emailsubscription table. The same Contact makes a purchase and on this occasion creates an account using the same email address. PrestaShop deletes the Contact from the (prefix)_emailsubscription table. If the Contact does not give consent to the receipt of newsletter emails in the registration form, they are added to the (prefix)_customers table with the opt-out status. In SALESmanago—due to the new API methods—they still have the opt-in status (they have not unsubscribed but have only not checked the subscription field). If the same Contact decides to edit their account, the newsletter subscription field will not be checked as the Contact has the opt-out status assigned to them in the shop’s database (they did not check the field on the registration form). When the new account settings are saved, the Contact will be marked as opt-out in the SALESmanago database.
SOLUTION: To avoid such situations, when the Contact is registering, at the checkout stage, the module checks if the email address exists in the (prefix)_emailsubscription table. If so, the Contact’s data will be saved in the new table: (prefix)_sm_subscribers.
If the Contact edits their account, the system will check if they exist in the (prefix)_sm_subscribers table. If they exist in the table, the Contact status in that table will overwrite the newsletter subscription status collected from the form. If the Contact is not listed in the (prefix)_sm_subscribers table and has not subscribed, they will have the opt-out status on the SALESmanago platform.