Predefined marketing dashboard presents the most crucial data in the view of the marketing activities. The widget configuration on the marketing dashboard is connected closely to the state of the contact base and the results achieved in Email marketing channel. The configuration presented is exemplary and can be suited to the individual needs.
To display and configure the marketing dashboard you need to go to
START

Contents
- Widget selection
a) contacts
b) email marketing - Editing
a) widget editing
b) widget size adjustment
c) choosing the space on the dashboard for a widget
1. Widget selection
[A] Contacts
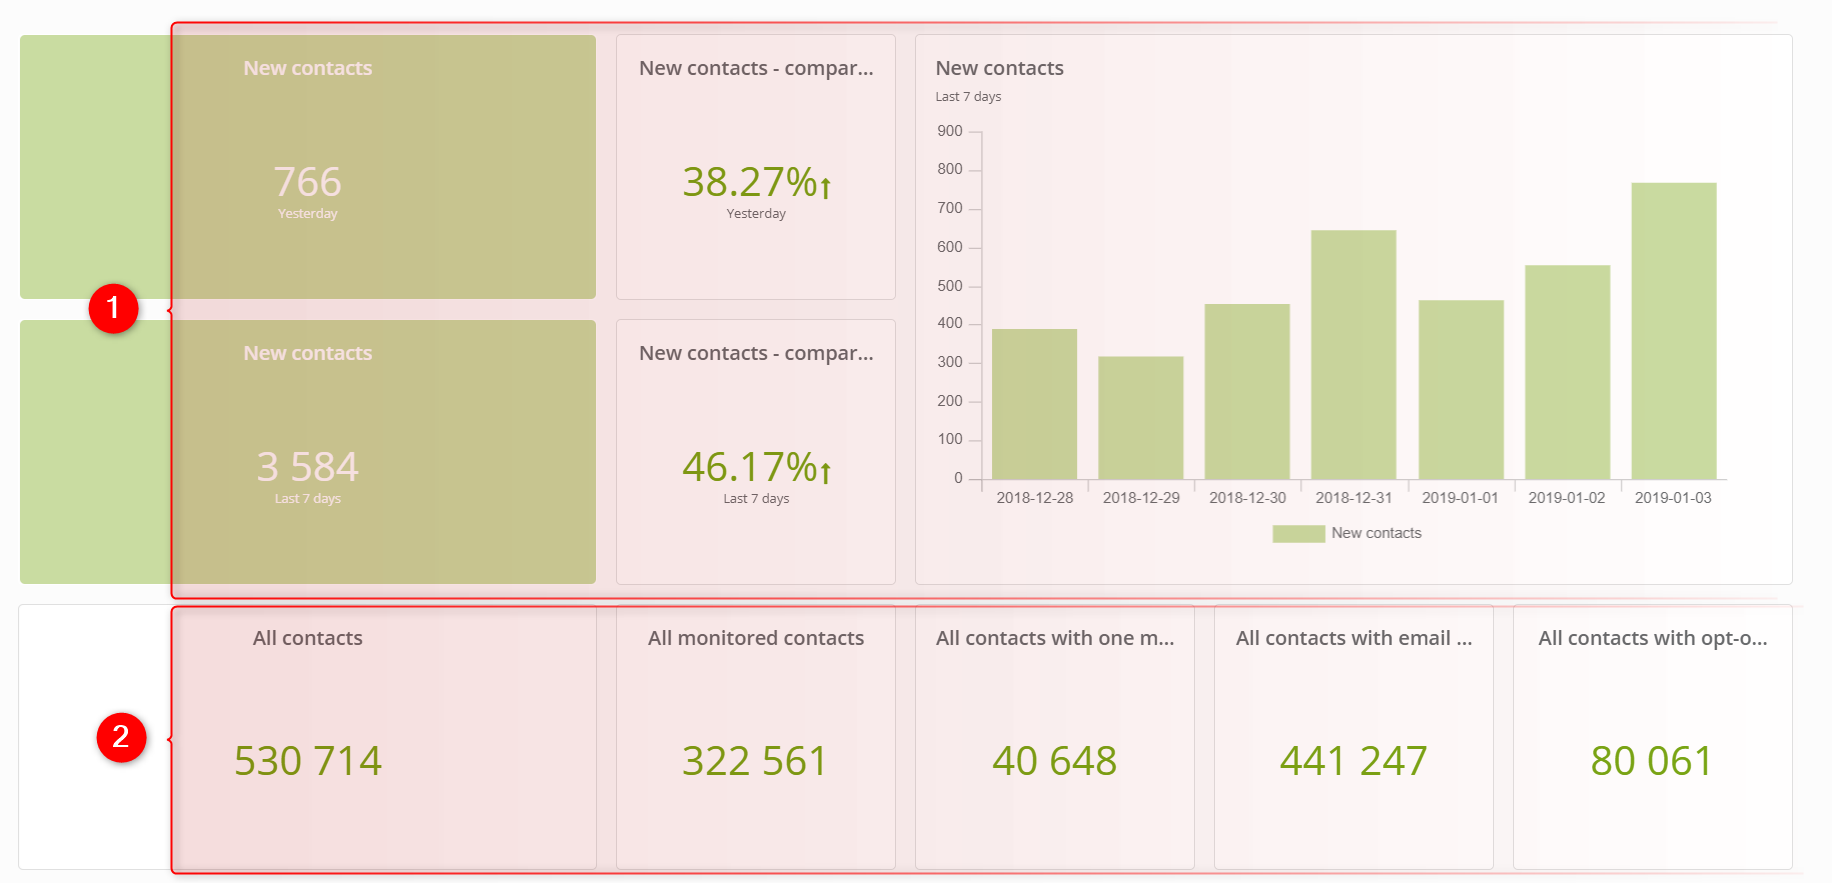
[1] – most widgets used on the marketing dashboard have been chosen from the group Contacts which is available in the widget library. Click the button Edit to enable the option.
![]()
The business dashboard consists of the widgets that present the growth of the contact base by contacts who belong to the particular user for two periods: yesterday and last 7 days. The dashboard presents the comparison of the contact base growth for two time periods (yesterday and the last 7 days).
The reference point for the system to show the comparison is the chosen timeframe. For instance, the last 7 days is compared with the seven days that precede the last seven days (excluding the current day).
Also, the dashboard uses the chart that presents the growth of new contacts in the system in the chose time frame. The chart can be presented in the form of a line or bars. You can also choose whose contacts will be taken into account while counting the state of the contact base. The user who shares permissions for both administrator and manager has the preview of the statistics for the whole contact base.
IMPORTANT: On the chart with New contacts which include the time frame longer than at least two months, each bar presented on the chart shows the total sum of contacts for each month.
[2] – the widgets present the base state of contacts who belong to a particular user, each widget presents the state of contacts with a separate status.
-
- All contacts – concern contacts who belong to the particular user (the owner or main owner) regardless of the status assigned to the contact.
- All monitored contacts – concern monitored contacts who belong to the particular user (the owner or main owner).
- All contacts with one message a week status – concern contacts who belong to the particular user (the owner or main owner) and agreed to receive one email per week while submitting an unsubscription form.
- All contacts with opt-in status – concern contacts who belong to the particular user (the owner or main owner) and they have subscribed for a newsletter.
Find more information about used widgets on the dashboard and the widget library here .
[B] Email marketing

[3] – analytics of the mass emails and analytics of the emails which have been sent by means of automation rules (divided into sent, opened and clicked). This way you can quickly figure out the OR and CTR of your emails.
Find more information about used widgets on the dashboard and the widget library here .
2. Editing
[A] Widget editing
To enable the editing of the dashboard, click the Edit button.
![]()
Then hover the cursor of the mouse over any widget, as a consequence, you will be able to see three icons.
IMPORTANT: You can add up to 24 widgets to one dashboard.

[1] Finish editing – the blockade of editing mode.
[2] Widget library – here you can find the widgets that you can add to the dashboard.
You can find more information about the widget library here.
[3] – the option of adding another dashboard. You can add up to 5 personalized dashboards.
[4] – the option of removing the widget from the dashboard. The deleted widget will be still available in the widget library.
[5] – the option of copying the widget.
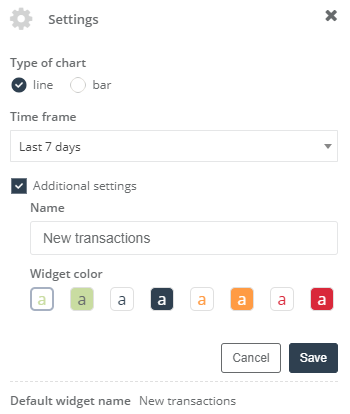
[6] – widget settings. Depending on the group to which the widget belongs, you can configure the type of displayed data, the time frame, the owner of contacts and the additional settings which are the change of the widget color scheme and the change of the default name.
[7] – the option of adjusting the widget size.
[B] Adjusting the size of the widget

Adjust the size of the widget by hovering the cursor over the edge of the widget. The maximum size the widget can take is highlighted grey color. You can add widgets in three rows and each row can contain up to 6 widgets.
[C] Choosing a place for the widgets on the dashboard

Drag and drop the widget onto the chosen place.
IMPORTANT: To add a widget into a chosen place, you need to prepare a space for it.
Submit your review | |