Spotlight is a new SALESmanago feature that allows you to monitor anonymous traffic on your website, analyze conversions into monitored Contacts, and precisely target anonymous visitors through the Web Push channel. This article explains the mechanics behind this feature, provides instructions for using it in practice, and describes its marketing applications.
The analysis of data collected by SALESmanago indicates that on average, around 85% of visitors to a website are anonymous, meaning they never reveal their email address. These visitors, although unidentified, leave digital tracks of their interactions with your website. This data can be collected, analyzed, and put to use—which is the essence of the Spotlight feature. Use its capabilities to personalize your website experience for a broader audience, increase engagement, and boost your marketing and sales results.
NOTE: Spotlight is not available under any SALESmanago plan. To activate Spotlight, please contact our Customer Success team at success@salesmanago.com.
Contents
1. Getting started
SALESmanago offers broad capabilities for collecting and using data concerning monitored Contacts. However, the Monitoring Code can do more than that—it also allows you to gather data concerning the activity of anonymous visitors on your website. With the Spotlight feature, you can put this data to work.
Spotlight allows you to:
- Monitor anonymous traffic on your website.
- Analyze the conversion of anonymous visitors into monitored Contacts.
- Precisely target anonymous visitors with personalized Web Push notifications.
The period for which anonymous visitor data is stored depends on your purchased Spotlight plan. You have the following options:
- last 7 days,
- last 30 days, or
- last 90 days.
Take full advantage of the data collected on your website and use it to enhance your marketing and sales results.
2. Mechanics behind Spotlight
This section describes the sources of anonymous visitor data and the mechanisms behind obtaining this data.
A. Distinguishing between anonymous visitors and monitored Contacts
Before diving into technicalities, it is important to clearly explain the difference between a monitored Contact and an anonymous visitor.
A Contact is one of the basic concepts used across the SALESmanago platform. This term denotes a person identified by their email address—this is because in SALESmanago, the email address is the only information required to create a Contact Card.
A Contact can be monitored or not monitored.
A Contact is monitored when an smclient cookie is present in their browser. This cookie is assigned if a Contact reveals their email address through a tool such as Lead Generation widgets (newsletter subscription, pop-ups, forms, sidebars) or clicks a link with a monitoring parameter in your email.
A Contact is not monitored if the smclient cookie is not present in their browser. This can happen in the following situations:
- The Contact was added to your SALESmanago database via API and had no smclient cookie assigned to them.
- The Contact was added to your SALESmanago database through a Contact import and later took no action that would result in assigning the smclient cookie to them.
- The Contact stopped being monitored because they deleted the smclient cookie from their browser (for example, when clearing their browsing data).
An anonymous visitor is an Internet user who visits your website without revealing their email address. In other words, they interact with your website without providing information that would enable the creation of a Contact Card for them. However, each time a user visits your website, even anonymously, the smuuid cookie is assigned to them. This way, their activity can be monitored even if they remain anonymous. As soon as they provide their email address through a Lead Generation tool (or as soon as their data is properly transferred via API), they become monitored Contacts.
Note that a non-monitored Contact can also be an anonymous visitor—it is impossible to associate their website activity with their Contact Card until they click a link in your email or fill out a form on your website.
Read more about Contact monitoring >>
B. Precise targeting of anonymous visitors: Data sources
SALESmanago collects data on anonymous visitors from a number of sources:
- Website visits—The SALESmanago Monitoring Code tracks the website activity of not only monitored Contacts, but also anonymous visitors. These monitoring capabilities rely on the storage of cookies in visitors’ browsers (see Section A above).
The activity of anonymous visitors (pages visited) reveals their interests and preferences. By using this data, you can create targeted Web Push campaigns and personalized experiences to enhance user engagement and drive conversions. - Interactions with Web Push notifications—Web Push notifications can be displayed to anonymous visitors as long as they have consented to receive marketing communications through this channel. By tracking the clicks of anonymous visitors on your Web Push notifications, you can gain insights into their interests and preferences.
- Custom website events—You can implement your own mechanisms on your website to collect custom events (such as scrolling down to a specific section, clicking a button, or zooming in on a picture) and then transfer these events to SALESmanago via the visit monitoring API. Such custom events (signals) are recorded as visits on the Contact Card. When filtering anonymous visitors by visits, you can define the value or the time range for such events, just as for any other visits.
Read more about the visit monitoring Frontend API >>
3. Marketing uses
Spotlight opens up new possibilities for your marketing activities. Read on to learn about its practical applications.
A. Monitor anonymous traffic and conversions
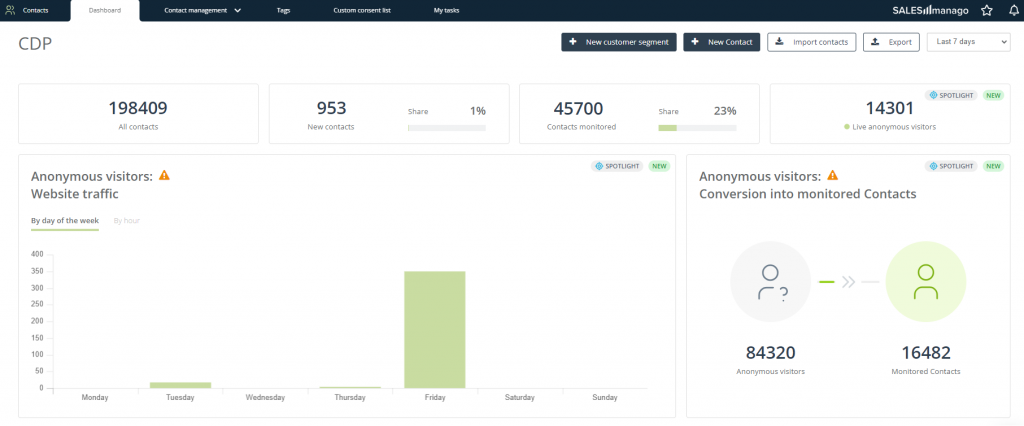
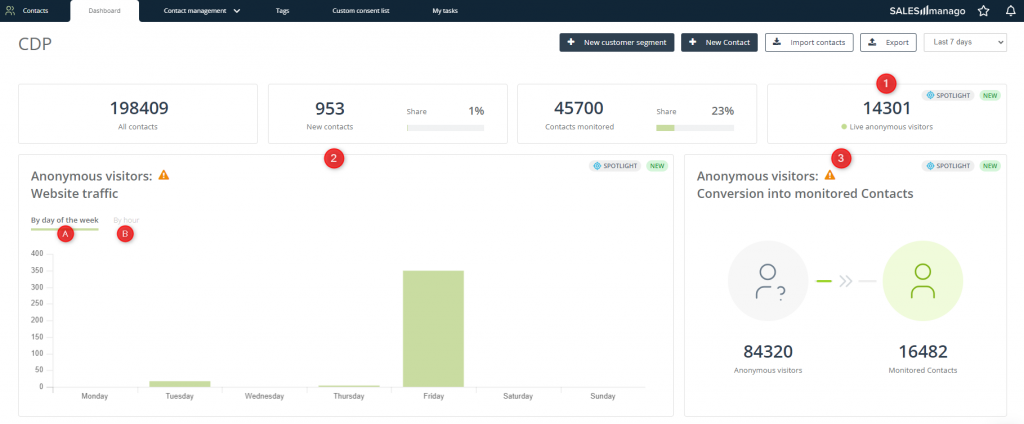
To monitor your anonymous traffic and conversions, go to Menu → Contacts → Dashboard.
[1] Live anonymous visitors—Here, you can check how many anonymous visitors are currently on your website.
[2] Anonymous visitors: Website traffic—Here, you can see website traffic data for the period covered by your Spotlight plan. The chart shows the total number of anonymous visits to your website in this period on different days of the week [A] and at different times of the day [B].
[3] Anonymous visitors: Conversion into monitored Contacts—Here, you can see how many anonymous visitors have converted into monitored Contacts during the period covered by your Spotlight plan.
NOTE: The scope of data displayed in [2] and [3] depends on your Spotlight plan—your selected time range for storing anonymous visitor data. When purchasing the Spotlight feature, you can choose between the following three options:
- 7 days,
- 30 days,
- 90 days.
B. Create personalized Web Push campaigns
Web Push remains one of the most popular marketing channels, known for being fast, dynamic, and effective in engaging customers and increasing conversion rates.
Read how to create a Web Push notification in SALESmanago >>
SALESmanago’s Spotlight is a game changer for the Web Push channel. Now, instead of sending generic notifications, you can target anonymous visitors with campaigns tailored to their individual behaviors, interests, and preferences.
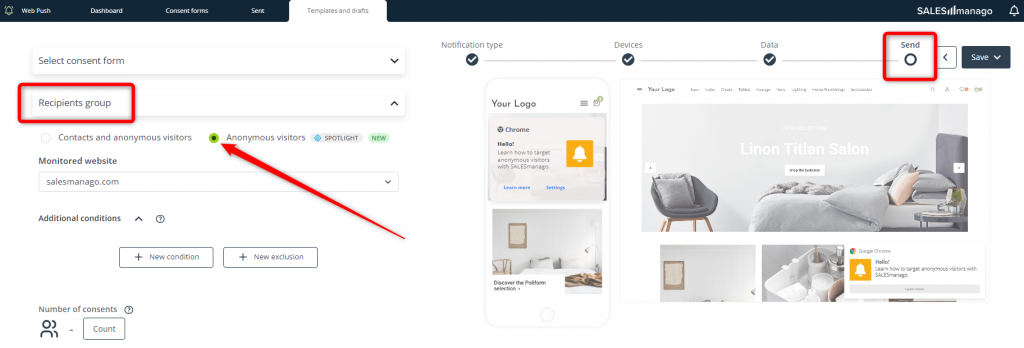
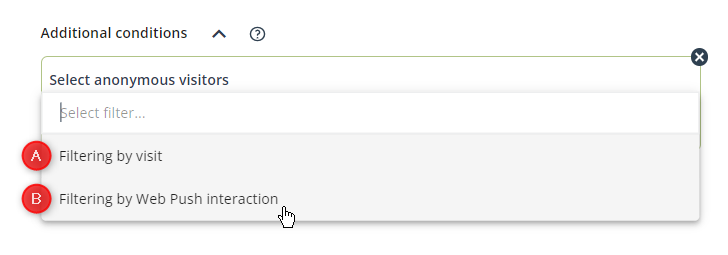
When creating a Web Push notification, in Step 4 (Send), go to the Recipients tab and select the option: Anonymous visitors. This is the Spotlight feature that allows you to precisely define the anonymous audience for your Web Push notification.
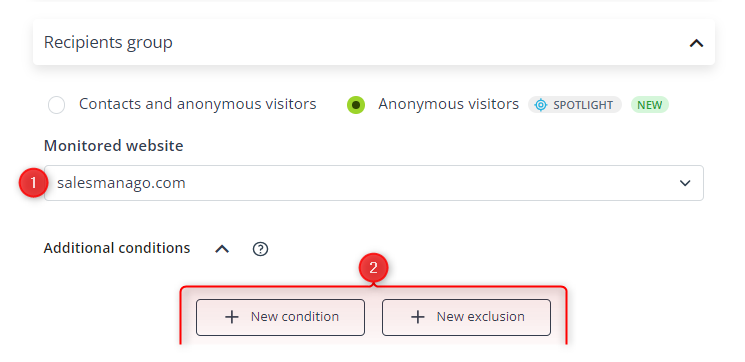
After selecting this option, first, you need to choose the monitored website [1] whose visitors will be targeted. Then, decide whether you want to add any conditions or exclusions [2] to specify which anonymous visitors should be included in or excluded from the group, respectively.
Now, you can apply filters to precisely define your group of anonymous recipients.
Note that each filter can be applied twice: once to define conditions and once to define exclusions.
[A] Filtering by visit
You can filter anonymous visitors based on their visits to your selected monitored website. For example, you can specify paths (URLs) to select only those anonymous visitors who have visited specific pages on your domain (or a specific area of your domain).
You can filter anonymous visitors based on their visits to your selected monitored website. For example, you can specify paths (URLs) to select only those anonymous visitors who have visited specific pages on your domain (or a specific area of your domain).
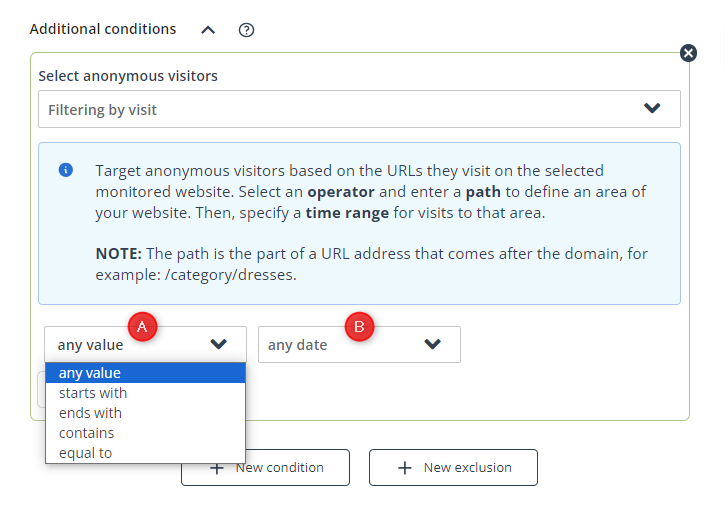
After selecting this filter, define detailed criteria based on which anonymous visitors will be included in or excluded from your group of anonymous recipients: the visited area of your website [A] and the period in which the visit(s) took place [B].
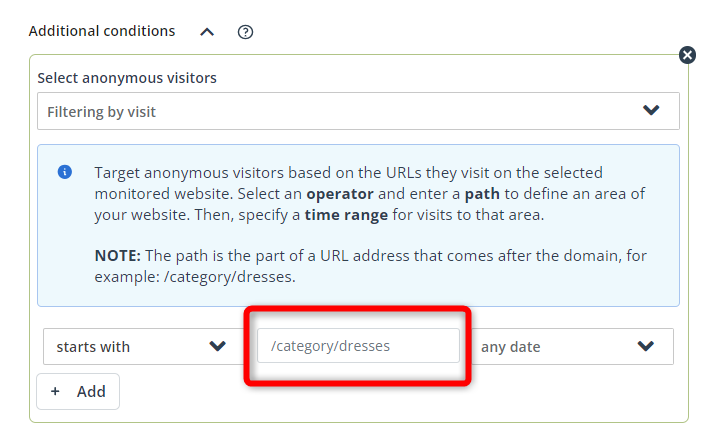
When specifying the visited website area [A], if you select anything other than “any value”, you will be able to enter a path on your website:
The path is the part of the URL address that follows the domain name, for example: /category/dresses in https://www.example.com/category/dresses.
When specifying the time range [B], the maximum period available depends on your Spotlight plan. This can be either 7, 30, or 90 days.
For basic and advanced configuration examples for this filter, see Section 4 below.
B. Filtering by Web Push interaction
You can also filter anonymous visitors based on their previous interactions with one or more specific Web Push notifications.
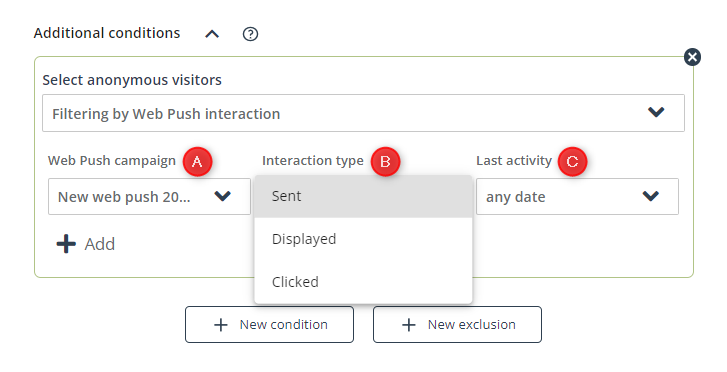
After selecting this filter, define the detailed criteria based on which anonymous visitors will be included in or excluded from your group of anonymous recipients. Specify the Web Push campaign [A], the type of interaction with this Web Push notification [B], and the period in which the interaction(s) took place [C].
You can choose from three types of interactions [B] with a Web Push notification:
- Sent—An anonymous visitor will be included in (or excluded from) the group of recipients if the Web Push notification selected in [A] was sent to them. (Note that a sent notification may or may not have been actually displayed).
- Displayed—An anonymous visitor will be included in (or excluded from) the group of recipients if the Web Push notification selected in [A] was successfully displayed to them.
- Clicked—An anonymous visitor will be included in (or excluded from) the group of recipients if the Web Push notification selected in [A] was successfully displayed to them and they clicked it.
TIP: If you want to select anonymous visitors to whom a Web Push notification was sent but not displayed, apply one condition (Filtering by Web Push interaction: Sent) and one exclusion (Filtering by Web Push interaction: Displayed) for the same Web Push campaign.
When specifying the time range [C], the maximum available period depends on your Spotlight plan. This can be either 7, 30, or 90 days.
For basic and advanced configuration examples for this filter, see Section 4 below.
4. Examples: Use Spotlight in practice
Spotlight is an innovative tool that can revolutionize your marketing strategies by empowering you to harness the full potential of your website activity data. Below, you will find examples how you can use it to precisely target anonymous website visitors, send them personalized Web Push notifications, and thus increase their engagement and your conversion rates.
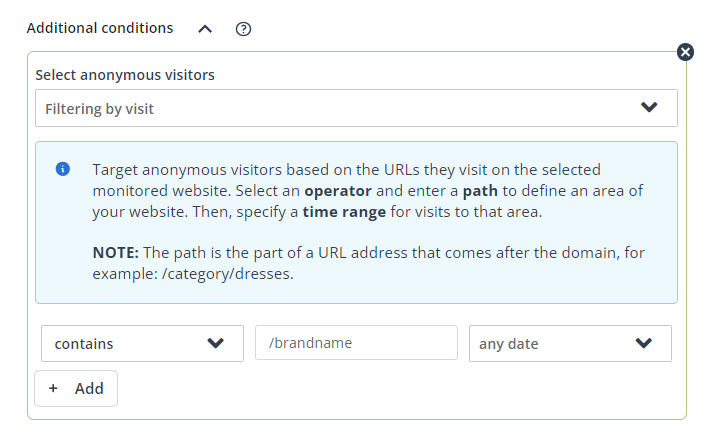
EXAMPLE 1: Select anonymous visitors interested in a specific brand.
You have an e-store specializing in electric and electronic appliances and you want to promote a specific brand, for example, because it has been selling worse. You want to target anonymous visitors who have viewed products from this brand in the past.
Click + New condition and select Filtering by visit. Since all your URLs for products from this brand contain the element: /brandname, configure the filter as follows:
NOTE: Even if you select “any date”, the maximum time range that will be checked by the system depends on your Spotlight plan. This can be either 7, 30, or 90 days.
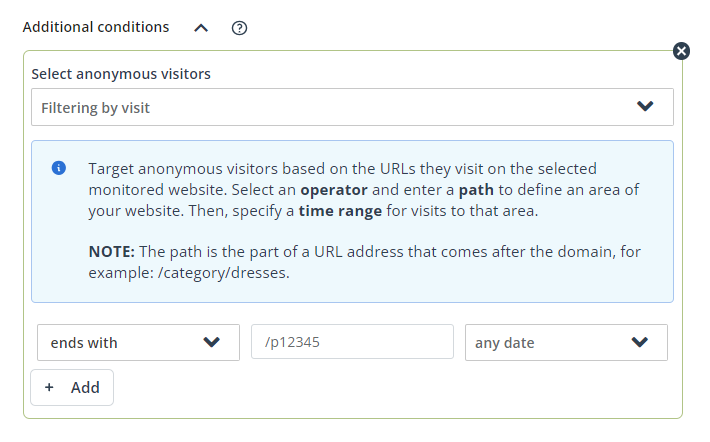
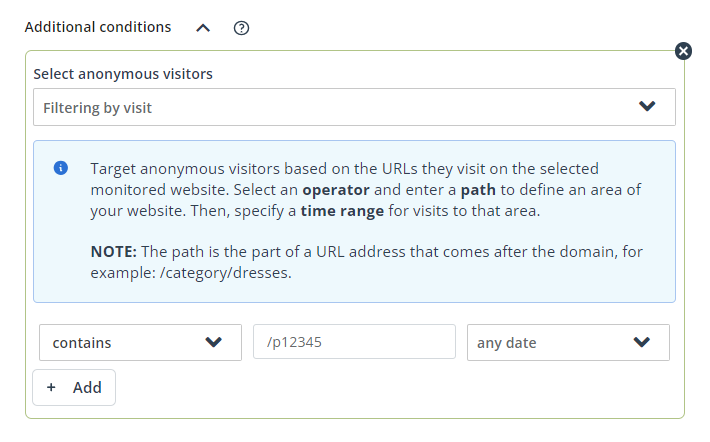
EXAMPLE 2: Select anonymous visitors interested in a specific product that is now on discount.
You are offering a very attractive discount on a specific product. You want to retarget anonymous visitors who have recently viewed this product.
Click + New condition and select Filtering by visit. Now, you can configure the filter in various ways to achieve a similar result:
- If your URLs for products end with their respective product IDs, you can select the operator: “ends with”.
Note that by selecting this operator you will not include visitors who entered this product page from sources such as Facebook or Google Ads (because UTM parameters indicating the source always come at the end of a URL). Selecting the operator: “equal to” will have the same effect.
- To select all anonymous visitors regardless of the source from which they entered the product page, select the operator: “contains”.
NOTE: Even if you select “any date”, the maximum time range that will be checked by the system depends on your Spotlight plan. This can be either 7, 30, or 90 days.
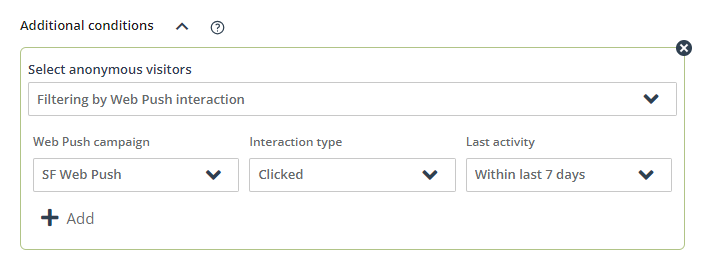
EXAMPLE 3: Select anonymous visitors who clicked one of your previous Web Push notifications.
You are the owner of an online bookstore. Last week, you ran a Web Push campaign promoting a science fiction novel. Now you want to promote another novel intended for the same audience. To achieve this, you can select anonymous visitors who clicked last week’s notification.
Click + New condition and select Filtering by Web Push interaction. Configure the filter as follows:
EXAMPLE 4: Exclude anonymous visitors interested in a specific category of products.
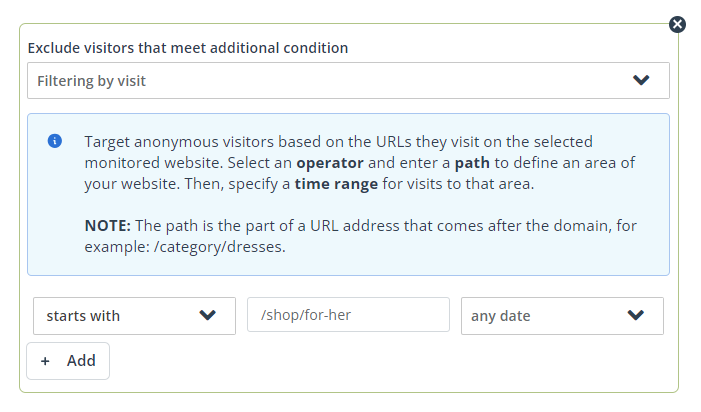
Your e-store offers clothes for men, women, and children. You want to promote products intended specifically for men. Exclude anonymous visitors interested in women’s clothes to maximize the chances that you will reach the right audience.
Click + New exclusion and select Filtering by visit. In your store, all products intended for women have URLs starting with: your-e-store.com/shop/for-her. Therefore, select the operator: “starts with” and enter /shop/for-her in the field next to it.
NOTE: Even if you select “any date”, the maximum time range that will be checked by the system depends on your Spotlight plan. This can be either 7, 30, or 90 days.
EXAMPLE 5: ABANDONED CART. As part of your retargeting campaign, you want to select anonymous visitors who browsed a specific category of products and added something to the cart but made no purchase.
You have an eCommerce store with gardening products and accessories. It’s spring, so it’s the high season for fertilizers. You are running a Web Push campaign aimed at promoting this specific category of products.
As part of that campaign, you want to retarget anonymous visitors who have recently added a fertilizer to their cart but made no purchase.
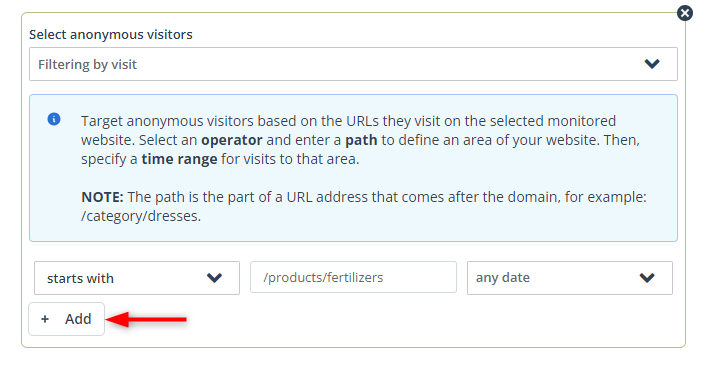
Click + New condition and select Filtering by visit. In your e-store, the URLs for all fertilizers start with your-e-store.com/products/fertilizers, so configure the filter as follows:
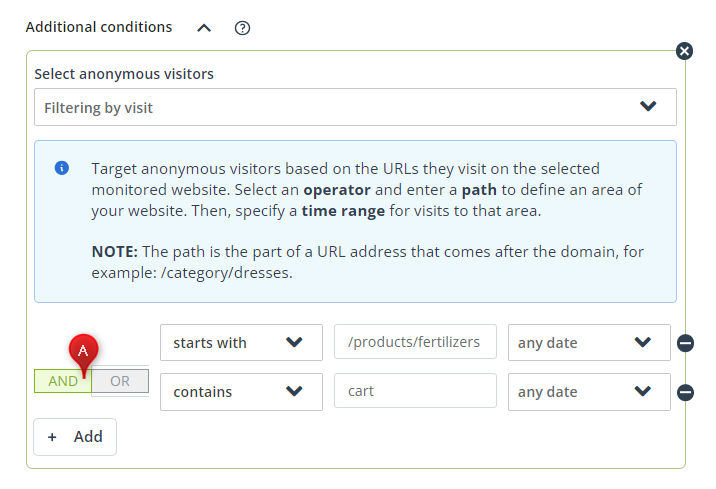
Then, click Add (indicated with a red arrow in the screenshot above) to add another filter of the same type. The URL for your cart page always contains the phrase: “cart”, so configure the second filter as follows:
Note that the operator selected is AND [A]. This way, you specify that both these conditions must be met for an anonymous visitor to be included in your group.
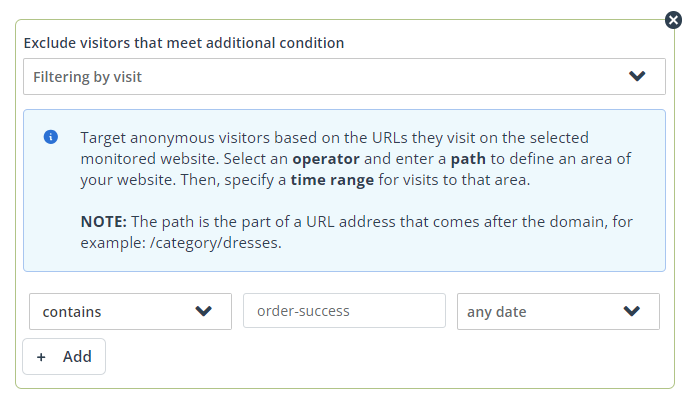
TIP: In most cases, an anonymous visitor who adds something to their cart and actually makes a purchase becomes a monitored Contact. Therefore, there is no need to exclude such Contacts when running an abandoned cart campaign (they are no longer anonymous visitors). However, if you only transfer data to SALESmanago for those Contacts who have consented to data processing for marketing purposes, you may want to exclude anonymous visitors who actually completed the purchase process. (While the purchaser has become a non-monitored Contact, they still remain an anonymous visitor to the SALESmanago system, so their website activity can still be tracked with the smuuid cookie).
To achieve this, click + New exclusion and select Filtering by visit. The URL for your order confirmation screen always contains the phrase: “order-success”, so configure the filter as follows:
EXAMPLE 6: Select anonymous visitors who entered your website from a specific source (for example, a Facebook Ads campaign).
You have an eCommerce store with cosmetics and you have recently run a Facebook campaign promoting a specific brand. Now, you want to retarget anonymous visitors who expressed interest in this brand’s products by clicking your Facebook ad.
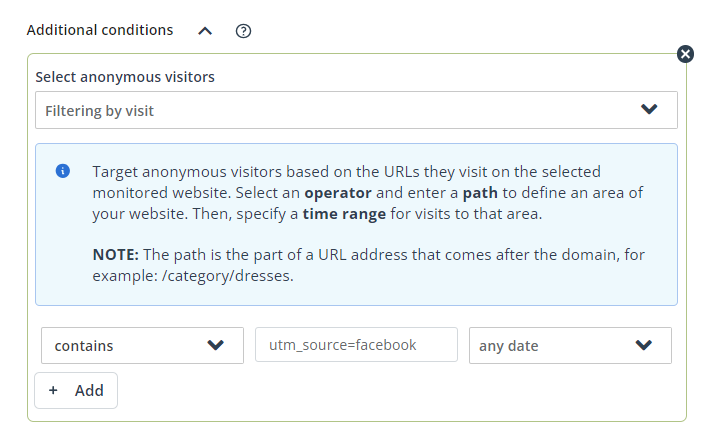
Click + New condition and select Filtering by visit. When a visit comes from a Facebook Ads campaign, the URL stored on the Contact Card contains the following UTM parameter: utm_source=facebook. Therefore, configure the filter as follows:
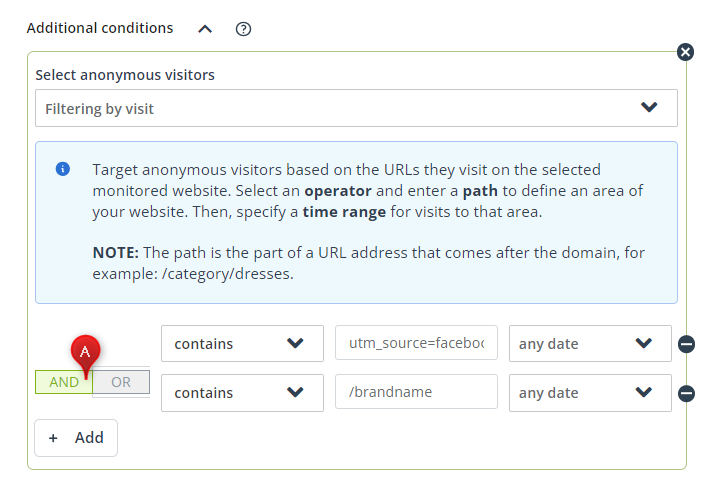
If you have been running more than one Facebook campaign, you may want to further narrow down the criteria. To select only those anonymous visitors who have recently expressed interest in the brand you are now promoting, click Add to add another filter of the same type and configure it as follows:
You can also add filters for campaign and/or medium UTM parameters.
Note that in this example, the operator selected is AND [A]. This way, you specify that both these conditions must be met for an anonymous visitor to be included in your group.
EXAMPLE 7: Use custom events transferred via the Frontend API to select anonymous visitors who scrolled down to a specific depth on a page.
You want to retarget anonymous visitors who expressed interest in a product by scrolling down to a specific depth (percentage) of a page, for example, to read a detailed description. The depth can be marked with anchor links. However, the SALESmanago Monitoring Code will only register a visit to an anchored section if the URL is entered directly into the address bar of the browser; if a visitor simply opens a product page and scrolls down, such details are not automatically recorded.
To store such details in SALESmanago, you can configure a custom event (such as “scrolling down to 40% of a page”) using the Frontend API. For example, you can add the following piece of code:
document.addEventListener('scroll', function() {
    var documentHeight = document.documentElement.scrollHeight;
    var currentScroll = window.scrollY + window.innerHeight;
    var scrollThreshold = documentHeight * 0.4;
    if (currentScroll >= scrollThreshold) {
        const currentPathname = window.location.pathname;
        sm.api.registerVisit(currentPathname + '#40percent', false, false);
        document.removeEventListener('scroll', arguments.callee);
    }
});
Read more about the Visit monitoring Frontend API >>
Such custom events will be associated with individual anonymous visitors, who can later be targeted based on this data.
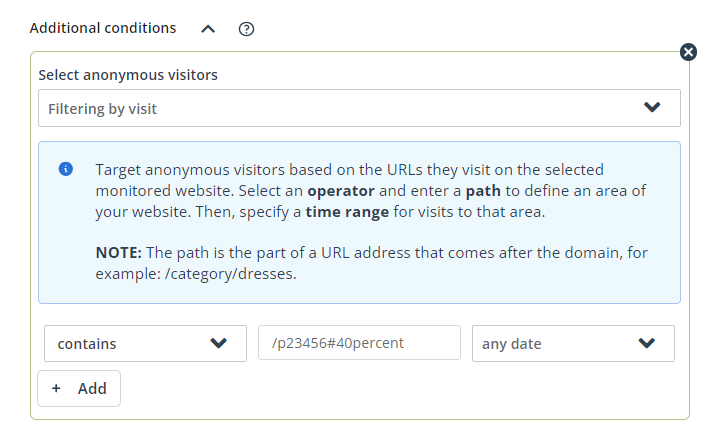
Following the configuration of such custom events for your website, you want to retarget anonymous visitors interested in a product that has the following URL: your-e-store.com/products/new/p23456. Click + New condition and select Filtering by visit. Configure the filter as follows:
NOTE: Even if you select “any date”, the maximum time range that will be checked by the system depends on your Spotlight plan. This can be either 7, 30, or 90 days.
