This article explains how to set up a WebFlow, an Automation Process that allows you to respond to the behavior of your website visitors across various channels, without any manual effort on your part.
Similar to a Workflow process, a WebFlow process consists of Events, Conditions, and Actions (ECA model). The WebFlow is triggered when a specific Event occurs on your website; provided that the specified Conditions are met, the SALESmanago system performs one or more Actions.
WebFlow includes Spotlight functionalities, allowing you to automate your response to the behaviors of both types of website visitors: monitored Contacts and anonymous visitors.
Using our intuitive WebFlow creator, you can easily configure an Automation Process tailored precisely to your needs. Discover the power of SALESmanago’s advanced WebFlow feature, designed to elevate your marketing activities to an unmatched level of efficiency and effectiveness.
To create a new WebFlow, go to
Automations → Automation Processes → WebFlow → + New WebFlow
Contents
1. Getting started
A WebFlow is an Automation Process in which the SALESmanago system performs an Action in response to an Event, provided that any specified Conditions are met.
Events are activities performed by your website visitors (who can be either monitored Contacts or anonymous visitors) that trigger the WebFlow process.
Conditions allow you to set certain requirements that must be met for a visitor to move further along a path. By using Conditions, you can precisely define under what circumstances an Action will be performed. This, in turn, allows you to create multiple paths leading from a single Event to different Actions, depending on which Conditions are (or are not) satisfied.
Actions are activities performed by the SALESmanago system on your website.
WebFlows are built using predefined elements in the form of tiles that can be moved around the board and connected by arrows to create cause-and-effect relationships. A detailed description of all element types and the rules for connecting them are provided further in this article.
The WebFlow creator is part of the new Spotlight functionality that allows you to target not only your monitored Contacts but also anonymous visitors. Considering that around 85% of website visitors are anonymous and never reveal their email addresses, this feature is crucial in personalizing your website visitors’ experience, increasing their engagement, and, as a result, boosting your sales results.
2. Element types
WebFlow processes are built using these types of elements:
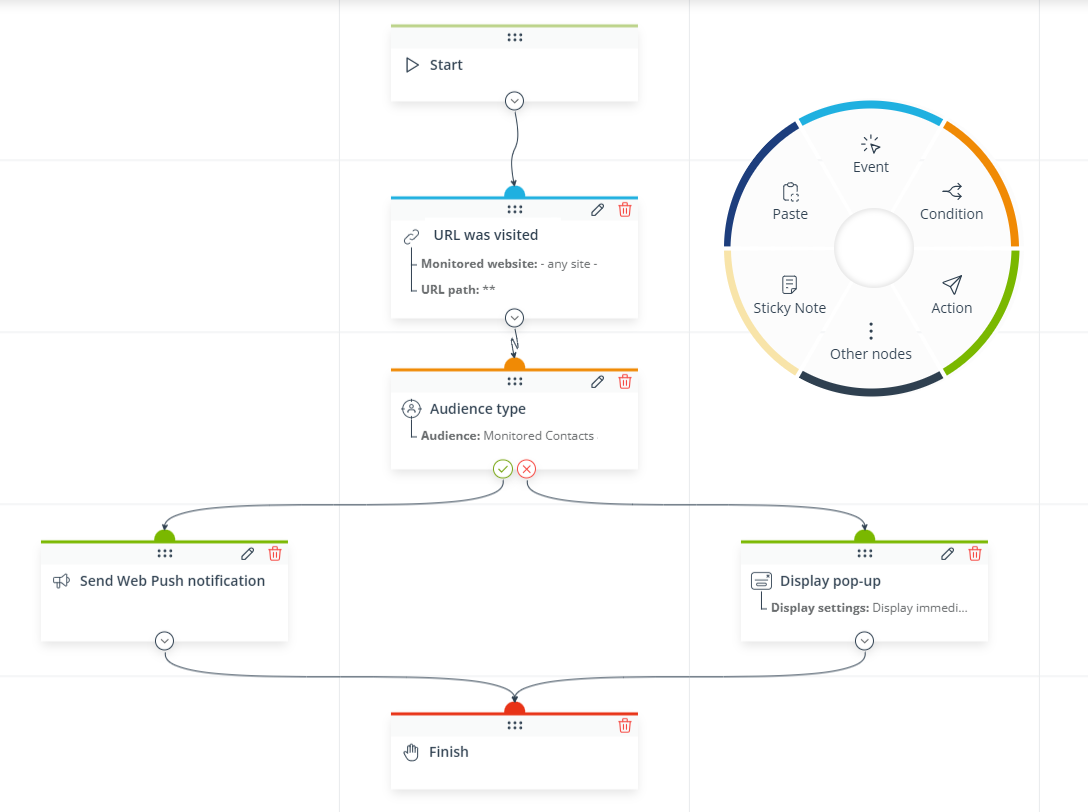
- Start—The opening element, which is present by default and cannot be deleted. The Start element must be connected to one or more Events.
- Events—An Event is something that needs to occur on the website and be recorded by the system for the WebFlow to be initiated (in the case of triggering Events, connected to the Start element) or for a website visitor to move further along a path (in the case of conditional Events, not connected to the Start element).
Each WebFlow process must include at least one Event. Only an Event can initiate (trigger) a WebFlow. Consequently, only Events can be connected to the Start element.
You can easily distinguish Events from other elements by their blue color:
- Conditions—A Condition is a requirement that needs to be met for a visitor to move further along a path. Conditions are optional, which means that you can build a WebFlow without using any Condition elements.
You can easily distinguish Conditions from other tiles by their yellow color:
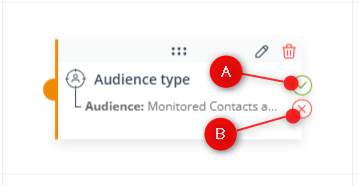
As you can see in the screenshot above, by default, each Condition has two connectors [A and B] intended for two different paths: one [A] that will be followed if the Condition is met and one [B] that will be followed if the Condition is not met.
IMPORTANT: The Condition: Audience type allows you to check whether a website visitor is a monitored Contact or an anonymous visitor. If you do not include this Condition in a WebFlow (or a WebFlow path), all its elements will be executed for both visitor types.
- Actions—An Action is what the SALESmanago system does if all the conditions (specified using Events and Conditions) preceding the Action on the same path have been met.
Each WebFlow process must include at least one Action. An Action does not need to be followed by Finish—it can be followed by an Event, a Condition, or even another Action.
You can easily distinguish Actions from other tiles by their green color:
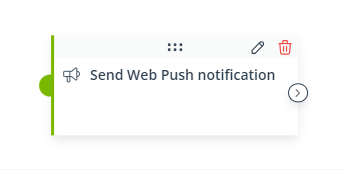
IMPORTANT: Note that most Actions available in the Webflow feature can only be performed by SALESmanago if the website visitor re-visits your website (for example, Display Web Push consent prompt or Display chat icon with text). The one exception is the Action: Send Web Push notification, because Web Push notifications are displayed outside of your website.
- Other nodes—These elements perform complementary functions.
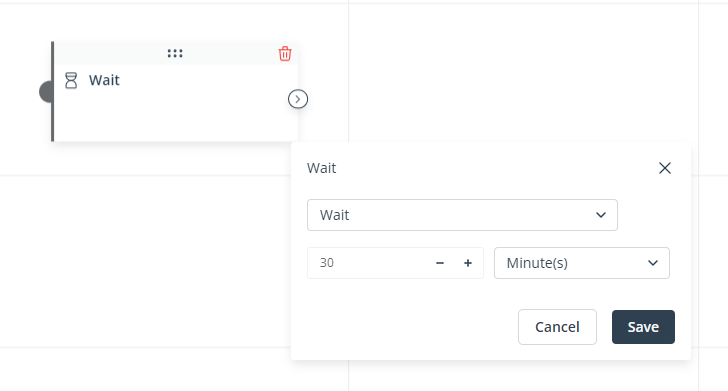
- Wait—Use this element if you want the system to wait for a specified period of time or until a selected date and time before moving on to the next WebFlow element.
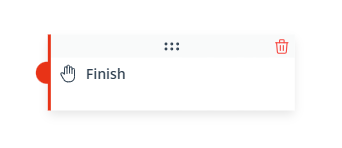
- Finish—The Finish element marks the moment when a visitor has completed the WebFlow. Each Webflow path must end with its own Finish element.
This element is mandatory (each WebFlow must include at least one Finish element).
- Finish—The Finish element marks the moment when a visitor has completed the WebFlow. Each Webflow path must end with its own Finish element.
Most WebFlow elements have their individual settings that must be defined to suit your individual needs and goals. To configure an element, click the pencil icon.
To remove an element, click the trash bin icon.
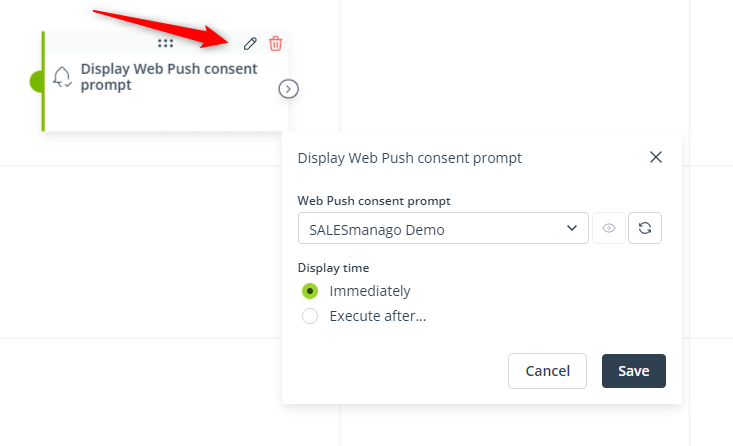
After entering your settings, remember to click Save. To discard any changes to the settings, click Cancel.
All the different WebFlow elements must be connected with other elements to create cause-and-effect relationships. The instructions and basic rules for connecting them are set out further in this article.
3. Creating a WebFlow
WebFlow processes are built using convenient, predefined elements in the form of tiles that can be moved around the board and connected by arrows to create cause-and-effect relationships.
To create a new WebFlow, go to Menu → Automations → Automation Processes → WebFlow and click + New WebFlow.
A. Moving around the WebFlow creator
After clicking + New WebFlow, you will see the following screen:
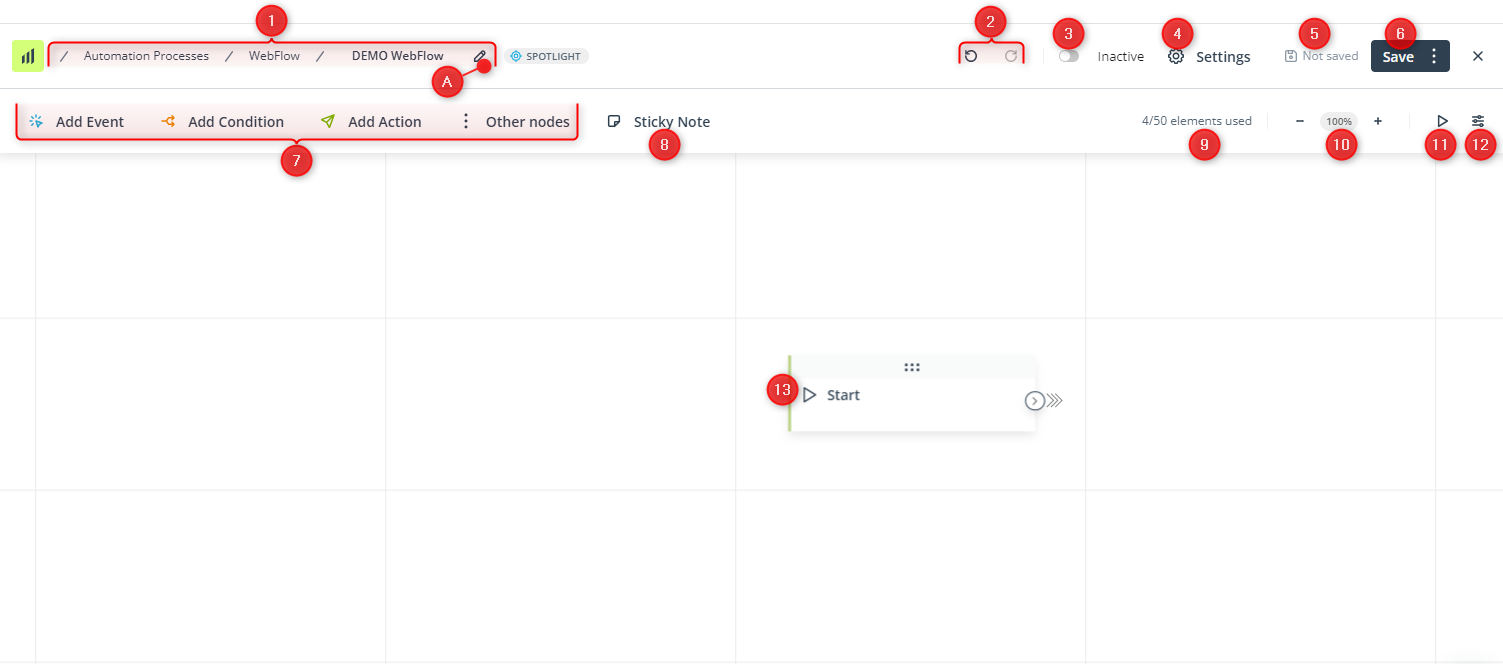
[1] Path and name—Here, you can see the path to your new WebFlow, ending with its name. To change the name of your WebFlow, click the pencil icon [A].
[2] Undo/Redo—Here, you can undo or redo your last actions.
[3] Active/Inactive—Here, you can activate or deactivate your WebFlow. Only an active WebFlow can actually be triggered (initiated) for a website visitor.
[4] Settings—Click here to change the name of your Webflow and define its launch settings.
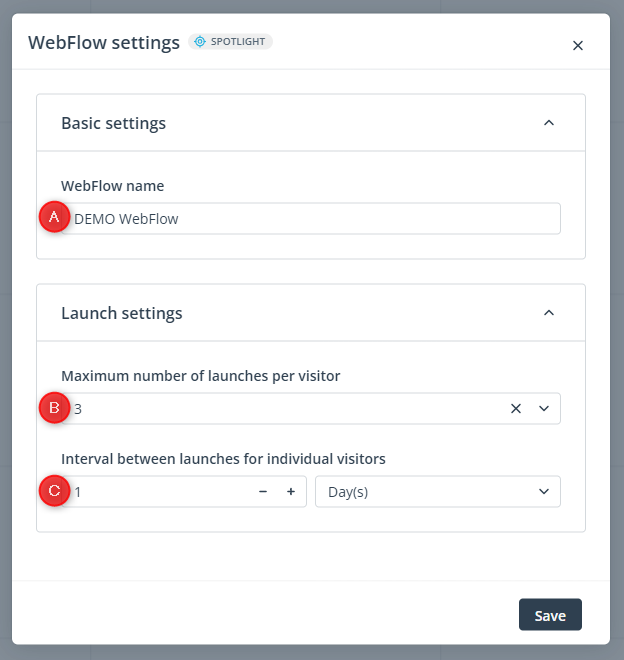
[A] WebFlow name—Click to edit the WebFlow name.
[B] Maximum number of launches per visitor—Here, you can define how many times this WebFlow can be launched for an individual website visitor.
[C] Interval between launches for individual visitors—Here, you can define a time interval in hours or days between subsequent launches for an individual visitor. The maximum interval is 360 days.
[5] Saving status—Here, you can see the information about the saving status for this WebFlow. It can be Saved, Unsaved, or Saved as a draft. If you edit an active WebFlow but do not save your changes, next time you edit the same WebFlow, you will be asked if you want to discard or accept any autosaved changes.
The autosave function saves your work on an ongoing basis. For example, if you close the browser tab by accident or your browser crashes, the last autosaved version will be available for recovery.
[6] Saving options—Click and decide if you want to save your work as a draft or a finished WebFlow process. Remember that a WebFlow can only be triggered for a visitor when it is active (see point [3]).
[7] Add element—Here, you can find all available WebFlow elements, grouped into four categories. Click on any of these buttons to see a list of all elements available within the selected category.
[8] Sticky notes—Click here to add a sticky note to your WebFlow. Sticky notes facilitate team communication by allowing you to leave questions, comments or explanations, tag other SALESmanago users or include links to external resources.
[9] Elements used—Here, you can check how many elements you have already added to your WebFlow.
[10] Zooming options—Here, you can zoom in and zoom out the view.
[11] Go to Start—Click this button to center the view on the Start element. This can be especially useful in the case of large WebFlows.
[12] View options—Here, you can adjust the settings of your working area.
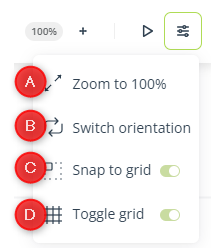
[A] Zoom to 100%—Return to 100% view after zooming in/out.
[B] Switch orientation—Choose whether you want to build your WebFlow vertically (from top to bottom) or horizontally (from left to right). Note that if you change the orientation after some elements have already been added, their layout may need some manual adjustment.
[C] Snap to grid—Turn on this switch if you want the SALESmanago system to automatically adjust the layout of your elements to the grid (so that each element lies perfectly in the middle of a grid cell).
[D] Toggle grid—Toggle this switch to show or hide the grid. The grid is the fine gray lines that run horizontally and vertically across the board. You may find these lines helpful in arranging the elements of your WebFlow in a neat and orderly manner.
[13] Start element—This element is required and present by default. Connect it to one or more Events to start building your WebFlow.
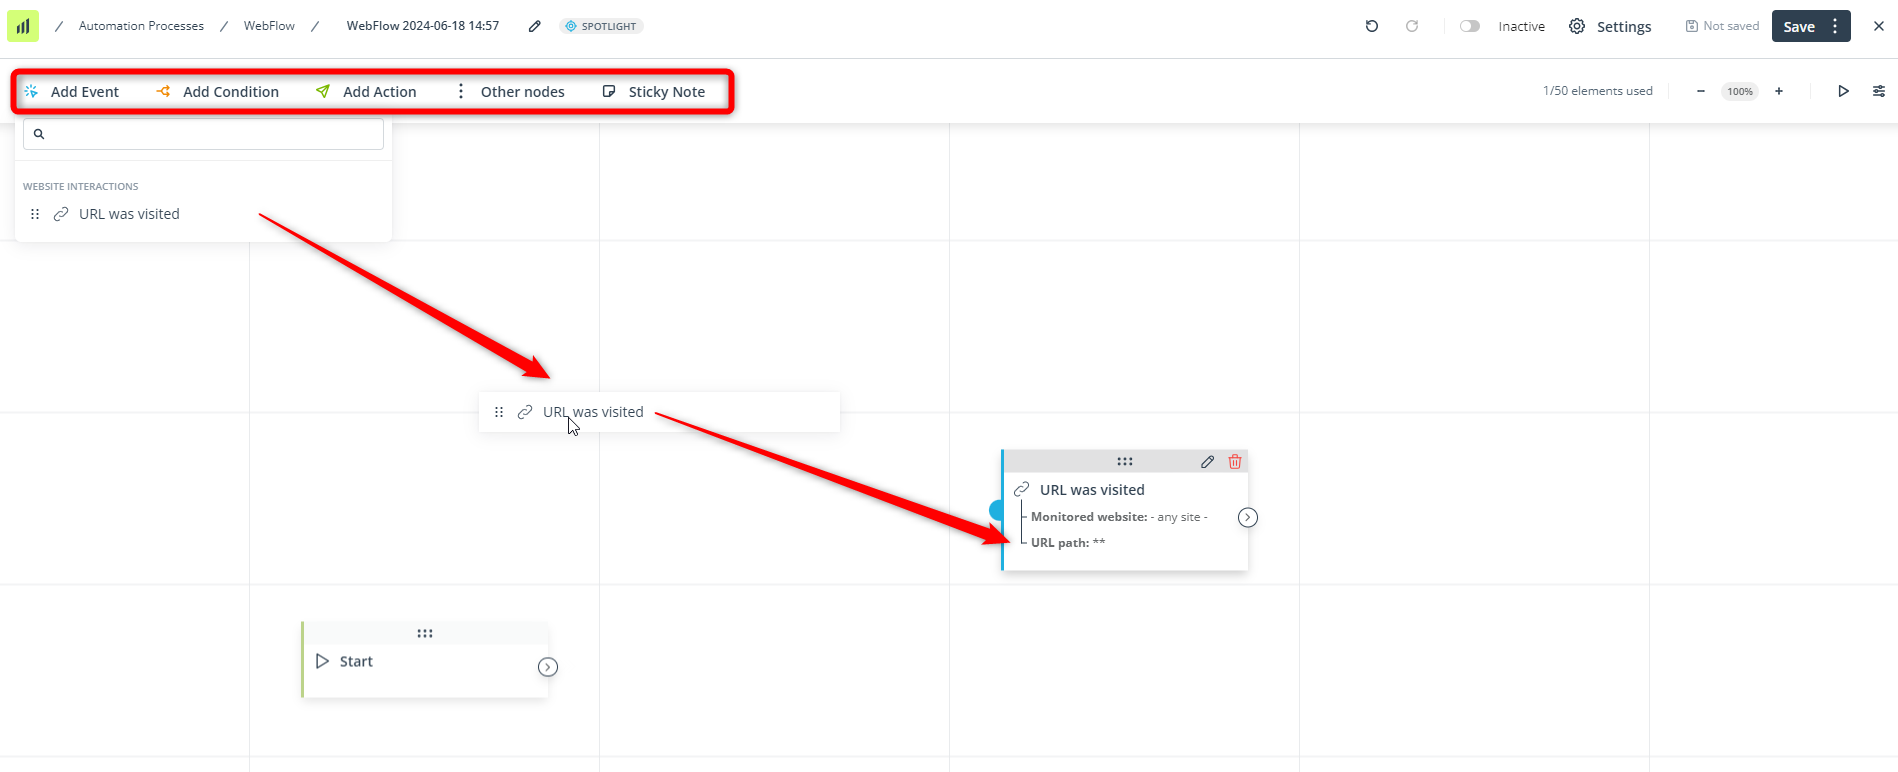
To build a WebFlow, first, you need to place the required elements on the board. You can do this in two ways:
- Select an element from one of the menus at the top of the screen and drag the element onto the board:
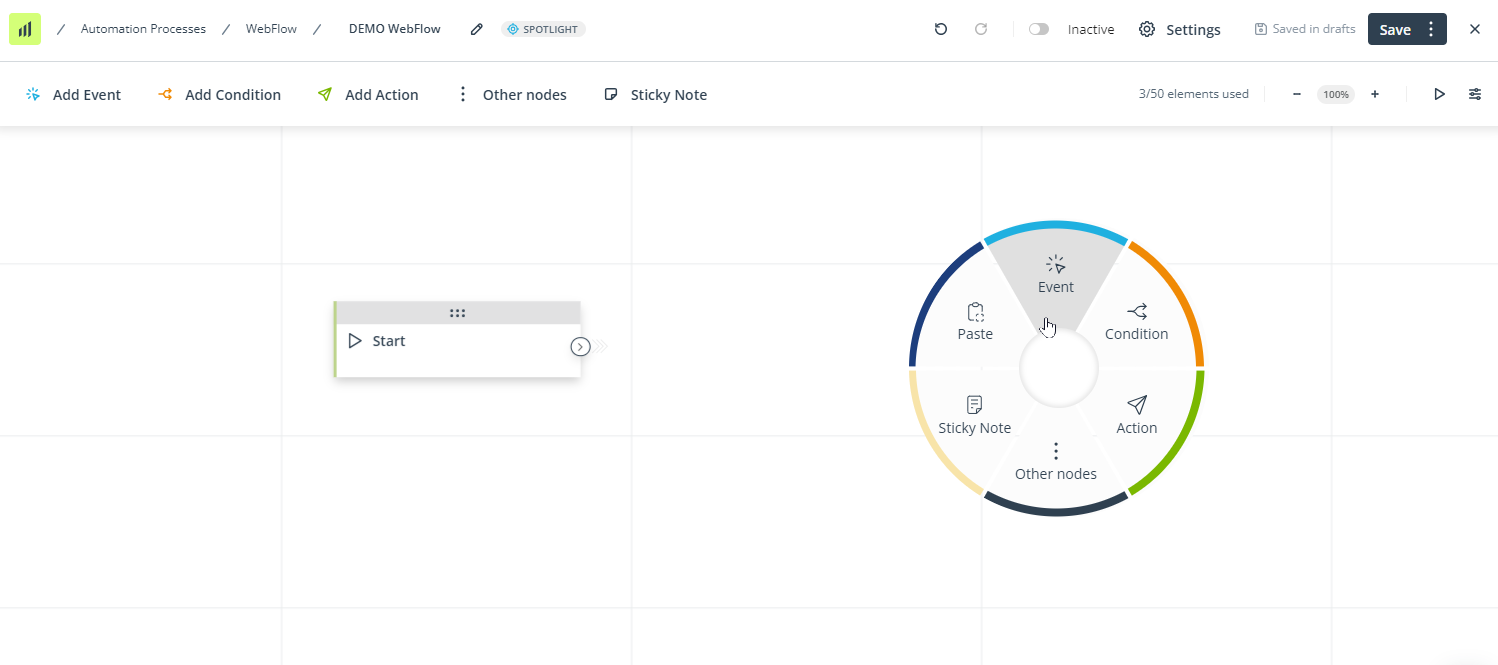
- Right-click anywhere on the board. A circular menu will appear. Select the action you want to perform: add an Event, Condition, Action, or one of Other nodes; add a Sticky Note; or paste a copied element.
If you right-click an element, a context menu with further options will open [A]:
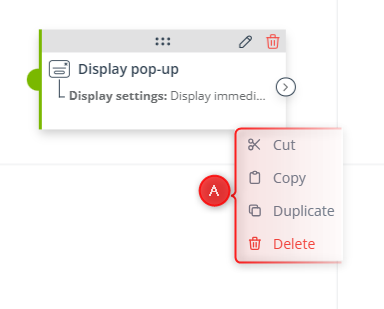
After cutting an element, you can paste it anywhere on the board, by right-clicking in the desired position and selecting Paste from the circular menu.
The Copy option allows you to copy an element and then paste it anywhere on the board, by right-clicking in the desired position and selecting Paste from the circular menu. Note that the copy has the same settings as the original.
The Duplicate option creates a copy of the element right below the original. Note that the duplicated element has the same settings as the original.
TIP: An element (or a group of elements—see Section A.1. below) copied in one WebFlow can be pasted into another WebFlow. To do that, right-click on an element and select Copy from the context menu. Then, save the WebFlow, go to the List of WebFlows, open another WebFlow, right-click anywhere on the board, and select Paste from the circular menu.
You can also open two or more WebFlows in separate browser tabs and switch between the tabs, copying and pasting elements.
A.1. Selecting multiple elements
You can select multiple elements to perform the same action for all of them at once.
You can do this in two ways:
- Press the Ctrl button and click on each individual element you want to select.
- Press the Ctrl button and draw a selection box by clicking next to an element and dragging your cursor over the area you want to select (as shown in the screenshot below).
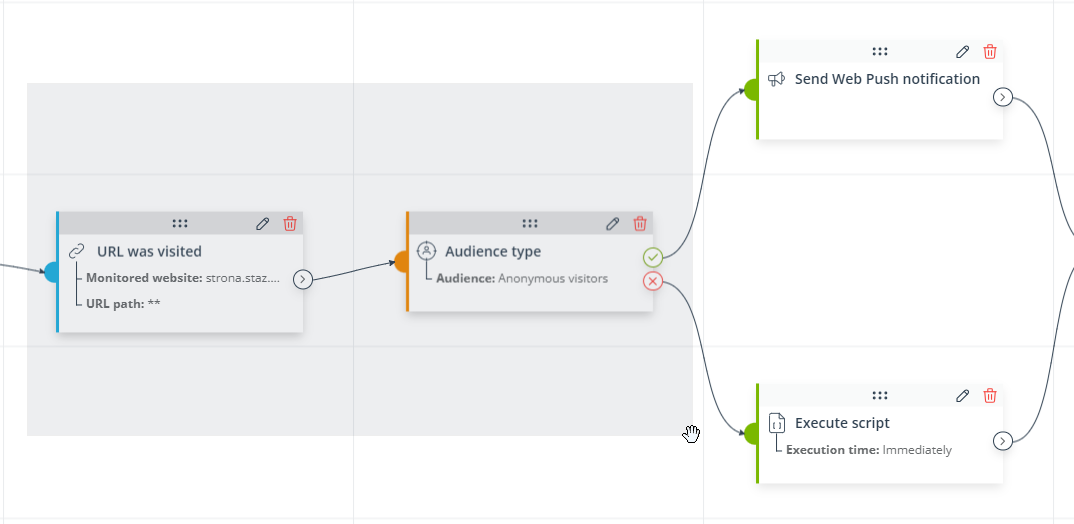
Note that the top bars of the elements selected will be highlighted in darker gray.
After selecting a number of elements, you can move all of them at once or right-click on any of them to open the context menu:
The action selected from the context menu will be applied to all the highlighted elements. This way, you can cut, copy, duplicate, or delete multiple elements at once.
Note that multiple elements are copied or duplicated along with all their individual settings and any connections (arrows) between them.
TIP: An element or a group of elements copied in one WebFlow can be pasted into another WebFlow.
A.2. Keyboard shortcuts
The following actions can be performed by using a keyboard shortcut:
- Switching orientation.
- Press Ctrl + down arrow to switch orientation to vertical.
- Press Ctrl + right arrow to switch orientation to horizontal.
- Zooming in/out.
- Press Ctrl + plus button to zoom in.
- Press Ctrl + minus button to zoom out.
- Press Ctrl + 0 to return to 100% view.
- You can also zoom in/out by pressing the Ctrl button and using the mouse scroll wheel.
- Copying and pasting.
- Press Ctrl + C to copy a highlighted element or a group of highlighted elements.
- Press Ctrl + V to paste a copied element or group of elements.
B. Connecting elements
When the element you want to use is already on the board and has been moved to the desired position, connect it with the previous element(s) and any following element(s) using arrows.
Click on the connector [A] and draw a line leading to the next element.

Elements connected by arrows form a path, which must always end with a Finish element. A single WebFlow can comprise multiple paths, each with its own Events, Conditions, and Actions, but always ending with a Finish element.
The arrows indicate the direction in which the path will be followed by a visitor, i.e., the order in which the connected elements will be processed by the SALESmanago system.
To remove a connection, place your cursor over the line and click the trash bin icon that will appear:
The rules for connecting WebFlow elements are described further in this article.
C. Building a WebFlow: Example
While the SALESmanago WebFlow feature offers great flexibility and allows you to build an Automation Process perfectly tailored to your specific needs, there are certain rules that must always be followed. This section will guide you through the process of creating an example WebFlow while providing the necessary instructions.
USE CASE: You want to create a WebFlow where a pop-up for signing up for the newsletter will be displayed to anonymous visitors. Monitored Contacts will see a chat with a message thanking them for returning to the site.
Each WebFlow must begin with the Start element, which is present by default and cannot be removed. The Start element must be connected to at least one triggering Event.
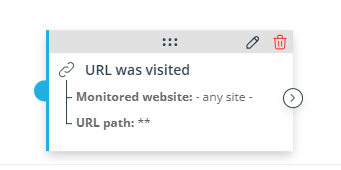
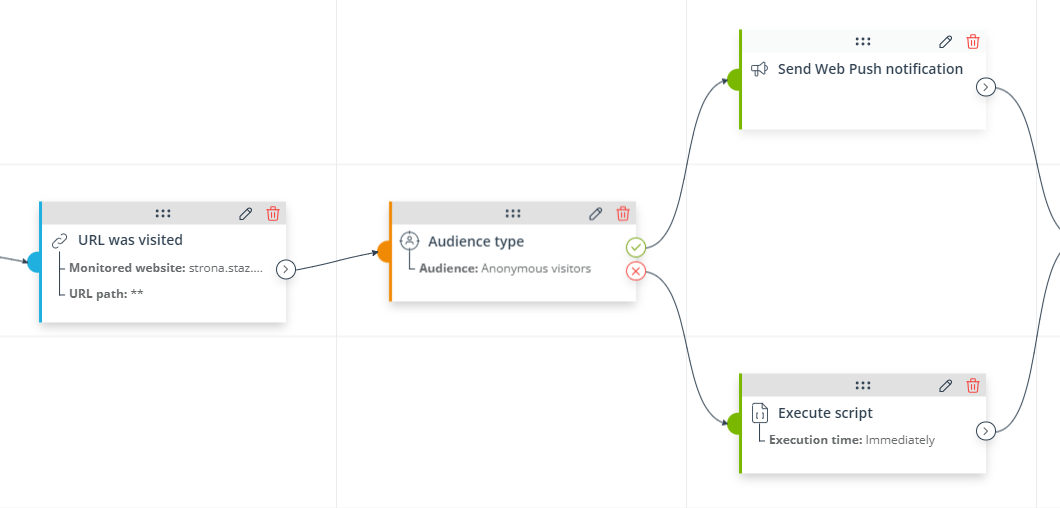
Add the Event: URL was visited to the board. Configure the Event to suit your individual needs and goals. In this case, you want the WebFlow to be triggered when a visitor visits any site within your monitored domain.
Configure the Event as follows:
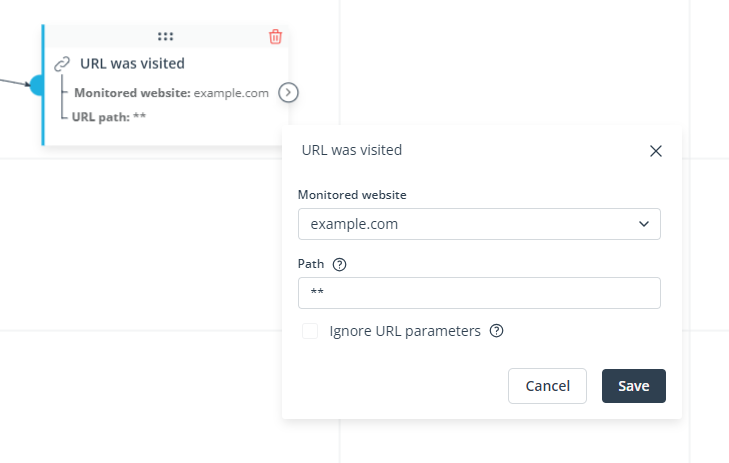
The WebFlow will be triggered when the triggering Event occurs.
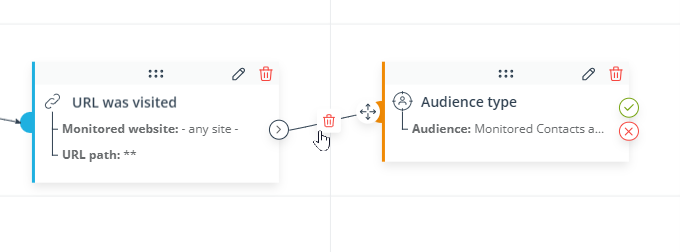
When the site is visited, you want to check whether the visitor is a monitored Contact or is anonymous. Add the Condition: Audience type. Connect the Condition to the Event. Then, open the Condition’s settings.
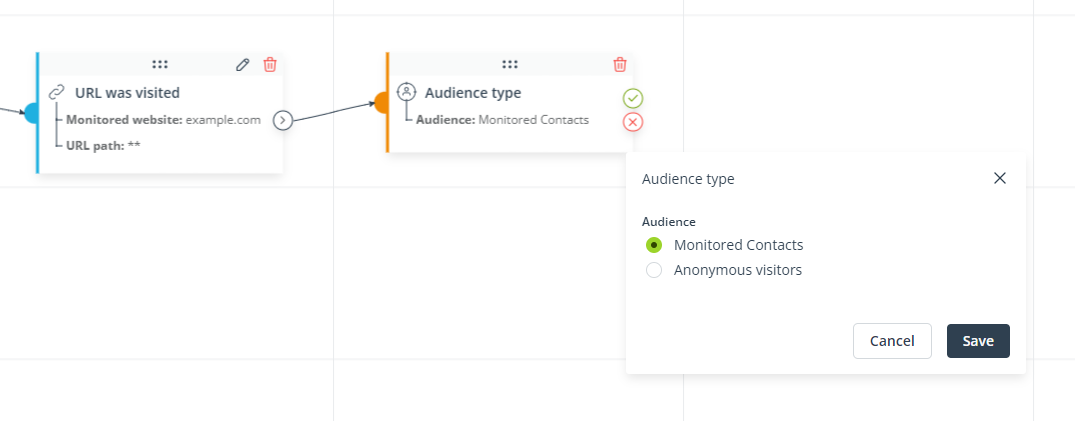
In this example, we will select the audience type: Monitored Contacts. Now, connect the Condition to the appropriate Events.
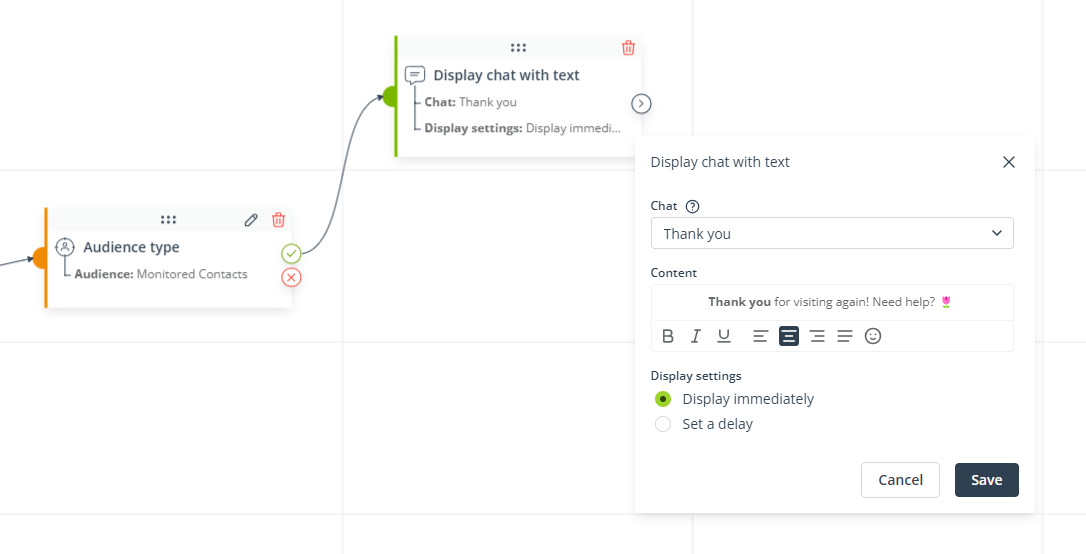
If the Condition is met (i.e., the visitor is monitored), you want to display to this Contact a chat window with text thanking them for returning to your website.
Add the Action: Display chat with text and draw a line from the Condition’s green connector to this Action. Then, open the Action’s settings and enter text tailored to you needs:
However, if the Condition is not met (i.e., the visitor is anonymous), you want to display a pop-up encouraging them to sign up to your newsletter.
Add the Action: Display pop-up and draw a line from the red (X) connector to the Action. Then, configure the Action as follows:
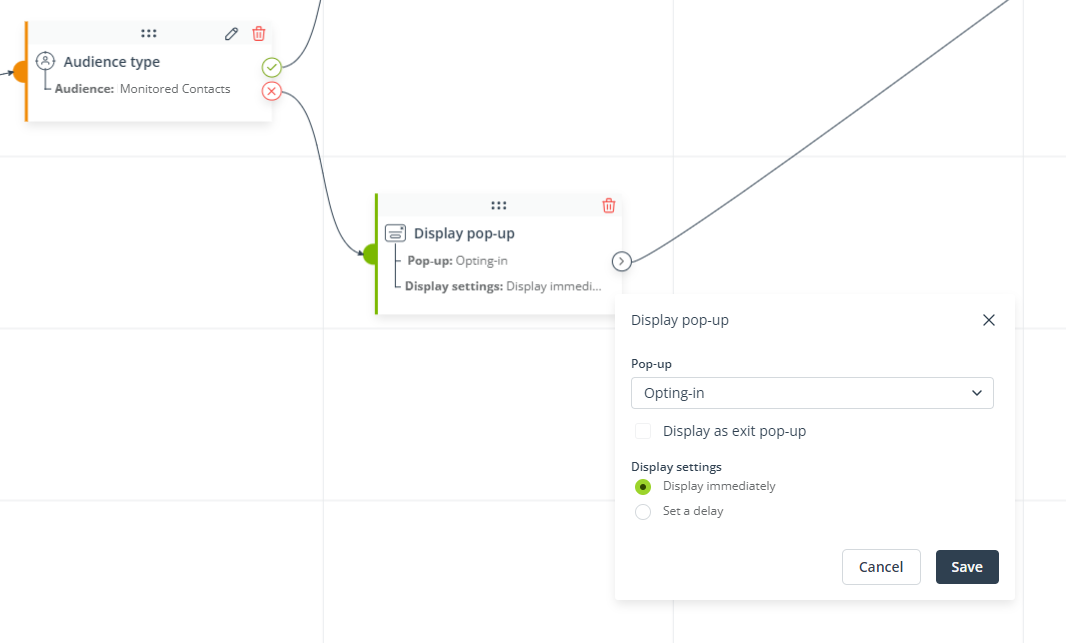
As you can see, the Action is so configured that the system will display the pop-up immediately after a visitor has reached this stage of the WebFlow.
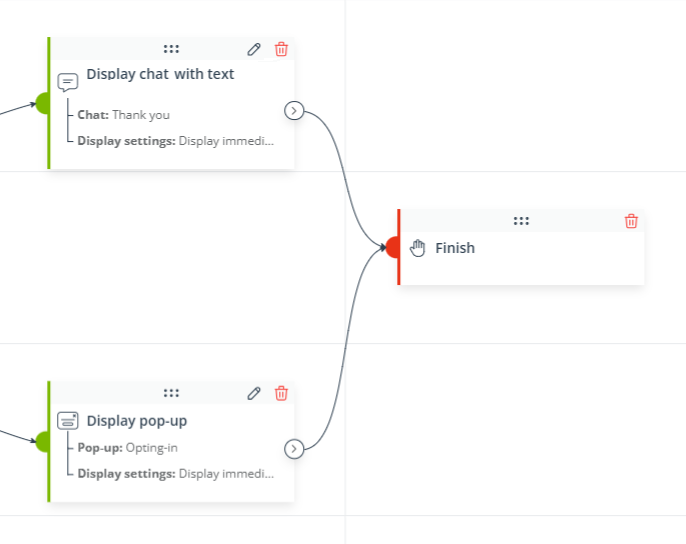
You don’t want to take any more actions at this point – the path (and the WebFlow) should end at this Action both for monitored Contact and anonymous visitors. Therefore, add a Finish element and connect it to both Actions:
If you want to immediately start using your WebFlow, activate it and save it as ready:
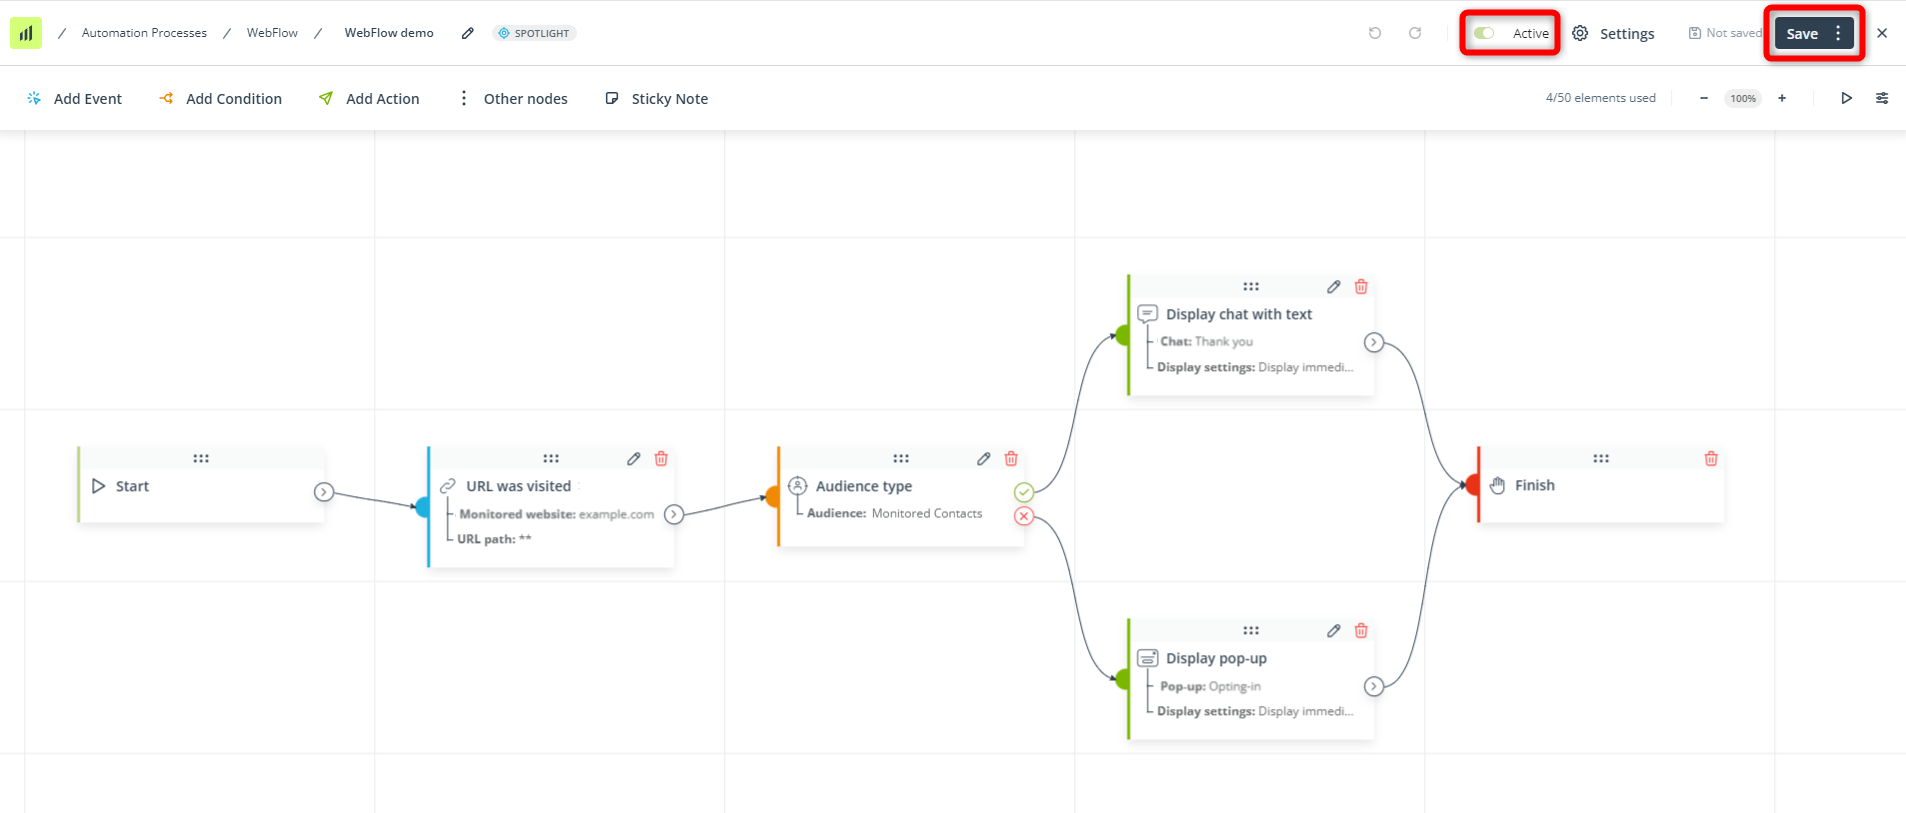
That’s it! You have just created a very simple WebFlow based on the very basic element configuration: Event → Condition → Action.
D. Basic rules for creating a WebFlow
Below, you can find a list of the basic rules that you should bear in mind when creating a WebFlow process.
Mandatory elements and basic connections
- Each WebFlow must begin with the Start element connected to an Event.
- Only Events can be connected to the Start element.
- You can connect more than one Event to the Start element. If the Start element is connected to more than one triggering Events, the Events will be connected by the OR operator, which means that the WebFlow will be triggered as soon as one of the Events occurs.
- If more than one triggering Events occur at the same time, the system will choose the path to be followed at random.
- Each WebFlow must contain at least one Event and at least one Action.
- All paths in a WebFlow process must end with the Finish element.
Website visitors in a WebFlow
- A visitor who has entered a WebFlow process always follows only one path. In other words, a visitor cannot be in several places in one WebFlow at the same time.
- A visitor who has entered a WebFlow process cannot enter the same WebFlow before reaching a Finish element in that first process (i.e., before that first process comes to an end for that visitor). However, a visitor who has already reached the end of a WebFlow can enter the same WebFlow again.
- A visitor can participate in several different WebFlows at the same time.
Activating and deactivating a WebFlow
- A WebFlow can only be triggered if it is saved and activated.
- If you edit an active WebFlow, any modifications will be autosaved as draft on an ongoing basis. However, to actually apply the changes, you need to save the WebFlow.
- If you deactivate an active WebFlow, the process will be paused for all website visitors that are currently in this WebFlow. When the WebFlow is reactivated, the website visitors will continue moving along their paths from where they stopped. Note, however, that anonymous visitor data is stored for 7 or 30 days, depending on your Spotlight plan. If the relevant data is no longer available, it is possible that the WebFlow will not be continued for some anonymous visitors.