Automatic Sales Chat is a smart bot which can be integrated with Facebook to replace a customer service in cases where their work can be automated. It is a highly practical solution for any business that has to deal with customer queries on a regular basis.
With SALESmanago you can create and implement your own bot from scratch. Automatic Sales Chat can:
- recommend new products to users,
- direct users to specified subpages,
- display buttons that show product descriptions, categories or other details when clicked.
You can create an unlimited number of complex conversation scenarios. Elements are the building blocks of each scenario – you can freely arrange them into interconnected structures and customize their settings.
To set a bot in the system, go to Web Tools→ Live Chat → Automatic SalesChat.
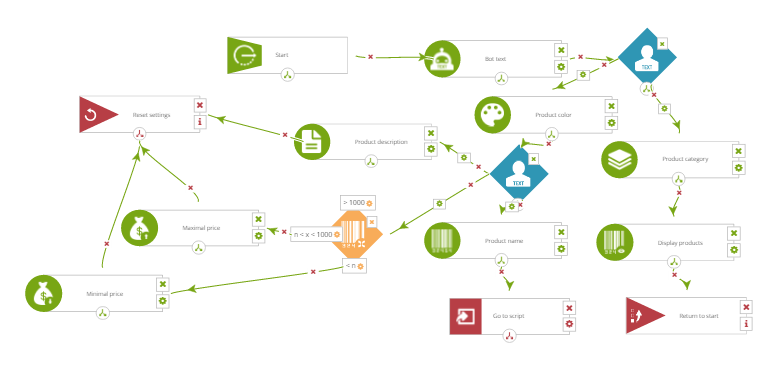
The Structure of an Automation Sales Chat bot.
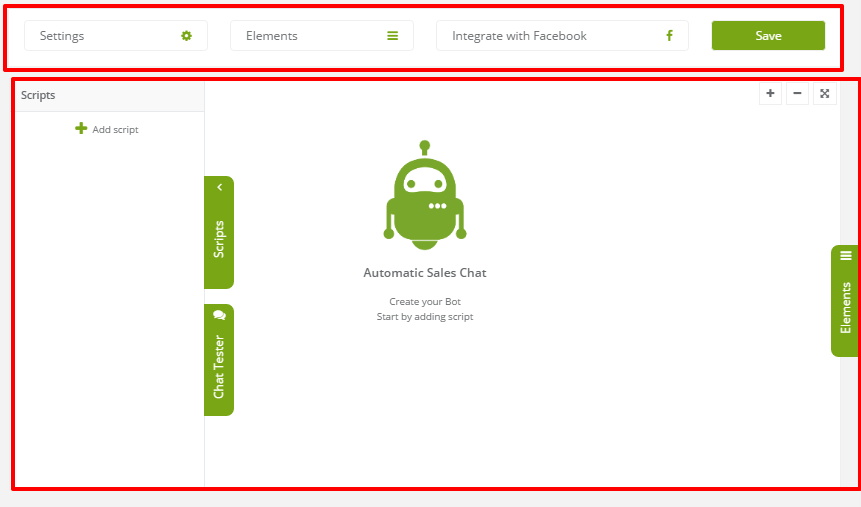
The screen is divided into two parts:
- The upper part, which has 4 buttons – Settings, Elements, Integrate with Facebook and Save.
- The lower part, where you can design conversation Scripts, test them using the Chat Tester, and adjust settings.
TIP: The “+” zooms the screen in and “-“ zooms it out. The third icon aligns the screen to the centre.
[A] Settings
![]()
As you begin, take a moment to adjust the basic Settings.
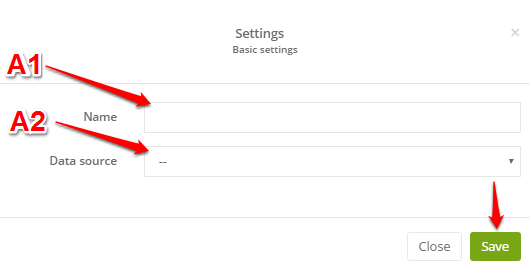
[A1] Name – name your bot. This name is visible only in SALESmanago – on Messenger, the bot chat shares the name of the Facebook page it is integrated with.
[A2] Data source – If you want the bot to be able to display information on products in your shop, provide an XML file from which the bot can load this information.
Uploading an XML file to SALESmanago >>
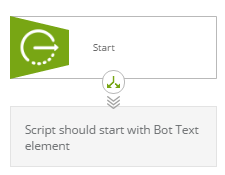
After basic settings, name the script. The Start element will appear. This element is the beginning of each conversation script.
[B] Elements
To start adding elements to the scenario, click Elements ≡.
4 categories of elements exist:
- eCommerce,
- Bot text,
- User Commands
- Elements ending the conversation.
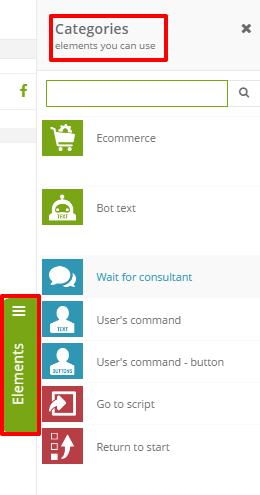
To insert an element into the script, drag and drop it onto the edit field. The only exception is the eCommerce category, which has editable sub elements.
Use ? to find a specific element. Click the arrow in the upper right corner to go back to choosing a category. Click ✗ to close this menu. To learn more about elements, see the final section of this article.
[C] Scripts
In this column, you can add new scripts. Click Add a script, provide a Name for and click ✓.
TIP: A name of a script can be up to 30 characters long. Names longer that will be replaced with an ellipsis.
A ☆ star next to a script’s name means that it is active and that you can add elements to it.
![]()
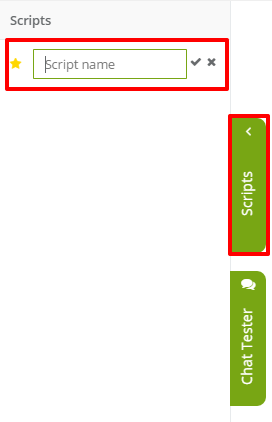
TIP: To delete a script, click ✗. To edit a script, use the pencil ✐
After creating and saving the bot, you can test it in Scripts → Chat Tester.

To test if the conversation script works as intended, enter some text in the empty field. The bot will respond according to its settings. You can also delete the conversation from the Chat Tester window by clicking Reset. Finally, the Auto-trace option highlights active elements.
[D] Integration with Facebook
Automatic Sales Chat works on the Messenger platform, that is why each bot must be integrated with a Facebook page.
How to integrate a bot with Facebook >>

[E] Save
After you have finished working on the bot, Save it in the system. If you did not integrate the bot with Facebook yet, it will be saved as an inactive. If this is the case, activate it after you carry out the integration.

If you save a previously created bot, consider checking every scenario just in case. To do this, open and save each scenario, one after another.
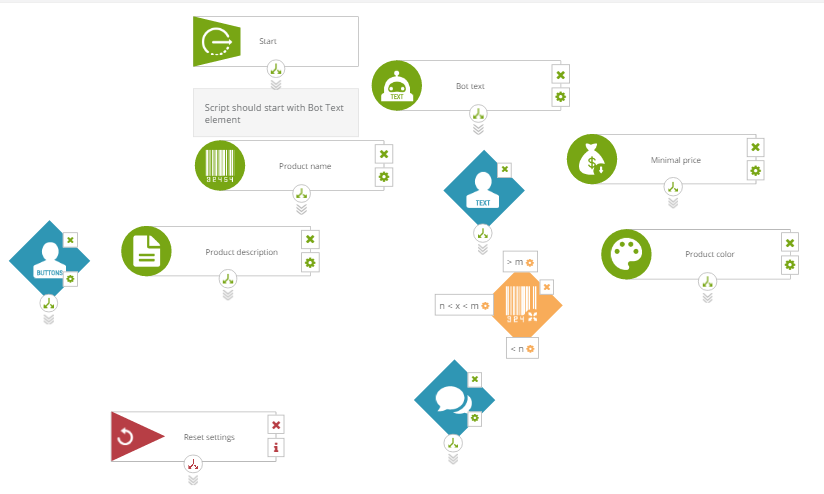
Elements – how to use them
To create a conversation scenario, you will need elements.
- Bot text,
- User commands,
- elements that end the conversation,
- eCommerce + sub elements.
Plan the conversation scenario and arrange elements, beginning with Start and ending with Go to the script, Return to start element or Reset settings.
Text within elements
Some elements let you enter text in titles or descriptions. Keep in mind:
- the length of texts is limited by Facebook app policy. In most cases, you will be able to enter 640 characters for descriptions and 20 characters for buttons. For a more detailed description of character limits for each element, see further down in this article.
When a user enters a command, the bot will look for exact matches, if it finds none, it will look for partial matches, and finally to a special command marked with an asterisk. Using certain characters in button text or descriptions may influence the way a bot works.
-
Letter size has no effect on commands and a user input.
*(asterisk) marks a special command in the script. This is a fallback command used to prevent users from being stuck when they use an unrecognized command. The asterisk must be the only character in a string (if used with other characters, it will work just like any other command).- Other signs and symbols such as the ‘ (apostrophe) can cause errors.
To connect points, click the forked arrows icon (under the middle of the element) and drag a line to another element you want to connect. The elements will be linked with a green arrow, that determines the cause-effect order. To delete an arrow, click the red cross × in its middle.

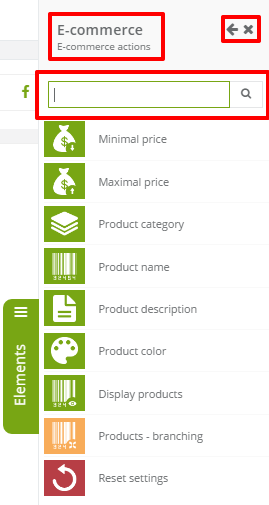
eCommerce
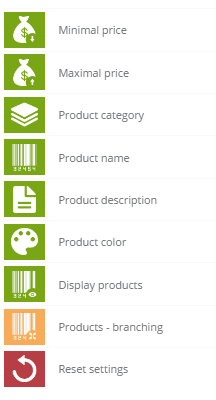
eCommerce is the only category to have subcategories. Their purpose is to let the bot pinpoint what the customer is looking for and present a relevant offer. They need data from an XML file to work.
In element settings, insert a question that will load a product from the XML file when asked by a user. If the user’s command matches the information in the XML file, the bot will move to the specified element.
Example: If you have set a command asking about product colour and a user asks about something else, the bot will not answer.
eCommerce elements::
- Minimal price – use this to find out the least amount of money a user is willing to spend on a particular product. After a user replies, the system searches the XML for products in that price range. In this case, the bot only reacts to numerical input. Max. 640 characters.
- Maximal price – use this to find out the highest amount of money a user is willing to spend on a particular product. Max. 640 characters.
- Product category – use this to let users search the XML file for categories. If the name of a category is complex, a user has to enter at least one of the words included in the name – otherwise, the bot will not react. Max. 640 characters.
- Product name – use this to let users ask about a particular product’s name. If the name of the product is complex, a user has to enter at least one of the words included in the name – otherwise, the bot will not react. Max. 640 characters.
- Product description – use this to let users find a product by typing words used in its description. Max. 640 characters.
- Product colour – use this to let users specify the colour they are interested in. The bot will look for information on products with this colour in the XML file.
- Display products – this element does what it says – use it after Product [ ] elements mentioned before. After a user reaches this element, they will see a picture of the product they searched for. The picture can redirect to the specified URL when clicked. You can set this element to display up to 5 products, in any order, with details of your choice. You can also include a button redirecting to the product page (max. 20 characters in a label) and the name of the campaign. Product name and product description+price can be up to 80 characters long.
- Products branching – use this to redirect the conversation to another stage if the number of searched products is very high or low.
- Reset settings – use this to clear all previous choices entered by the user. You can redirect the user to another stage.
User commands
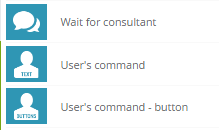
User commands are sets of possible replies to questions asked by the bot. These activate other elements in the script. If a user enters a command that is not present in the set, the bot displays a fallback response. Each connection can have up to 20 commands. There is no limit of the number connections. Three kinds of user command elements exist:
- Wait for a consultant – use this to specify commands that let users request a consultant to join the conversation. Max. 640 characters.
- User command – use this to specify commands that let users start a product search. Max. 640 characters for a description.
- User command – button – use this to specify commands that cause a button to be displayed – this button can redirect to an element of your choice. Max. 20 characters for a button.
An element can have many buttons, but only the first 3 with the highest position are displayed (buttons with duplicate labels are not displayed).
Elements ending the conversation
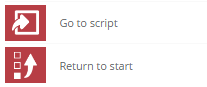
Claret elements end the conversation. You can also use them to clear a previous user input and move the conversation to another point in the script. (Reset settings – element from the eCommerce category), or to the beginning of the script.
- Go to script – choose the script to which you want to redirect the user.
- Return to start – returns the conversation to the Start element (the beginning of the scenario). The conversation can start again and take a different course.