Magento 2 is one of the most popular eCommerce platforms on the international market. It allows you to create different language versions of a single store, each with separate configurations. With the intuitive admin panel, you can manage individual domains and adjust currencies, payment methods, and shipment options to each language version.
To download the SALESmanago integration plugin from the Magento Marketplace, click here.
Contents
- Basic information
- Scope of integration
- Installation
- Logging in
- Plugin Configuration
- Data export
- Technical description
1. Basic information
In this article, you will find detailed information about the SALESmanago integration with Magento 2. The integration plugin is constantly being improved and available for free to our customers.
If you use Magento 1, read the dedicated article >>
Integrating Magento 2 with your SALESmanago account will enable you to transfer relevant Contact and transactional data between the two platforms. You can also configure Product Catalog synchronization to transfer product data to SALESmanago in real time.
Configure real-time Product Catalog synchronization through an eCommerce plugin >>
Use this information to automate your marketing activities and thus boost your e-store sales.
2. Scope of integration
After logging in to the plugin, synchronization and data transfer are performed automatically.
The scope of the integration includes:
-
Transferring the following data to SALESmanago:
- Contact data, including data provided when registering, logging in, purchasing, and purchasing as a guest
- Option to assign tags when a Contact registers, logs in, subscribes to the newsletter, makes a purchase, or makes a guest purchase
- External Events: CART and PURCHASE for all monitored Contacts.
- External Event: CANCELLATION for orders canceled via the admin panel.
- Email and Mobile Marketing subscription statuses (opt-in/opt-out)
- Archival data (export of archival Contact and transactional data)
- Updating the opt-in/opt-out status in Magento 2 based on data transferred from SALESmanago (callbacks).
- Automatically adding the SALESmanago Monitoring Code to all pages of the integrated store (which allows you, among other things, to implement certain SALESmanago features, such as Live Chat, Pop-ups, and Web Push notifications, in your online store).
- Adding a monitoring parameter to Contacts transferred to SALESmanago.
You can also configure Product Catalog synchronization to transfer product data to SALESmanago in real time.
Configure real-time Product Catalog synchronization through an eCommerce plugin >>
3. Installation
Magento 2 is an advanced platform, and the installation of any modules (plugins) requires technical knowledge. Therefore, the installation of the SALESmanago integration plugin should be performed by a developer. The necessary instructions are provided below.
If you need any help with the installation and integration process, please contact us at support@salesmanago.com.
If you already have the SALESmanago module installed, go to Section 5: Plugin Configuration.
Installation instructions
Start by adding the SALESmanago module to your Magento Marketplace account >>
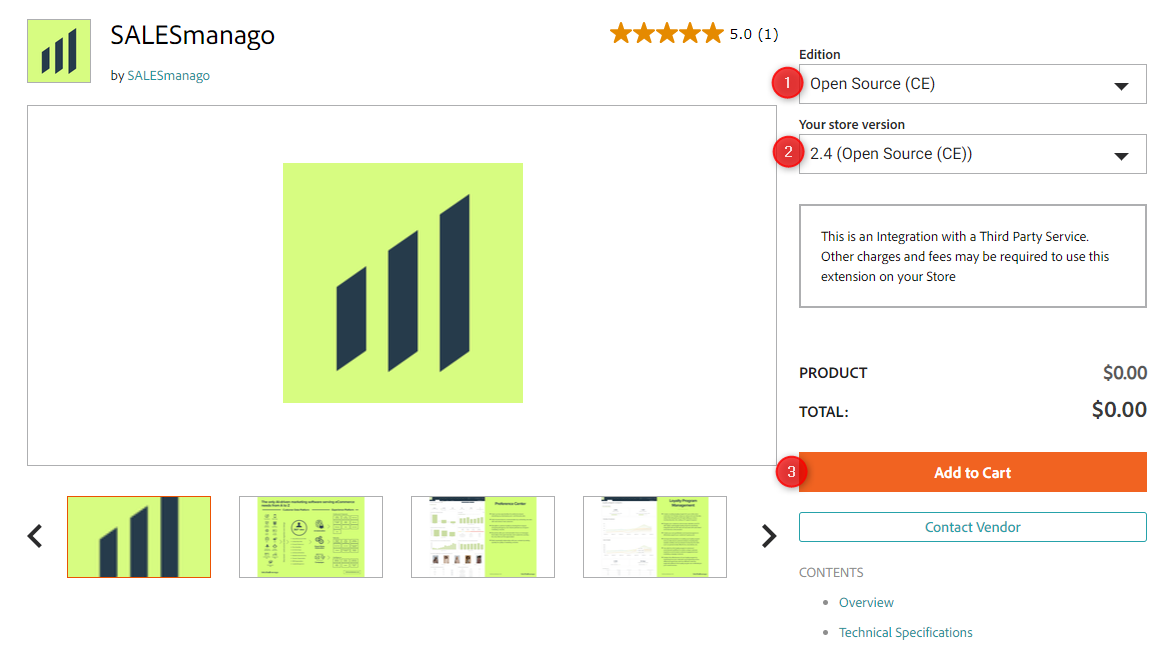
[1] Edition—select the edition compatible with your version of Magento 2.
[2] Your store version—specify your store version.
TIP: To check which version of Magento 2 you use, go to the address bar of your browser and add /magento_version to the domain of your store, e.g.: https://example.com/magento_version. Press enter.
[3] Add to Cart—add the module to the cart and complete the order.
To integrate the plugin, turn on the console and install the module by entering one of the commands below in the Magento 2 main catalog:
- for the development environment:
composer require salesmanago/integration:x.x.x
- for the production environment:
composer require salesmanago/integration:x.x.x --no-dev
—where x.x.x is the plugin version you want to use. You can check the current version of the SALESmanago plugin in the Magento Marketplace in the Technical Specifications section >>
Add the module to the platform by entering the following commands:
php bin/magento setup:upgrade;—registers the extension (module);
php bin/magento setup:di:compile;—recompiles your project with all dependencies;
php bin/magento setup:static-content:deploy;—deploys static content;
php bin/magento cache:flush;—flushes the cache.
Read more on the Adobe support website >>
A. Installation instructions for Magento versions below 2.3
If you have a store version older than Magento 2.3, you can also use an alternative method of installing the plugin by going to the Packagist modules repository.
Visit the SALESmanago plugin website on Packagist >>
To integrate the plugin, turn on the console and install the module by entering one of the commands below in the Magento 2 main catalog:
- for the development environment:
composer require benhauer/salesmanago-integration:x.x.x
- for the production environment:
composer require benhauer/salesmanago-integration:x.x.x --no-dev
—where x.x.x is the plugin version you want to use. You can check the current version of the plugin on Packagist >>
Read more on the Adobe support website >>
4. Logging in
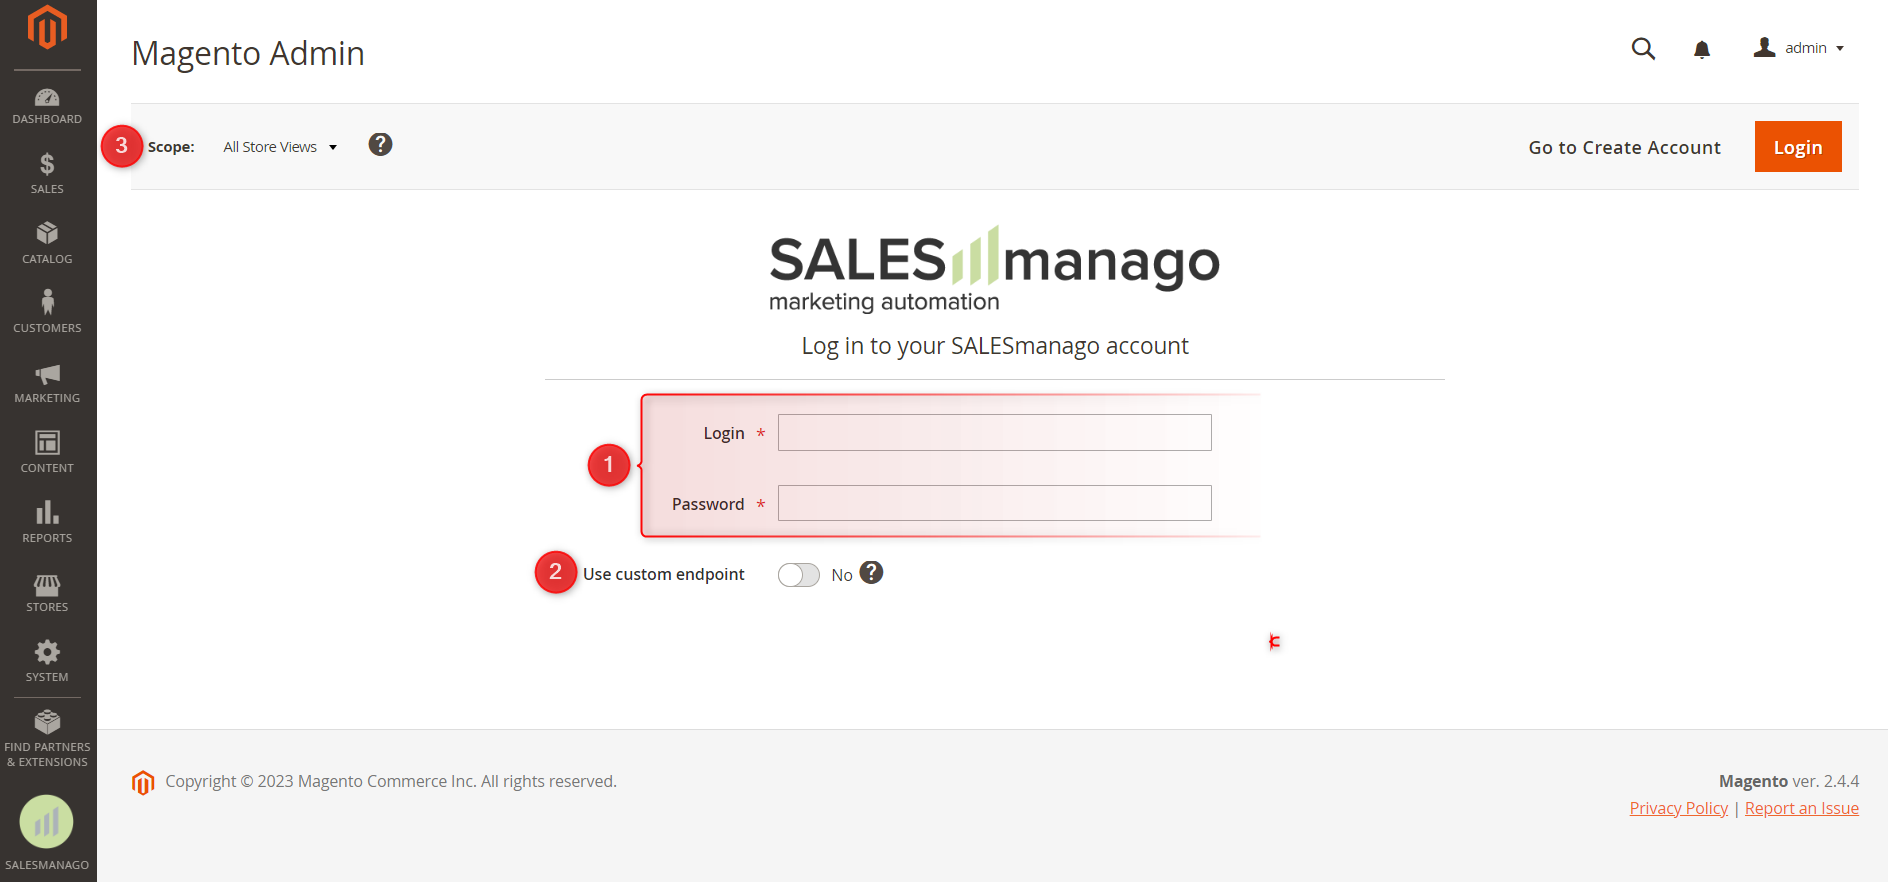
After installing the plugin and going to the SALESmanago module, you will see a login screen. Enter the data you use when logging in to SALESmanago [1]. If your SALESmanago account has a non-standard endpoint, click Use custom endpoint [2] and enter the address in the field that will appear.
If you are unable to log in, check for the following possible reasons:
- Incorrect login data—verify your credentials by logging in to SALESmanago.
- Two-Factor Authentication (2FA)—if you use this login method, please contact Customer Support (support@salesmanago.com) for more information.
- Incorrect endpoint—if your SALESmanago account uses a non-standard endpoint, use the option: Use custom endpoint.
IMPORTANT: You can look up the endpoint assigned to your account in the SALESmanago system by going to Menu → Integration Center → API → API v2 tab:
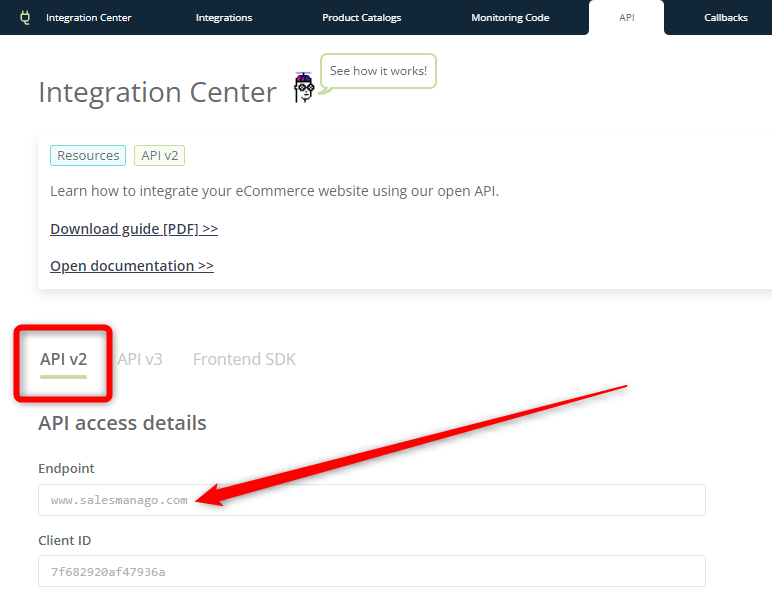
A standard endpoint starts with “www,” “app2,” or “app3.” If your endpoint starts with anything else, copy the content of this field and paste it on the Magento 2 platform:

[3] Scope—here you can find a list of all your Magento 2 Store Views. The SALESmanago plugin allows you to change settings for all Store Views at once or only for a selected Store View.
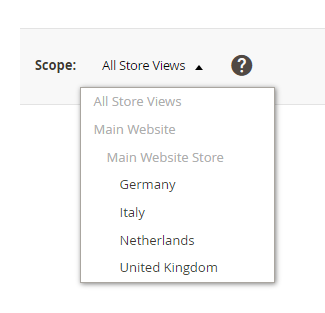
If you select All Store Views, you can configure settings for all stores at once (your settings will be applied to all Store Views for which you have not individually logged in to the SALESmanago plugin).
If you select an individual Store View and log in to a SALESmanago account, this individual store will stop inheriting settings from All Store Views. This means that you can define specific settings for this individual store. Note that in this case, the Use Default checkbox that you can see next to individual options and settings becomes non-effective (it will not work even if you check it).
After logging in to the plugin, you will see the following screen:
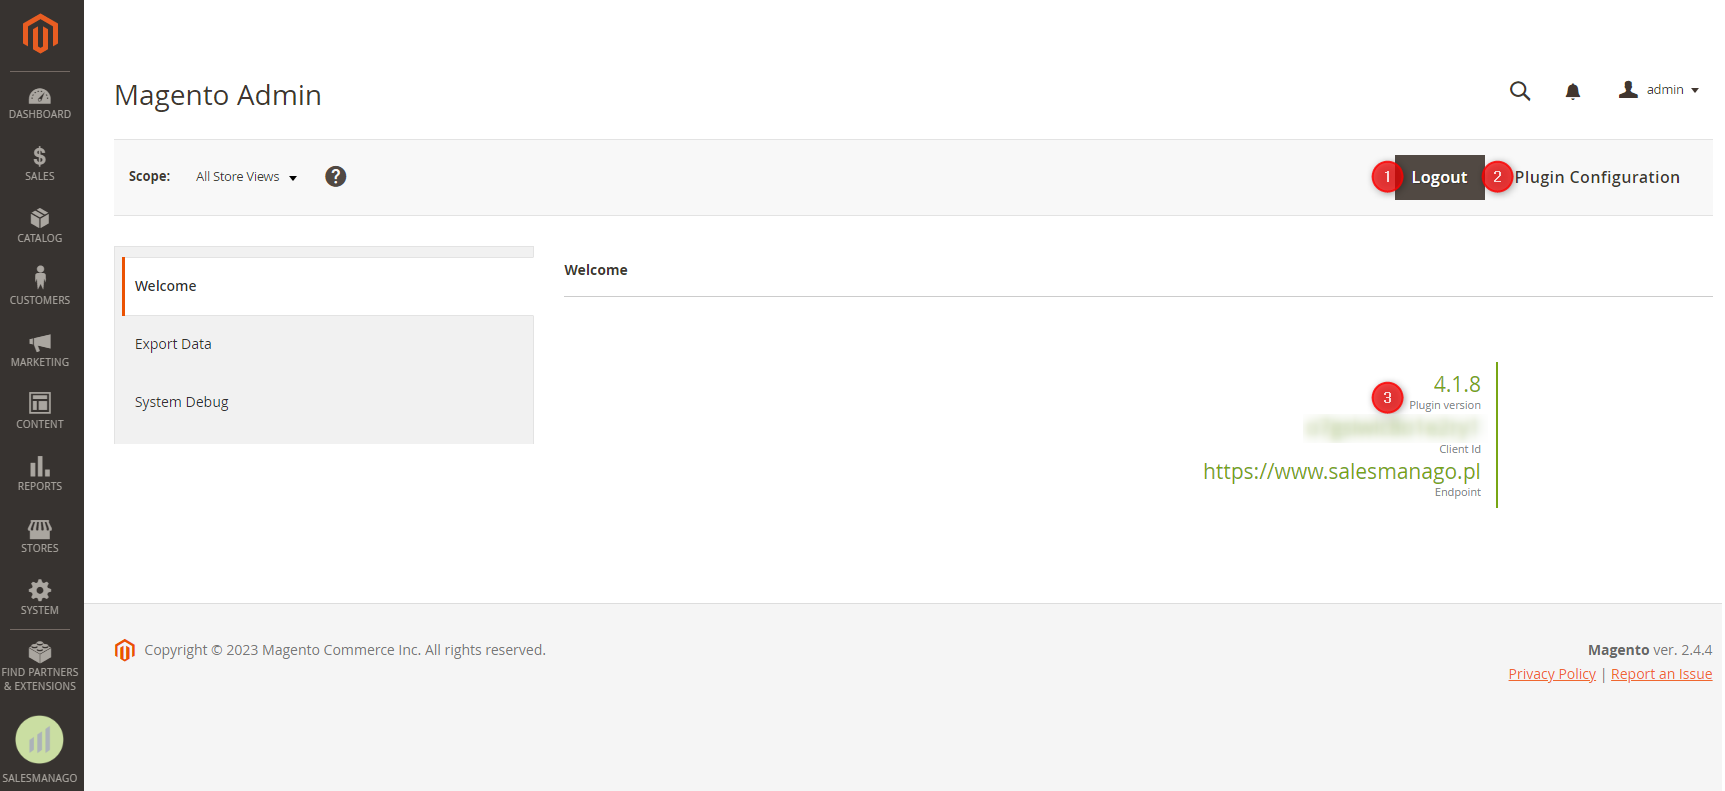
[1] Logout—click here to log out of your SALESmanago account.
IMPORTANT: If you log out, the integration will become non-functional. No Contact or transactional data will be transferred, and the Monitoring Code will stop working on your website (so no Lead Generation widgets will be displayed in your store, no Contacts will be monitored, etc.).
[2] Plugin Configuration—click here to go to the plugin configuration page (see Section 5 below).
[3] Basic information—here, you can check the currently used plugin version, your Client ID, and the Endpoint URL assigned to the SALESmanago account to which you are currently logged in.
5. Plugin Configuration
After logging in to the SALESmanago plugin and clicking on Plugin Configuration, you will see the following screen:
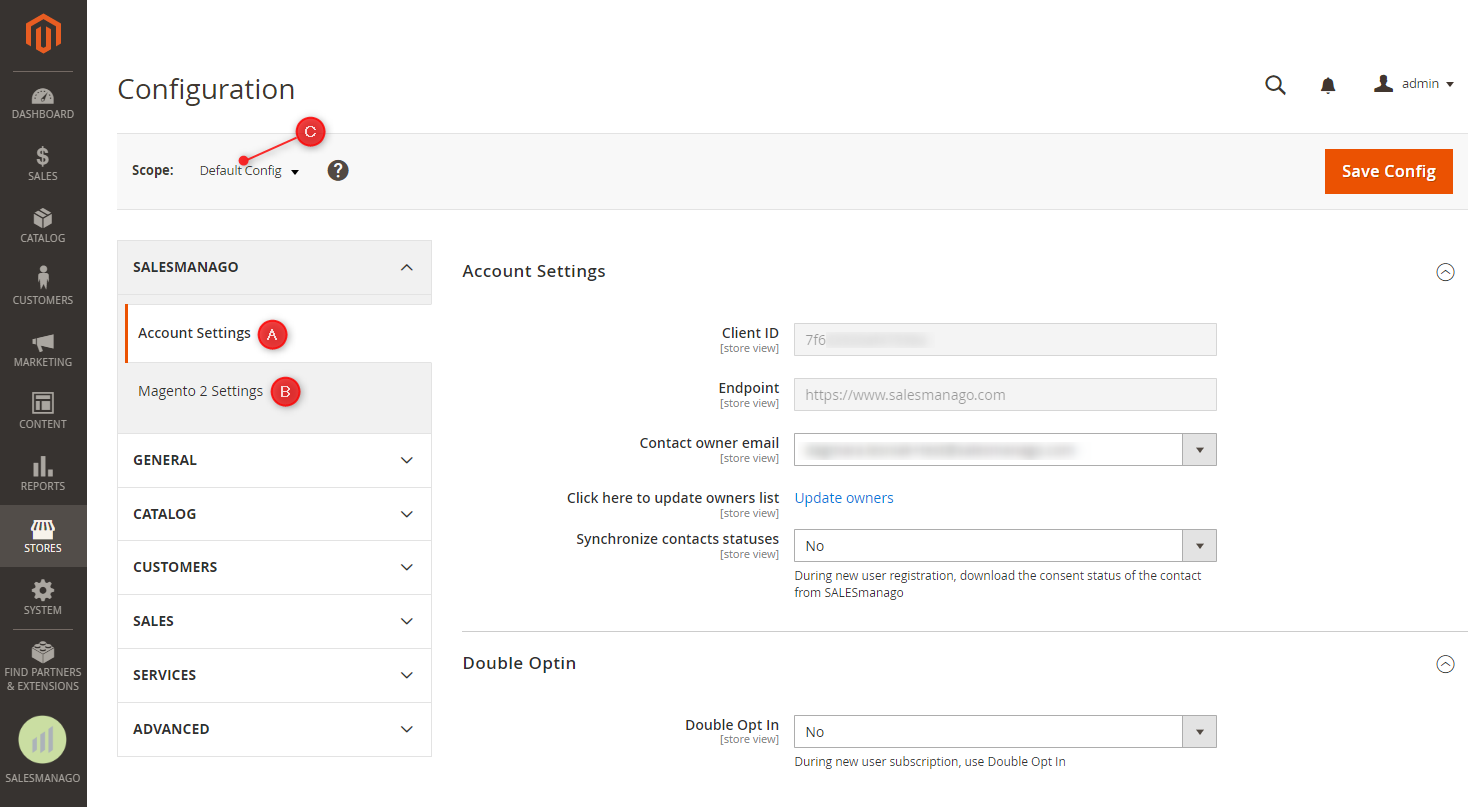
Navigate to Account Settings [A] and Magento 2 Settings [B] to configure the integration.
NOTE: The default scope is named “All Store Views” on the login screen, whereas on the configuration screen, it is named “Default Config” [C].
A. Account Settings
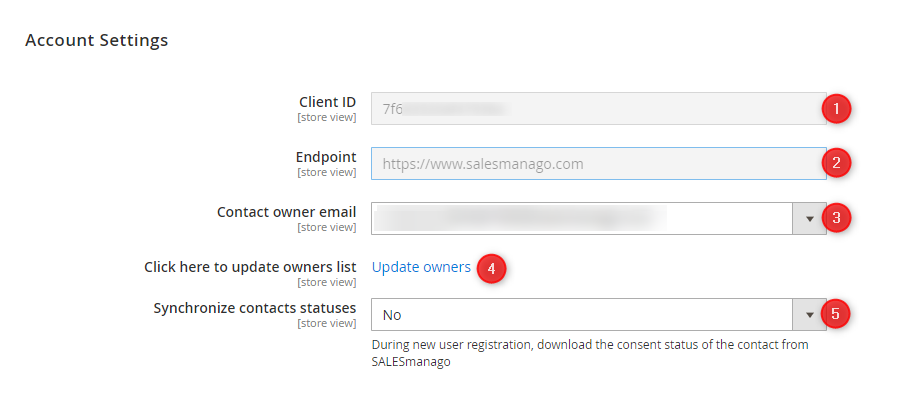
[1] Client ID—the identifier of your SALESmanago account. This field is completed automatically.
[2] Endpoint—the subdomain of your SALESmanago account. This field is completed automatically.
[3] Contact owner email—the list of all users of your SALESmanago account that have the “Contact owner” role assigned to them. Select the email address (Contact owner) to which new Contacts from your Magento 2 store will be assigned.
[4] Click here to update owners list—if the email address you are searching for is not present on the list, click Update owners to load the current list of Contact owners from SALESmanago.
[5] Synchronize contact statutes—select Yes if you want Contacts who have the opt-in status for Email Marketing in SALESmanago to be added to the group of subscribers in Magento 2.
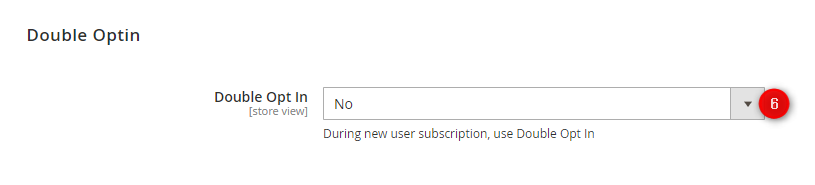
[6] Double Opt-in—decide whether Contacts subscribing to your newsletter should be asked to confirm their subscription by clicking on a link in a subscription confirmation email.
Learn more about the double opt-in mechanism >>
If you select No, each new Contact that subscribes to the newsletter will be assigned the opt-in status immediately, without additional confirmation.
If you select Yes, a new field [A] will appear.
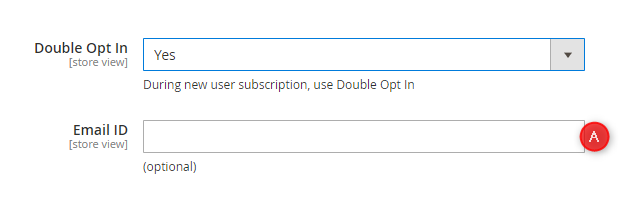
This is an optional field where you can specify the Email ID of the subscription confirmation email that will be sent to users subscribing to your newsletter.
TIP: To implement the double opt-in mechanism, first you need to create a subscription confirmation email (Email Marketing → Email List → Subscription confirmation). You can configure the sending of this email either in SALESmanago (Menu → Settings → Other → Other) or in the SALESmanago module on the Magento 2 platform by filling out field [A] (shown in the screenshot above).
To check the ID of a subscription confirmation email, go to the SALESmanago Menu → Email Marketing → Email List → Subscription confirmation tab. Find the email of interest on the list and click on Preview:
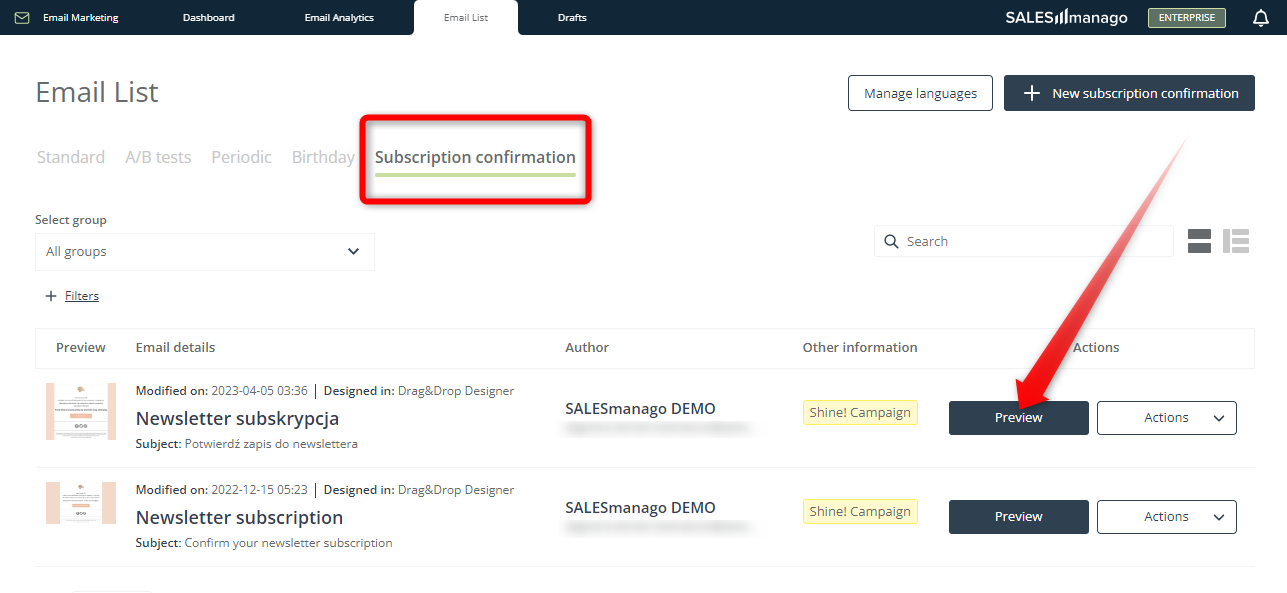
A new window will appear that contains basic information about the email, including its Email ID.
If you enter an Email ID in field [A], that specific email will be sent to confirm subscriptions, regardless of the language of the user’s browser.
If you leave field [A] empty, the subscription confirmation email will be sent in the language version corresponding to that of the user’s browser. In this case, make sure that the double opt-in settings on the SALESmanago platform are appropriately defined (Menu → Settings → Other → Other, Application tab, section: Manage languages).
Read more about enabling the Double Opt-in mechanism on eCommerce platforms >>
B. Magento 2 Settings
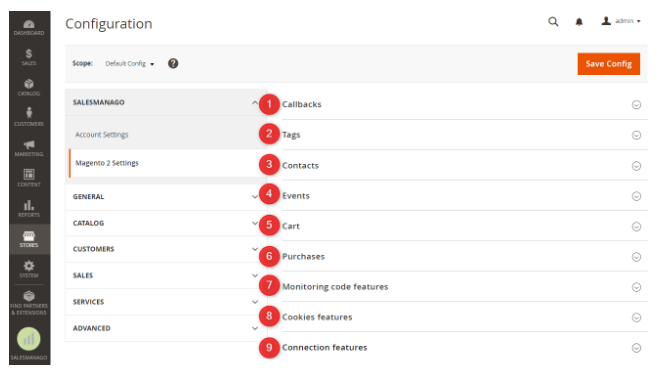
[1] Callbacks—Callbacks allow you to synchronize the opt-in [A] and opt-out [B] status from SALESmanago to Magento 2, e.g., in the following situations:
- A Contact unsubscribes from the newsletter via an opt-out link in an email.
- A Contact subscribes to the newsletter via a Lead Generation widget (e.g., Pop-up).
- A Contact’s status is changed manually.
- A Contact’s status changes due to the Contact’s activity on another eCommerce platform integrated with SALESmanago.

Copy the callback URLs [A, B] and paste them into the appropriate fields in the SALESmanago system (Menu → Integration Center → Callbacks):
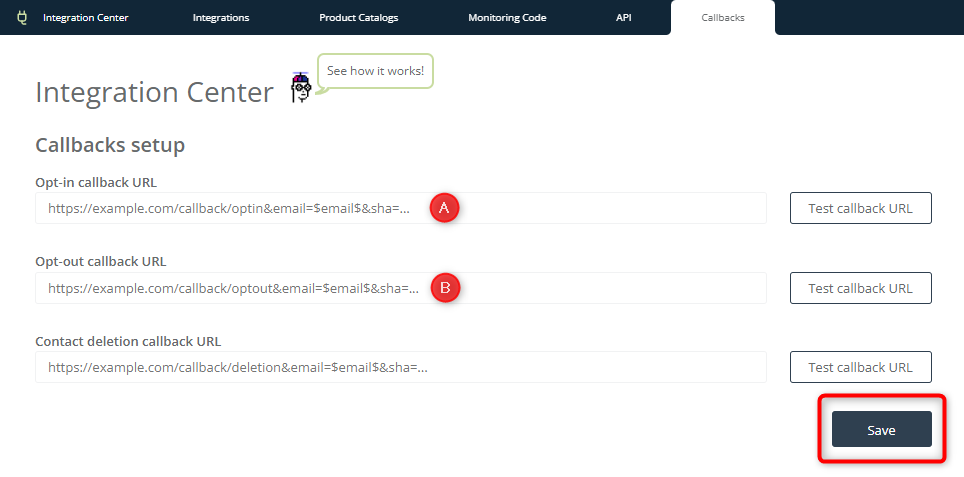
Remember to click Save.
[2] Tags—here you can define the tags that will be assigned to Contacts transferred to SALESmanago.
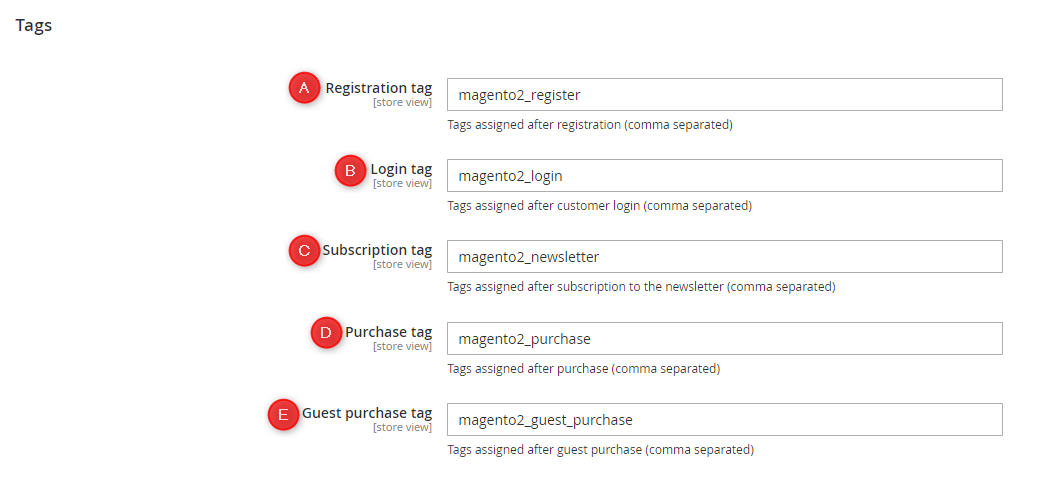
[A] Registration tag—enter the tag(s) that will be assigned to Contacts when they register in your Magento 2 store as customers.
[B] Login tag—enter the tag(s) that will be assigned to Contacts when they log into their accounts in your store.
[C] Subscription tag—enter the tag(s) that will be assigned to Contacts when they subscribe to the newsletter in your Magento 2 store.
[D] Purchase tag—enter the tag(s) that will be assigned to Contacts when they make a purchase.
[E] Guest purchase tag—enter the tag(s) that will be assigned to Contacts when they make a guest purchase.
IMPORTANT: Remember that in the SALESmanago system, tags must consist of at least 3 characters. Use the “_” character (and not a space) as the separator, e.g., TOYS_DOG.
If you want to enter more than one tag, separate them with commas, without spaces (e.g., MAGENTO2_NEWSLETTER,MAGENTO2_SUBSCRIPTION).
[3] Contacts—define settings related to Contacts.

[A] Email domains to ignore—specify the email domains to be ignored, i.e., domains for which no data will be transferred to SALESmanago.
It is particularly recommended to list single-use/disposable email domains.
IMPORTANT: Separate particular domains with commas, without spaces (e.g., example.com,domain.com).
[4] Events—define settings related to products and External Events.
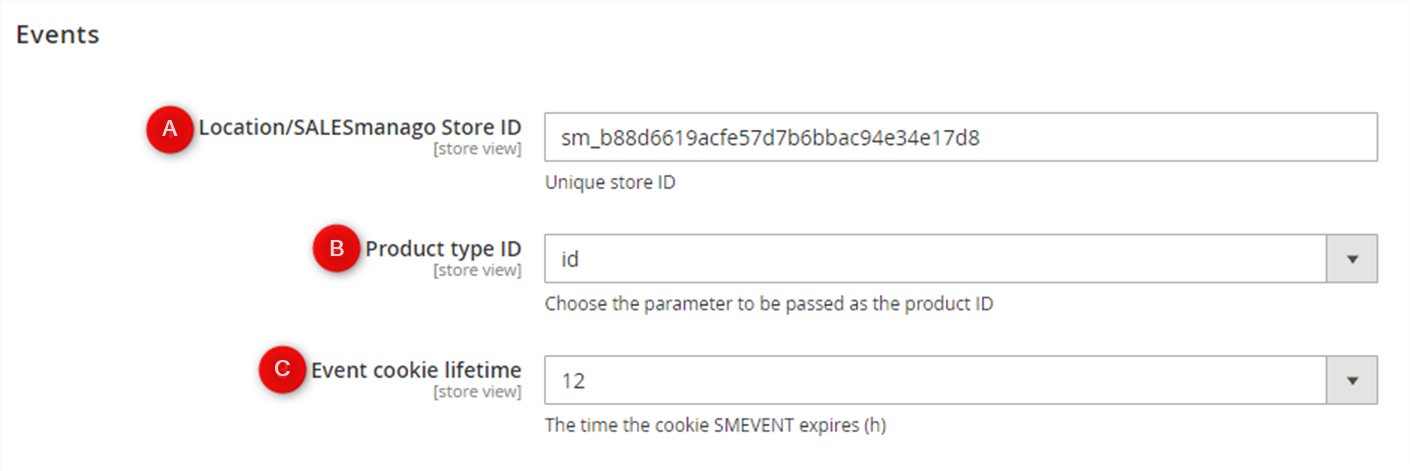
[A] Location/SALESmanago Store ID—the value of the Location field specified when configuring a Product Catalog / XML Product Feed in SALESmanago. It is used to match External Events (transactional data) from your Magento 2 store to the Product Catalog / XML Product Feed in SALESmanago.
Make sure that the value of this field matches the Location field configured in the SALESmanago system (Menu → Integration Center → Product Catalogs). It is important to make any necessary edits so that both fields have the same value. This is necessary to create accurate personalized recommendations and gather reliable analytical data.
[B] Product type ID—select the type of product identifier that will be transferred as the product ID(s) in External Events. You can choose between the following:
- ID—the product identifier created within your store
- SKU—the trade identifier of products
[C] Event cookie lifetime—select the lifetime of the smevent cookie (in hours). The smevent cookie is responsible for updating CART Events.
Whenever a customer adds a product to the cart, a CART Event is created in SALESmanago, and an smevent cookie is created in the user’s browser. The cookie lifetime selected in this field is the period over which a CART Event is updated.
EXAMPLE: If you select a cookie lifetime of 12h, CART Events will be updated for 12 hours from the time of adding a product to the cart. After this time, the cookie will expire, the event will no longer be updated, and a new CART Event will be created if any new change is made to the cart.
[5] Cart—define settings related to External Events: CART.

[A] After cart recovery redirect to—decide where a Contact should be redirected to if they click on an abandoned cart link included in an email.
[6] Purchases—configure settings related to External Events: PURCHASE.
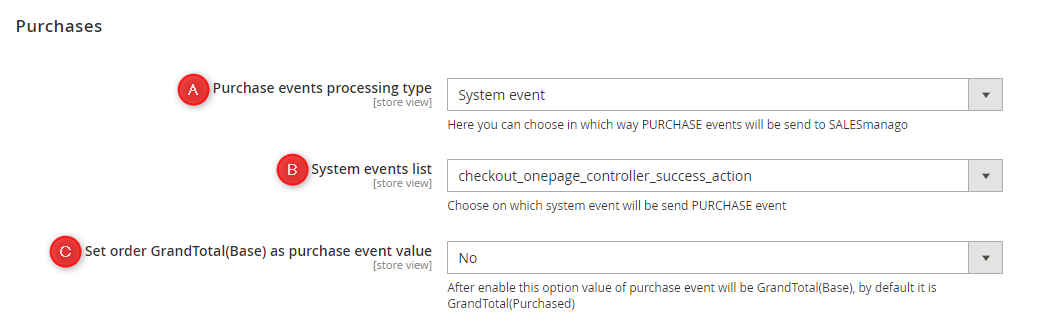
[A] Purchase events processing type—decide how PURCHASE Events will be transferred to SALESmanago.
Choose one of the available options:
- Default—PURCHASE Events will be sent to SALESmanago at the very beginning of the order validation stage.
- System event—if you select this option, a new field will appear in which you can select the Magento Event (hook) that will be responsible for sending PURCHASE Events. A detailed description of all Magento Events used by the SALESmanago integration is provided in Section 7.B below.
- After all purchase system events—PURCHASE Events will be sent to SALESmanago after the order has been finalized.
- Plugin/Interceptor method—the recommended option, available from plugin version 4.1.9. PURCHASE Events will be sent to SALESmanago the moment the Magento save() method is executed.
[B] Set order GrandTotal (Base) as purchase event value—If you select Yes, PURCHASE Events will have the value GrandTotal (Base) instead of the default GrandTotal (Purchased).
[7] Monitoring Code features—configure settings related to the SALESmanago Monitoring Code.
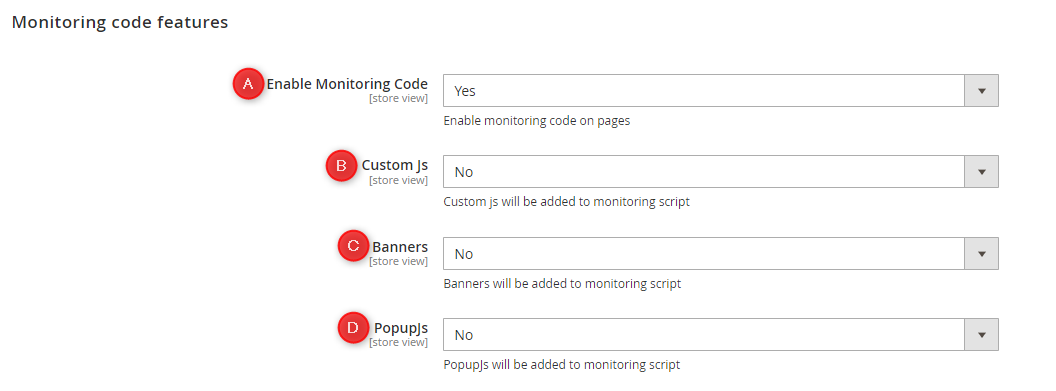
[A] Enable Monitoring Code—set the value in this field to Yes if you want the SALESmanago Monitoring Code to be automatically added to your website.
This option allows you to take control of the placement of the Monitoring Code on your website. For instance, you may want to disable the Monitoring Code if you do not want Contacts to be monitored on all pages of your store.
IMPORTANT: If you decide to disable the Monitoring Code, make sure to add it manually, e.g., in template files, to all or selected pages of your store.
[B] Custom JS—select Yes if you want to add the _smcustom flag to the Monitoring Code. This will allow you to implement custom scripts created in SALESmanago on your website.
[C] Banners—select Yes if you want to add the _smbanners flag to the Monitoring Code. This will allow you to display banners created in SALESmanago on your website.
[D] PopupJs—select Yes if you want to add the _smpopup flag to the Monitoring Code. This will allow you to display pop-ups created in previous versions of SALESmanago pop-up wizards on your website.
[8] Cookies features—define settings related to cookies.

[A] Cookies life time—specify how long SALESmanago cookies (all except smevent) will be active, i.e., after what time they will expire. Enter the number of days.
TIP: When setting this value, consider your local data protection regulations.
[9] Connection features—these are advanced settings for connection between plugin and SALESmanago. You can change the values of timeout to fine-tune the connection performance.
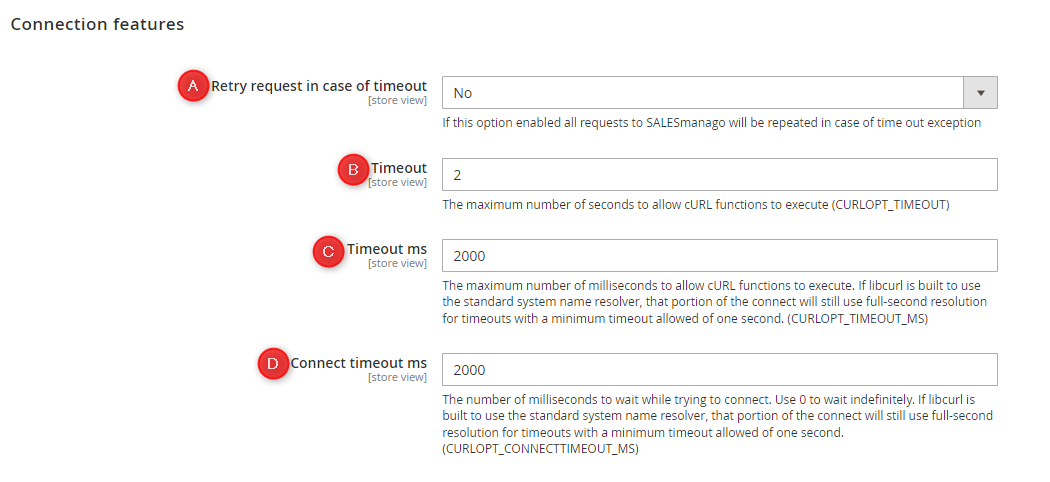
[A] Retry request in case of timeout—select Yes if you want requests sent from the plugin to SALESmanago to be repeated if a timeout occurs. This option is useful in the case of a slow server infrastructure.
If you select No, then in the case of a timeout, the request will not be sent again.
[B] Timeout—set the maximum time (in seconds) that a request to SALESmanago will wait for a response from the server (after the connection has been established) before timing out. This field is mandatory.
[C] Timeout ms—define the timeout specified in [B] in milliseconds. This field is mandatory.
[D] Connect timeout ms—set the number of milliseconds that a request will wait while trying to establish a connection. If no connection is established within this time limit, a timeout will occur.
If you enter 0, requests will wait indefinitely.
TIP: Consult your developer if you feel that you need help with defining these settings.
6. Data export
From the moment you install the plugin and log in to your SALESmanago account, Contacts and Events will be transferred to SALESmanago automatically. Additionally, the integration offers the option to export Contact and transactional data gathered before the integration.
To export archival data, go to the SALESmanago module and select the Export Data tab:
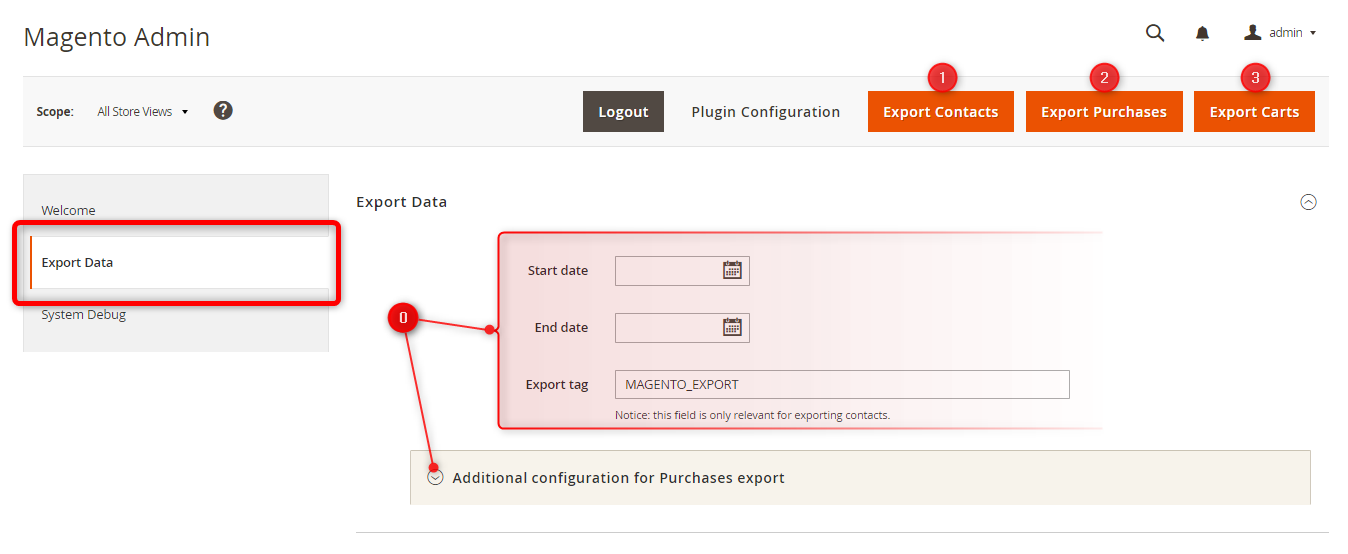
First, define the settings [0].
Then, decide whether you want to export Contacts [1], PURCHASE Events [2], or CART Events [3].
Read on for warnings and detailed instructions.
IMPORTANT:
- Make sure to export Contact data before exporting CART or PURCHASE Events (the SALESmanago database needs to include Contacts to whom particular External Events can be assigned).
- You can export Contacts any number of times as Contact data is updated in the SALESmanago database with each export. However, in the case of External Events, another export results in the duplication of the data on the SALESmanago platform. Therefore, any External Events should be exported only once.
- Before performing an export, make sure that there are no active Automation Rules or Workflows on the SALESmanago platform that include the following Events: Contact has been added to the system or New External Event occurred. Otherwise, an export of archival data to the SALESmanago system will trigger such Automation Processes for each exported Contact or each exported External Event, respectively.
- If you perform an export while being logged in for the Scope All Store Views, data from all your stores will be transferred to the SALESmanago account to which you are logged in. If you want to export data from a single Store View, log out temporarily from All Store Views and log in to an individual Store View. When you are logged in for an individual Store View, data from that single store will be exported.
- Note that Contact exports do not include any Contacts whose email addresses have domains listed as ignored domains in Magento 2 Settings (see Section 5.B for more information).
Whether you export Contacts [1], Purchases [2], or Carts [3], you can define the following settings:
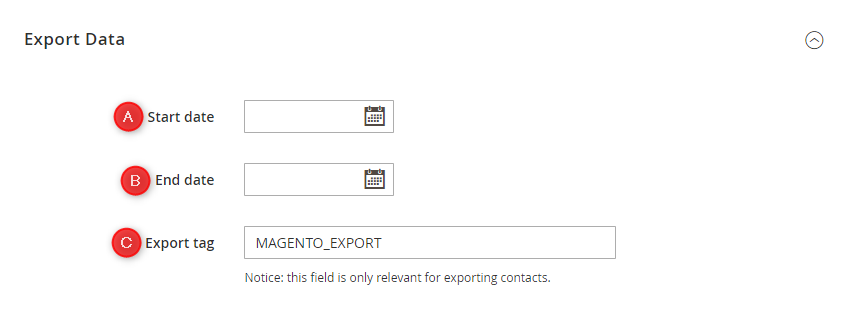
[A] Start date—click on this field to select the start date from the calendar.
[B] End date—click on this field to select the end date from the calendar.
IMPORTANT: If you provide only the start date, all data collected since that date up to the present moment will be exported.
If you provide only the end date, all data collected since the creation of your store up to that date will be exported.
[C] Export tag—enter the tag(s) that will be assigned to Contacts in the SALESmanago database following this export.
Remember that in the SALESmanago system, tags must consist of at least 3 characters. Use the “_” character (and not a space) as the separator, e.g., TOYS_DOG.
If you want to enter more than one tag, separate them with commas, without spaces (e.g., MAGENTO2_NEWSLETTER,MAGENTO2_SUBSCRIPTION).
NOTES:
-
Contact exports include the following types of Contacts:
- Registered users who have an account in your store (customers)
- Users who purchased as a guest (without registration)
- Users who subscribed to the Magento newsletter (subscribers)
- Email addresses can be repeated within these three groups, e.g., when the email address of a registered Contact was used before creating an account to make a purchase as a guest or to subscribe to the newsletter. Such duplicated users will be merged into a single Contact in SALESmanago.
- By default, Purchases export includes orders with the following statuses: Closed, Complete, and Pending. You can select (or deselect) the statuses that you want to export by clicking on Additional configuration for Purchases export:
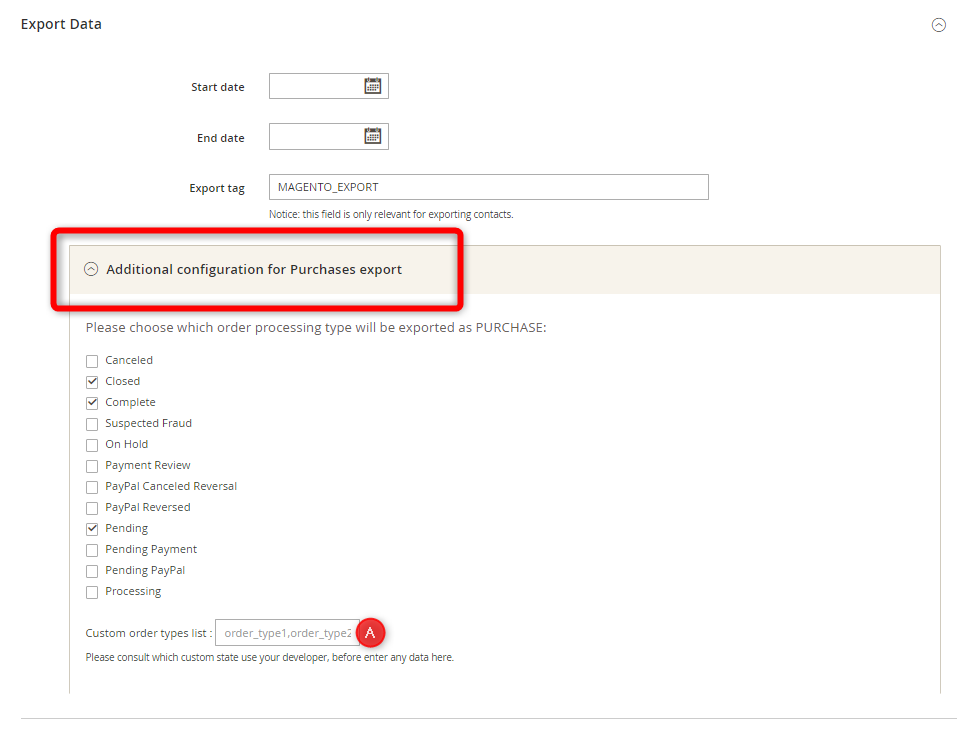
Note that you can also include your own custom statuses [A].
- CART Events only relate to users who have an account in your Magento store (which means that anonymous Carts cannot be exported).
7. Technical description
A. Database
The same mechanism that is used by the Magento 2 platform is used to store the SALESmanago plugin configuration data. Apart from this, SALESmanago does not use the Magento 2 database.
B. Hooks
A hook is a mechanism used by many eCommerce platforms that allows a plugin to launch a certain action at a specific time. In the case of the SALESmanago plugin, this can be, for example, sending a Contact to SALESmanago after the registration.
The SALESmanago plugin uses the following hooks (Magento Events) from the Magento 2 system. These hooks are used to send Contact data and CART Events to SALESmanago. As they run automatically, you cannot select or deselect them.
- customer_login—runs when a Contact logs in. Allows the plugin to send Contact data to SALESmanago.
- customer_register_success—runs during registration. Allows the plugin to send Contact data to SALESmanago.
- customer_account_edited—runs when data is edited in the customer panel. Allows the plugin to send Contact details to SALESmanago.
- newsletter_subscriber_save_after—runs when a user has subscribed to the newsletter (usually by filling out the form in the footer or selecting a checkbox in the registration form). Allows the plugin to send Contact data and opt-in/opt-out status to SALESmanago.
- customer_address_save_commit_after—runs when data is edited in the customer panel (the addresses tab). Allows the plugin to send Contact data (email address) to SALESmanago.
- customer_address_save_after—runs when data is edited in the customer panel (the addresses tab). Allows the plugin to send Contact details (postal address) to SALESmanago.
- checkout_cart_save_after—runs when the cart is saved. Allows the plugin to send CART events to SALESmanago and update them.
- adminhtml_customer_save_after—runs when customer data is saved (when creating or editing an account) in the Magento 2 admin panel.
- sm_pwa_cart_interceptor—runs when adding to or modifying the cart using graphQl (when Magento is used as a Progressive Web App).
PURCHASE hooks
You can select which hook will be used to send PURCHASE Events to the SALESmanago system. Select from the following:
- [default] checkout_onepage_controller_success_action—runs during order finalization, when the one-page checkout form is submitted by the customer (Magento code path: vendor/magento/module-checkout/Controller/Onepage/Success.php)
- multishipping_checkout_controller_success_action—runs during order finalization, when the checkout form is submitted by the customer and the customer has selected the multishipping option (one purchase sent to different postal addresses): vendor/magento/module-multishipping/Controller/Checkout/Success.php
- checkout_submit_all_after—runs when the order is added to the Magento database: vendor/magento/module-checkout/Model/Type/Onepage.php
- checkout_controller_onepage_saveOrder—runs in the following cases: an order is created by the administrator; an order is accepted by the customer; an order is added to the Magento database (path: vendor/magento/module-checkout/Controller/Onepage/SaveOrder.php
- restore_quote—runs when the customer returns from the order summary page to the shopping cart (vendor/magento/module-checkout/Model/Session.php)
- sales_convert_order_to_quote—runs when the order is taken back on the Admin side, i.e., when the Admin changes order to quote (vendor/magento/module-sales/Model/AdminOrder/Create.php)
- sales_order_invoice_register—runs when an invoice is added to an order (vendor/magento/module-sales/Model/Order/Invoice.php)
- _set_sales_order—deprecated; the module-sales catalog is not present in the newest Magento versions (vendor/magento/module-sales/Model/ResourceModel/Order/Collection/AbstractCollection.php)
- checkout_type_onepage_save_order_after—runs when a customer submits a purchase at the one-page checkout stage: vendor/magento/module-checkout/Model/Type/Onepage.php
- checkout_type_multishipping_create_orders_single—runs when a customer submits a purchase at the one-page checkout stage and the multishipping option has been selected: vendor/magento/module-multishipping/Model/Checkout/Type/Multishipping.php
- paypal_express_place_order_success—runs when a customer submits a purchase with the option to pay by PayPal Express (vendor/magento/module-paypal/Controller/Express/AbstractExpress/PlaceOrder.php)
IMPORTANT:
- Each hook that sends Contact data uses the smclient cookie, which is necessary for the proper functioning of the Monitoring Code.
- All hooks that transfer PURCHASE events also transfer Contact data.
- Hooks that transfer CART events do not transfer Contact data.
- Some hooks only work in certain situations (e.g., when a store admin modifies an order invoice).
C. Monitoring Code
The Monitoring Code is automatically added to the source code of your website only in the case of the standard Magento 2 installation. With the Progressive Web App (PWA) storefront, the code should be added by your developer.
You can configure settings related to the Monitoring Code in Magento 2 settings in the Monitoring Code features section.