The consultant panel in Live Chat allows you to manage the conversation queue and conduct conversations with users that ask questions on your website. From here, you can forward a conversation to a specific consultant or a group of consultants, view messages written by chat users in real-time, or send product recommendations. These are just a couple of the possibilities that this extensive panel offers you.
If you have already created a chat and configured your consultant, you can start working with the chat.
How to create a chat and configure a consultant
In order to display a consultant’s panel, you need to go to
Web Tools → Live Chat
Contents
- Grant access to the chat
- Log into the chat
- Use the consultant panel
1. Grant access to the chat to the selected users
To use the chat, you must have your user account already created.
In the permission settings, grant access to the Website Marketing section.
TIP: You can make custom permission sets to grant to particular users, for example, your consultants.
2. Log in to the chat
Go to Live Chat.
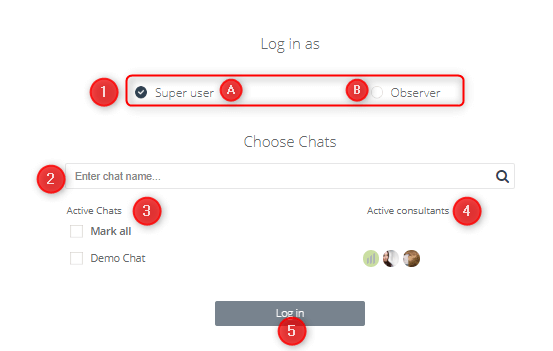
[1] Select the role of the consultant, you want to login as
[A] Super user – can both operate the chat and have access to all chat conversations, and can also assign roles to consultants
IMPORTANT: A super user has access to all the features in the Live Chat section; he can create, manage, and view Live Chat analytics – access to all features.
[B] Observer – sees all conversations and can browse them, but does not write anything back and the way he previews conversations to take place does not take them; this is an additional role where, when logging in to a chat, the user can log in as an observer, a kind of “super viewer” who can watch as others are having conversations. The observer can forward the conversation to a consultant or to the group of consultants.
[2] Enter chat name – allows searching for a chat by typing in its name
[3] Active Chats – list of the active chats
[4] Active consultants – the list of all the consultants assigned to the selected chat.
[5] Log in – click to log into the chat.
IMPORTANT: Being logged into the system, you have not logged automatically into the Live Chat. To use the chat, you must log into the chat separately.
3. Consultant panel
After you have logged into the selected chat, the consultant panel will be displayed.
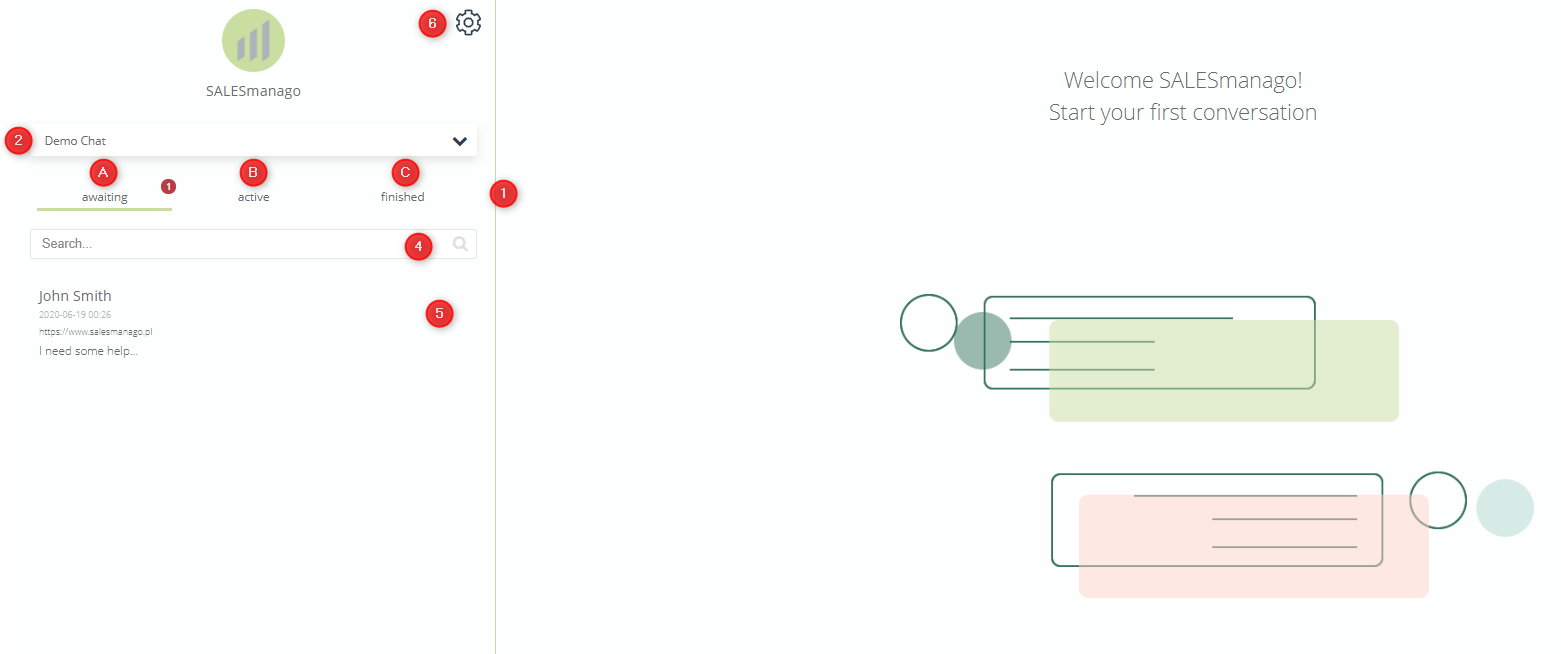
[1] Message folders – it’s a place where all chat conversations go to. Wehave three different folders:
[A] Awaiting – all new messages and those that were left when a consultant was inactive, go to the Awaiting folder, where they wait until somebody starts a conversation.
IMPORTANT: The number of awaiting messages will display on **the Live Chat tab in the browser’s menu.
[B] Active – after starting a conversation, the conversation can be found in this folder.
IMPORTANT: Shortly before deactivating Live Chat according to the schedule, you will see a pop-up asking to end the started conversations within 15 minutes.
[C] Finished – this folder is the history of all started conversations with the possibility to resume. To this folder also go all blocked chat conversations.
IMPORTANT: If a consultant forwards a chat conversation to another consultant it will display in an Active folder, but if the consultant forwards the chat conversation to a group of consultants, the chat conversation will display in the Awaiting folder.
IMPORTANT: Each conversation that is finished will be stored in the [C] Finished. However, the archive of abandoned conversations will not be displayed in any of those three folders.
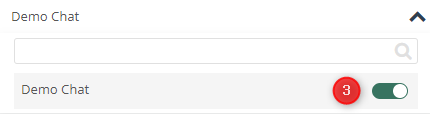
[2] Choose which chat conversations are displayed or select the option Show all.
[3] Invisible – this button appears on the slider after opening the list of available chats, it changes the status of the consultant to an invisible It means that the consultant can talk to customers, however, the rest of the users will see a contact form in the chat window indicating that the consultant is inactive.
[4] Search – search conversation by entering a name and an email address. This option works only for identified users.
[5] Start a conversation.
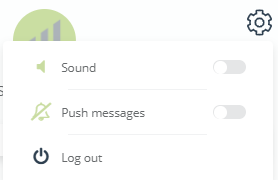
[6] Settings – in Settings you can switch on/off sound in Live Chat, push messages or log out of this chat:
After having started the conversation, the conversation window appears next to the consultant window.
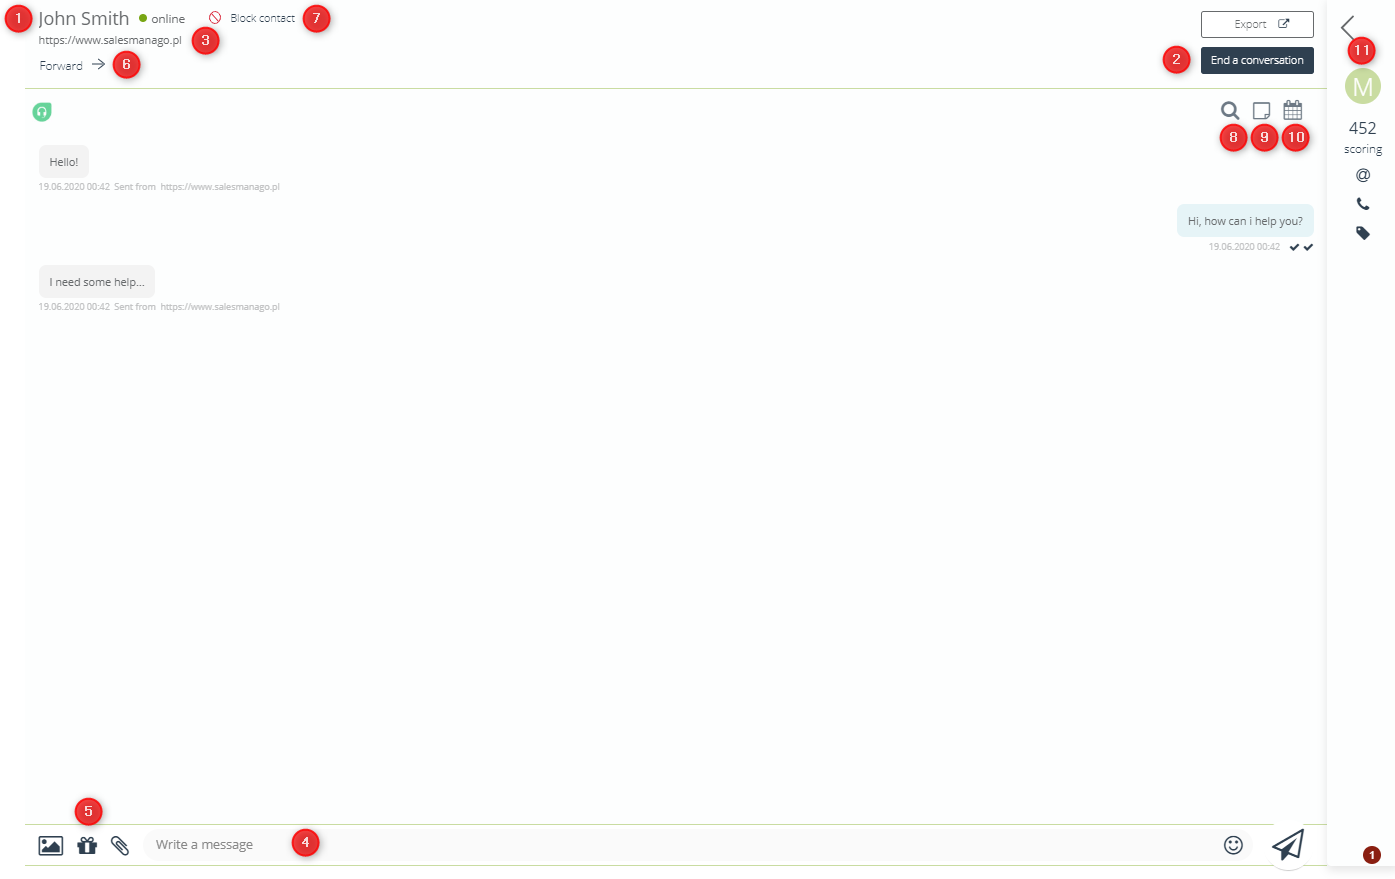
[1] Name and email address of the person you are having a conversation with.
[2] Finish the conversation – click to stop the conversation.
[3] You can see the address of the website your contact is currently visiting below every message.

[4] Text field – enter your message and click  to send it. You can also send emoticons and files. Only consultants can send
files without permission. If you add a link to your message, it will be graphically highlighted.
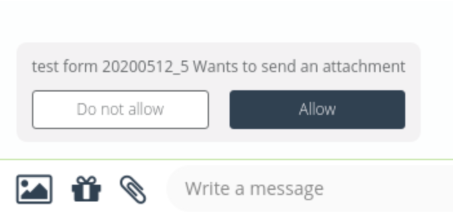
IMPORTANT: If a user with who we are talking to wants to send us a file, the consultant will receive a notification and can allow or not collecting a file. It’s a safety feature to avoid unwanted files. The notification for the consultant looks like in the picture below:
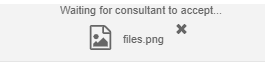
Another statement will see a customer:
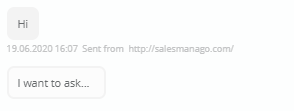
TIP: The consultant can see a message written by the client before he will even send it. Thanks to this feature the consultant can prepare a response before the client will send a message finally. Send and non-send messages have different colours, you can see how it looks in the picture below:
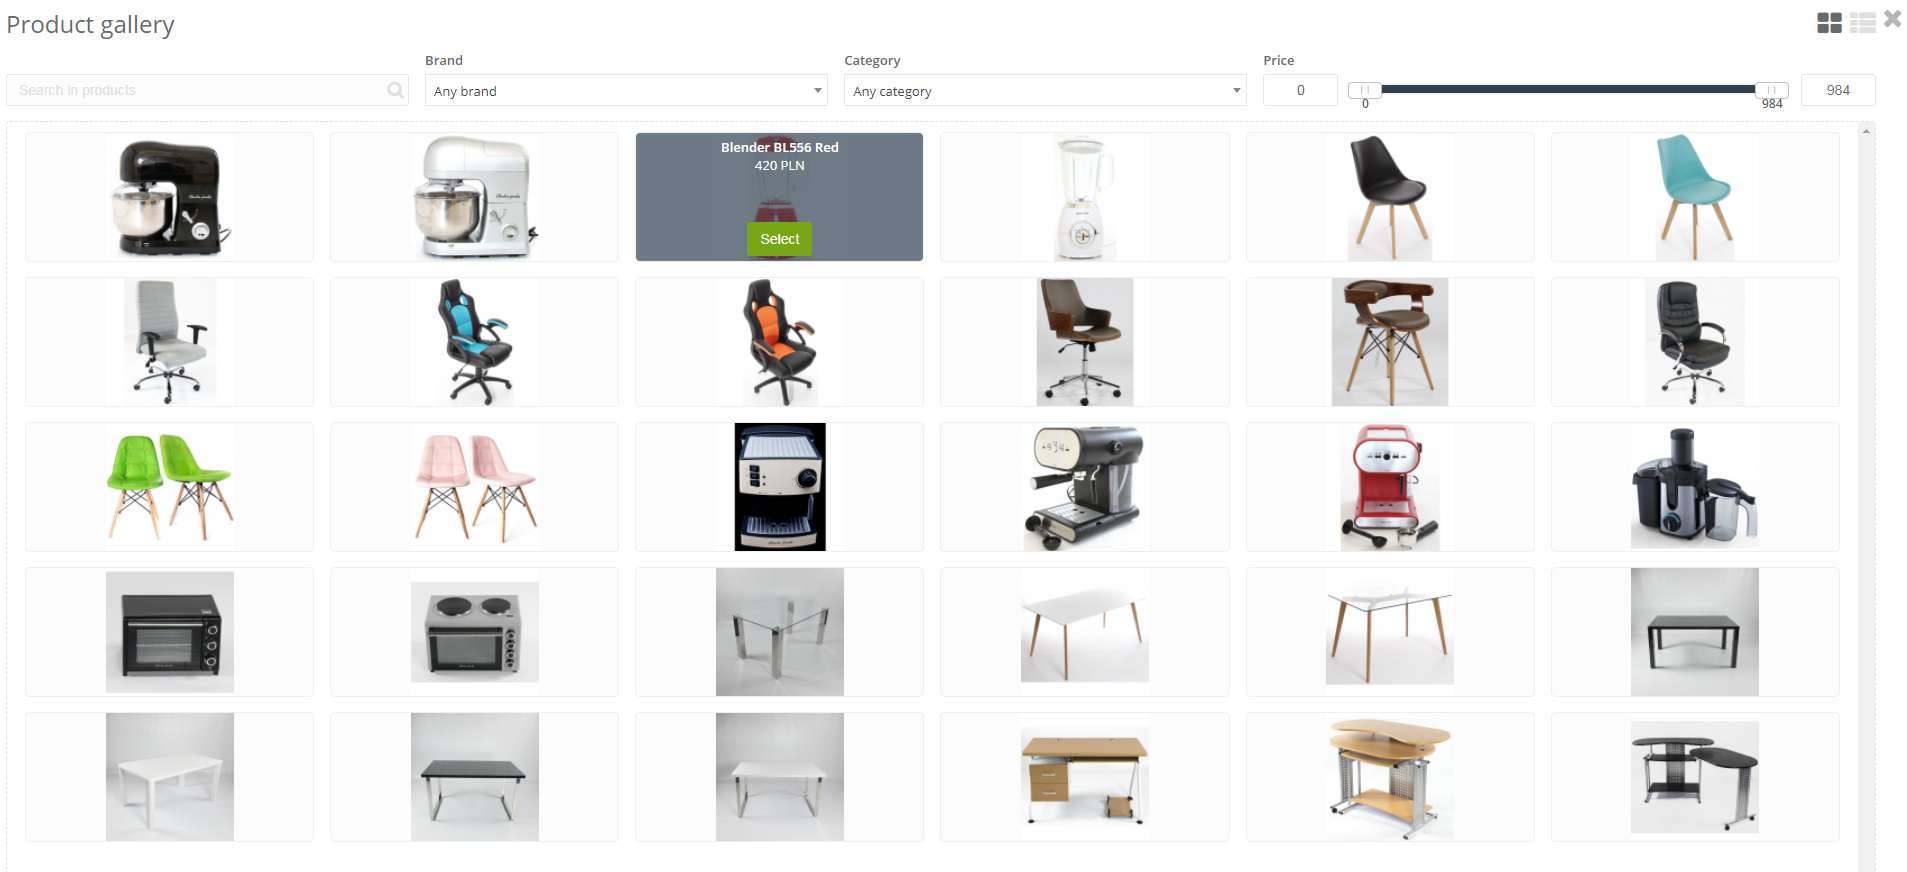
[5] Product gallery – click the icon and you will be redirected to the product gallery of your shop. You can select by yourself the products which you can send your customer during the conversation on the chat. You can search the products by typing the name of the product, choosing the brand, price or a category of the product.
[6] Forward – this feature allows the consultant to forward a chat conversation to a different consultant or the group of the consultants. Also, an Observer can forward the chat conversation. After forwarding a chat conversation your status will automatically change to the “Observer”:
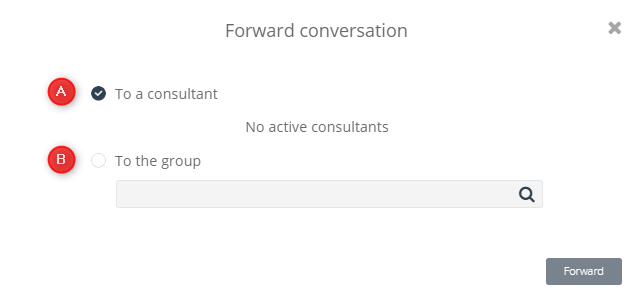
[A] To a consultant – the chat conversation will be forward to another consultant and goes to the folder Active.
[B] To the group – the chat conversation will be forward to the group of consultants and goes to the folder Awaiting.
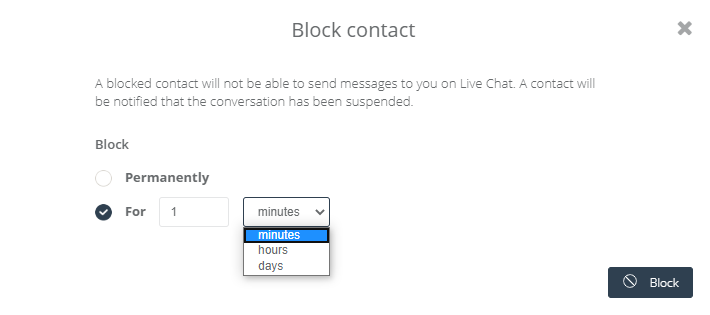
[7] Block contact – this feature allows blocking for a time (selected amount of minutes, hours or days) or permanently an abuse user. Blocked client can not send you any messages in the Live Chat. The contact will receive a notification, that the conversation has been ended.
[8] Search – this feature allows you to search the conversation after word, phrase or sentence. You need to write a word and click enter, and then the search results will show you below.
[9] Tags – you can add chat conversation tags to each chat conversation. More about Tags and how to use them you can find in Live Chat: chat conversation Tags.
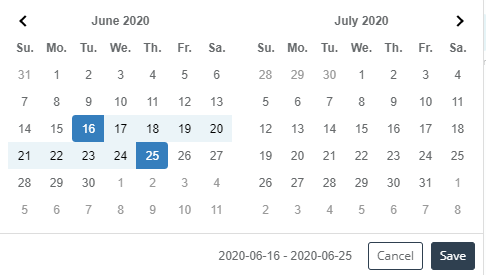
[10] Calendar – it is possible to search the chat conversations after the date, just select interesting your time or a specific day which one you want to check and click Save button:
[11] Contact card – there are two possible contact card views:
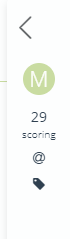
[A] Half-open contact card – when talking with non-anonymous user you can have a half-open contact card.
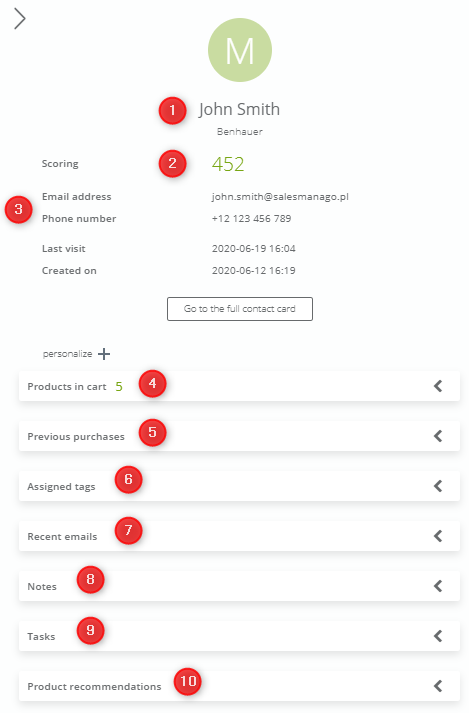
[B] Open contact card – when talking with non-anonymous user you can have an open contact card.
[1] Contact’s name
[2] Scoring – the total number of scoring points collected by the contact.
[3] Contact’s personal details such as an email address, phone number or an address.
[4] Products in cart – on the list we can see all products, which one the client, with whom we have a conversation, had in his cart for the last 24 hours
[5] Previous purchases – on the list we can see all products, which one the client, with whom we have a conversation, bought in the last 24 hours
[6] Assigned tags – all tags assigned to contacts in the system. Click +Add tag to add new tag directly from the chat window.
[7] Recent emails – the list of emails which has been lastly sent to the contact.
[8] Notes – notes about the contact. Click +Add note to add a new note. All notes added by means of the chat become global notes, which are available also in the system. The notes are visible to all people having access to the selected contact.
[9] Tasks – all tasks connected to the contact. Click +Add task to add a new action and assign it to the selected person.
[10] Product recommendations – in this attachment you can see three types of product recommendations:
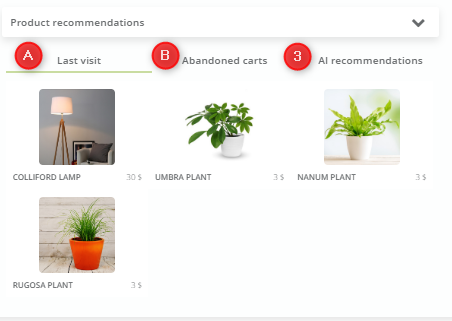
[A] Last visit – the products, that the user watched last time.
[B] Abandoned carts – the products from abandoned carts.
[C] AI recommendations – This is the advanced type of the recommendation that works on a basis of self-learning the behaviour of the individual customer. Combining the analysis and prediction, it proposes products for users. The consultant can choose product from them and send it with selected information and product photo.
TIP: You can easily personalize the list of attachments on the contact card, just click “Personalize” button.
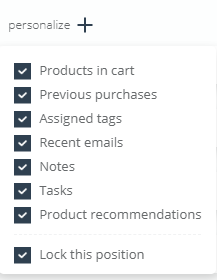
Also, you can uncheck “Lock this position” and then change positions of attachments freely – mix them variously on the contact card.
If you need any help – check our other Support pages or feel free to contact us.