This article covers all essential information about the Mobile Push channel and how it works on the SALESmanago platform.
Mobile Push notifications are a powerful, modern marketing tool that enables you to engage users of your mobile application. In SALESmanago, the Mobile Push channel also includes In-App notifications, which are displayed directly in your mobile app.
By integrating Mobile Push and In-App notifications into your marketing strategy, you can enhance real-time communication, deliver personalized messages directly to users’ devices, and create new opportunities for customer engagement. This approach not only strengthens your connection with users but also helps to drive conversions, increase retention, and ultimately boost your sales performance.
NOTE: In the SALESmanago system and throughout the article, In-App notifications are treated as a type of Mobile Push notifications.
Contents
- Getting started
- Initial setup
- Collecting consents
- Creating notifications
- Sending notifications
- Mobile Push analytics
1. Getting started
Mobile Push notifications are messages sent to users’ mobile devices through a mobile application. They appear on the lock screen or in the notification center, even when the app is not open, which makes them a very direct way to engage your mobile app users. Moreover, using the Mobile Push channel does not involve any additional costs.
In SALESmanago, there are two types of Mobile Push notifications:
- Standard—Notifications having a fixed (non-personalized) content, looking the same to all recipients.
- Personalized—Notifications enriched with individual data of individual app users, such as name or birthday date.
Additionally, in SALESmanago, within the Mobile Push channel, you can create and send In-App notifications, which appear directly within your mobile app.
NOTE: For ease of reading, throughout this article, whenever possible, Mobile Push and In-App notifications are jointly referred to as “Mobile Push notifications”.
Mobile Push notifications can only be sent to recipients who have consented to this type of marketing communication (for example, when installing your mobile app).
To create and send Mobile Push notifications via SALESmanago, first, you need to integrate your SALESmanago account with your Android and/or iOS account(s). For that, you need to provide at least one APNs certificate (to be able to send notifications to iOS devices) or FCM Service Account Key (to be able to send notifications to Android devices). Then, integrate your mobile app with SALESmanago by adding an API key generated in SALESmanago to your mobile app.
Read on to learn more about the integration process, requirements and limitations, and the operation of the Mobile Push channel via SALESmanago.
2. Initial setup
To send Mobile Push and In-App notifications from SALESmanago, you need to integrate your SALESmanago account with at least one of the following mobile operating systems:
- Android (minimum version: 5.0 Lollipop)
- iOS (minimum version: 15+)
Next, you need to integrate SALESmanago with your mobile app.
IMPORTANT: You can integrate only one mobile application per SALESmanago account. However, this mobile application can come in many versions or instances, depending on the system or purpose. For example, if your mobile app has two versions— one for Android and one for iOS—you can integrate both versions as one app.
If you integrate another mobile app (for example, for another brand), the data from the two apps will be combined together and you will be unable to monitor user and engagement statistics separately for these two apps.
Read detailed instructions for setting up the Mobile Push channel >>
3. Collecting consents
Mobile Push and In-App notifications can only be sent to app users who have given two types of consent:
- System permission—Requested by the device’s operating system. The request can be configured within your mobile app to be shown at a time of your choice.
If a user dismisses this request, it can be shown to them again.
If a user denies this request, it cannot be shown again.
TIP: If the system permission is denied, you can still encourage the user to edit its status in the device settings (users can enable or disable notifications from mobile apps at any time). You can also configure your mobile app to open the device settings.
- Marketing consent—The standard consent required to send marketing communications. It must be displayed by your mobile app, and its status must be transferred to SALESmanago.
This single consent covers both Mobile Push and In-App notifications. Unlike system permission, it can be displayed multiple times, even if the user denies it. Additionally, you can provide the option to manage this consent in your app’s settings.
You can freely design the consent prompt’s appearance to make it appealing and encouraging. The timing of when the prompt is shown is also configured on your side.
NOTE:
- SALESmanago can store the status of these two permissions for both Contacts (identified by their email address) and anonymous app users.
- The order in which these two permissions are requested is not important. However, users who have already granted marketing consent may be more likely to give system permission as well.
You can find detailed information regarding the transfer of consent statuses in the developer documentation >>
4. Creating notifications
To create a new Mobile Push notification in SALESmanago, go to Menu → Channels → Mobile Push → Templates. Click New notification and select the type of message you want to create: Standard, Personalized, or In-App.
NOTE: Neither Mobile Push nor In-App notifications can be saved as drafts. To avoid losing your work, save it as a template and then finish it before sending.
4.A. Mobile Push: Standard and Personalized
When creating a Standard or Personalized template, first, select the APNs certificate and/or FCM key you want to use to send this message.
Next, define the message content. A Standard template can contain the following elements:
- Subject (required)
- Content (required)
- Image (optional)—The maximum image size recommended by Android is 1 MB.
A Personalized template can additionally contain placeholders for recipients’ individual data. Placeholders can be used in both the subject and the main content.
IMPORTANT: Select a placeholder from the list. Placeholders not available in the list are not supported in Mobile Push notifications.
Read more about placeholders >>
Finally, you can define the tracking parameters for Google Analytics (utm_medium and utm_campaign), which will be added to the URLs of any links included in the message.
4.B. In-App
In-App notifications can be designed much more freely than Mobile Push notifications. Therefore, SALESmanago offers an In-App creator modelled on the Email Design Studio and the Web Engagement Studio.
Read how to use the In-App notification creator >>
4.C. Links in notifications
Both Mobile Push and In-App notifications can redirect users to a webpage (standard link) or to a specific location within your app (deep link).
For Mobile Push notifications (both standard and personalized), the entire notification area functions as a clickable link. When creating a notification template, you can define what happens when a user taps the notification:
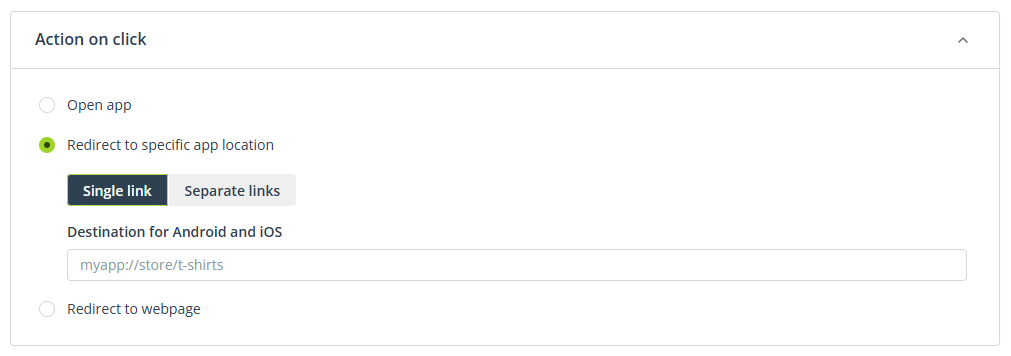
If you select the deep link option: Redirect to specific app location, you can choose whether to provide a single URI address for both Android or iOS or separate URIs for each system.
In the case of In-App notifications, links can be attached to buttons. You can define the on-click action in the widget’s settings:

Again, after selecting the deep link option, you can use either a single URI or two separate URIs for Android and iOS.
5. Sending notifications
When your template is finished, you need to save it to be able to send it. A saved template will appear in the list of notification templates (Menu → Channels → Mobile Push → Templates).
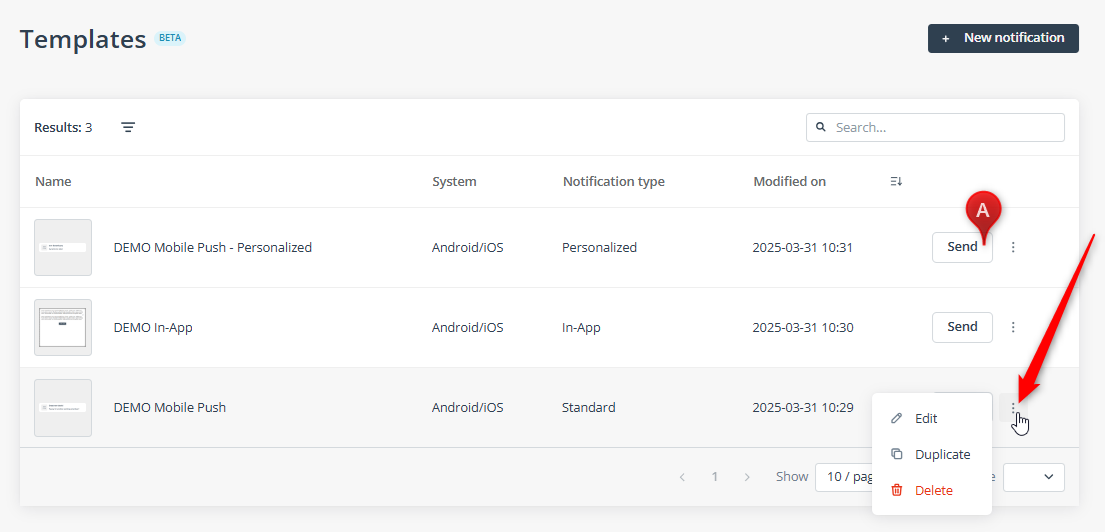
To edit, duplicate, or delete a template, find it in the list and click the three-dot icon.
To send a template, click button [A].
Alternatively, if you are ready to send a notification immediately after creating or editing its template, you can click Save and send directly within the creator.
The sending screen looks the same for all types of notifications:
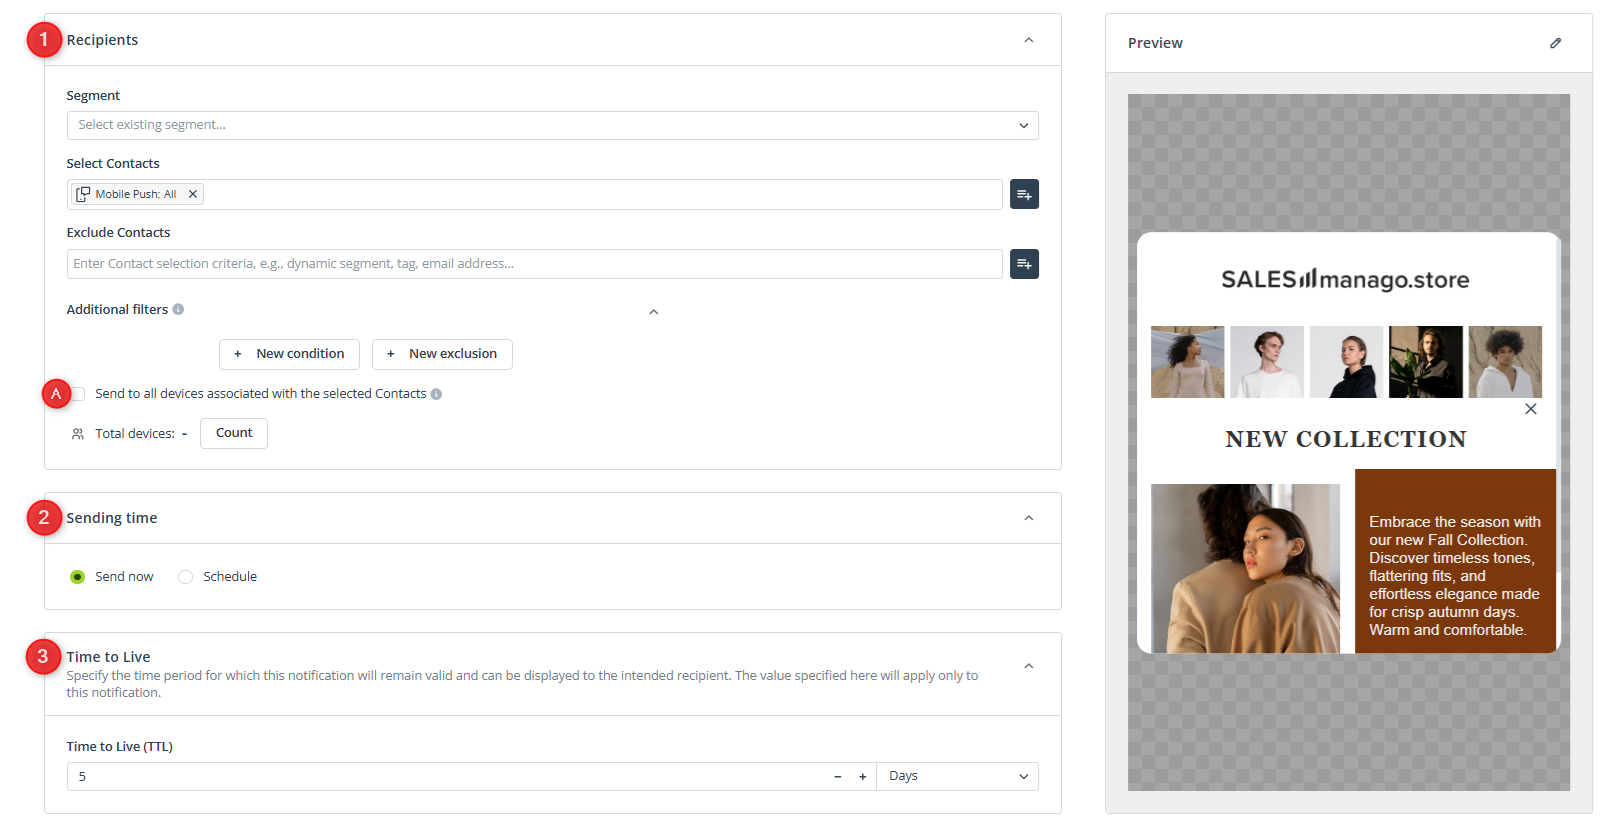
[1] Recipients—Define the recipients using the standard Contact selectors and filters used across the SALESmanago system.
Note that a single Contact can have your app installed on multiple devices. If the same email address is used on each device, all of them will be associated with that one Contact. By default, the campaign will be sent to one device per Contact (the device that was the source of the most recent update, e.g., to personal details or consent status). To send the notification to all devices associated with the selected Contacts, enable option [A].
[2] Sending time—In this section, decide whether you want to send your campaign “now” (immediately after clicking the Send button) or schedule it for a later date and time.
[3] Time to Live—Define the lifespan of your notification, i.e., the period for which it can actually be displayed to a recipient.
The TTL is counted from the moment of sending. If the TTL expires before a recipient turns on their device or connects to the internet, the notification will not be displayed to this recipient at all.
The default value displayed in this field is the one set in Menu → Channels → Mobile Push → Settings → Sending settings. However, you can always adjust this value for each individual campaign.
Mobile Push notifications in Workflows
By configuring a Workflow containing the Action: Send Mobile Push notification, you can dynamically respond to the behaviors of your app users, targeting them with high precision and at the right time.
6. Mobile Push analytics
To view analytics for the Mobile Push channel, navigate to Menu → Mobile Push → Channels → Dashboard. The dashboard consists of three sections:
- Sales analytics—Revenue attribution data for all your notifications.
Read more about revenue attribution in SALESmanago >>
- Notifications—Engagement statistics for your notifications (both Mobile Push and In-App). Here, you can see how many notifications were sent, actually displayed, and clicked by users. You can see this data separately for Android and iOS or for all systems together.
- Audience analytics—Distribution of your app users (Contacts and anonymous users) across mobile operation systems.