Useful links
The Monitoring Code is a script used for transferring data from a website to the SALESmanago system. It allows you to track user activity on your website and enables the functioning of key Marketing Automation processes. Each SALESmanago Customer receives a unique Monitoring Code that must be added to the website to fully exploit the platform’s potential.
Contents
- Basic information
- How the Monitoring Code works
- Integration of the Monitoring Code
- A. Adding the Monitoring Code by yourself
- B. Sending the Monitoring Code to your developers
- C. Adding the Monitoring Code using Google Tag Manager (GTM)
- D. Adding the Monitoring Code to websites built on eCommerce platforms
1. Basic information
The Monitoring Code is a script responsible for tracking the activity of website visitors and enabling key marketing automation processes. It is essential to fully exploit the potential of many SALESmanago functions, including: the Personal Shopping Inbox, Recommendation Frames, Customer Preference Center, Live Chat, Lead Generation widgets, and many others. The script supports all website personalization and makes it easier to use the SALESmanago platform.
A single website can be integrated with only one Monitoring Code, whereas a single Monitoring Code can be used to gather data from any number of websites.
- identifying and monitoring website users,
- tracking opening and clicking statistics in Email Marketing campaigns,
- automatic display of the Live Chat on the website,
- automatic display of pop-ups on the website.
IMPORTANT: After you have added your Monitoring Code to the website, the message prompting you to add the Monitoring Code (displayed on the main dashboard) will stop showing as soon as the first monitored Contact appears in the system.
2. How the Monitoring Code works
The SALESmanago Monitoring Code installs smuuid and smclient cookies on the devices of users visiting the monitored website.
The smuuid cookie assigns a unique ID to Contacts and is responsible for monitoring anonymous and B2B visits. It is assigned to any user who visits the website and consents to the installation of cookies in their browser.
The smclient cookie is responsible for monitoring identified Contacts.
Cookies are installed as a result of the following actions:
- clicking a link in an email sent from SALESmanago,
- filling out a form integrated with SALESmanago,
- clicking a link generated on the Contact Card,
- clicking a link in an email sent from a proxy account.
3. Integration of the Monitoring Code
IMPORTANT: If you use a ready integration provided by SALESmanago, the Monitoring Code has already been added to your website automatically (see section 3.D below) – unless specified otherwise.
Below you can find a description of various ways of adding the Monitoring Code to your website. In each case you can do it via the Integration Center. On the SALESmanago platform, go to Menu → Integrations → Integration Center. You will also be redirected to the Integration Center after clicking Integrate [A] on the welcome dashboard.

If you want to learn more about integrations, including the integration of the Monitoring Code, click See how it works! [B] next to the name of the module.

A. Adding the Monitoring Code by yourself
To add the Monitoring Code to the script of your website by yourself, go to Menu → Integrations → Integration Center → Monitoring Code. There you will see the option Do it yourself. Click Copy [A] to conveniently copy your unique Monitoring Code.
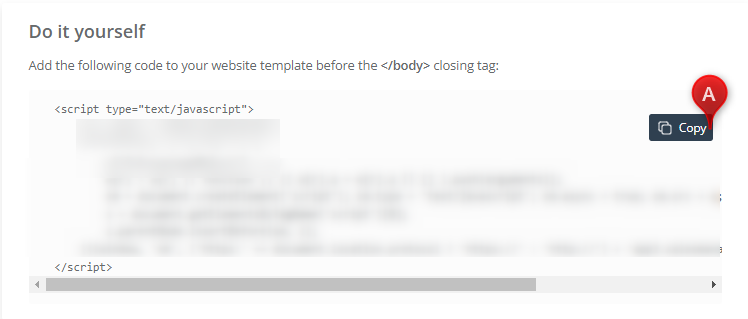
Then go to the source code of the website you want to monitor. Paste the copied script at the end of the <body> section (before the marker closing the section: </body>).
IMPORTANT: Include the code on all pages of your website.
B. Sending the Monitoring Code to your developers
If you are unable to add the Monitoring Code by yourself, you can conveniently send it to the administrator of your website. Go to Menu → Integrations → Integration Center → Monitoring Code. There you will see the option: Send it to your developers. Enter the administrator’s email address in field [A] and click Send [B].

The administrator’s task will be to paste the received script into the source code of the website you want to monitor. The script must be pasted at the end of the <body> section (before the marker closing the section: </body>).
IMPORTANT: The Monitoring Code must be included in the source code of all website pages.
C. Adding the Monitoring Code using Google Tag Manager (GTM)
If you have a Google Tag Manager (GTM) account integrated with your website, you can add the Monitoring Code via the GTM. Go to Menu → Integrations → Integration Center → Monitoring Code. There you will see the option: Use Google Tag Manager (GTM). Click Sign in with Google [A] and follow the instructions on the screen.
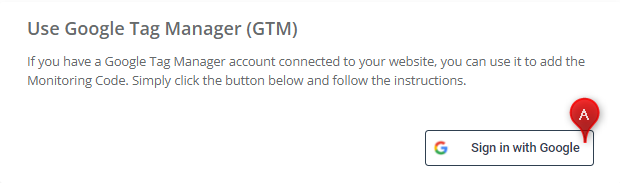
See how to add the Monitoring Code via Google Tag Manager >>
D. Adding the Monitoring Code to websites built on eCommerce platforms
If your store is located on an eCommerce platform, check if SALESmanago offers an integration with this platform (usually by means of a plugin that must be downloaded and then uploaded to the eCommerce platform and appropriately configured). You can find a complete list of eCommerce integrations in the Integration Center:
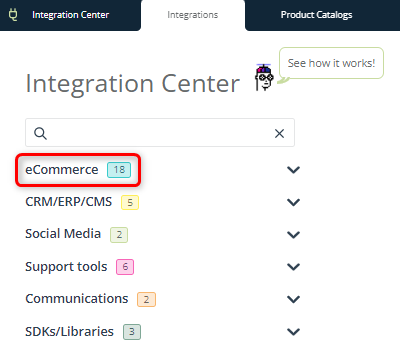
Find your platform and click on it. You will be redirected to a page dedicated to the given integration, where you can find the necessary instructions (often including a link to the Support portal). In some cases you will be informed that in order to perform the integration, you should contact the Customer Success Department. If this is so, write to: support@salesmanago.com or contact your Project Manager.