Using pop-ups is a very effective method of generating leads from your website. With SALESmanago Marketing Automation you can display pop-ups either to identified visitors who filled out contact forms or to anonymous visitors. Pop-ups will only be displayed if a contact spends a specified amount of time on the website or after subsequent visits.
ADD POP-UP ON THE WEBSITE
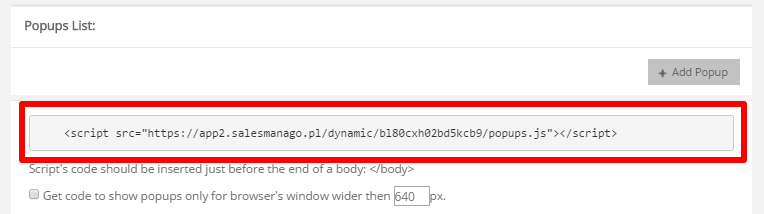
To add pop-ups to your page, paste their code between <body> and </ body> of your website script. The rest of the code is located in the SALESmanago system. There is only one, shared script for all pop-ups on your monitored websites. Paste it only once (or on every subpage, which is recommended).
Note: The page must finish loading all assets before running the script.
The code can be found in Web Tools → Lead Generation → Lead Generation forms → HTML Pop-ups
You can choose between two display options.
Option 1. Display pop-ups on all screens regardless of their size.
Option 2. Display pop-ups only on large screen sizes.
It is possible to set pop-ups to never display on smaller screens. To do this select the option Get code to show pop-ups only for browser windows wider than [ ] px. Do this before you copy the code.
The best solution, in this case, is to limit the browser window width according to the widest pop-up being used + an additional 20px of a margin. For example, if the widest contact form to display on your site is 800px wide, you should set a limit to a minimum value of 820px.
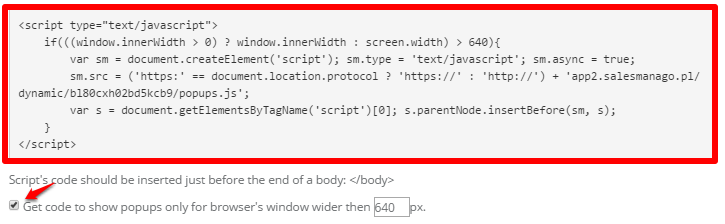
Note: Option 1 and option 2 can not be active at the same time on a single webpage.
CREATING POP-UPS
Start by opening Menu → Web Tools → Lead Generation → Lead Generation forms → Pop-ups → + Create new.
TIP: If you want to use this pop-up with Google Analytics, make sure you know your Google Analytics ID. To find it, sign in to your Analytics account, select the Admin tab, select an account from the dropdown in the Account column and select a property from the drop-down list, in the Property column. Under Property, click Tracking Info > Tracking Code.
LEARN HOW TO SET UP FORMS – CLICK HERE >>
In this menu, you will see a list of already created pop-ups. You can select more than one. You can use the same script for all pop-ups and paste it into the body section. The script can be used on all monitored websites. Pop-ups will only appear on pages that have the script. If you are using a CMS system, paste the code in the footer.
Click “Add a new pop-up”:
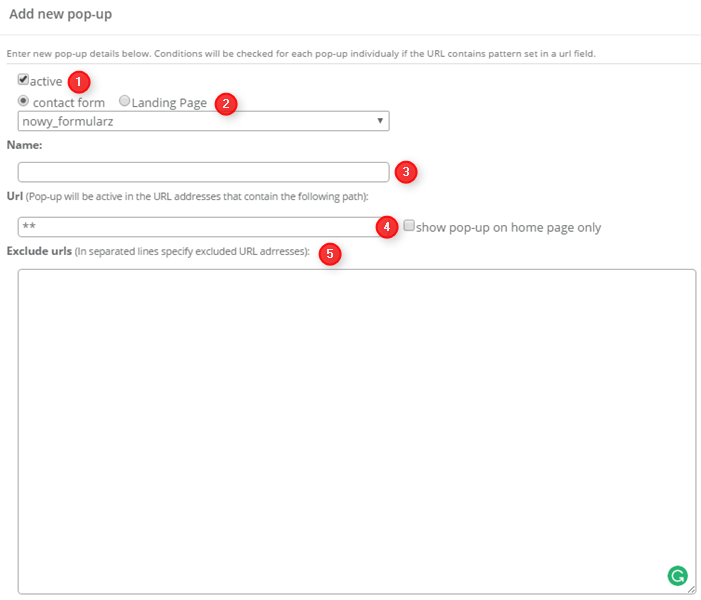
Pop-up settings:
[1] Pop-up activation switch. The pop-up is not active by default, but you can activate or deactivate it without having to remove it from the list of pop-ups or removing the code from the page.
[2] The form used for the pop-up. You can choose between using a standard contact form or landing pages (only for advanced applications). Select the appropriate form from the drop-down list.
[3] Choose a name for this pop-up.
[4] Destination addresses. Enter URLs here.
You can also enter URL patterns or regular expressions, Learn how to do it from this article >>
[5] Excluded addresses. You may want to prevent certain pages on your site from displaying pop-ups. For example, you may want to exclude the ‘Contact us’ page if you already have a static pop-up there.
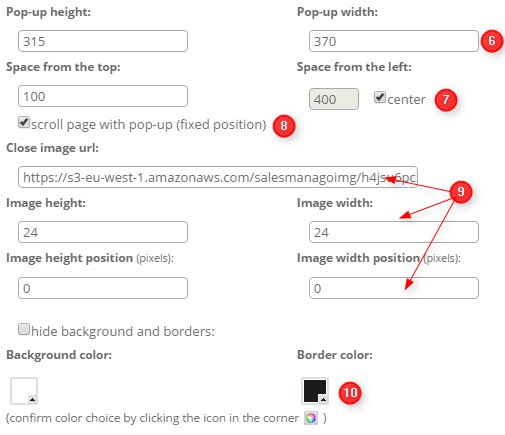
[5] Pop-up size. Set the height and width of the pop-up. Values that are too small will cause the pop-up to not display properly.
[7] Pop-up positioning. Here you can choose to have the pop-up centred, or enter how far from the screen border it will be displayed (in px)
[8] Pop-up auto scrolling – If this checkbox is selected, the pop-up will follow mouse scroll movements on the page.
[9] Settings of the image that closes the pop-up. Click outside the pop-up or click on the “X” to close it. You can upload your own graphics and indicate where you want the close option to be.
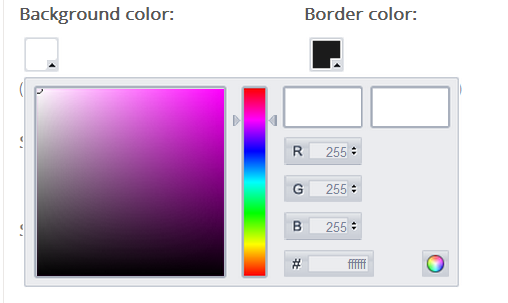
[10] Background settings. You can either make the pop-up look as if it was an integral part of the website rather than a separate frame or shade the background You can also choose the colour manually or enter its code. To apply, click the icon in the bottom right corner.
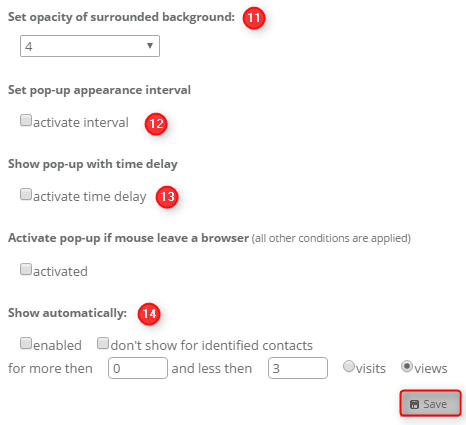
[11] Adjust a background opacity with this slider, on a scale from 1 to 9.
[12] The interval of pop-up appearances. Here you can set how often the pop-up will be displayed.
To do this, click activate interval. Remember to check if the pop-up is active (in setting at the top of the “add a pop-up” page).
[13] The delay of pop-up appearances. Here you can set with what delay the pop-up will be displayed. You can also select the checkbox below if you want the pop-up to appear if the mouse pointer leaves the active browser window.
[14] You can disable the pop-up for identified contacts. However, the contact would have to click on the email, mail the proxy server and fill in a form on an integrated system or API. Until the contact does this, they will be treated as an anonymous contact by the system. Moreover, the cookie is attached to the browser. If the user visits the site from another device, they will also be treated as an anonymous contact.
Also, there are two ways the pop-up display time can be set. You can use the scope of pages visited, or use the time range. For example, you can set the pop-up to display after a visit to the 5th subpage, regardless of what kind of subpages was visited, and as long as they are not on the list of excluded URLs. You can also set it for the 4th visit to the site.
Unique visits by one contact are counted after a default time of 3 hours from each other.
Note: these options are mutually exclusive. You cannot, for instance, set it up so that there is a pop-up on the 5th subpage after the 3rd visit.
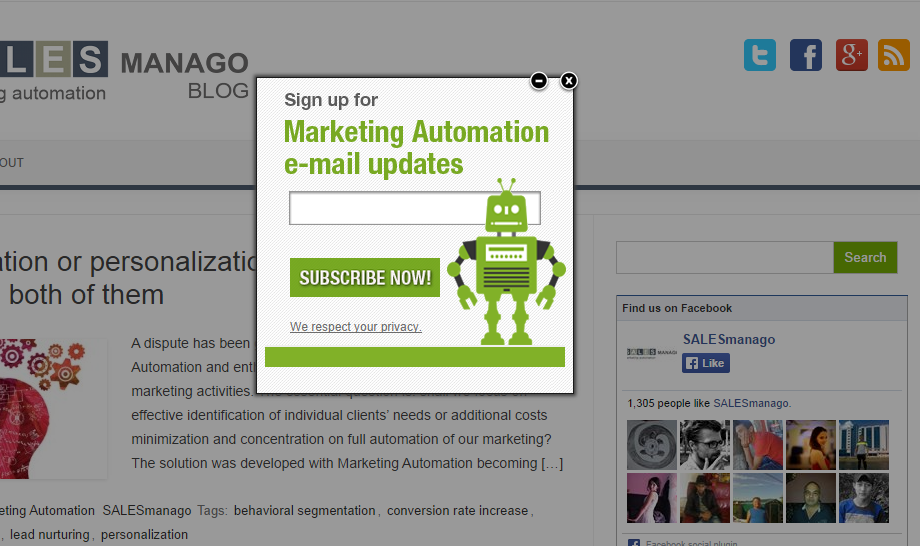
A sample pop-up is shown below. This is an example of what is displayed on our blog website.