Useful links
Rich Web Push is the advanced version of Web Push notifications. The solution enables to conduct communication in a custom way, even with anonymous users. While a standard Web Push notification enables you to send a short text with a little picture next to it, Rich Web Push displays as an attractive banner. A visible, interesting graphic attracts users’ attention, and, therefore, increases their response to your offer. It displays within a browser, even if a user is currently not on your website. Users do not have to fill in any personal details – the only requirement for this kind of notification to appear is that the users agree to receive them via an agreement form.
With Rich Web Push notifications:
- you will address significant information to your contacts both by means of a computer and a mobile device after they have agreed to receive notification separately on either of them;
- you will increase the group of your recipients. Except for opt-in users, you will also address not monitored users, those with opt-out status or even those who are not in your database. A notification will be sent to everybody who accepts notification and you will have the opportunity to convert anonymous users into identified contacts;
- you will send notifications directly to a recipient’s device in real time. It results in 30 times greater click rate than in the case of an average email;
- you will increase responsiveness to your notification because of an attractive, eye-catching graphic;
- you will react to contacts behavior – you can create a notification as an action to a selected event in automation rules.
Web push and rich web push notification comparison (displayed on Chrome)

A graphic form of a notification may differ depending on a browser since web push notifications are regulated by a user’s system as well as a particular browser.
IMPORTANT: For the latest update of Windows 10 the images in Rich Web Push notifications for are cut by default to 364×180, the text is moved below and the background color of the text is adjusted automatically to the system color scheme in the Chrome version 60 and higher.
Agreement to receive notifications
Web push notifications may be sent to everyone who agrees to receive notifications from your site by means of an agreement form. Learn how to create the agreement form for web push notifications.
This is how an exemplary agreement form looks like.

Web push notifications are sent by means of a browser. To guarantee the possibility to modify a form and attractiveness of a web push notification in the SALESmanago platform, a user must also accept subscription in their browser window. Moreover, the monitoring cookies assigned by SALESmanago are not connected with the agreement form cookie. Therefore, clearing cookies does not remove the agreement. After clearing the cookies and re-entering the site, a user will again see the agreement form, however, the notifications will be sent to them regardless of whether they agree again.
Compatibility
Google Chrome is the first browser that introduced the Rich Web Push innovation. We are up to date with all the news, therefore, Rich Web Push notifications are available now for Chrome 55 and above. What is more, in case users’ browsers do not support Rich Web Push, the SALESmanago enables automatic delivery of a standard Web Push notification instead.
In order to create a Rich Web Push notification, go to
WEB PUSH => ADD NEW WEB PUSH NOTIFICATION
Contents
- How to create a rich web push notification?
- Settings
- Contact group
1. How to create a rich web push notification?
- Create an agreement form.
- Create a new notification – go to Website Marketing → Web Push and click + Add new web push notification.

TIP: Remember that a user must agree to subscription in the agreement form and confirm the browser message to be able to receive Web Push. For both Web Push and Rich Web Push use the same agreement form. To see how to create an agreement form, go to Web Push – Agreement Form.
2. Settings

[1] Tour – switch on the tour that will guide you through the process of the form configuration so you will not miss any step.
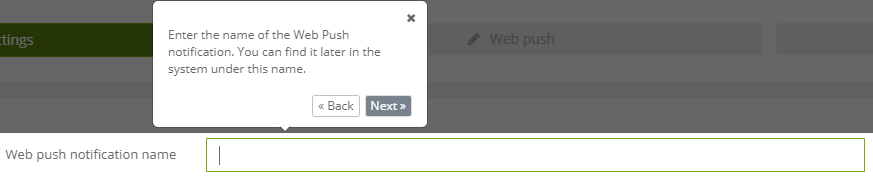
[2] Web Push notification name – enter the notification name.
Click Next.
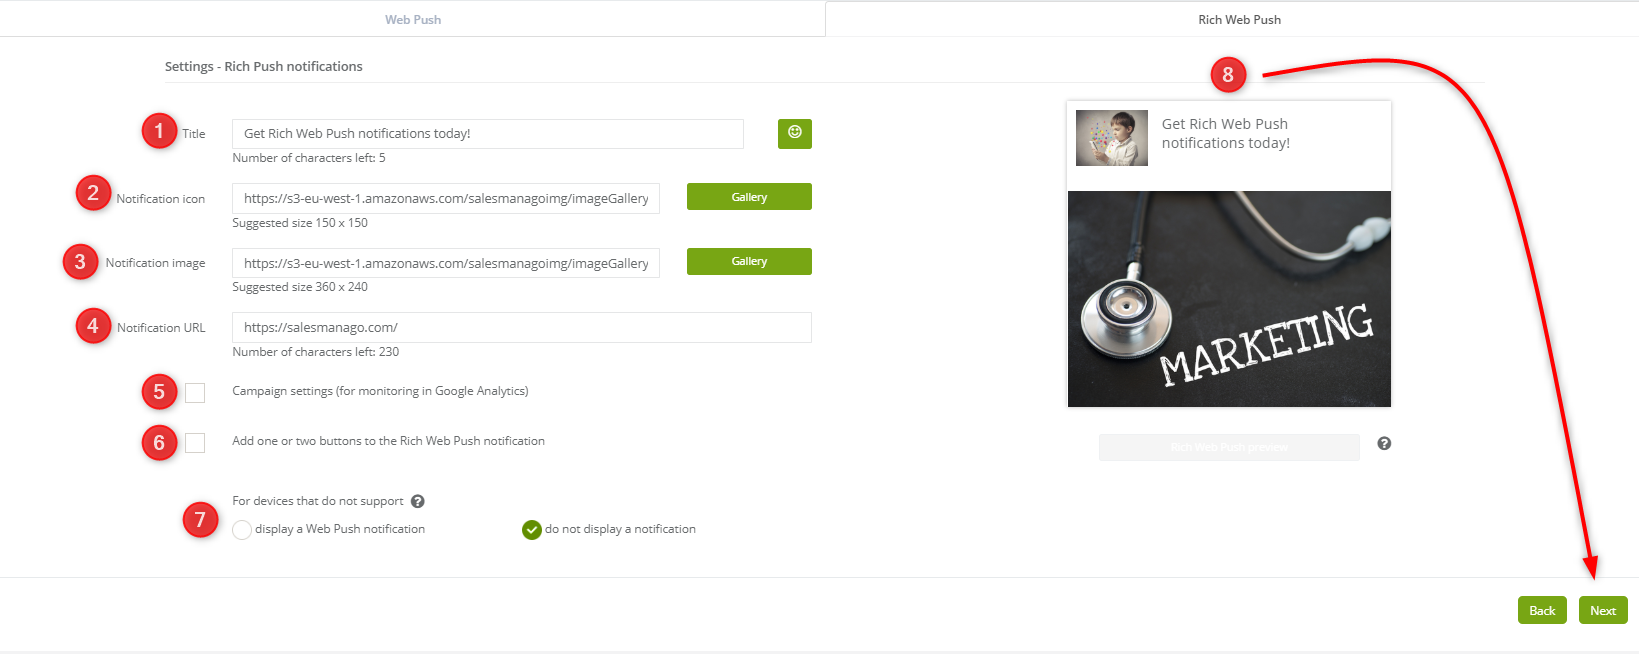
[1] Title – enter the notification title. Up to 45 characters.
[2] Notification icon – upload a graphic to be displayed next to the title. The following file formats can be used as icons: JPG, PNG, WebP, ICO/CUR, and BMP. The GIF format is not supported by browsers. The suggested size is 150×150 px.
[3] Notification image – upload a main graphic of the notification. The following file formats can be used as icons: JPG, PNG, WebP, ICO/CUR, and BMP. The GIF format is not supported by browsers. The suggested aspect ratio 16 : 8.
[4] URL – add a URL address, so it can redirect users to a dedicated landing page or a product page.
[5] Google Analytics Campaign – optionally you can add parameters to monitor marketing effects in Google Analytics.
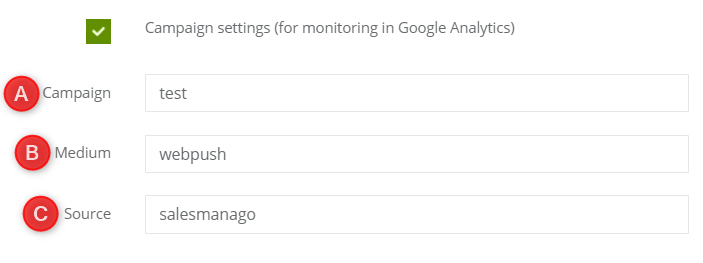
[A] Campaign – type the utm_campaigne parameter value
[B] Medium – type the utm_medium parameter value
[C] Source – type the utm_source parameter value
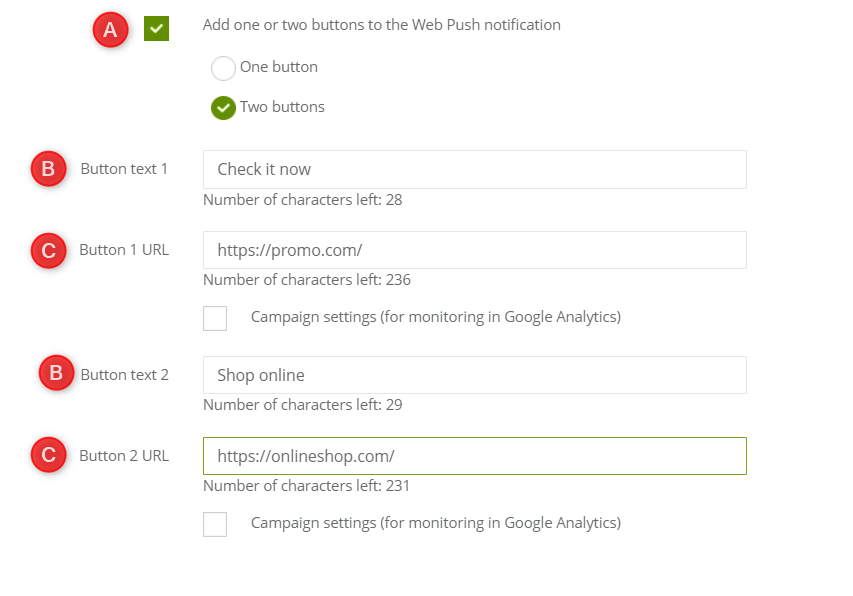
[6] Rich Web Push button – add one or two Rich Web Push notification buttons. This feature allows you to create Web Push and Rich Web Push notification button.
[7] For devices that do not support – you can choose an action in case a user’s browser does not support Rich Web Push notifications.
IMPORTANT: Rich Web Push notifications are available for Chrome 55 and above, and, to make sure that all users receive a notification, the option ‘display a web push notification‘ is recommended. After choosing this option, you have to adjust the settings of Web Push notification described above.
[6] Notification preview.
Click Next.
3. Contact group

[1] Agreement form selection – select a proper agreement form.
IMPORTANT: Only one agreement form may be active on one URL address, so you need to select the same agreement form for both Web Push and Rich Web Push notifications. Since a particular agreement form is linked with a particular recipient group, select many agreement forms to address many recipients on different URL addresses.
[2] Group of recipients – select contacts based on criteria:
- monitored – the monitored contacts
- anonymous contacts – the contacts that are not monitored and not saved in SALESmanago system,
- all contacts,
- select by tags – enter tags of contacts that you want to select for or exclude from web push delivery.
ESTIMATION OF THE RECIPIENTS’ GROUP
The group of recipients consists of users who have given a consent by means of an agreement form sent to them. This way they agree to receive Rich Web Push notifications. Due to the fact that there are a lot of variables, calculating the precise number of the recipients is a challenge. These variables concern situations, when:
- a user removes the cookie files from the browser at any time thus deleting the confirmed consent for receiving Rich Web Push notifications,
- a user doesn’t turn on the device (and the browser) before the expiration of the Rich Web Push notification.
[3] Send on a date – set a particular date and time for Web Push notification to appear.
[4] Lifespan – set the time of Web Push notification validity. The validity is counted starting from the sending date. If a contact opens the browser after the set validity time, the Web Push notification will not show up.
IMPORTANT: After sending, the notification displays only once for every user as soon as it is possible (for example when a user opens a browser).
To queue the notification on a server, click Send. The notification will be sent to all contacts fulfilling the proper conditions at the moment of queuing.
TIP: You can also send Web Push notifications while creating your automation rules in Automation Processes → Automation Rules → Action: Send Web Push notification.