In Web Push Analytics you can track the deliverability and effectiveness of your web push notifications. You can also edit and manage your notifications and permission prompts.
Benefits:
- insight into the number of sent, displayed and clicked notification
- easy management of notifications and agreement forms directly from the list
To access Web Push Analytics, from the main menu select
Channels → Web Push → Dashboard
Contents
- Overview
- Notification list
- Agreement form list
.1. Overview
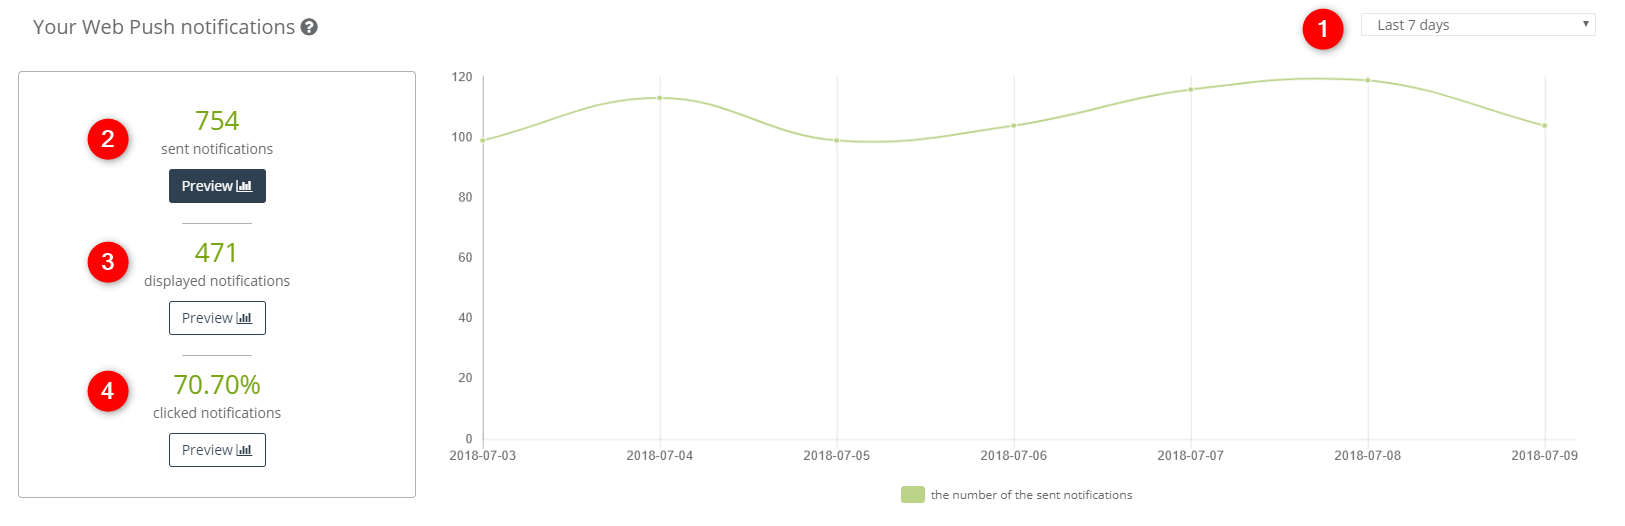
Your web push notifications – here you can compare how many of your notifications were sent, displayed and clicked over the specified period of time.
[1] Timeframe – you can specify a period of time to be displayed on the chart and the tiles on the right.
[2] Sent notifications – the total number of web push notifications you have sent over the specified timeframe.
[3] Displayed notifications – the total number of Web Push notifications you have sent over the specified timeframe.
[4] Clicked notifications – the average rate of the clicked Web Push notifications you have sent over the specified timeframe.
IMPORTANT: Statistics about Web Push notifications are collected since April 2018, hence it is the earliest time period you can probe into data on the chart.
.
2. Notification list
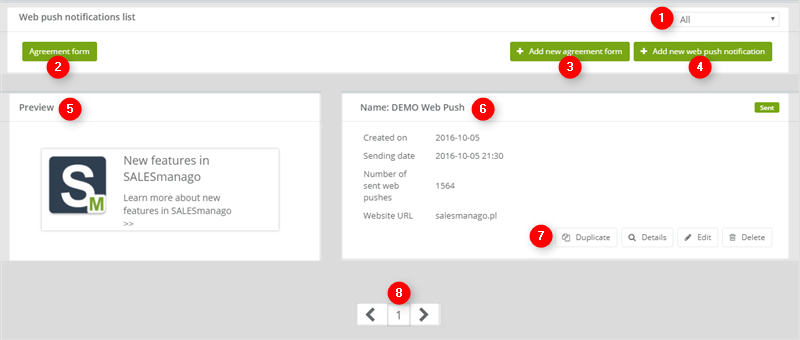
[1] Select type – select an item on this list to specify which type of notifications to display (all, planned, or sent).
[2] Permission prompt – click this button to switch the view to a list of permission prompts.
[3] Add new permission prompt – click this button to create a new permission prompt.
[4] Add new web push notification – click this button to create a new web push notification.
[5] Preview – here you can see the preview of the currently selected notification.
[6] Notification details – here you can see when the selected notification was created and sent. You can also see how times it was sent and to which website it is linked.
[7] Options
- Duplicate – creates a copy of this notification (the copy is inactive by default, you can manually activate it later).
- Details – provides additional information regarding the selected notification.
- Edit – lets you change this notification’s icon, text and so on.
- Delete – permanently removes this notification from the system (along with its deliverability statistics).
[8] Previous/next page – click an arrow to go to another page of the list.
.
3. Agreement form list
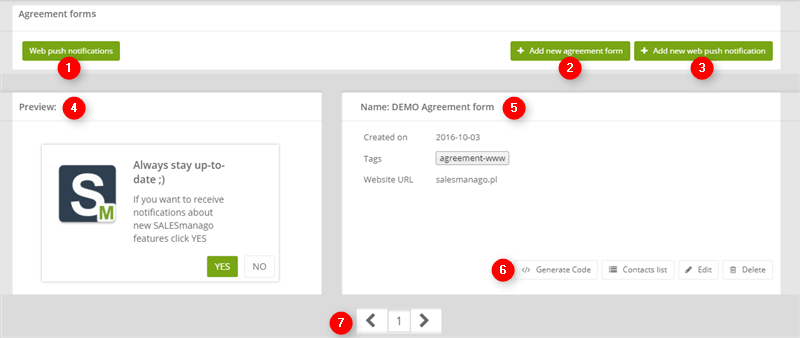
[1] Web push notifications – click this button to switch the view to a list of web push notifications.
[2] Add new agreement form – click this button to create a new permission prompt.
[3] Add new web push notification – click this button to create a new web push notification.
[4] Preview – here you can see the preview of the currently selected notification.
[5] Agreement form details – here you can see when the selected agreement form was created, which tags it assigns to contacts who agree to receive notifications and to which website it is connected.
[6] Options
- Generate code – creates a code snippet for this agreement form. Add it to your website’s code to allow the permission prompt to be displayed.
- List of contacts – opens a list of contacts, who agreed to receive notifications via this agreement form.
- Edit – lets you change this notification’s icon, text and so on.
- Delete – permanently removes this notification from the system (along with its deliverability statistics).
[7] Previous/next page – click an arrow to go to another page of the list.
Submit your review | |