Useful links
With SALESmanago you can create contact forms and add them to your websites. Contact forms can be used to automatically add a contact to CRM and monitor their behaviour from the moment they fill in the form. If the imported database did not contain the contact before, they will have to confirm subscription first.
The SALESmanago System offers its users several possible ways of displaying contact forms.
Creating forms in each case is quite similar, but they differ when it comes to settings. Forms can be created in two ways:
- by using the SALESmanago creator
- by uploading an HTML form developed by a professional graphic designer
You can also decide to use additional options, such as:
- assigning tags to contacts who signed up for a newsletter,
- sending subscription confirmation messages,
- creating a Thank You page to show your contacts you appreciate their subscription,
- creating an automatic alert sent to a user who filled out a contact form
You can access all of these in the Contact form settings. Using them is very useful when creating forms with the landing page creator.
Find out how to create a form in the landing page creator >>
Find out how to create a form in HTML >>
To create a form go to Web Tools → Lead Generation → Lead Generation forms → Form → Create new or click Edit on an existing form
TIP: Contact forms created with the landing page creator will have ‘suffix _form’ at the end of their name.
Option 1.
You will see the following screen:
To configure the form you will have to fill in the following information:
[1] Form name – do not use spaces or diacritics – the form name will constitute the URL of the page displaying the form.
[2] Owner – the account which will be automatically denoted as the owner of contacts who registered via the form.
[3] Form appearance – after clicking the plus (+) sign you will see additional fields to be filled in (described below).
[4] Tags – tags added automatically upon subscription.
[5] Tags added after opt-in – tags added automatically upon user confirming their subscription.
[6] Custom fields – contact form fields that display more contact details (‘Details’ on the contact card). Saved in the form of $cst.detail_name$, eg. $cst.business$.
[7] If the contact exists – decide whether the message will be sent with or without the opt-in link
[8] Set a coupon for contacts – check this box if you wish to generate a discount code for contacts.
[9] This form is dynamic – (advanced option) check the box if the form has been created in Freemarker.
FURTHER SETTINGS
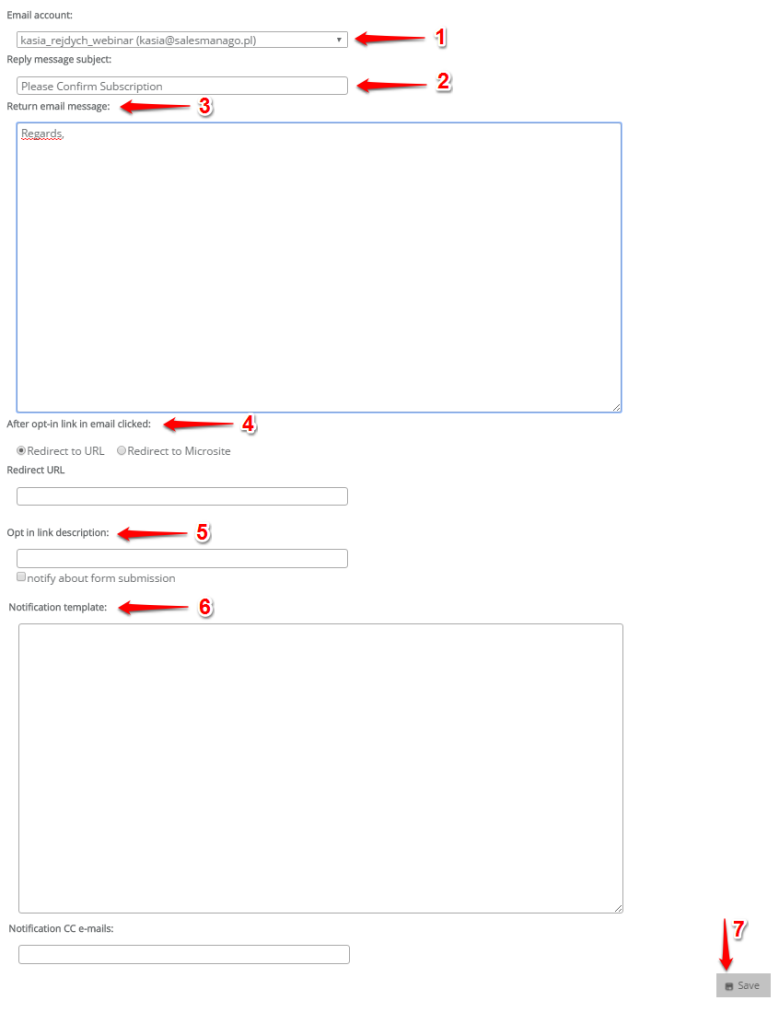
The next step is creating a Thank you Page – the page to be displayed to a user after a successful registration:

Fill in these fields.
[1] Email account – select the sending account from which the subscription confirmation message will be sent.
[2] Replay a message subject – enter the message subject line.
[3] Return an email message – complete the content of the message.
[4] After the opt-in link in an email is clicked – you can enter a redirection URL or a previously created landing page. Learn more about landing pages >>
[5] Opt-in link description – enter the content of the link used for confirming a subscription.
[6] Notification template – after selecting the ‘sent form notification’ option, the form owner will receive reports on who filled in the form.
[7] SAVE – after clicking on ‘Save’ go back to Menu → Web Tools → Lead Generation → Lead Generation forms → Form. You can preview and test the created contact form by clicking the link displayed there.
In order to publish the contact form on your website, you will need a special code and paste there. Generate that code by clicking the ‘GENERATE CODE’ button.
CONFIRM A SUBSCRIPTION EMAIL TEMPLATE
If you wish to modify the look of the subscription confirmation message, go to Menu → Settings → System Settings → Contact Forms. Learn more about subscription confirmation emails here >>


