The Settings tab is a single place where you can define all crucial aspects of your Email Marketing communication: create and configure your sender accounts, select the subscription confirmation templates for different languages, customize your unsubscribe page, define priority levels for different email types, apply sending filters, and enable or disable redirects in emails.
Well-configured email settings ensure high deliverability. Additionally, by setting smart sending limits and adjusting your communication to general customer preferences, you can maximize the effectiveness of your email campaigns and minimize the risk of your emails being marked as spam.
To define Email Marketing settings, go to
Channels → Email Marketing → Settings
Contents
- Getting started
- Sender accounts
- Subscription confirmation languages
- Unsubscribe page
- Priority management
- Sending settings
1. Getting started
The Settings tab in the Email Marketing feature allows you to define and configure all crucial aspects of your email communication, including:
- Sender accounts—Here, you can create a sender account and define all its properties: internal name, email address, display name, and reply-to address. If you decide to use your own sending infrastructure, this is where you can define the connection settings.
- Subscription confirmation languages—Here, you can enable the subscription confirmation (double opt-in) mechanism and select the email templates that will be sent as your confirmation emails in different languages (as well as the default template).
- Unsubscribe page—Here, you can customize your unsubscribe page, including the image and color schemes. You can also select the default language.
- Priority management—Here, you can define priority levels for different email types (API, Birthday, Automation Processes, Periodic, Mass emails, A/B tests) and determine the order in which they will be sent from your account.
- Sending settings—Here, you can define a number of settings that can be crucial to the effectiveness of your email campaigns and the perception of your brand by customers:
- Limit the number of emails sent to a single Contact within a given time period,
- Specify the days of the week on which emails can be sent,
- Define bank holidays—the dates on which you don’t want to send any emails,
- Enable (recommended) or disable redirects through SALESmanago when Contacts click on links included in your emails.
Read the remaining part of this article for detailed explanations and instructions.
2. Sender accounts
The SALESmanago platform allows you to use two types of sender accounts:
- Email Marketing account—Select this account type if you want to use the SALESmanago infrastructure to send your emails. This is the recommended option as SALESmanago offers top sending performance and the highest deliverability standards.
- External (SMTP) account—Select this account type if you want to send emails from your own infrastructure. In this case, the performance and deliverability will depend solely on your own servers.
You can create as many sender accounts as you want. Also, you can create and use accounts of both types, depending on your needs.
TIP: Research from Pinpointe Marketing found that by using a specific personal name rather than a generic email address or company name, you can increase your open rates by 15–35%.
TIP: Consider creating a number of sender accounts with different addresses and display names and run an A/B test to determine which of them yields the highest OR.
To add a new account, click Add new account [A].

At this stage, you can select between the two sender account types:
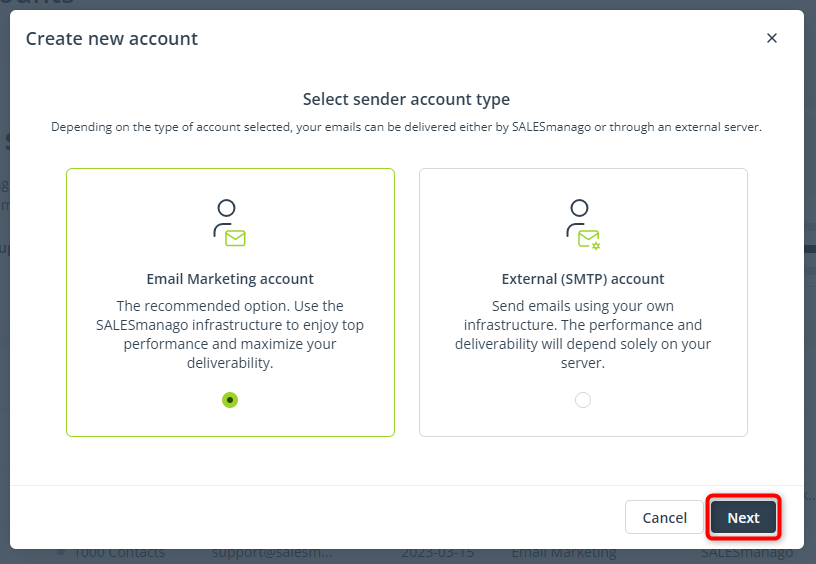
Select the account type you want to configure and click Next.
A. Email Marketing account
This option is strongly recommended if you want to ensure top sending performance and top deliverability for your email communication.
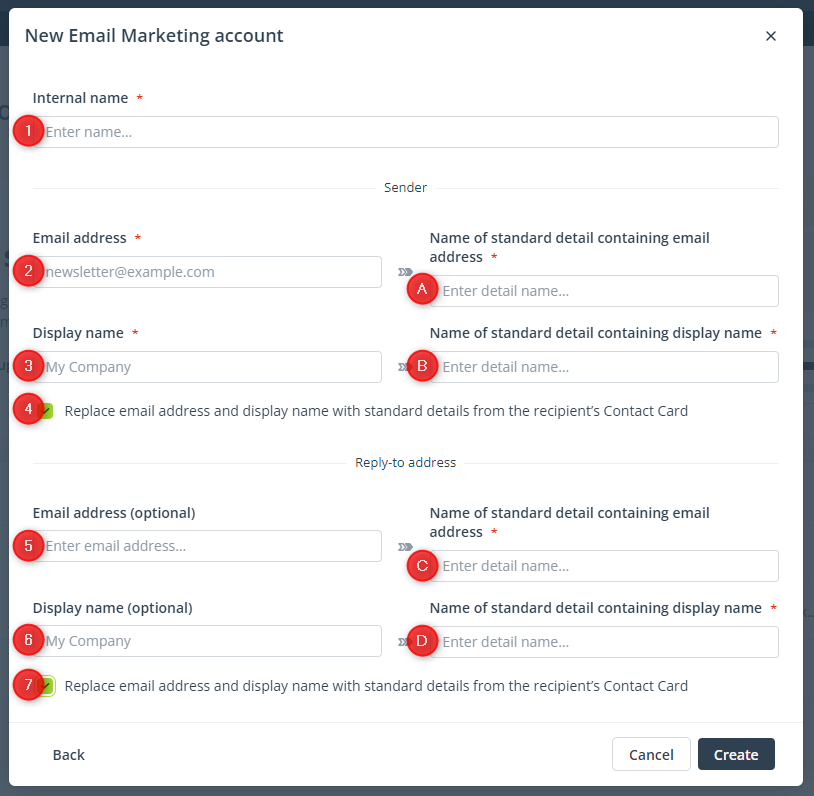
[1] Internal name—Provide a name for your new account that will allow you to easily identify the account within the SALESmanago system.
[2] SENDER Email address—Provide the email address you want to use when sending emails from this account. This email address will be visible to your recipients.
The sender email address should be associated with your own domain. Any popular email domains, such as Gmail or Hotmail, are not allowed.
NOTE: The email address you enter in this field does not need to be pre-configured on your server (i.e., does not need to be created in advance).
[3] SENDER Display name—Specify the sender name that will be displayed next to the subject line in recipients’ inboxes.
[4] Replace email address and display name with standard details from the recipient’s Contact Card (optional)—Check this box if you want to use the values of standard details as the email address [A] and the display name [B] and this way, personalize these data fields for individual recipients.
You can create two standard details—one for the email address and one for the display name—and assign them to individual Contacts with different values. This way, if you use the option: Replace email address and display name with standard details from the recipient’s Contact Card and provide the standard details’ names in fields [A] and [B], each Contact that has these details on their Contact Card will see those details’ values in their inbox.
If a Contact has neither of these standard details or only one of these standard details, they will see the default value(s) entered in fields [2] and [3].
[5] REPLY-TO Email address (optional)—Provide an email address that will be displayed as the recipient address if a Contact decides to reply to an email sent from this sender account.
IMPORTANT: The email address you enter in this field must be pre-configured on your server (i.e., an inbox with this email address must be created in advance).
If you leave this field blank, any potential replies will be sent to the sender email address (see point [2] above).
TIP: If you don’t want to receive replies to communications sent from this account, use an address like no-reply@example.com.
[6] REPLY-TO Display name (optional)—Specify the recipient name that a Contact will see if they decide to reply to an email sent from this sender account.
[7] REPLY-TO Replace email address and display name with standard details from the recipient’s Contact Card (optional)—Check this box if you want to use the values of standard details as the email address [C] and the display name [D] and this way, personalize these data fields for individual recipients.
When all the settings are configured as required, click Create.
IMPORTANT: Each new sender account intended for more than 1000 Contacts must go through an expert checkup, i.e., be verified by a Support specialist to ensure that its configuration guarantees maximum deliverability.
B. External (SMTP) account
Choose this account type to use your own infrastructure to send emails. This option is not recommended as it does not guarantee top performance and deliverability.
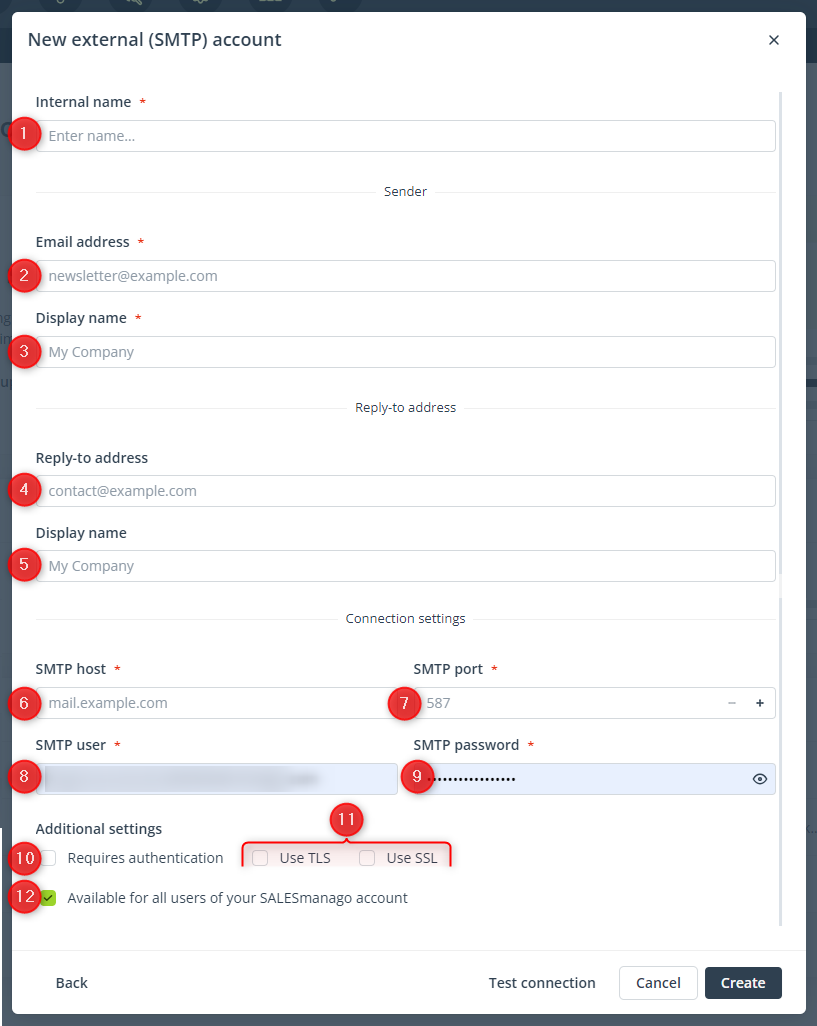
[1] Internal Name—Provide a name for your new external account that will allow you to easily identify it within the SALESmanago system.
[2] SENDER Email address—Provide the email address you want to use when sending emails from this account. This email address will be visible to your recipients.
NOTE: The email address you enter in this field does not need to be pre-configured on your server (i.e., does not need to be created in advance).
[3] SENDER Display name—Specify the sender name that will be displayed next to the subject line in recipients’ inboxes.
[4] REPLY-TO address (optional)—Provide an email address that will be displayed as the recipient address if a Contact decides to reply to an email sent from this sender account.
IMPORTANT: The email address you enter in this field must be pre-configured on your server (i.e., an inbox with this email address must be created in advance).
If you leave this field blank, any potential replies will be sent to the sender email address (see point [2] above).
[5] REPLY-TO Display name (optional)—Specify the recipient name that a Contact will see if they decide to reply to an email sent from this sender account.
[6] SMTP host—Provide the address of your SMTP server.
[7] SMTP port—Provide the SMTP port.
[8] SMTP user—Provide the name of the SMTP user authorized to use the sender email address entered in field [2].
NOTE: Some servers may require the user name in this field while others require the email address.
[9] SMTP password—Provide the password for your SMTP account.
[10] Requires authentication—Select if your server requires TLS or SSL authentication. Most servers require this setting to allow the connection.
[11] Use TLS and Use SSL—Choose SSL (Secure Sockets Layer) if your email server requires an encrypted connection on a specific port, or select TLS (Transport Layer Security) for a more secure, modern encryption method typically used on standard email ports.
Typically, SSL connections use port 465 for secure email sending, while TLS often uses port 587 or 25, accommodating secure communication on standard email ports.
[12] Available for all users of your SALESmanago account—Check this box if you want this sender account to be available for all users of your SALESmanago account. If you don’t check this box, this sender account will be available only for the user who created it.
When all the settings are configured as required, click Create.
3. Subscription confirmation languages
In this tab, you can enable the subscription confirmation (double opt-in) mechanism and select the email templates that will be sent as subscription confirmation messages in different languages.
The SALESmanago system selects the template to be sent to a Contact based on the doubleOptInLanguage field in the API request. You can override this mapping by using the doubleOptInEmailId field.

[1] Activate subscription confirmations—Set this toggle to enabled state if you want to configure a SALESmanago integration plugin or API to apply the double opt-in mechanism.
If you implement the double opt-in mechanism (by enabling this option and appropriately configuring your integration plugin or API), a subscription confirmation email will be sent to new subscribers to your newsletter. This means that a Contact will be added to your database with opt-in status for Email Marketing only if they first express the intention to subscribe to your newsletter (e.g., by filling out a form on your website) and then confirm this intention by clicking a button or a link in a subscription confirmation email that will be automatically sent by SALESmanago, according to your language settings (see below).
[2] Default template—Select the default template that will be sent to a Contact if no template in the Contact’s language is available.
Make sure that the Subject and Sender fields are filled as required. To see a preview of the selected email template, click the eye icon [A].
[3] Languages—Select the pre-prepared email templates for specific languages. For other languages the default template will be used.
[4] Create new confirmation—Click here to create a new subscription confirmation email. You will be redirected to a screen where you can select the email creator in which you want to design your new template.
Learn more about creating a subscription confirmation email >>
[5] Save—Click this button to save any changes.
4. Unsubscribe page
Here, you can customize the unsubscribe page to which a Contact will be redirected if they click an opt-out link in your email.
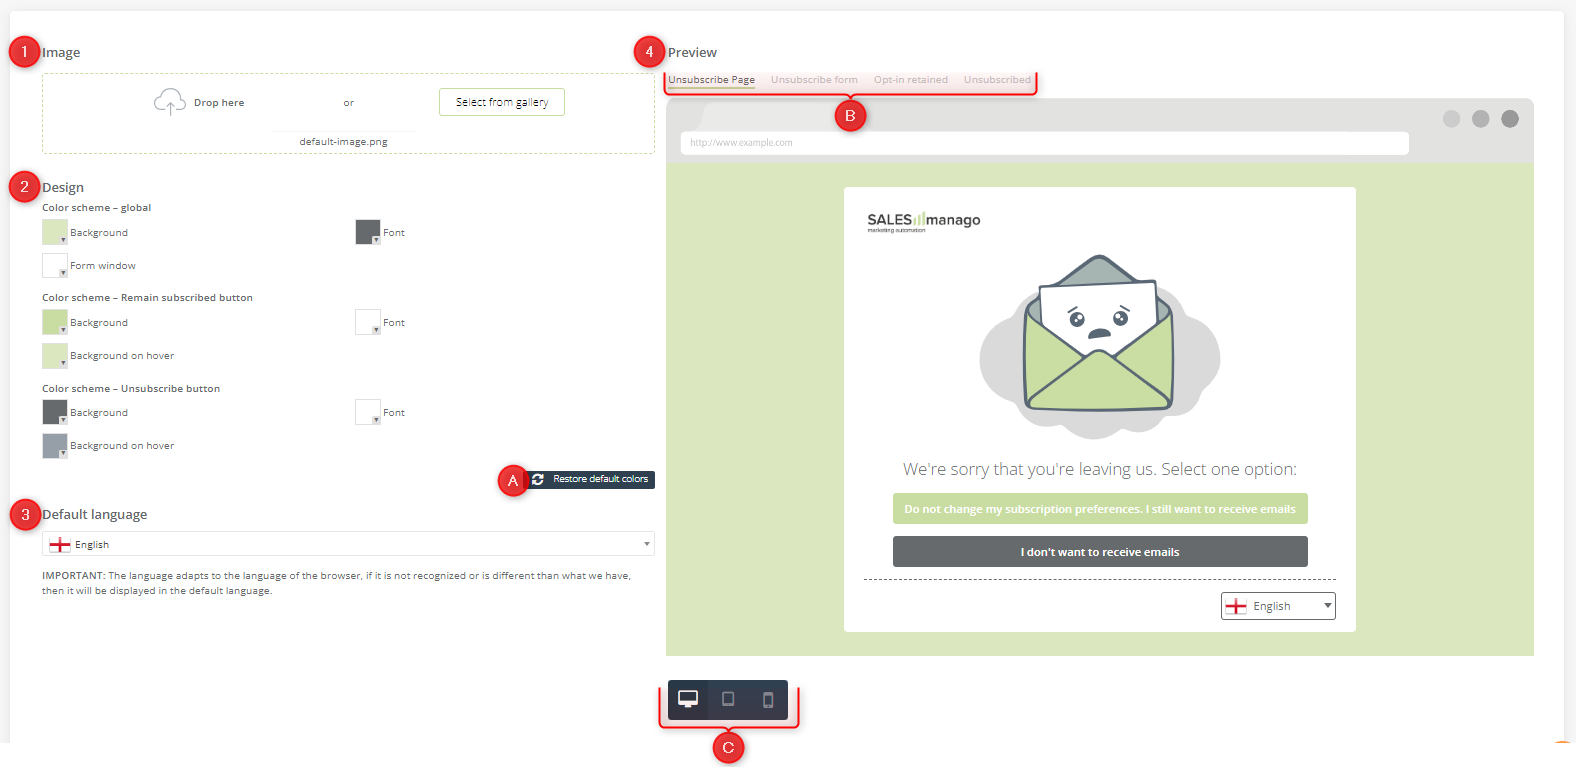
[1] Image—Here, you can upload your own image that will be displayed instead of the default one on your unsubscribe page.
IMPORTANT: If you delete your custom image, the default image will automatically be applied in its place.
[2] Design—Personalize the background and button colors for your unsubscribe page.
TIP: Click Restore default colors [A] if you want to return to the default design.
[3] Default language—Select the language that you want to set as default. This language will be used if the browser language of the unsubscribing Contact is not recognized. You can choose from 30 available languages.
[4] Preview—Here, you can see what your unsubscribe page and all follow-up pages will look like for Contacts. Switch between the different pages [B] (see Section A below) and between different devices: desktop, tablet, and mobile [C].
A. Unsubscribe page and follow-up pages
Unsubscribe page. This is the actual unsubscribe page, i.e., the message seen by a Contact immediately after they click an opt-out link.
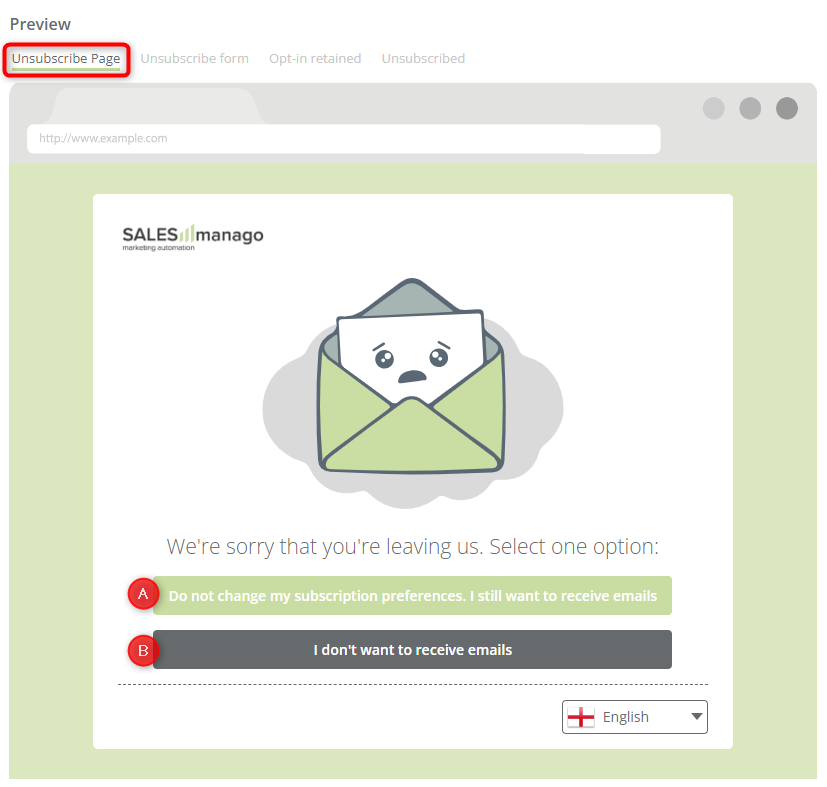
If the Contact selects the option: Do not change my subscription preferences. I still want to receive emails [A], they will be redirected to the Opt-in retained page (see below).
If the Contact selects I don’t want to receive emails [B], they will be redirected to the Unsubscribe form page (see below).
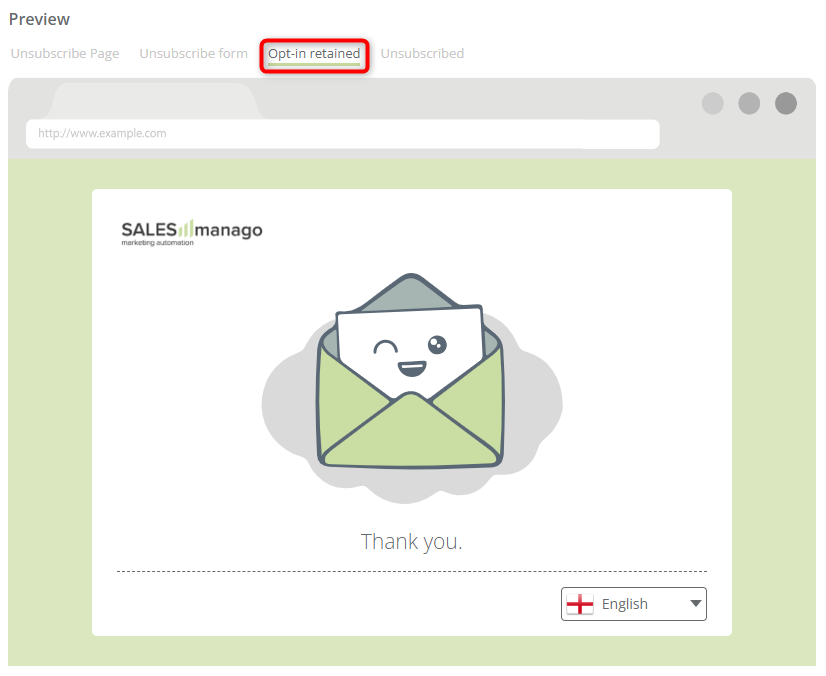
Opt-in retained page. This is the message to which Contacts are redirected if they decide to continue their subscription to your newsletter, i.e., if they select the option Do not change my subscription preferences on the first page or the option to receive one email per week on the Unsubscribe form page (see below).
Unsubscribe form. This is the message displayed to Contacts if they select the option I don’t want to receive emails on the first screen. Here, a Contact can decide whether they want to receive one email per week [A] or whether they want to receive no emails at all [B]. Additionally, they have the option to unsubscribe from text messages.
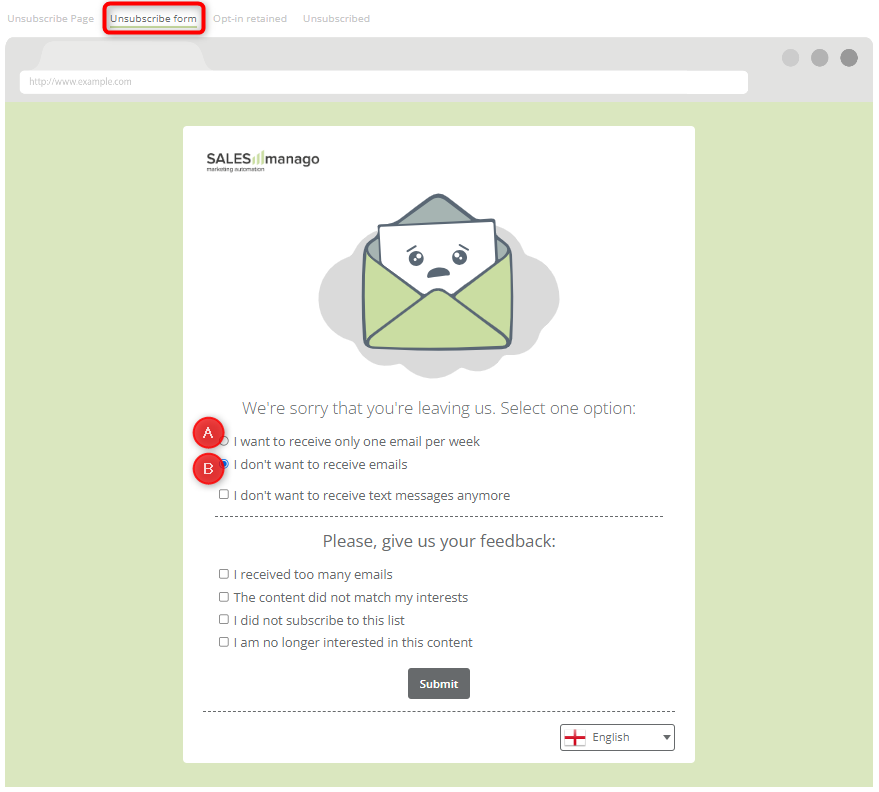
If a Contact selects option [A], they will be redirected to the Opt-in retained page. If they select option [B], they will be redirected to the Unsubscribed page (see below).
Below, an unsubscribing Contact can provide reasons for their decision to unsubscribe. Such information can help you improve and optimize your marketing communication in the future.
Unsubscribed page. This message is displayed to Contacts that have decided to unsubscribe from your newsletter and have confirmed this by clicking I don’t want to receive emails. At this stage, their Email Marketing status in the SALESmanago system will change to opt-out.
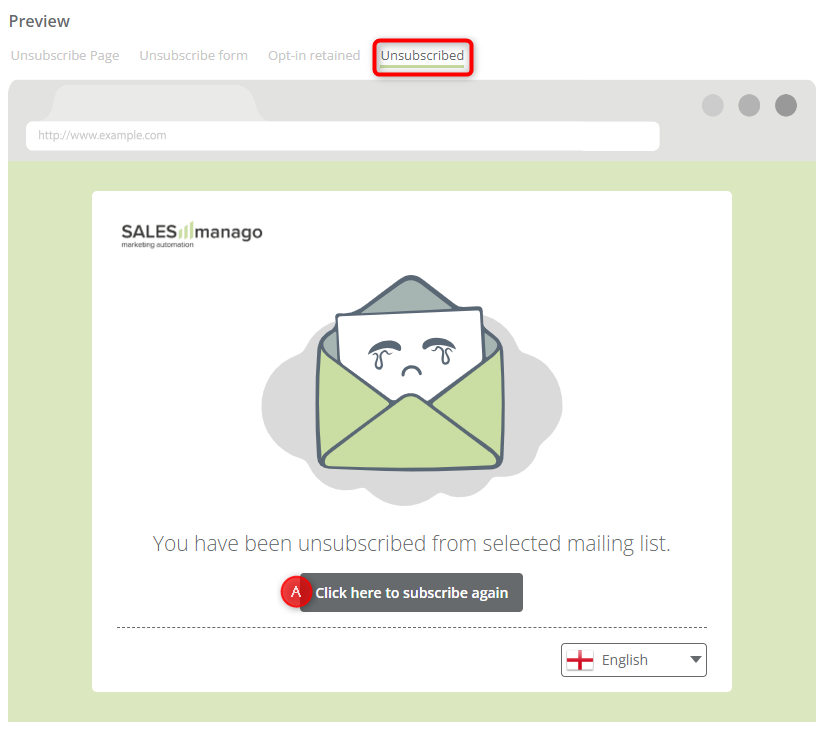
If the Contact clicked the unsubscribe option by mistake or has changed their mind, they can click button [A] to subscribe again. In this case, a confirmation message will be displayed to them and their status in your SALESmanago database will change to opt-in again.
5. Priority management
This section allows you to define priority levels for different email types and thus determine the order in which they will be sent from your account. This way, you can ensure that critical communications are delivered to your Contacts first, without having to wait in the queue.
NOTE:The sending priorities are defined within your account and are not affected by any other SALESmanago accounts.
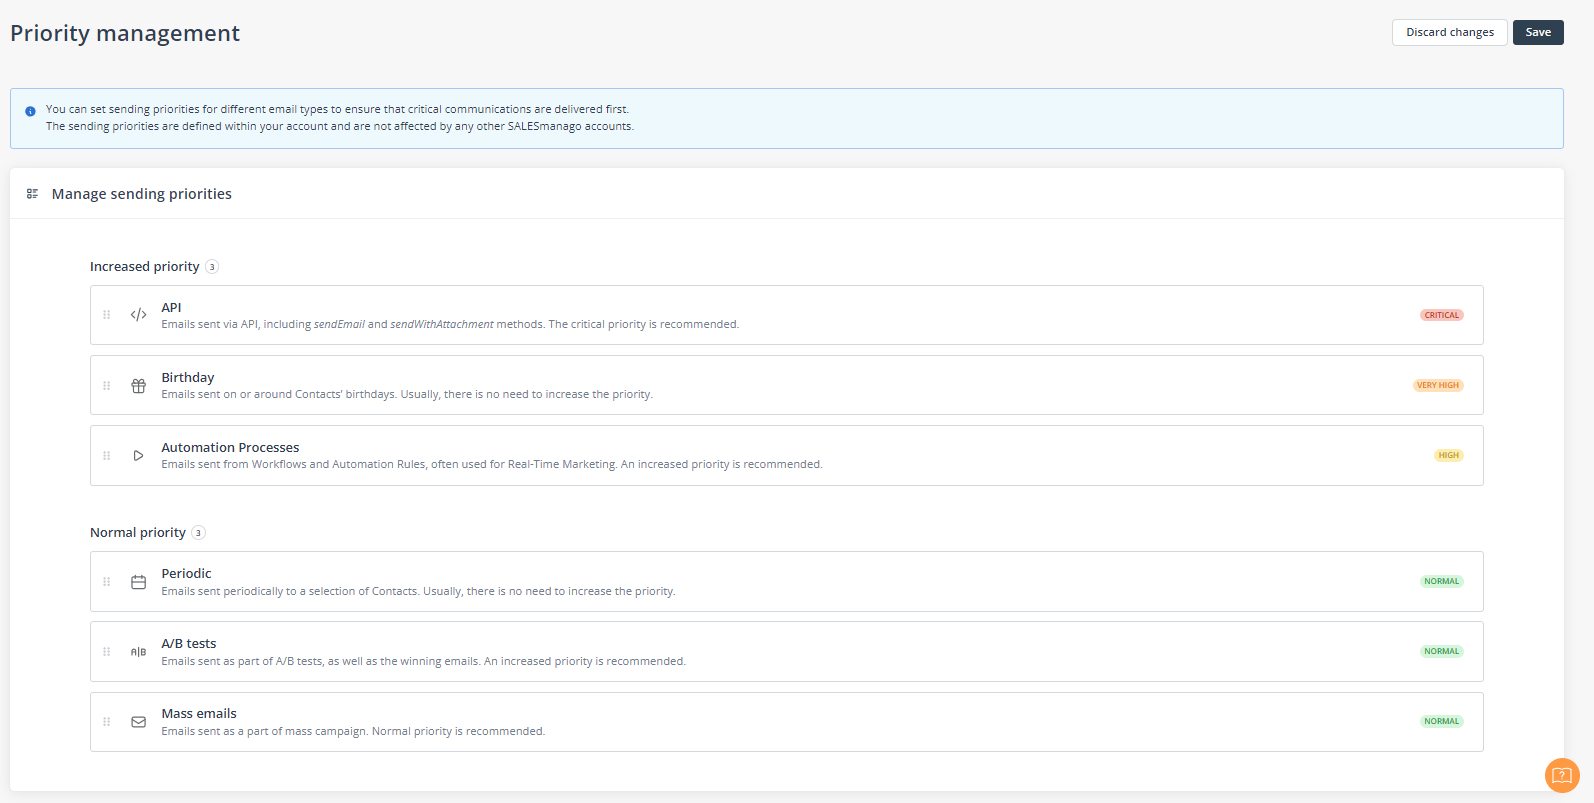
You can define priority levels for the following email types:
- API—Emails sent via API. Critical priority is recommended.
- Automation Processes—Emails sent as part of Workflows and Automation Rules. The increased priority is recommended.
- A/B tests—Emails sent as part of A/B tests, including the winning emails. You may want to increase their priority to conduct A/B tests instantly.
- Birthday—Emails sent on or around Contacts’ birthdays. Usually, normal priority will be sufficient.
- Periodic—Emails sent periodically. Normal priority is recommended.
- Mass emails—Emails sent as part of mass campaigns. Normal priority is recommended.
When managing sending priorities, you can choose between Increased priority [A] and Normal Priority [B].
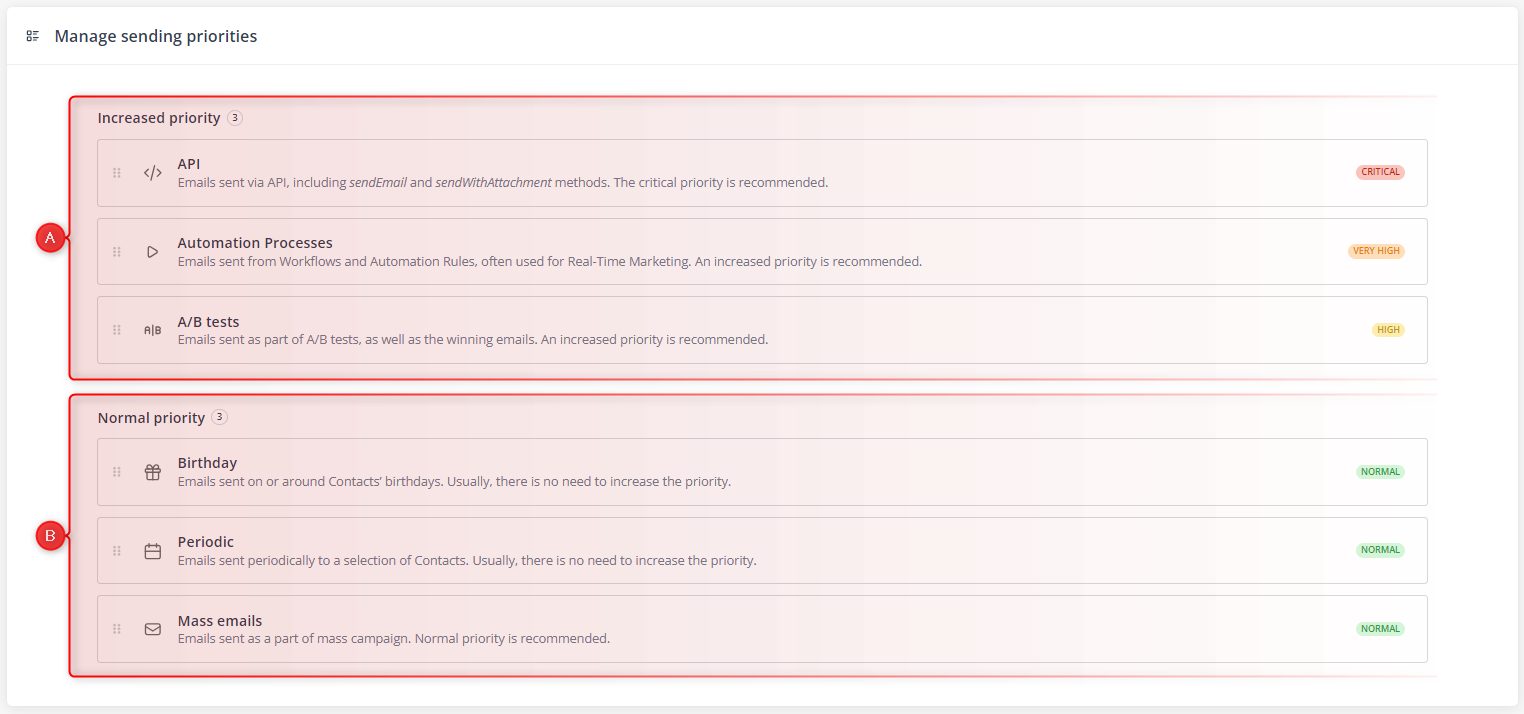
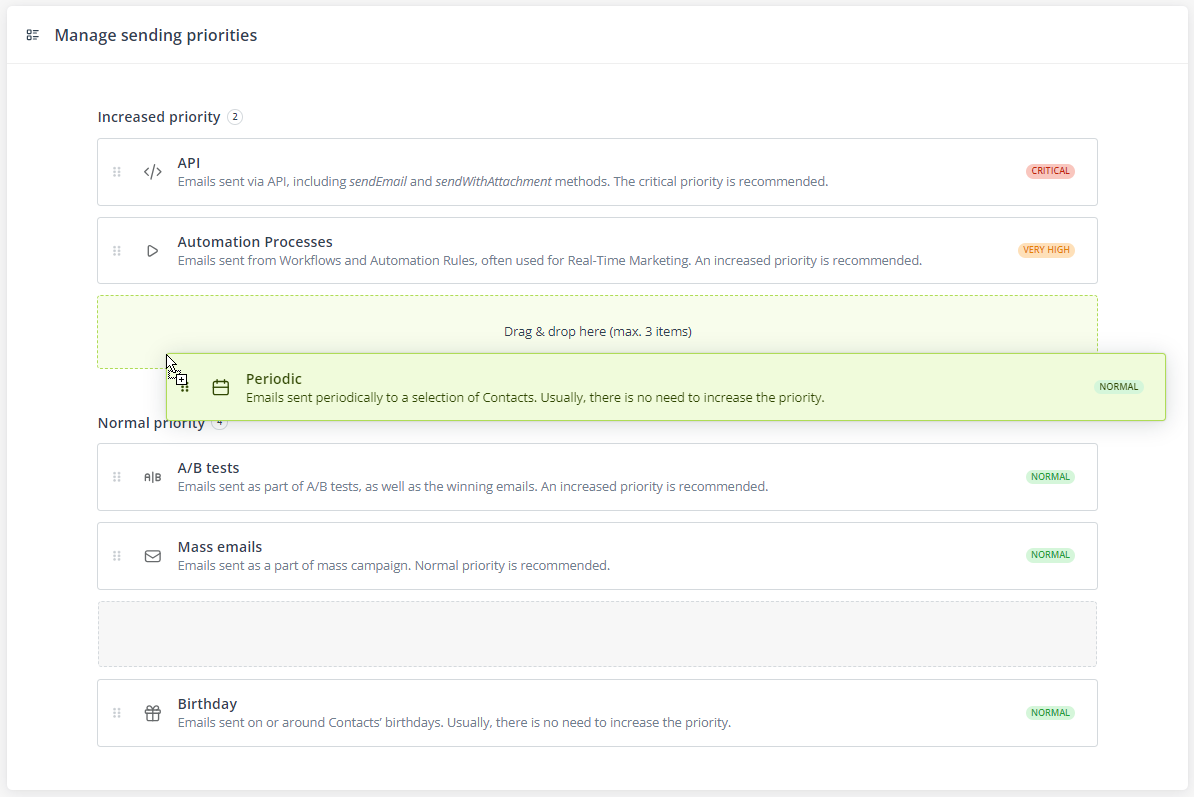
To assign increased priority to an email type, drag and drop the selected item into area [A]. Note that up to three email types can be assigned an increased priority, so area [A] can contain up to 3 items. The order in which these items are arranged is important because these email types will be given Critical, Very high, or High priority based on their position, from top to bottom.
Area [B] can contain between 3 to 6 items. All items in this area have the same (Normal) priority.
If you want to change the priority for an email type, drag and drop it into the desired position.
NOTE: If area [A] (Increased priority) already contains 3 items and you add another item to this area, the item in the lowest position (currently assigned High priority) will automatically be moved to area [B] (Normal priority).
6. Sending settings
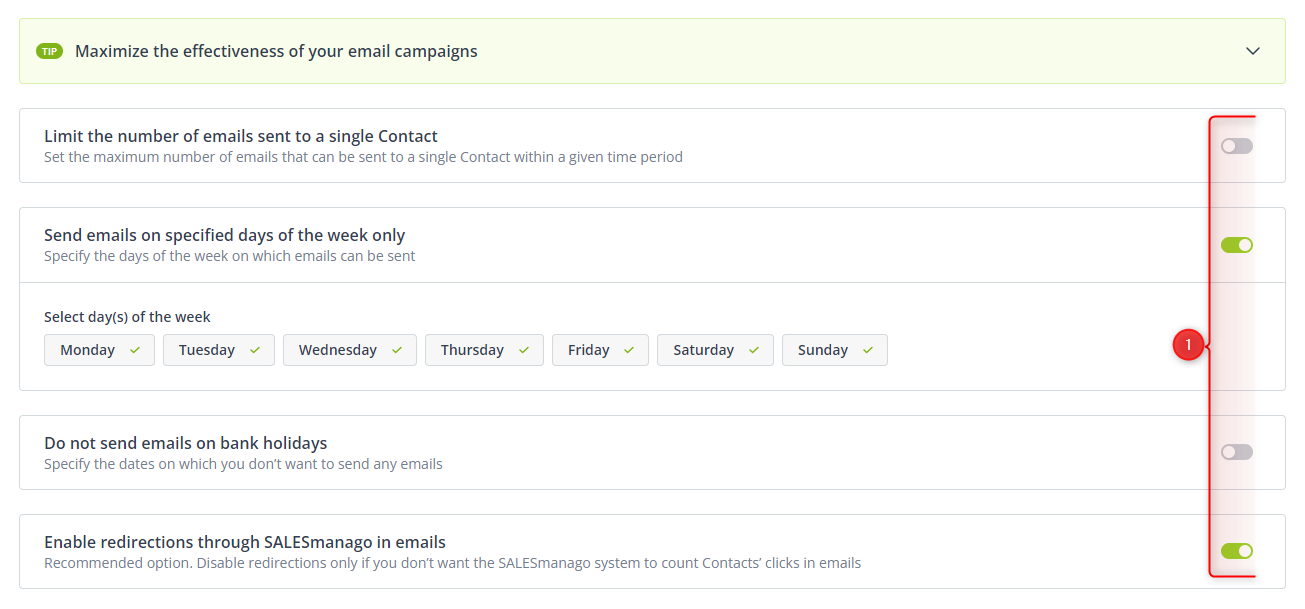
This section allows you to define advanced settings that will apply to all your emails:
- the maximum number of emails that can be sent to a single Contact within a given time period,
- the days of the week on which emails can be sent from your account,
- specific dates on which you don’t want to send any emails (especially bank holidays),
- the use of redirects for links included in your emails.
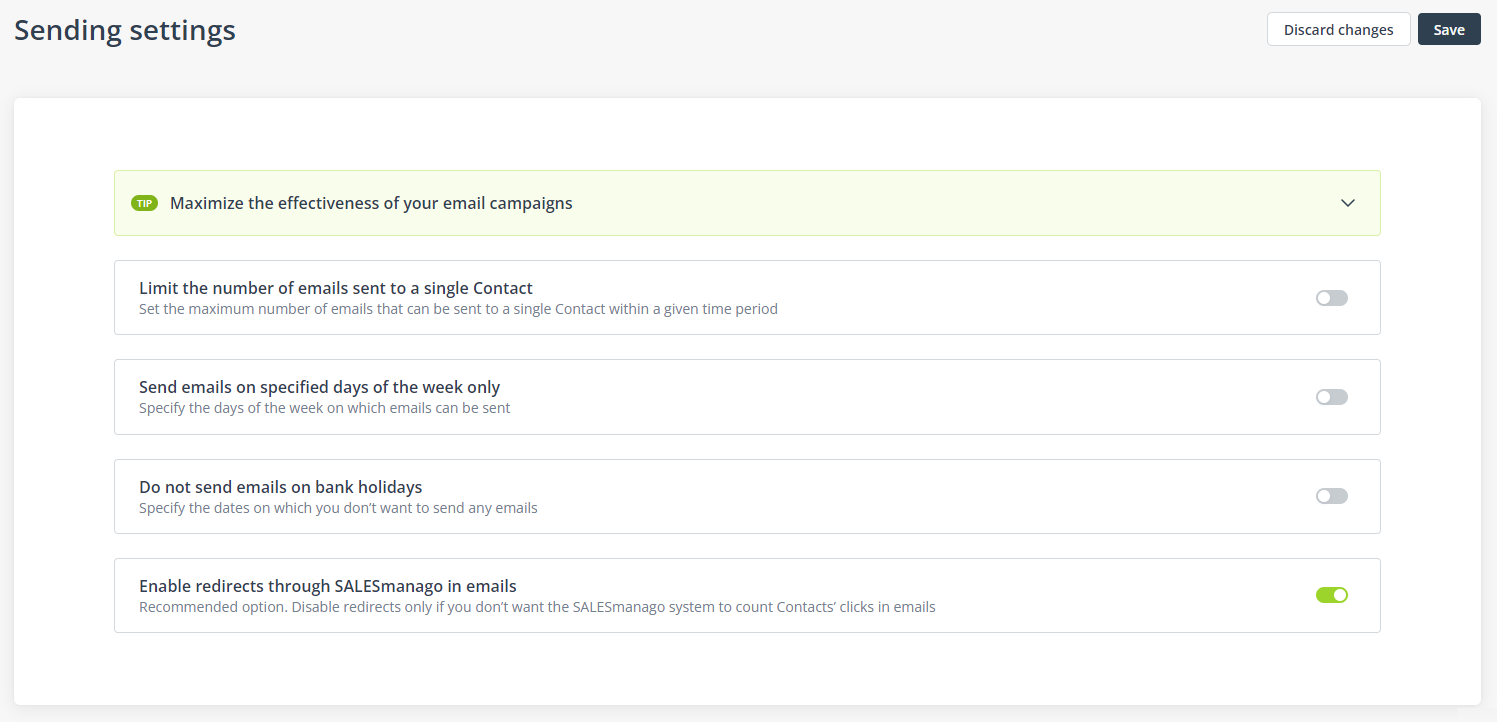
Use the toggle switches [1] on the right side of the screen to enable or disable the different options.
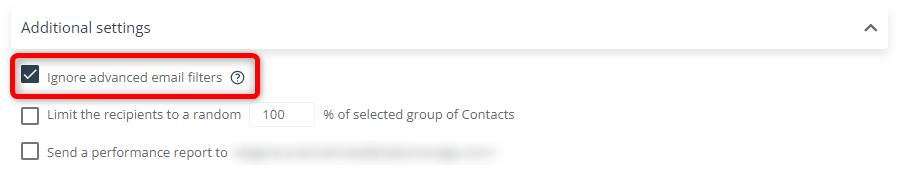
NOTE: Remember about the filters applied in this section when sending emails. If you want to make sure that an email reaches all the intended recipients, irrespective of any options enabled in Sending settings, check the option Ignore advanced email filters on the email sending screen.
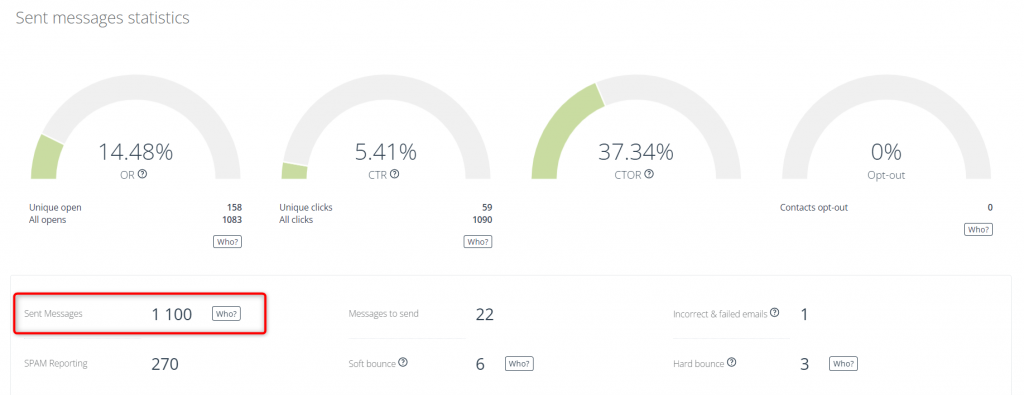
NOTE: When you click the Count button on the email sending screen, the result displayed does not take into account any filters that may apply to any of the selected Contacts. This is why the number shown at this stage may differ from the number you can later see in Email Analytics.
A. Limit the number of emails sent to a single Contact
SALESmanago allows you to set limits on the number of emails that can be sent from your account to a single Contact within one day, week, and month. You can specify separate limits for: the total number of emails sent to a single Contact; emails sent as part of mass mailings; and emails sent as part of active Automation Processes (Automation Rules and Workflows). If the number of emails intended for a single Contact exceeds these limits, any excess emails will be blocked and never sent to that Contact.
NOTE: In these settings, a day is understood as one full day (24 hours), a week—as a period from Monday to Sunday, and a month—as a calendar month (a period from the first to the last day of each calendar month).
If you want to apply a simple filter—for the number of emails that a Contact can receive per day—just select a value from dropdown [1]:
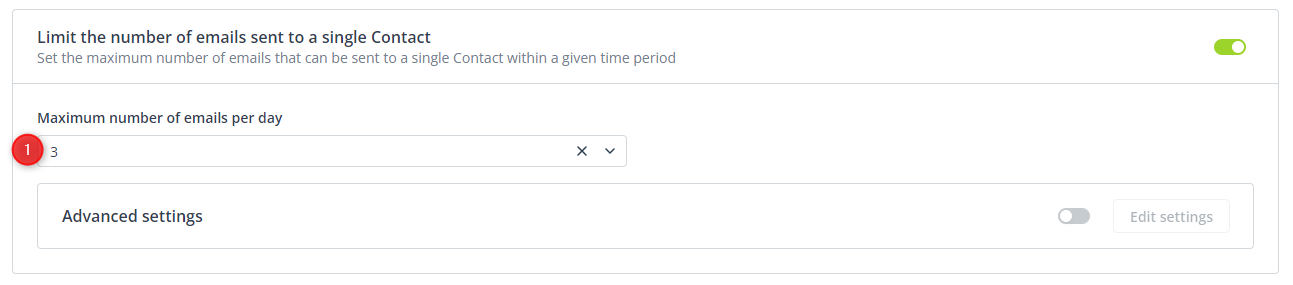
If you want to define specific limits for different periods, enable Advanced settings [2].
NOTE: If you enable Advanced settings, option [1] will be disabled.
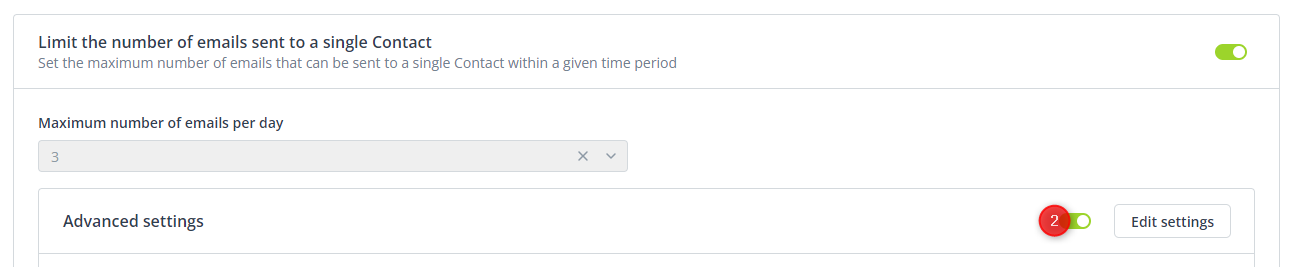
You will see the current limits for mass emails, emails from Automation Processes, and all emails. Click Edit Settings [3] to define new limits.
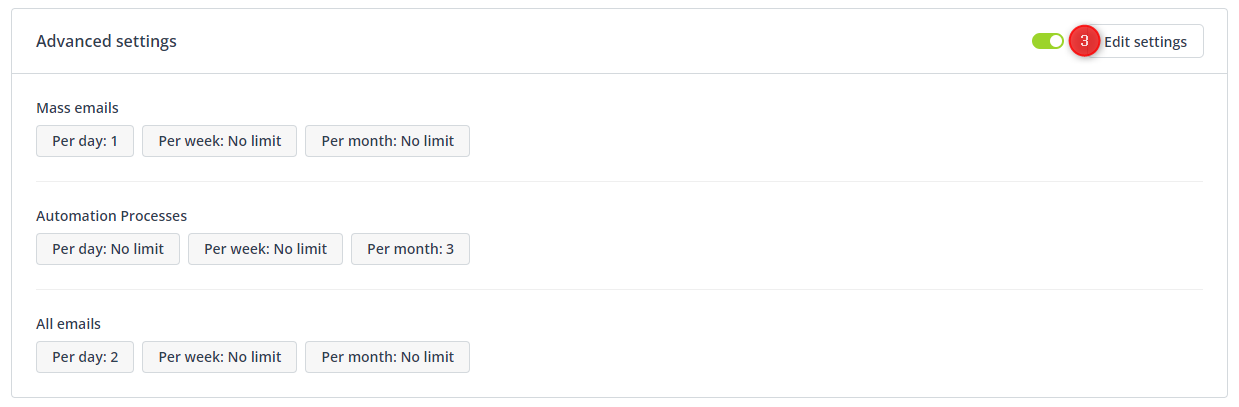
You will see the following options:
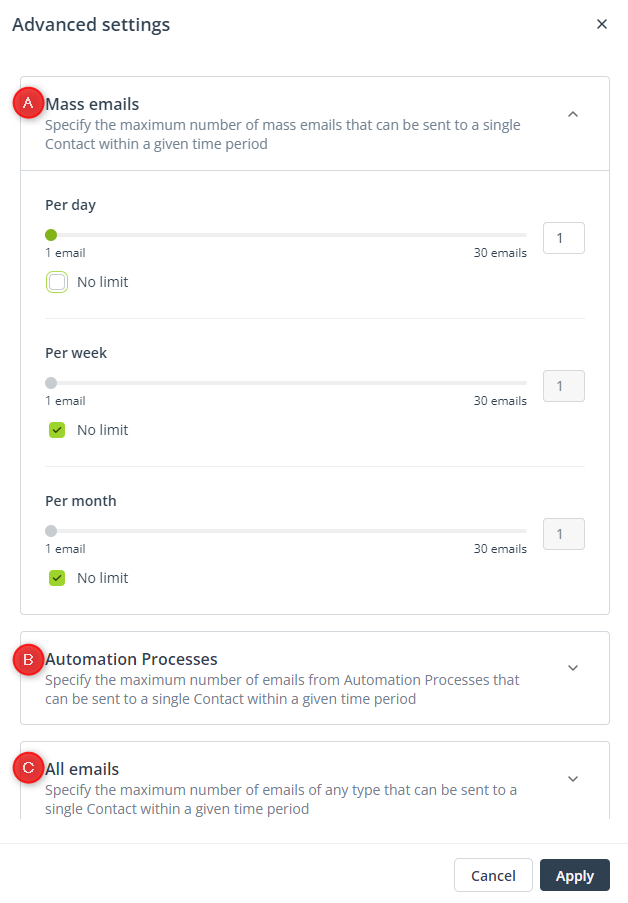
[A] Mass emails—Specify how many emails sent as part of mass mailings a Contact can receive within one day/week/month. You can specify one, two, or all three values.
If you don’t want to set a limit for any of these periods, leave the No limit box checked.
[B] Emails from Automation Process—Specify how many emails sent from Automation Processes (Automation Rules or Workflows) a Contact can receive within one day/week/month. You can specify one, two, or all three values.
If you don’t want to set a limit for any of these periods, leave the No limit box checked.
Read more about the settings for emails sent as part of Automation Rules and Workflows >>
[C] All emails—Specify how many emails (of any type) a Contact can receive within one day/week/month. You can specify one, two, or all three values.
If you don’t want to set a limit for any of these periods, leave the No limit box checked.
EXAMPLE: If you apply the following settings:
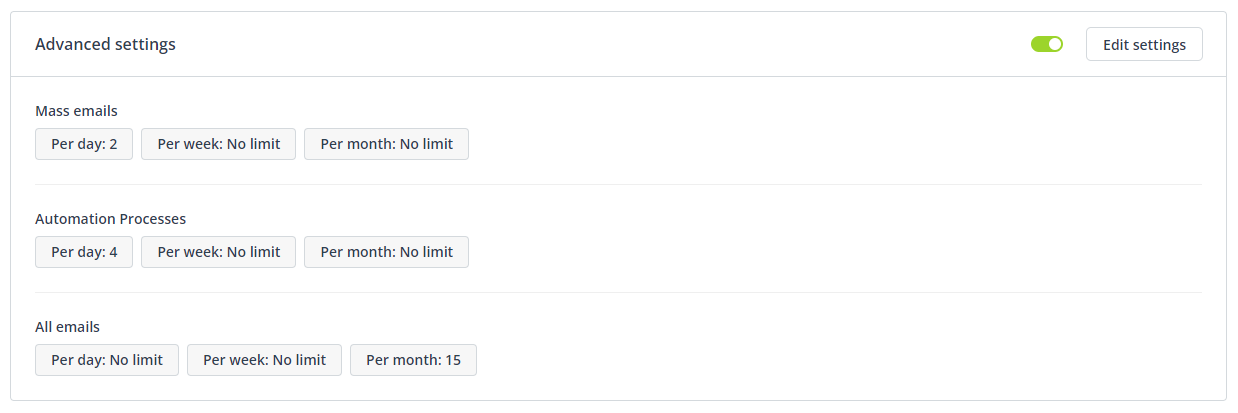
no Contact will receive more than two mass emails per day; no Contact will receive more than 4 emails from Automation Processes per day; and no Contact will receive more than 15 emails of any type per month.
B. Send emails on specified days of the week only
Enable this option if you want to allow emails to be sent from your account only on certain days of the week.
By default, all days are selected and emails can be sent on any day of the week. Check or uncheck the options according to your needs.
EXAMPLE: If you select all options except for Saturday and Sunday:

No email will be sent from your account to any Contact on any Saturday or Sunday.
Any emails due to be sent on a day not allowed in this section (especially automatically scheduled messages, e.g., a birthday email or an email sent as part of a Workflow process) will be sent on the next possible day (in the example above, this will be Monday).
C. Do not send emails on bank holidays
Enable this option if you want to specify dates on which no email should be sent from your account.
You can enter your custom bank holidays in field [3]. Alternatively, you can automatically generate a list of bank holidays for a selected country. Choose a country from the list [1] and click Generate [2]. The automatically generated list will appear in field [3]. Make sure to verify all the dates before applying them to your settings.
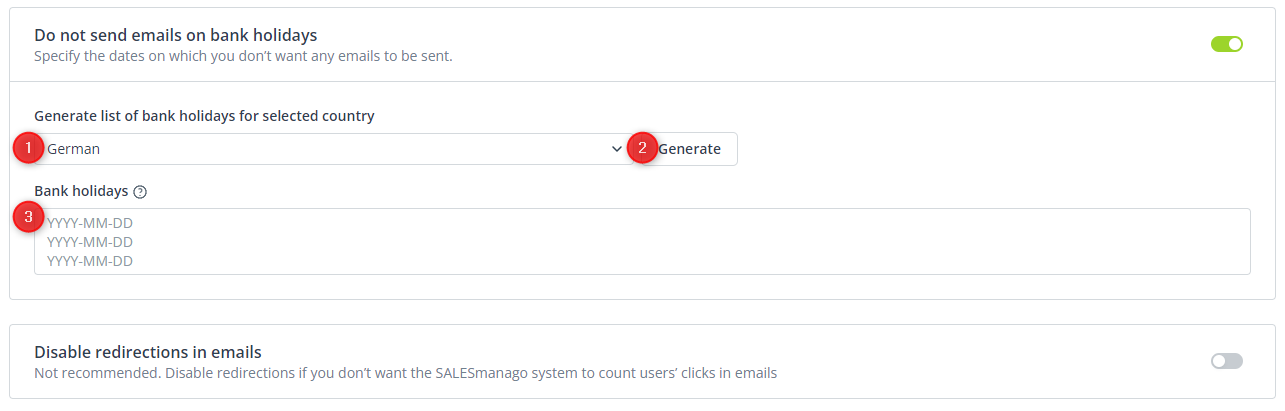
IMPORTANT: If you disable email sending on bank holidays, emails that would normally be sent on these days will be sent on the following day.
D. Enable redirects through SALESmanago in emails
This option is enabled by default.

When redirects are enabled, links included in emails lead to the target page through the SALESmanago counting system. The redirection process takes approx. 30 milliseconds and is unperceivable by the user. Thanks to this function, the SALESmanago system is able to count Contacts’ clicks on links in emails.
If you want to disable redirects in emails and prevent SALESmanago from counting Contacts’ clicks in emails, set the toggle button [1] to disabled state.
WARNING: If you disable this option:
- links included in emails will lead directly to the destination website. As a result, the SALESmanago system will be unable to track clicks and provide you with CTR statistics and click maps.
- Automation Processes will only be triggered for links leading to your monitored website.
Read more about click analytics >>