Useful links
The Customer Preference Center allows you to use various built-in tools from the Customer Data Platform to collect information about consumers. You can freely combine these tools to understand your audience even better. You can send your Contacts an access link to your Customer Preference Center by email, SMS, or WhatsApp.
Contents
- Basic information
- Link to the Preference Center
- Sending invitations to the Preference Center in messages
- Collecting information using integrated tools
1. Basic information
You can implement your Customer Preference Center on your website. It will be displayed as a separate landing page – a special space containing your perfectly designed data collection tool. You can freely customize its appearance. A Preference Center can include one or more of the following tabs:
- Product preferences,
- Personal data (Basic information and Personal preferences),
- Consents,
- Channels & Frequency.
2. Link to the Preference Center
To invite Contacts to your Preference Center, you need a link leading to the Center. To obtain it, first you need to save and activate your Preference Center.
When the Center is ready, click Save [1] and then Save and activate [2].
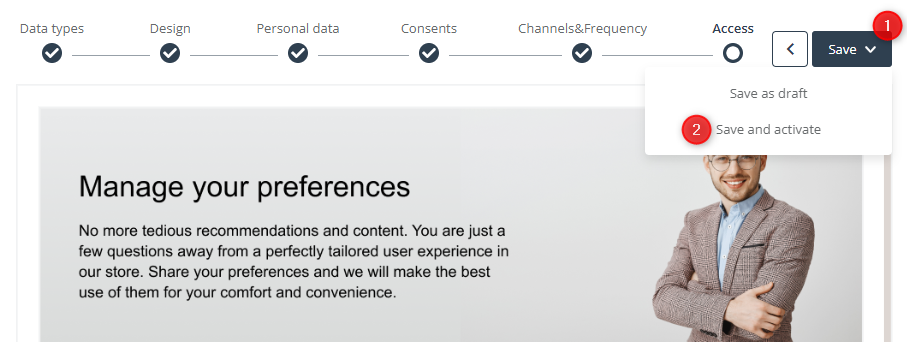
A pop-up with instructions for the next steps will be displayed.
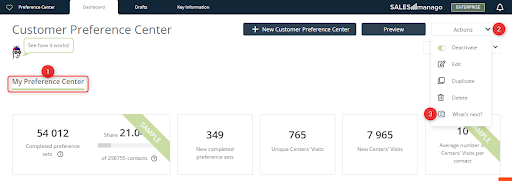
If your Preference Center is already active, you can access the same pop-up if you go to the Preference Center’s Dashboard [1], open the Actions menu [2] and select What’s next? [3].
The pop-up with the instructions has three tabs.
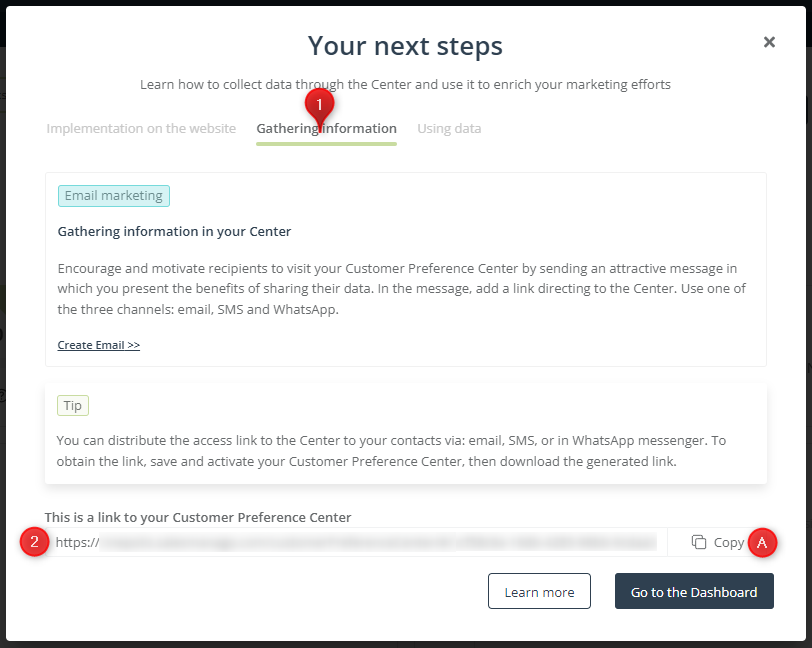
Under the Gathering information [1] tab, you will find a unique access link to your Customer Preference Center [2]. You can copy it conveniently by clicking on button [A].
IMPORTANT: The generated link has the following format:
https://www.salesmanago.com/CustomerPreferenceCenter/#/CenterID/$ContactId$/
where CentrumID is the automatically generated ID of your particular Preference Center, and the attribute: $contactid$ is automatically replaced with the addressee’s Contact ID in each message. Thanks to this, each person has a unique view of the Center, where only their own data is stored.
Read more about personalization by means of attributes (such as $email$) >>
3. Sending invitations to the Preference Center in messages
Communication channels offer many possibilities for targeting and message personalization. You can use different channels to collect information about your customers in the Preference Center. You can send a link to your Center through:
- email,
- SMS, and
- WhatsApp.
All you need to do is paste the unique link for your saved and activated Center into the contents of the message. The SALESmanago system customizes the link so that each Contact will receive a unique link that provides access to their own view of the Center. The message should also include some encouragement to share the information.
4. Collecting information using integrated tools
Beautifully designed pop-ups can help you collect data for your Preference Center from each section of your website. You can adjust their display to many factors, such as the contents of the page, the level of user engagement in the relationship with your brand, or individual interests. A person who has indicated their preferences through a pop-up does not need to access the Preference Center to confirm the information. However, they can update their information through the Center at any time.
Use the Custom Modal Designer to prepare a pop-up integrated with the Customer Preference Center, which will help you collect personal information.
Learn how to create a pop-up using the Custom Modal Designer >>
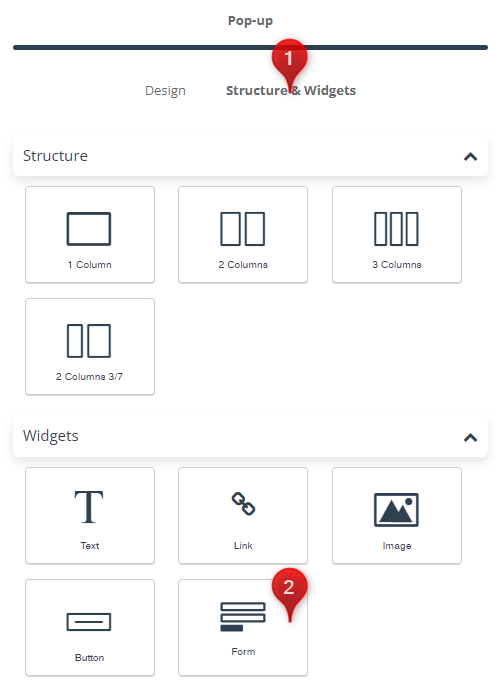
To add a field for collecting zero-party data, go to Structure & Widgets [1] and select the widget: Form [2]. Drag and drop it on the design panel.
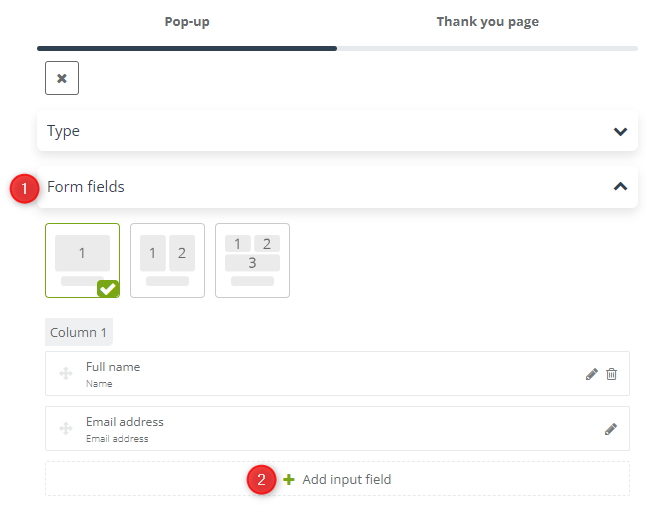
Edit the widget. In the section: Form fields [1], click on Add input field [2].
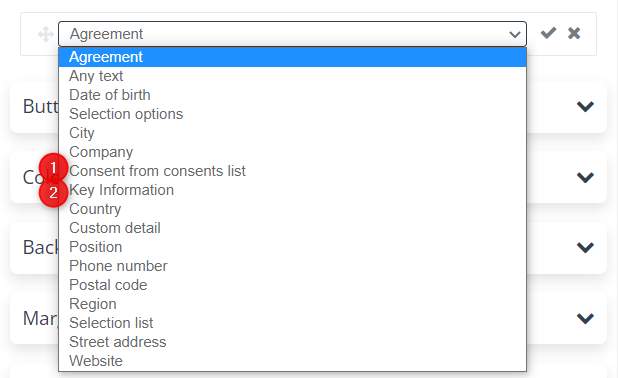
Use the drop-down list to select a field of interest. The fields that can be used to gather the data displayed in the Customer Preference Center are: Consent from consent list [1] and [2] Key Information.
A. Consent from consent list
After clicking on + Add input field, select Consent from consent list and then confirm your choice by clicking on the tick icon.

Then click on the pencil icon to define the settings.

IMPORTANT: For a Consent to be stored in a Preference Center, it needs to be defined in that Center’s settings.
Read more about Customer Preference Center settings >>
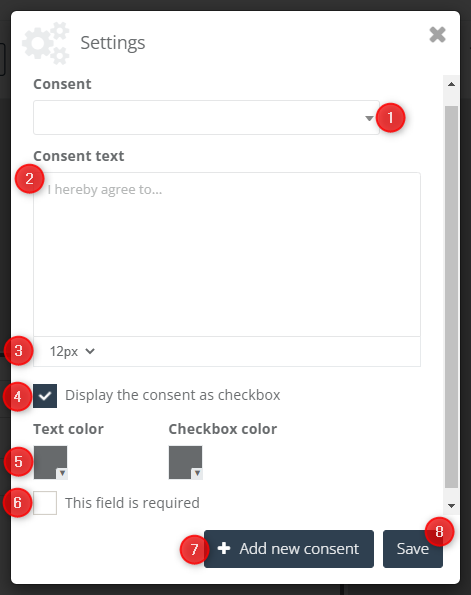
[1] Consent – use the drop-down list to select the consent that you want to include in the form. If you have no consent on the list or if you need a new consent form, click on Add new consent [7].
[2] Consent text – after selecting a consent form from the list, its contents will be displayed in this field. However, it cannot be edited from here.
Read more about managing consents in SALESmanago >>
[3] Font size – select the font size that you want to apply in the form.
[4] Display the consent as checkbox – if you select this option, the consent will be displayed on the form as a checkbox.
[5] Text color and checkbox color – use the color selector to change the color of these two elements.
[6] This field is required – check this option if you want the user’s consent to be required for the form to be sent.
[7] Add new consent – select this option if you want to create a new consent.
IMPORTANT: If you are adding a new consent form that you want to be stored in a Customer Preference Center, you need to define it in that Center’s settings. Otherwise the consent will not be stored in that Preference Center.
After clicking on + Add new consent, a new window will appear:
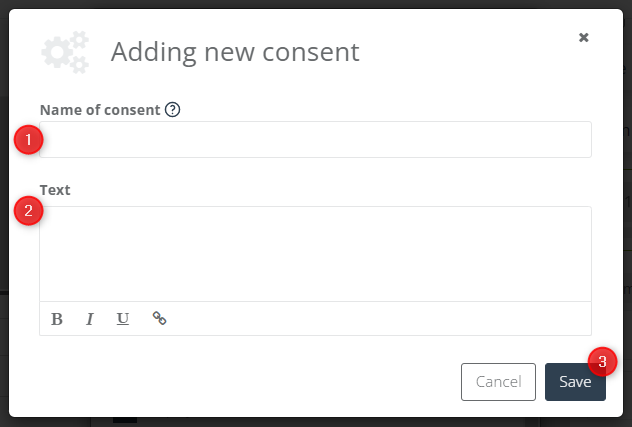
[1] Name of consent – enter the name for your new consent. The name can consist of a maximum of 30 characters, including letters, digits, and underscores. Do not use diacritical marks (such as ä, ü, ß), special characters (such as #, %, !, ?), or spaces. The consent name cannot be changed in the future.
[2] Text – enter the contents of the consent (you can edit it later, if necessary). You can choose your preferred font format and add links as required.
Click Save [3] to save the consent in the system and go back to the previous setting screen.
Read more about managing consents in SALESmanago >>
After defining all the settings, click Save.
Below you can see an example of a form with two consents [1]. You can add any number of consents to a single form.

B. Key Information
After clicking + Add input field, select Key Information from the list. Confirm your choice by clicking on the tick icon.

Then click on the pencil icon to define the settings.

IMPORTANT: For a Key Information item to be stored in a Preference Center, it needs to be defined in that Center’s settings.
Read more about the Customer Preference Center settings >>
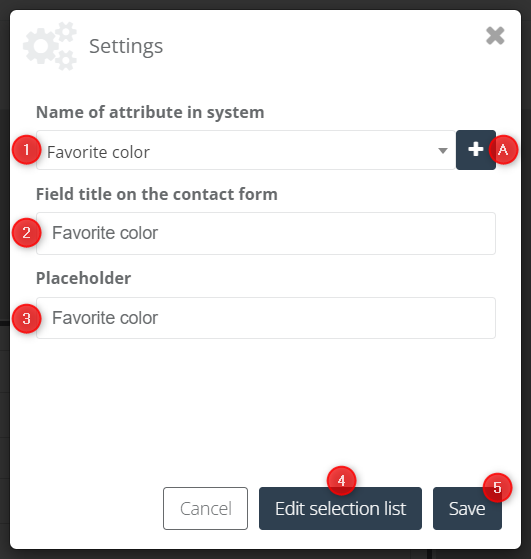
[1] Name of attribute in the system – use the drop-down list to select the attribute you want to include in the form. If you have no attribute on the list or if you need a new one, click on the plus icon [A] to add it.
When you click on [A], a new window will appear. From there, you can create a new Key Information item.
Read more about Key Information items and how to create them >>
IMPORTANT: If you are adding a new Key Information item that you want to be stored in the Customer Preference Center, you need to define it in that Center’s settings. Otherwise the Key Information will not be stored in that Preference Center.
[2] Field title on the contact form – enter the name of the field to be displayed on the form.
[3] Placeholder – enter a placeholder or a prompt for users to demonstrate what type of information should be provided in this field.
[4] Edit selection list – in the case of attributes with a list of answer options, you can edit the answer list.
If you click on Edit selection list, a new window will open where you can edit replies or add new ones as required.
Read more about Key Information items and how to edit them >>
IMPORTANT:If a Key Information item is currently in use, you cannot edit the existing answers. You can only add new ones.
[5] Save – after defining all settings, click here to save them.
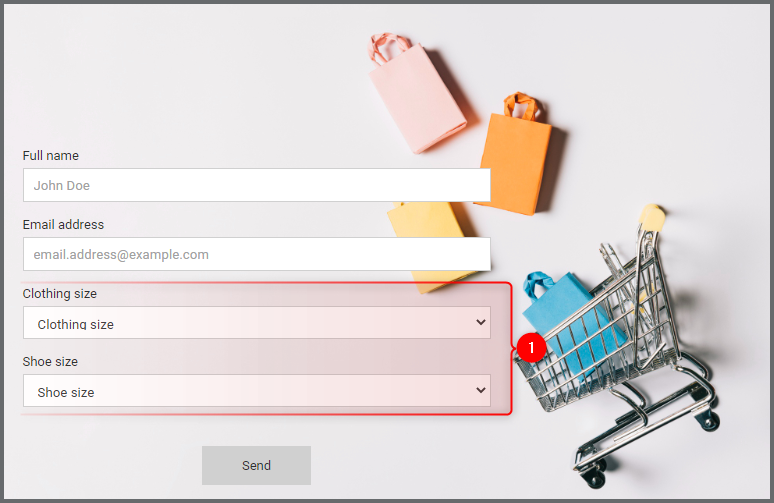
Here is an example of a form with two Key Information items [1].