Analyze the effects of the campaigns based on information that is included in advanced sent text messages analytics, which you can find on the new Mobile Marketing Dashboard. Check, which channels are the most effective for your eCommerce: SMS, WhatsApp, or maybe Viber?
In order to open the Mobile Marketing Dashboard, you need to go to
Channels → Mobile Marketing → Dashboard
Contents
- Analyzing SMS/WhatsApp/Viber messages
- Sent message list
1. Analyzing SMS/WhatsApp/Viber messages
The completely new Mobile Marketing Dashboard is a place from which you can view the analytics of each sent and scheduled message, and check if the customer communication channels you use meet your assumptions.

Check how to create a new birthday message >>
Check how to send a new message >>

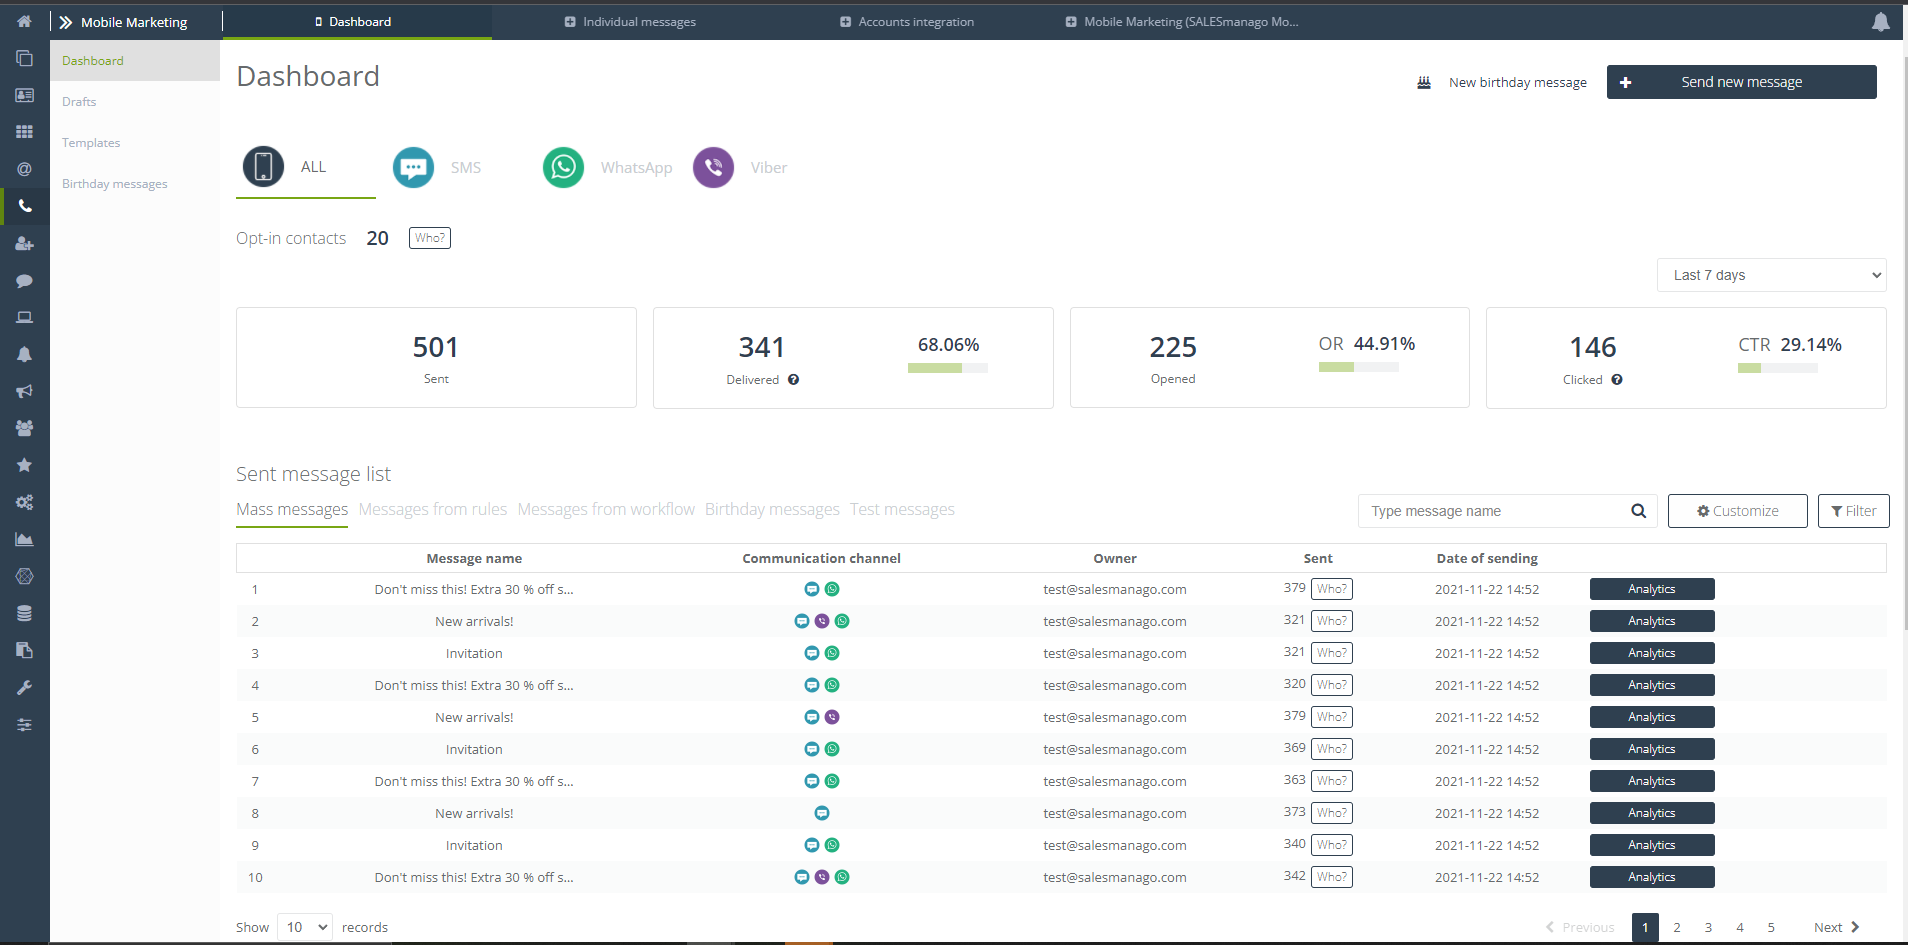
By opening the panel, at the top of the page, you can see analytics of sent messages. Remember that the data may vary depending on the communication channels that have been integrated with your account.
[1] Select for which source you want to display statistics:
- All – select to display comprehensive statistics of messages sent via available, integrated communicators, and synchronized SMS gateways.
- SMS – statistics for messages sent via SMS gateways. Remember, that some of the gateways don’t have callbacks – the option of transferring information about the result of sending. That means, send messages via gateways without callbacks won’t be included in stats.
- WhatsApp – statistics for messages sent by integrated the previously integrated WhatsApp communicator. See how to integrate WhatsApp with SALESmanago system >>
- Viber – statistics for messages sent by the previously integrated Viber communicator. See how to integrate Viber with SALESmanago system >>
[2] Opt-in contacts – the number of contacts who have agreed to receive messages via SMS/WhatsApp/Viber. Click the “Who?” button to view the full list of contacts with opt-in status for the source selected in [1], e.g. see which contacts are assigned for receiving messages via WhatsApp.
[3] Time period – display the statistics for the selected time period – available options: last 7 days, last 30 days, current month, previous month, current quarter, previous quarter, current year, previous year, last 12 months.
[4] Sent – the number of messages sent by the source selected in [1]. If you choose the option “All”, statistics for all channels will be displayed.
[5] Delivered – the number of opened messages, that were sent by the source chosen in [1]. If you choose the option “All” the statistics for all channels will be displayed.
[6] Opened – the number of opened messages, that were sent by the source chosen in [1]. If you choose the option “All” the statistics for all channels will be displayed.
[7] Clicked – the number of clicked messages, that were sent by the source chosen in [1]. If you choose the option “All” the statistics for all channels will be displayed.
2. Sent message list
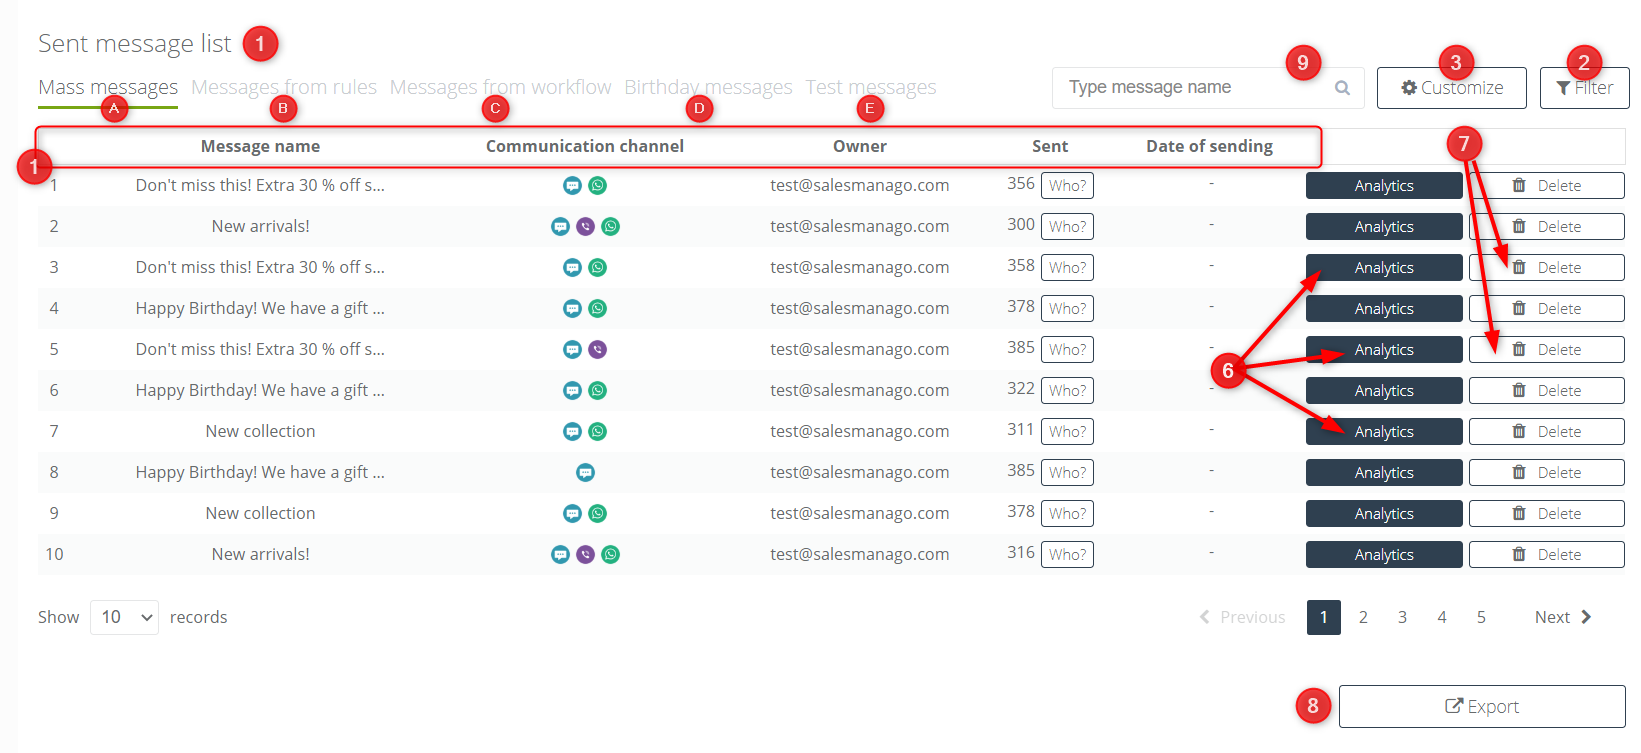
The Dashboard allows you to view the list of sent and scheduled messages with details, and go to the analytics of the given message.
[1] Sent message list – sent and scheduled text messages are divided into 5 basic groups:
[A] Mass messages – messages scheduled and sent to the contact group.
[B] Messages from rules – messages scheduled and sent from automatic rules.
[C] Messages from workflow – messages scheduled and sent from the Workflow module.
[D] Birthday messages – messages scheduled and sent from Mobile Marketing module via the “Send birthday message” function
[E] Test messages – messages sent as a test.
IMPORTANT: Messages sent as a test are not counted in overall messages statistics.
[2] Filter – allows you to filter messages and shorten their list to those that:
- were sent from this account
- have been scheduled – concerns all messages except test ones
[3] Customize – the button allows to make any arrangement of table elements, deleting, and adding them.
Click the “+” button, that appears in the bar with the names of each tile to edit them.
[4] Search – enter a full name of the message or a fragment to shorten the list of sent messages to the searched one.
[5] Column elements – the most important information about the message is displayed under the tiles. The available options are:
- Communication channel – displayed as one of the following icons:

- Message name
- Owner
- Sent
- Date of sending
- Delivered
- Opened
- Undelivered
IMPORTANT: Each information about the number of sent, delivered, and opened messages there is a button “Who?”. Click it to open the list of contacts with opt-in status that are signed up in the system to receive text messages.
[6] Analytics – open the analytics of a selected message. You can find more about it here >>
[7] Delete – delete the chosen message, remember that deleted messages will not be included in the statistics.
[8] Export – export messages:
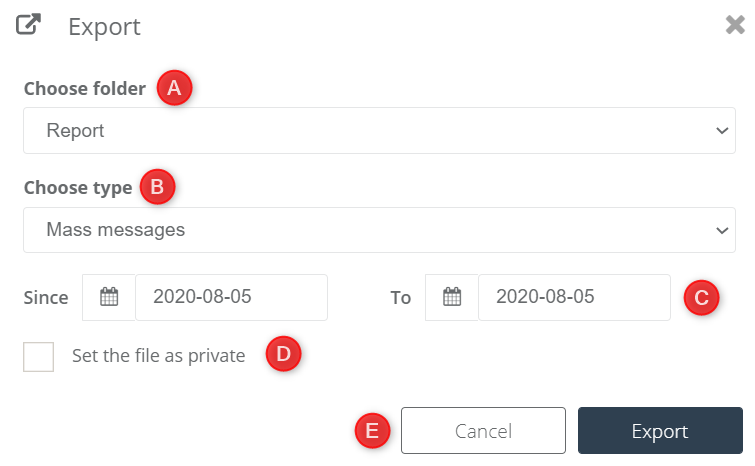
[A] Choose folder – choose the folder to which you want to do the export.
[B] Choose type – choose the type of messages that you want to do the export (mass messages, messages from automatic rules, messages from workflow, birthday messages, test messages), or choose option all.
[C] Time period – select the time period from which you want to do the export of messages.
[D] Set the file as private – if you set the file as a private only you as an owner will have access to the exported messages.
[E] Export – confirm all information and run an export in the background.