Command Center is the new UI standard for managing KPI-oriented, multi-channel, multi-functional, and multi-tasking marketing processes. It gives a centralized view of all marketing processes and solutions aimed at achieving specific goals. Most importantly – with the easy-to-use Drag & Drop tool, you can easily plan your campaigns by creating their schemes from all the elements available in the system, and plan the dispatch of emails, text messages, and Web Push notifications!
To plan and build campaigns in the Marketing Management Cockpit in SALESmanago, select the tab
Automations → Command Center → Campaigns + Calendar
Contents
- Campaign view
- Calendar view
1. Campaign view
Command Center is the future of all your marketing activities, if you haven’t heard about this functionality yet:
See what the functionality works in the Campaign view >>
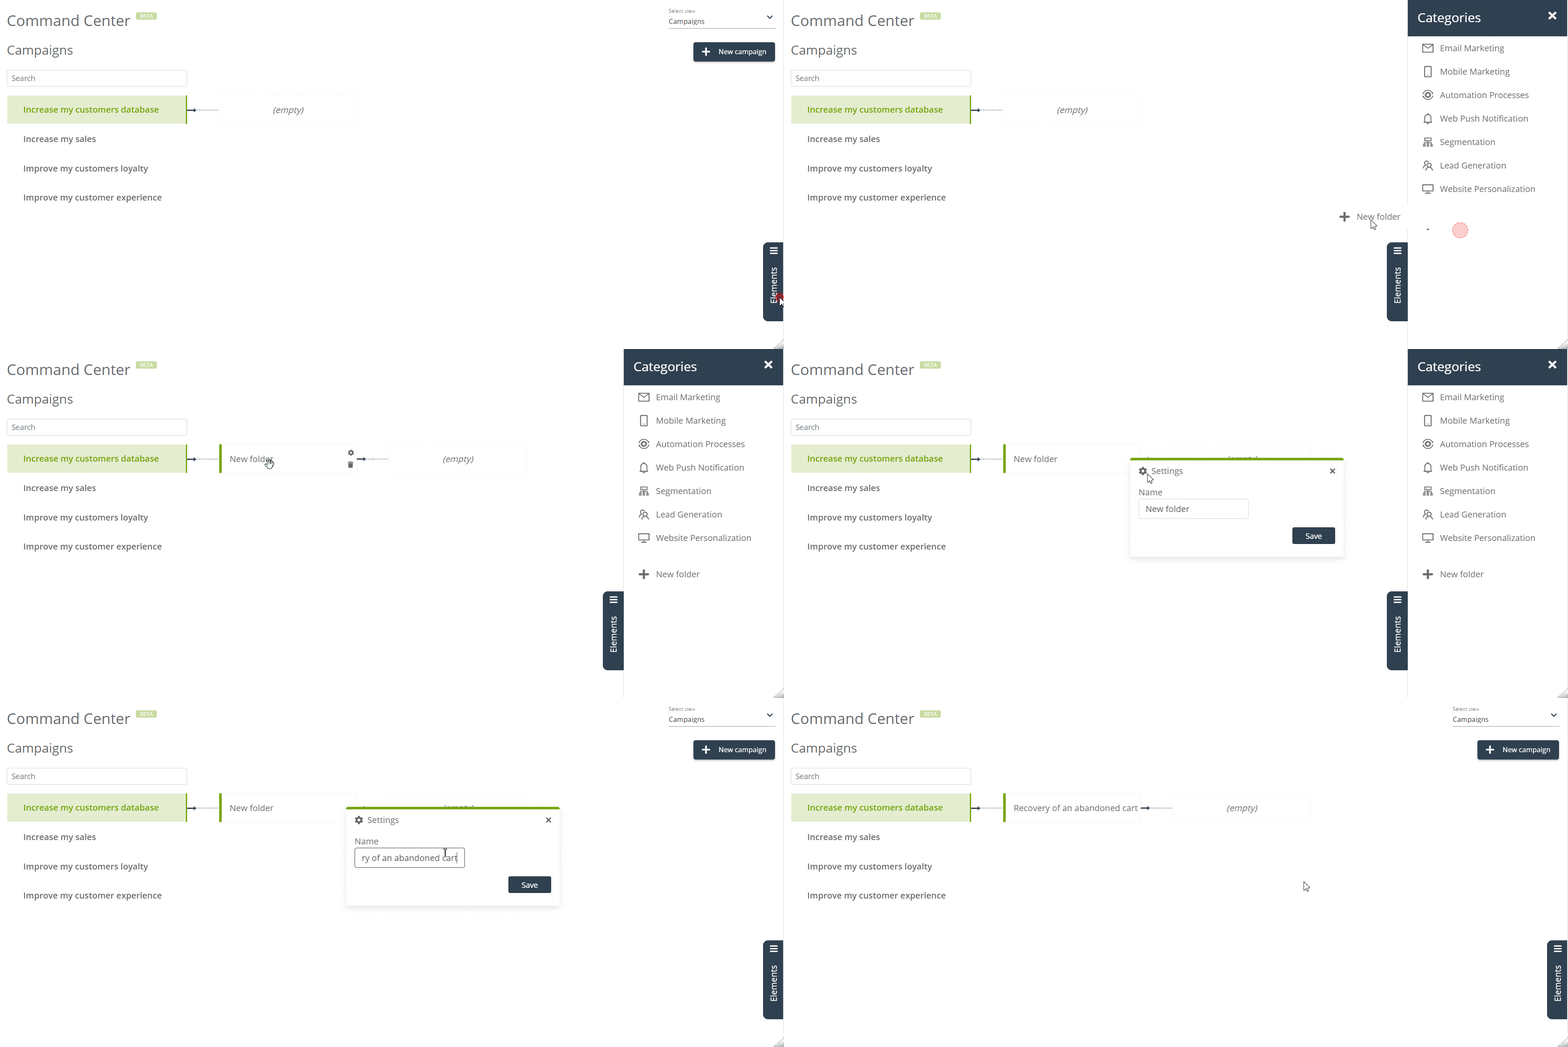
In the Campaigns view, you can plan a scheme of marketing processes, dividing them into specific campaigns, which may consist of folders and all the elements that you have created in the system so far. To create your first scheme, click the [1] + New campaign button, then in the [2] Settings window, enter its name and set the colors you want it to stand out in the scheme. Finally, click the [3] Save button, and your first folder, where you have collected all your marketing plans, will appear in the place marked with an arrow:
For the purposes of explaining the function’s activity, let’s assume that we are building a campaign aimed at increasing sales in our company. Create a folder that will define, for example, what the purpose of the selected campaign elements is or group them – in our case, we create a folder called “Recovery of an abandoned cart”.
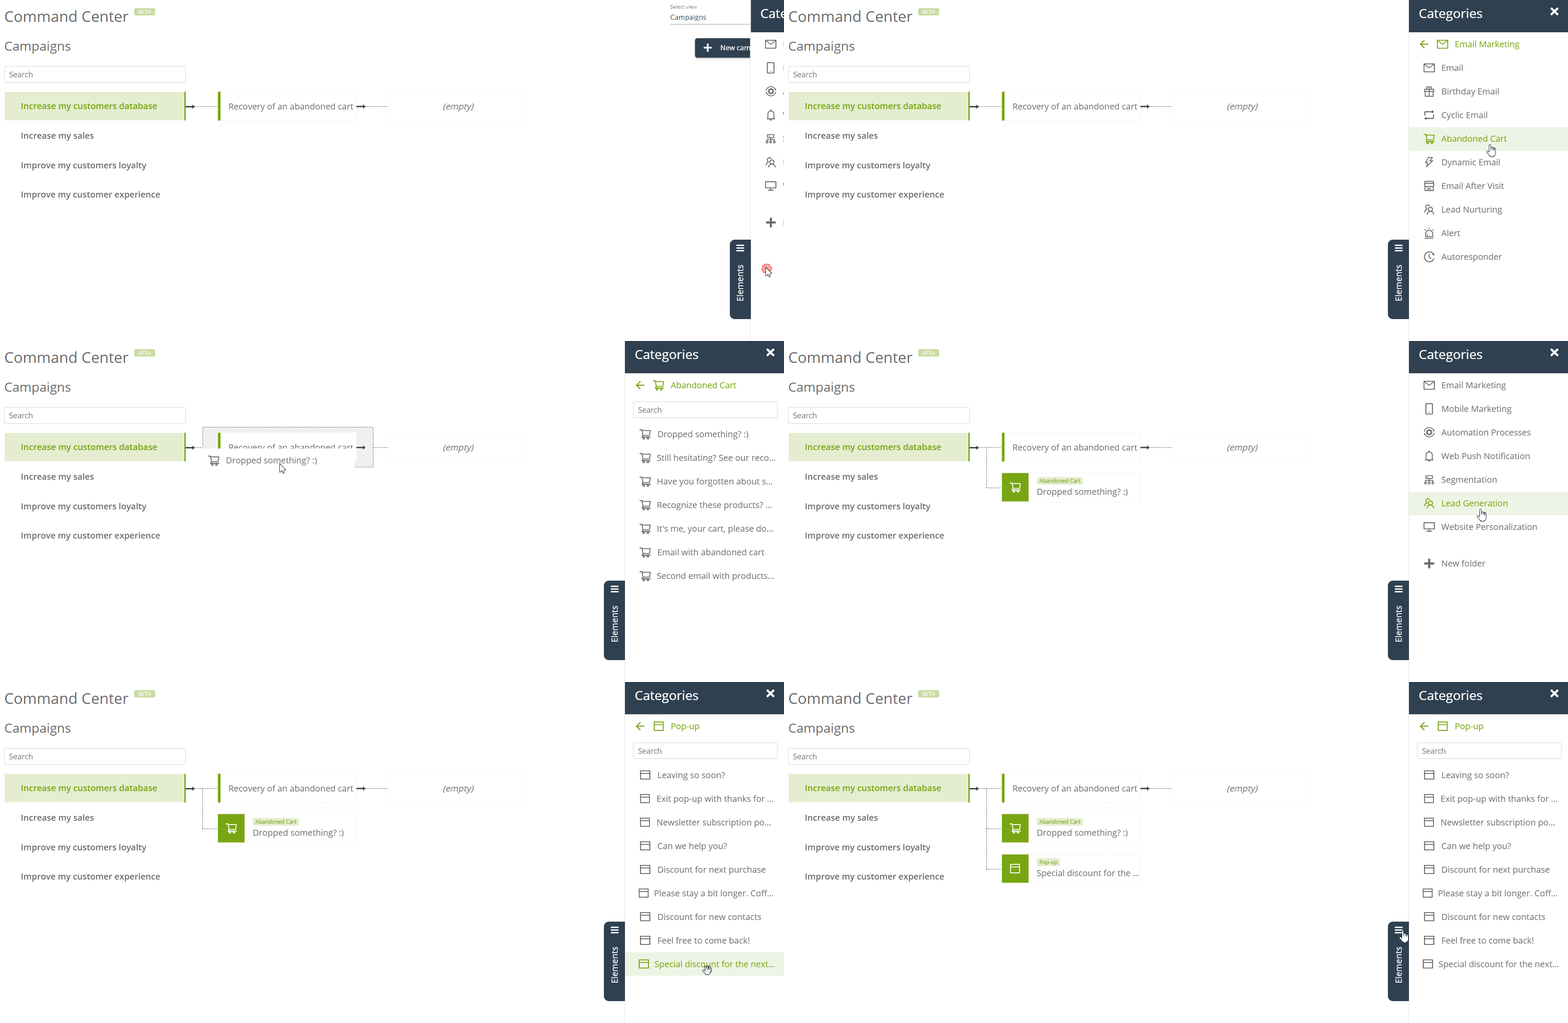
In the side menu, select one of the available tabs with elements created by you in the system:
[1] Email Marketing – a list of all email messages created by you in the system. The list consists of sub-tabs where you will find the required items:
- Email – messages created by a button on the Email Marketing Dashboard
See how to create an email in Drag & Drop Email Designer >>
- Birthday Email – messages created by the Email list tab -> Birthday messages.
See how to set the dispatch of birthday emails >>
- Periodic Email – messages created by the Email list tab -> Periodic messages.
See how to set up periodic email sending >>
- Abandoned Cart – messages created by the Automation Processes panel -> Wizards -> Abandoned Cart.
See how to create an abandoned cart email in the wizard >>
- Dynamic Email – messages created by the Automation Processes panel -> Wizards -> Dynamic Emails.
See how to create a dynamic email in the wizard >>
- Lead Nurturing – campaigns created by the Automation Processes panel -> Wizards -> Lead Nurturing.
See how to create a Lead Nurturing campaign in the wizard >>
- Alert – alerts created by the Automation Processes panel -> Wizards -> Sales Alert
See how to create an Alert in the wizard >>
- Autoresponder – messages created by the Automation Processes panel -> Wizards -> Autoresponder.
See how to create an Autoresponder in the wizard >>
[2] Mobile Marketing – that is a list of all text messages created by you in the system, in the Mobile Marketing 2.0 tab. The list consists of sub-tabs where you will find the required items:
- Text message – messages created by the Mobile Marketing 2.0 Dashboard, via the Send Text Message button
See how to send a text message in Mobile Marketing 2.0 >>
- Birthday message – messages created by Mobile Marketing 2.0 Dashboard, via the Send birthday message button
See how to send a birthday message in Mobile Marketing 2.0 >>
[3] Automation Processes – a list of all rules and processes created by you in the system. The list consists of sub-tabs where you will find the required items:
- Automation Rules – processes created in the Automation Rules panel.
See how Automation Rules work in SALESmanago >>
- Workflow – processes created in the Workflow panel.
See how Workflow works in SALESmanago >>
- Website Automation – rules created in the Website Automation panel
See how Website Automation works in SALESmanago >>
[4] Web Push Notification – a list of all elements created by you in the Web Push panel. The list consists of sub-tabs where you will find the required items:
- Agreement form – forms created by the button + Add new agreement form
See how to create an agreement form in the form of Web Push in SALESmanago >>
- Web Push notification – Web Pushes created by the button + Add new Web Push notification
See how Web Pushes work in SALESmanago >>
[5] Segmentation – that is a list of all elements created by you in the Segmentation panel. The list consists of sub-tabs where you will find the required items:
- Dynamic segment – dynamic segments created by you in the Dynamic Segments tab.
See how to create Dynamic Segments in SALESmanago >>
- Matrices – matrices created by you in the Segmentation Matrices tab
See how to create segmentation matrices in SALESmanago >>
- RFM – matrices created by you in the RFM Marketing Automation tab
See how the RFM Marketing Automation panel works in SALESmanago >>
[6] Lead Generation – a list of all elements created by you in the Lead Generation panel. The list consists of sub-tabs where you will find the required items:
- Pop-up – all pop-ups created by you in the Pop-up / Exit Pop-up tab
See how to create a Pop-up in one of the available wizards >>
- Form – all forms created by you in the Form tab, and HTML Form
See how to create a form in one of the available wizards >>
- Landing Page – all landing pages created by you in the Landing Page tab, and Landing Page HTML
See how to create a Landing page in one of the available wizards >>
- Sidebar – All the pop-ups created by you in the Sidebar tab
See how to create a Sidebar in one in the wizard >>
[7] Website Personalization – a list of all elements created by you in the Website Personalization panel. The list consists of sub-tabs where you will find the required items:
- Recommendation frame – all frames you created in the Recommendation frames panel
See how to create Recommendation Frames in the wizard >>
- Social Proof widget – all widgets you created in the Social Proof widget panel.
See how to create a Social Proof widget in the wizard >>
- Personalized Banner – all the banners you create in the Personalized Banners panel.
See how to create a Personalized banner in the wizard >>
- Dynamic Content Test – all tests created by you in the Dynamic Content Test panel
See how the A/B/X tests work in the SALESmanago system >>
[8] + New folder – drag the tile onto the campaign diagram to create a new folder, after clicking the settings button you can rename it:

Elements are added in the same way as new folders by dragging the tile of interest to the selected place:

In this case, we built this campaign folder only from two elements – a pop-up with a discount for the next purchases, and sending an email after an abandoned cart, but you in your Marketing Management Cockpit can create a campaign consisting of up to 50 elements.
IMPORTANT: You can only insert an item into the selected folder once. Folders can be linked to folders, but items cannot be linked to folders.
The photo shows a demonstrative example of an advanced campaign built in the Command Center:
2. Calendar view
The second available feature in the Command Center SALESmanago is Calendar.
See what the functionality works in the Calendar view >>
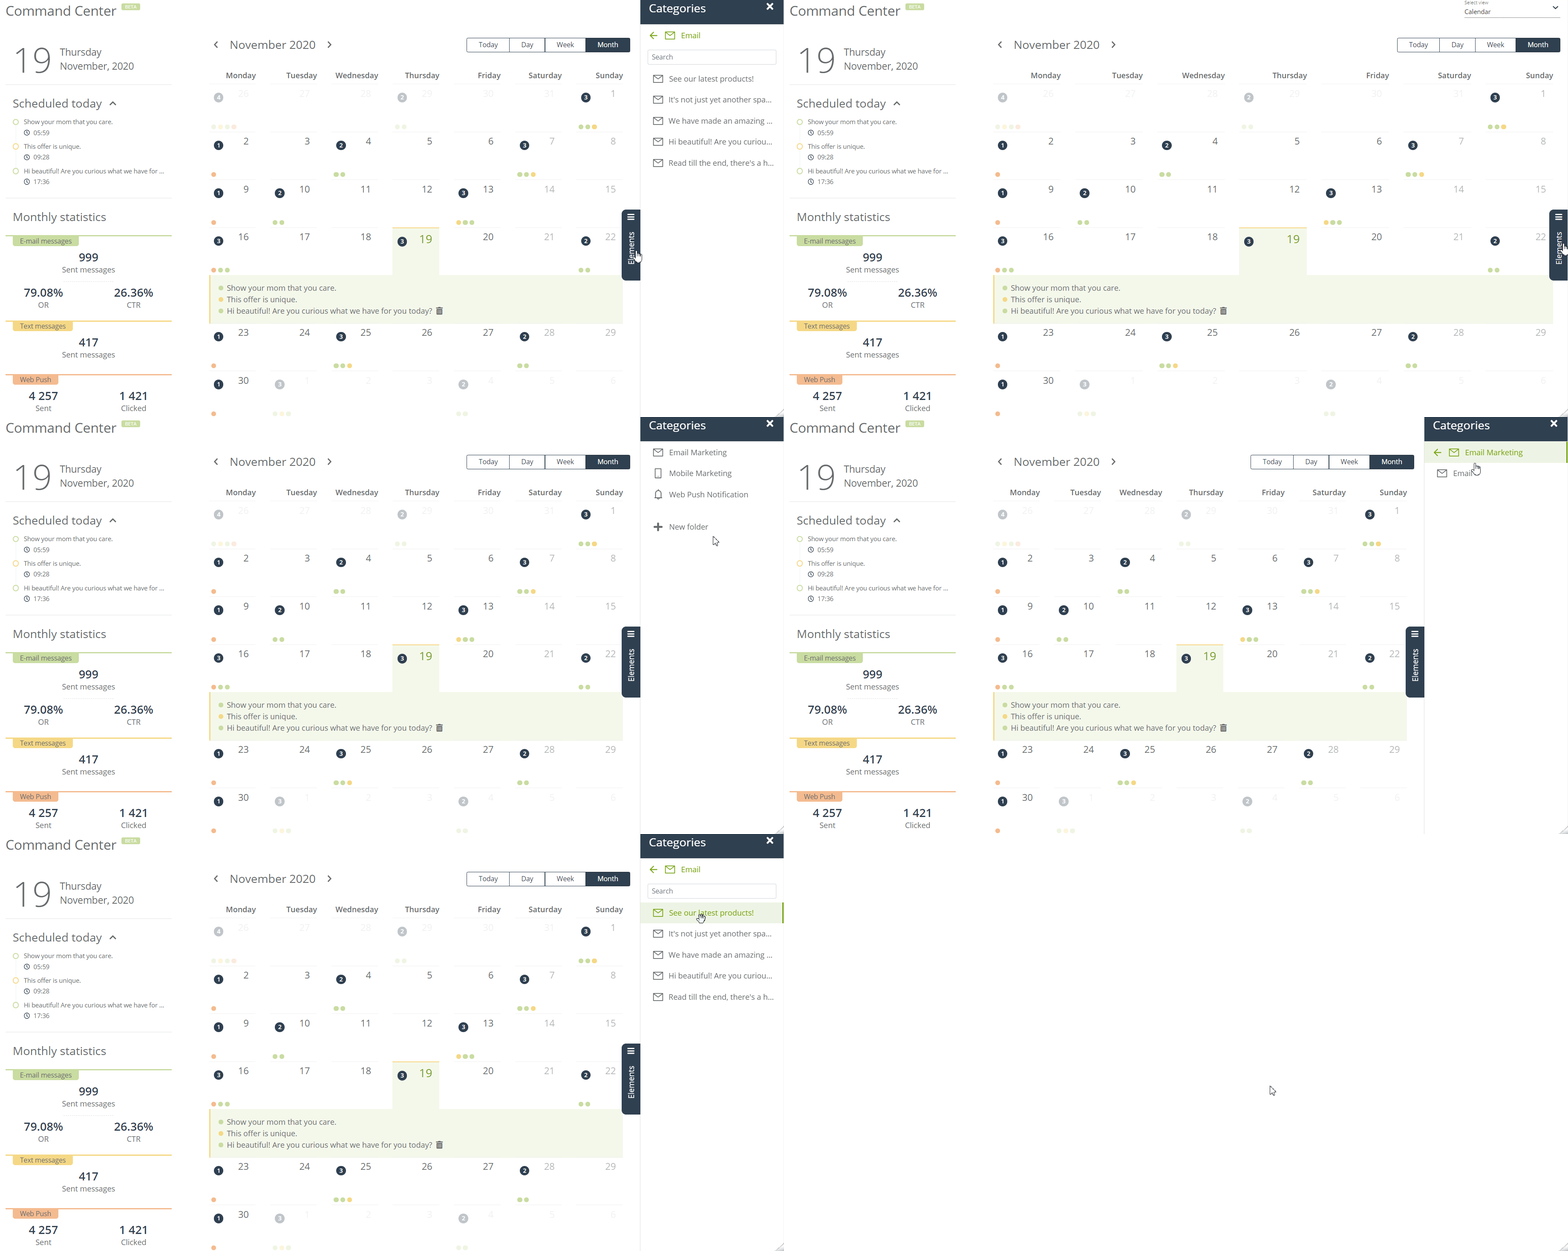
In the Calendar view, you can schedule the actual mass mailings of emails, text messages, and Web Push notifications, thanks to the Drag & Drop tool. You also have a preview of all mass, planned marketing activities.
To schedule the sending of a given item, expand Elements, and then move the selected one to the scheduled date or time of sending (depending on the view):

A new browser tab will open with a message or Web Push panel, where you can more precisely define its time and specifications.


