Useful links
This article describes how to configure and send an email A/B test.
A/B tests are one of the best tools for optimizing email communication and improving the effectiveness of email campaigns. SALESmanago offers a comprehensive range of A/B testing options, allowing you to compare the results achieved by emails that differ in terms of subjects, content, and sending times.
You can run an A/B test using any two standard emails from the Email List, including emails used as birthday and periodic emails. There is no option to run A/B tests for subscription confirmation emails.
To create an A/B test, go to
Channels → Email Marketing → Email List → A/B tests → + New A/B test
Contents
1. Getting started
A/B testing allows you to experimentally check the performance of two email versions on a small percentage of intended recipients. The most common practice is to prepare two email variants that differ in small details, such as the subject or the main banner, and determine which variant is more successful in terms of the open rate (OR) or the click-through rate (CTR). The winning email can be sent to the remaining intended recipients (i.e. Contacts who have received neither of the tested emails).
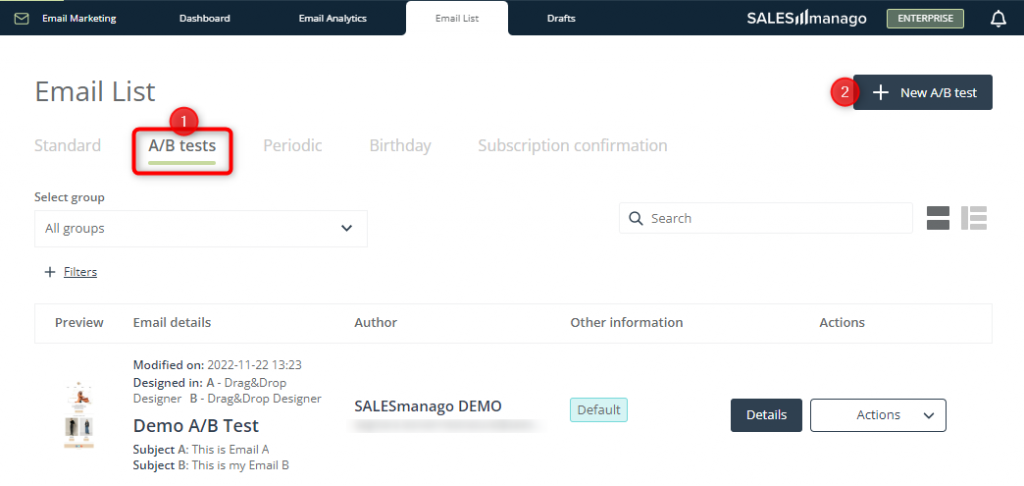
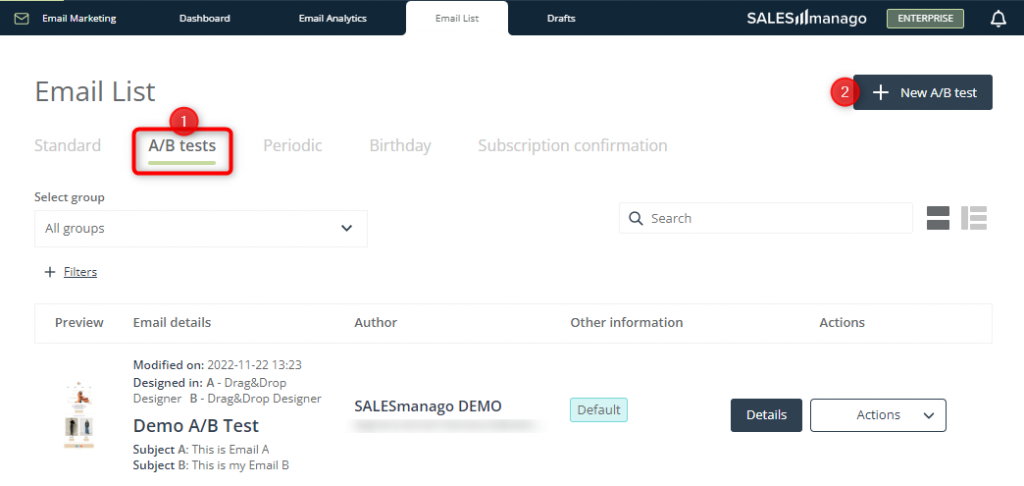
To create a new email A/B test, go to Menu → Channels → Email Marketing → Email List and select the A/B tests tab [1]. Then click + New A/B test [2] in the top right-hand corner of the screen.
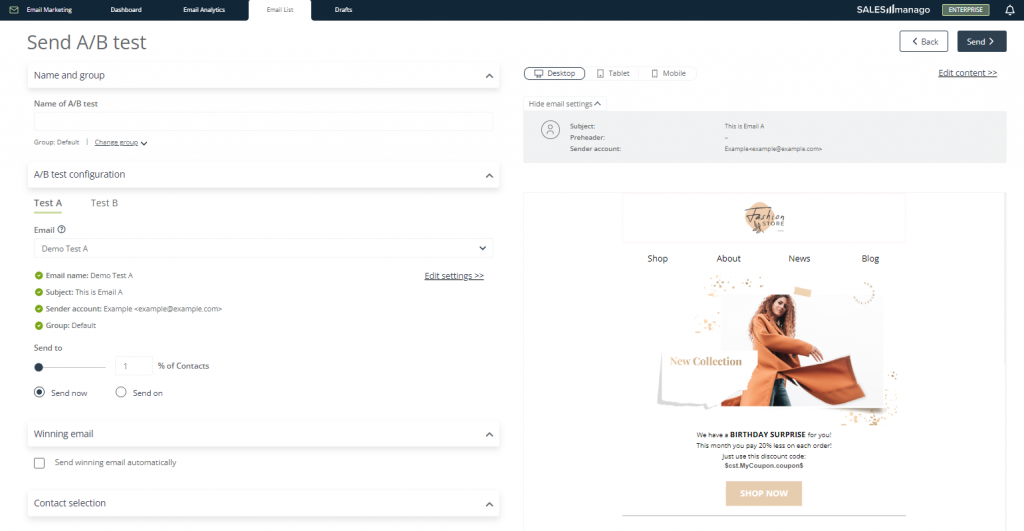
You will be redirected to a new screen, where you can configure the A/B test and send (or schedule the sending of) the two email variants.
The left-hand side of the screen is where you can define all the necessary settings (described in section 2 below).
On the right, there is a preview of the email variants selected for the test, along with some basic information.
2. Configuring an email A/B test
[1] Name of A/B test—enter a name that will allow you to identify the new A/B test in the system.
[2] Group—this is where you can assign your new test to a group of A/B tests. Select the group from the list or click on + New group to create a new one.
Categorizing A/B tests into groups makes it easier to find them on the list (Menu → Channels → Email Marketing → Email List → A/B tests) when you want to check their results or any other details.
Read more about the Email List >>
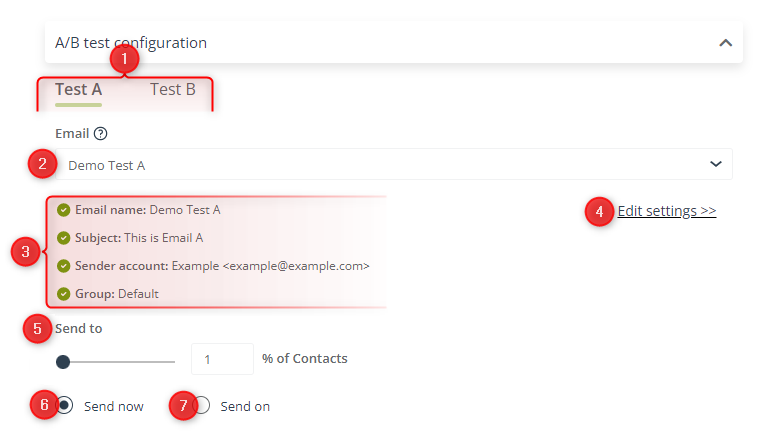
[1] Email variant settings—switch between the two tabs to select the email variants you want to test, review their basic settings, define the percentage of the intended recipients to whom each variant will be sent, and specify the sending time for each variant.
IMPORTANT: When you switch between the two tabs, the preview and the email settings shown on the right side of the screen change accordingly. For instance, if you select the Test B tab, on the right, you will see a preview of the email variant selected as Test B, as well as information about its basic settings (subject, preheader, and sender account).
TIP: A good practice is to check what the email variants look like on different devices, which option is also available on the right side of the screen, above the email settings.
[2] Email—select the email variant you want to use as Test A or Test B (depending on the tab selected in point [1] above).
[3] Email details—here you can review the basic information about the selected email variant: name, subject, sender account, and group.
[4] Edit settings—this button will redirect you to the wizard in which the email selected in point [2] was created. There you can change the email’s settings, such as the subject or sender account, or modify the email’s content.
IMPORTANT: If you click on Edit settings [4], all changes introduced on this screen will be lost.
[5] Send to—specify the percentage of the intended recipients (you can define the group of recipients in the Contact selection section below) to whom this email variant will be sent. You can use the slider or enter a number in the input field.
EXAMPLE: You have defined a group of recipients in the Contact selection section (see the explanations below). The group includes 1000 recipients (which you can check by clicking on the Count button—see below). You have defined the following percentage of recipients for Test A:
You have defined the following percentage of recipients for Test B:
The email variant selected as Test A will be sent to 150 Contacts selected randomly from among the 1000 intended recipients (15%), whereas the email variant selected as Test B will be sent to 120 Contacts selected randomly from among the 1000 intended recipients (12%).
If you decide to send the winning email, it will be sent to 730 recipients.
NOTE: The sum of the percentages specified for Tests A and B must not exceed 100%. However, it is not a good practice to send the test to 100% of the intended recipients. A better option is to send each variant to 10–20% of the intended recipients and then send the winning variant to the remaining audience.
[6] Send now—choose this option if you want this email variant to be sent to the specified percentage of the intended recipients immediately after you click Send in the top right-hand corner of the screen.
[7] Send on—choose this option if you want to schedule this email variant to be sent to the specified percentage of the intended recipients at a later time. Then specify the date and hour.
Read more about sending email messages >>
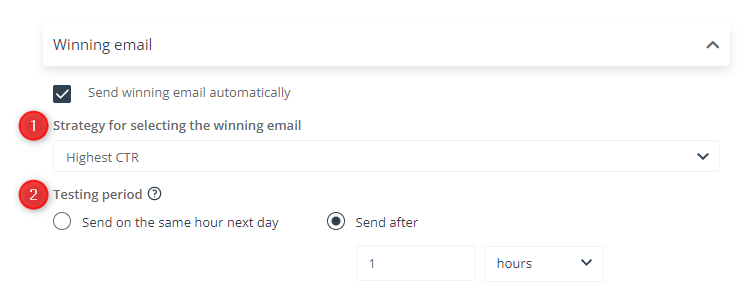
[1] Send winning email automatically—check this box if you want the SALESmanago system to automatically send the email that performs better to the remaining part of the recipients (i.e., the Contacts who were not included on the list of recipients for Test A or Test B).
When you check this box, new fields will appear where you can define detailed settings for sending the winning email.
[1] Strategy for selecting the winning email—use the drop-down list to select the criterion based on which the system will determine the winning variant to be sent automatically. The available options are as follows:
- Highest CTR—selecting this option is particularly recommended if you want to test the effectiveness of the email content.
- Highest OR—selecting this option is particularly recommended if you want to test the effectiveness of the email subject, or determine the best sending time.
[2] Testing period—define how long the test is to take, i.e., after what time the performance of the two variants will be compared (and the winner selected).
- Send on the same hour next day—check this option if you want the system to send the winning variant automatically one day after the test emails are sent, and at the same time of day. Selecting this option means that the test will last for 24 hours from the time both variants are sent.
- Send after—check this option if you want to define any test duration other than 24 hours. Then enter a number and select the time unit, choosing between hours, days, weeks, months, and years.
EXAMPLE: If you enter the following settings:
The winning variant will be selected based on the OR and sent to the remaining recipients 4 days after the test emails are sent.
TIP: To obtain reliable results, wait for at least several hours before sending the winning email.
[1] Select Contacts—define the group of recipients for the A/B test. Select a pre-defined segment or use selectors to include or exclude groups of Contacts. If necessary, apply appropriate filters.
NOTE: The group of intended recipients is the same for Test A and Test B.
Learn more about selecting Contacts (recipients) when sending emails >>
Read about predefined Contact segments and selectors >>
Read about Contact filtering >>
[2] Count—click this button to see how many Contacts will be included on the list of recipients based on the selections you made above.
3. Sending an email A/B test
When you have configured your A/B test (see section 2 above), finish by clicking the Send button [1] in the top right-hand corner of the screen:

The two email variants will be sent according to the settings defined in the A/B test configuration section on the left side of the screen (see section 2 above).
If you have selected the option Send now for either variant, that email will be sent immediately after you click the Send button.
If you have selected the option Send on for either variant, that email will be scheduled and sent on the specified date and time (to see scheduled emails, go to Menu → Channels → Email Marketing → Email Analytics → Scheduled tab).
4. Email A/B test analytics
To see which of the variants tested has performed better (achieved the better OR and/or CTR), go to Menu → Channels → Email Marketing → Email List and select the A/B tests tab [1]:
A new window will open where you can check the test’s settings and performance statistics.
Read more about email A/B test analytics >>
Read more about Email Analytics >>
Submit your review | |
