Useful links
With the SALESmanago Email Design Studio, you can design an email with just a few clicks and enjoy messages that look perfect on any device, regardless of the recipient’s device, inbox, or email client configuration.
Learn how to create an email in the Email Design Studio >>
The Email Design Studio offers a broad choice of widgets—elements that allow you to include different types of content in your email and thus easily convey the message you want to deliver to your audience. After dragging a widget into the email body, click on the widget to display and configure its settings.
This article describes the common settings that can be configured for most widgets available in the Email Design Studio: positioning, display settings, text editing options, and links.
See the list of articles dedicated to individual Email Design Studio widgets >>
Contents
1. Positioning

For most widgets, you can specify the horizontal positioning of the content and the padding.
Padding is the distance between the widget’s frame and the content included in the widget:

You can set the same paddings for each side or adjust each padding individually.
EXAMPLE: The three different alignment options (left, center, and right):
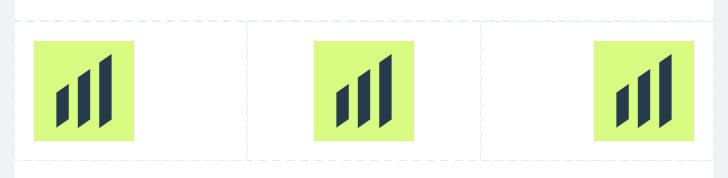
EXAMPLE: Same alignment (center), different padding sizes (0, 25, and 50 px on top and bottom):

2. Display settings
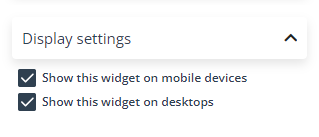
For each widget, you can choose whether you want to display it on desktop computers and/or mobile devices (tablets and smartphones).
IMPORTANT: The only exceptions are the opt-out and opt-in links—they cannot be hidden on any device and must always be clearly visible.
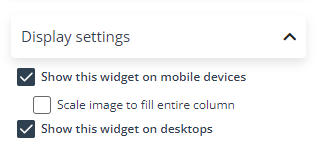
Note that in the case of the image widget, if you check the box Show this widget on mobile devices, you can also select the option to scale the widget to fill the entire column.
The option to hide a widget is particularly useful in the case of elements that can be displayed incorrectly on small tablet and smartphone screens. This option is also useful if you want to adapt the layout of a responsive section so that it looks neat on mobile devices.
By default, both options available in this section are selected. Adjust the settings as required.
EXAMPLE: If you enter the following settings:

The widget will be displayed on desktop computers, but not on smartphones or tablets.
3. Text toolbar
A number of widgets can contain text. You can edit any text by clicking on it.
To format text, use the toolbar that appears at the top of the screen:

The menu can be different depending on the widget, however, it always contains the most important text editing options that you know from any other text editor.
IMPORTANT:
- Many email clients have very limited support for custom fonts. If you decide to use a font not listed as a web-safe font, it may be replaced with another font.
Visit the W3Schools portal for a list of web safe fonts >>
- Some email clients can ignore the line height property, which can cause issues with the formatting and layout of your emails. This can be especially problematic if you rely on line height to create a visual hierarchy or to make your emails easier to read. To avoid this issue, you can use other techniques, such as padding, to control the spacing between lines of text.
TIP: Before sending an email to the intended recipients, test it in multiple email clients to ensure that it is displayed correctly. Pay special attention to Outlook, as this email client is particularly troublesome.
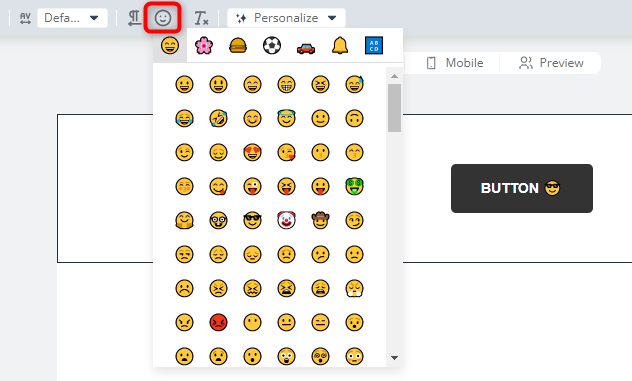
TIP: You can add an emoticon to any text by selecting the appropriate option on the top toolbar.
Note that these are system emoticons, which means they will look different depending on the system used by individual devices. Compare the following:
| Apple | LG | Microsoft | Samsung | |
 |  |  |  |  |
4. Links
You can add a link to the following widgets:
- Text—mark a piece of text and select the Insert link option on the top toolbar.
- Image.
- Button.
- HTML Content—you can include links in your custom code.
- Icon.
- Table—you can add a link to both text and images included in a table.
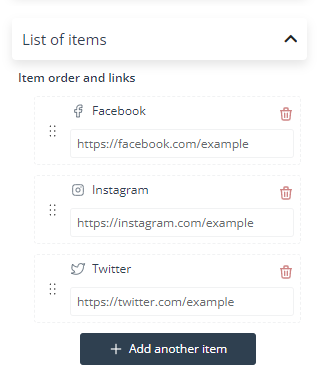
- Social Media—make sure to provide the correct URLs in the List of items section of the widget settings.
- Stars—you can add one link for the entire widget (i.e., for all stars).
- Yes/No—you can add separate links for the two buttons: Yes and No.
- Rating/NPS—you can add one link for the entire widget or a separate link for each individual button.
- See also IMPORTANT at the end of this article.
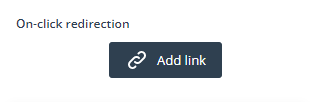
The option to add a link is available in the individual widget settings:
When you click Add link, a new window opens. First, choose the type of link that you want to insert:
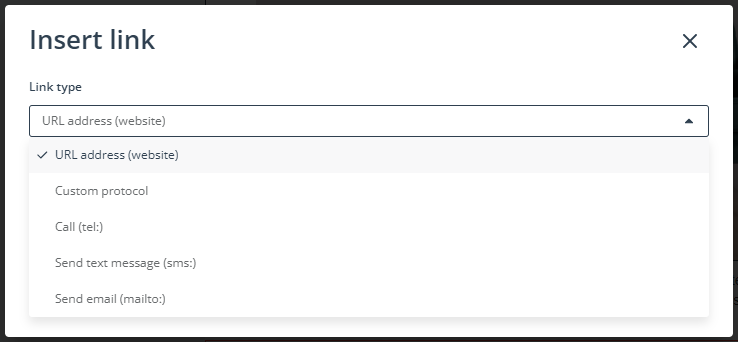
You have the following options:
- URL address (website)—a standard link to a website. The URL address must include the protocol (https://).
- Custom protocol—an advanced option that allows you to use any protocol in your link. Many email clients don’t support this option.
- Call (tel:)—when an email recipient clicks on this link, depending on the device they are using, they will see a dialing screen or a prompt to select an application from which they can make a call.
- Send text message (sms:)—this option works only in some email clients. When an email recipient clicks on this link, they will see the text message sending screen.
- Send email (mailto:)—after clicking on this link, depending on the Contact’s individual system configuration, they should see a new window with their default email client.
After selecting the link type, enter an appropriate value in the input field below, for example:
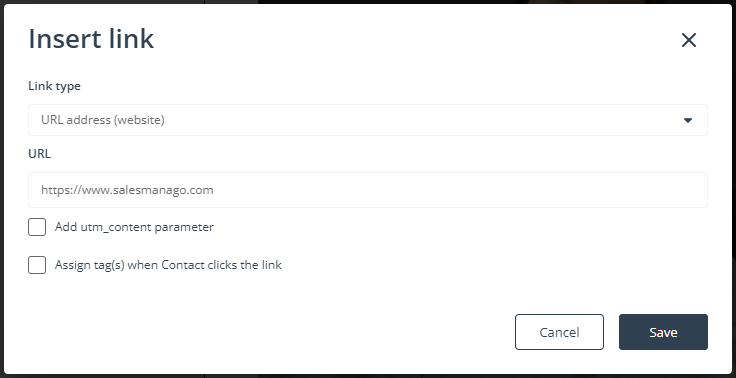
For some link types, you can also define additional settings:
- For URL address (website), you have the options to:
- Add a utm_content parameter.
- Define the tags that will be assigned to a Contact when they click on this link in your email. Remember that tags must consist of at least 3 characters. Use the “_” character (and not the space) as the separator, e.g., TOYS_DOG.
- For Send text message (sms:), in addition to providing the phone number, you can specify the default text message content.
- For Send email (mailto:), in addition to providing the email address, you can specify the default email subject.
When your link is fully configured, click Save to add the link to the widget.
To add a link to a piece of text, mark it with your cursor and select the option to insert a link on the top toolbar:

Select the link type from the list:

Enter an appropriate value in the input field below and specify any additional settings. Then, click Save to add the link to the widget.
IMPORTANT:
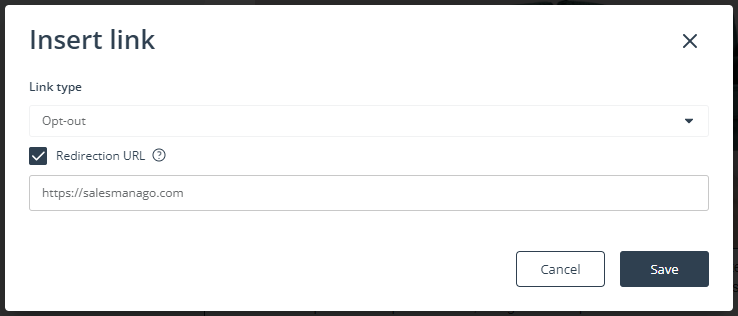
- The following widgets contain an appropriate link by default: Opt-in Link, Opt-out Link, and See in Browser. You don’t need to configure the links included in these widgets in any way, however, you can edit and format the placeholder text. You can also add a redirection URL to your opt-in/opt-out link.
- If you want to add a video thumbnail to your email, you need to include a link to YouTube in the Video widget.
- If you want to use the Social Media widget, make sure to complete the List of items section with the correct URLs for your social media profiles.
A good idea is to add the ready widget to the Library so that you won’t need to configure it anew in the future.
- There is no option to add a link to the Personalized Banner widget. Any links to a Personalized Banner must be configured in the Personalized Banner wizard.
For more details, read the article dedicated to the Personalized Banner widget >>
- You don’t need to add links to buttons included in Product Blocks (either Static or Dynamic). Links to the appropriate products are automatically loaded from your Product Catalog / XML Product Feed.