Useful links
This article describes how to create an email in SALESmanago’s Email Design Studio.
Email Marketing remains one of the more effective marketing channels, generating very high returns on investment (ROI). Thanks to SALESmanago’s Email Design Studio, you don’t need to waste time coding email templates from scratch. You can design an email with just a few clicks and enjoy beautiful messages that look perfect on any device.
Use easy-to-configure widgets designed to boost conversion, increase customer engagement, and even collect Zero-Party Data. Deepen personalization with conditional content and enhance your emails with dynamic 1:1 product recommendations based on Zero- and First-Party Data, to increase your customer lifetime value (CLV) and ROI from the Email Marketing channel.
To access the Email Design Studio, go to
Channels → Email Marketing → + New email → Email Design Studio
Contents
- Getting started
- Design Studio overview
- Create an email
- Basic actions: move, save, duplicate, delete
- Saving options
1. Getting started
SALESmanago offers a number of ways to create the perfect email that will catch people’s attention and encourage them to visit your website and make a purchase.
To create an email in the SALESmanago Email Design Studio, go to Menu → Channels → Email Marketing. In the top right-hand corner of the screen, you will see the option to create a new email:
After clicking this button, you will be redirected to a screen where you can select one of the SALESmanago email wizards. Select the Email Design Studio:
Now, you can start working on your new email.
2. Design Studio overview
A. Design zone
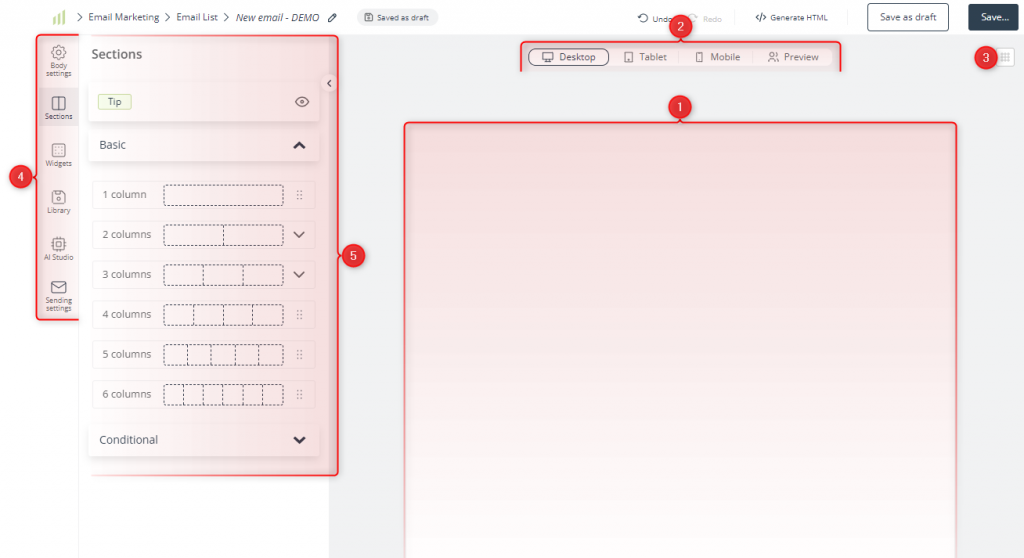
[1] Email body—this is where your new email will be emerging. Drag elements from the side menu, drop them into this area and arrange to create your perfect design.
[2] Devices and preview—switch between these device icons at any time to see how the appearance of your email will change depending on the device on which it is displayed, or to see a full preview.
[3] Grid—click this button to hide or show the grid—fine gray lines that mark divisions between columns and widgets, helping you to insert and arrange the elements of your email.
[4] Menu—switch between these buttons to access the different options and settings available in the Email Design Studio. The menu sections are described in detail further in this article.
[5] Options and settings—this is where you can define the email’s settings and find the elements that you can drag and drop into the panel on the right side of the screen. The view of this panel depends on your selections made in point [4] above.
B. Top bar
[1] Path—here, you can see where your new email will be located in the system after you save it.
[2] Autosave—here, you can see the information that your work has been saved as a draft.
The autosave function saves your work on an ongoing basis. For example, if you close the tab by accident or your browser crashes, the last autosaved version will be available for recovery. When you edit the email again, you will be asked if you want to restore the autosaved version.
[3] Undo/Redo—click here to undo an action or redo an undone action.
[4] Generate HTML—click here to export your work as HTML code.
[5] Saving options—here you can save your work as a draft or a ready-to-send email. For a detailed explanation of the options, see section 5—Saving options.
3. Create an email
A. Body settings
Here you can:
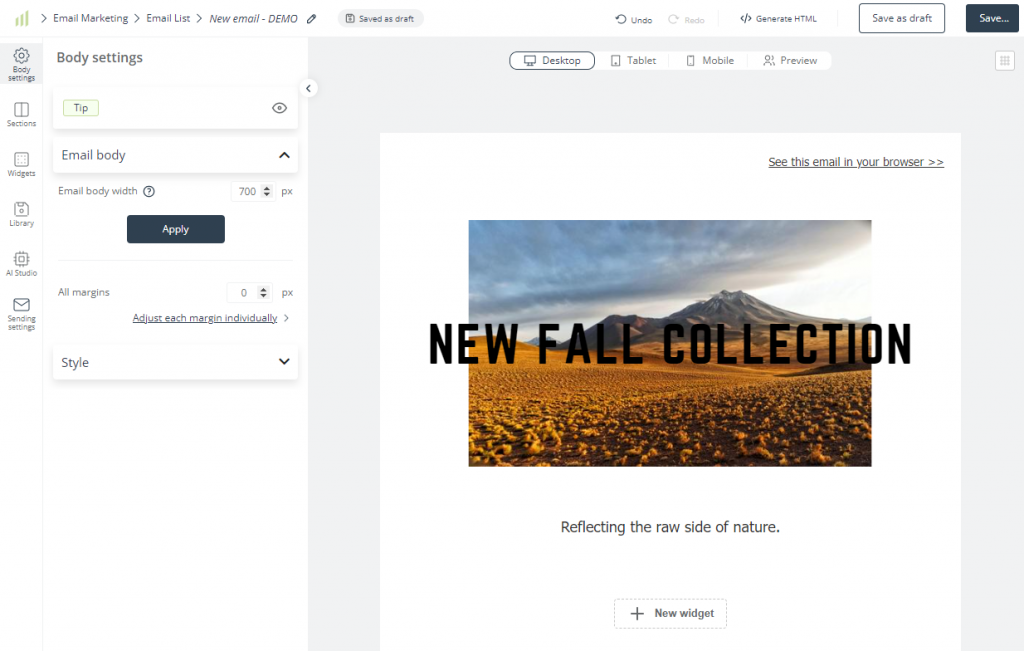
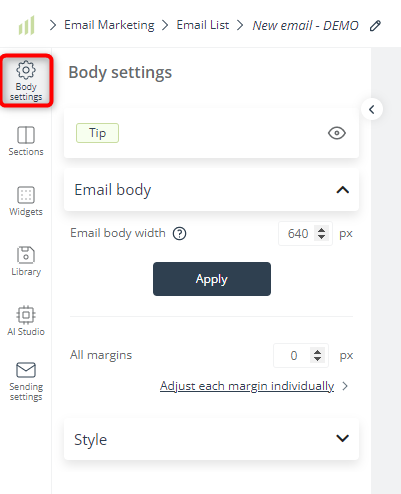
- define the email body width—select a value from 600 to 700 px and click Apply. The new appearance will be shown on the right side of the screen. Before confirming your choice, make sure that the email looks right. Pay attention to conditional content—you can switch between the variants to see how they will look.
- add margins to your email—define all margins at the same time or adjust each margin individually.
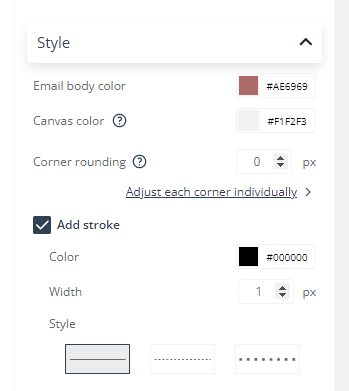
- define the general appearance of your email—select the background and canvas colors, the corner rounding, and the border stroke.
The possibilities are endless!


B. Sections
IMPORTANT: The default email body width is 700 px. If you want your email to have a different size, the best option is to define it at the very beginning of your work, before adding any sections or widgets. You can change the body width in Body settings (see Section 3.A above).
On this tab, you can add sections to your email, effectively dividing the email body (or a part of it) into columns.
Columns are frames that divide the email body vertically, allowing you to create elaborate layouts.
TIP: Why use columns? Make it easy for mobile users! 42.3% of people will delete an email if it’s not optimized for mobile (SaleCycle). Divide your email into columns that will seamlessly adapt to narrow smartphone screens. This way you can ensure that your content will be displayed correctly.
Columns function as containers for widgets, that is, widgets are placed inside columns.
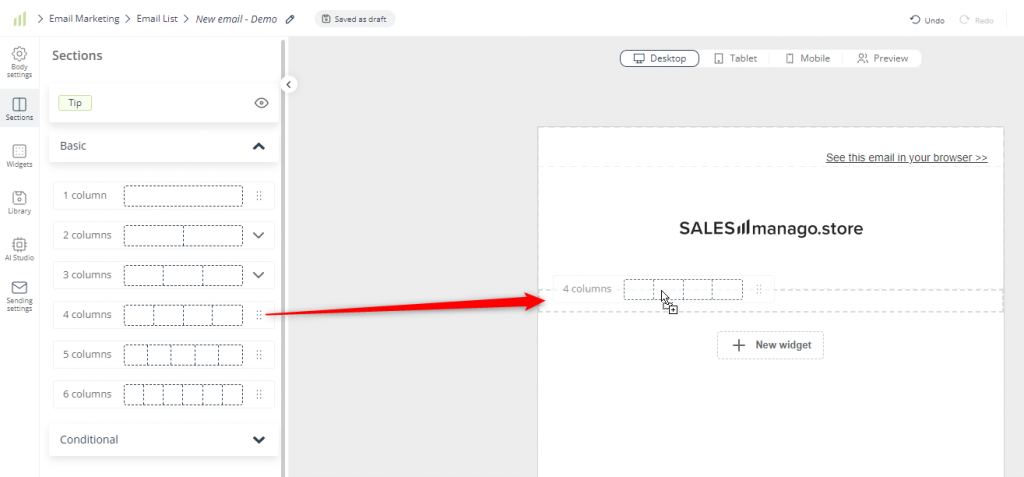
Different sections of your emails can have different numbers of columns. You can insert another section at any stage of your work—simply drag a section from the menu and drop it into the intended spot in the email body.
EXAMPLE: If you drag and drop a four-column section into the email body:
From here downward, the email body will be divided into four columns—until you insert another section by dragging it from the Sections menu.
NOTE: You can insert a new section above or below an existing section, but not anywhere in the middle (not in between widgets).
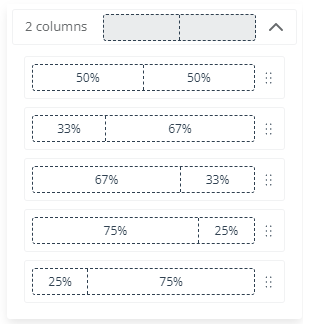
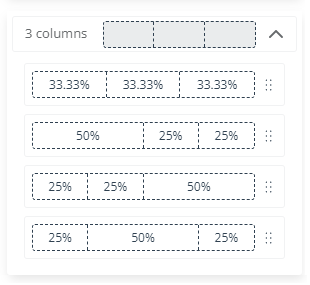
Note that in the case of two-column and three-column sections, you can choose the relative sizes of the individual columns:
This offers even more flexibility in arranging the layout of your email.
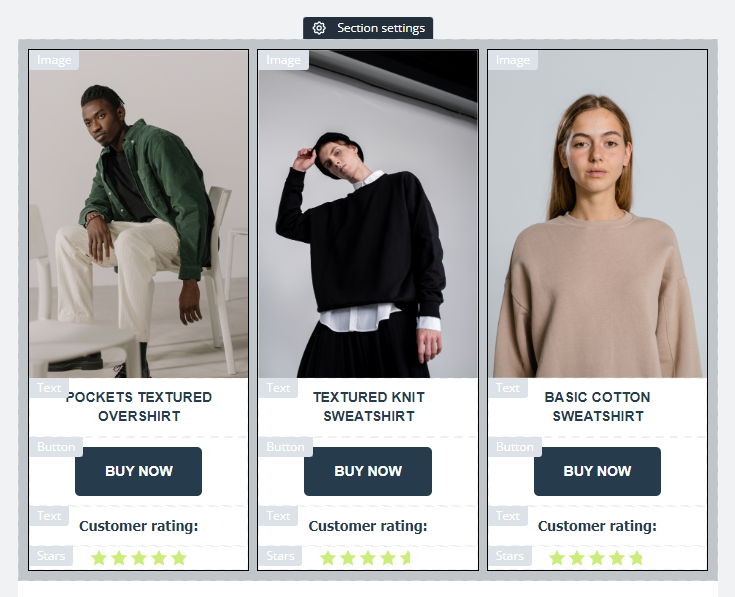
You can place any widgets you want in the individual columns of a section. A column can contain more than one widget:
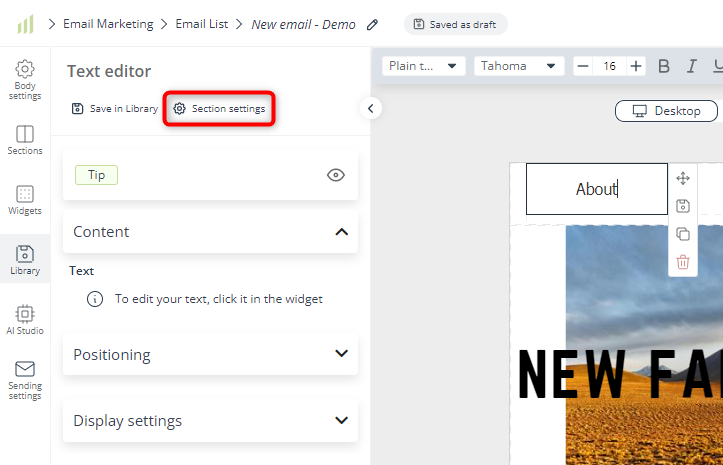
In addition to defining the widget settings (described in section 3.D below), you can define certain section (and column) settings. You can access section settings in two ways:
- Move your cursor over the section you want to edit and click on the Section settings button that appears.
- Click on any widget in the section you want to edit. The widget settings will open in the left-side panel. At the top of that panel, click Section settings.
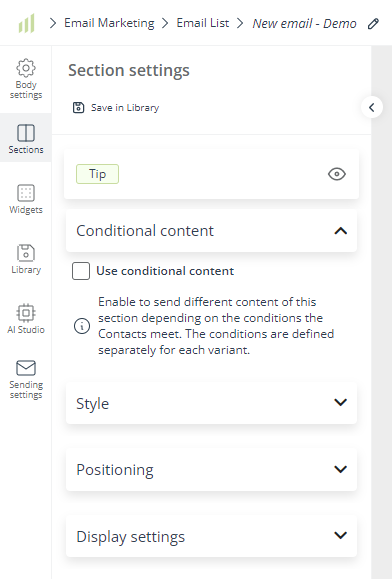
The section settings menu looks like this:
Here is what you can do in particular sections:
- Conditional content—enable this option if you want to display different content variants depending on conditions met by individual Contacts.
Read more about conditional content in the Email Design Studio >>
In the case of conditional sections, this option is already enabled—so if you know that you want to configure conditional content, drag and drop a conditional section (instead of a basic one).
- Style—choose the background color for each individual column. Add a stroke (border) to the column(s) and define the stroke color, width, and style.
IMPORTANT: While you can freely change the background color of individual columns, all widgets included in a single column will always have the same background color.
- Positioning—define the vertical positioning of widgets placed in columns and the section margins.
- Display settings—decide whether you want the contents of this section to be displayed on desktop computers and/or mobile devices (smartphones and tablets).
If the option Show this section on mobile devices is enabled, you can decide whether you want the section to be responsive or not. Responsive elements adapt to the screen on which they are displayed (for instance, on a smartphone screen, columns may be displayed one below another). Note that columns in the Table widget are not affected by this option.
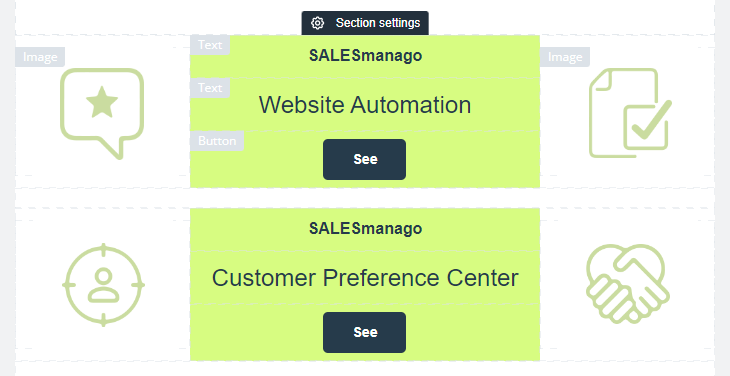
The section and column settings allow you to create elaborate, original designs, for example:
C. Widgets
The Email Design Studio offers a broad range of advanced widgets that allow you to freely shape your content and easily convey the message you want to deliver to your audience.
See the list of articles dedicated to individual widgets available in the Email Design Studio >>
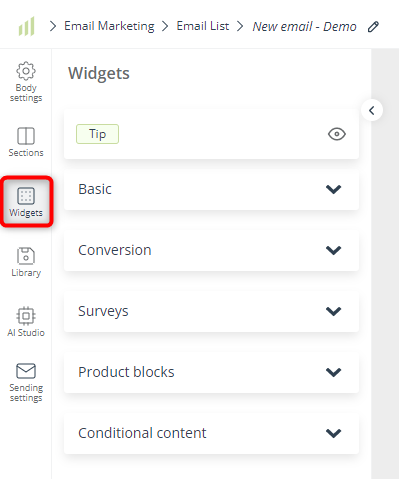
The widgets are conveniently divided into four categories:
- Basic—these widgets allow you to include essential content in your email, such as images, text, social media icons, and an opt-out link.
IMPORTANT: Each email sent via the SALESmanago platform must contain an opt-out link allowing the recipient to unsubscribe from mailings. The opt-out link must be clearly visible and unambiguously labeled as an unsubscribe link. The only exception is a subscription confirmation email, which must contain an opt-in link (and no opt-out link).
- Conversion—these widgets are specifically designed to encourage your audience to visit your website.
- Survey—use these widgets to ask your audience for their opinions and collect zero-party data.
- Product blocks—here you can find product recommendation blocks. By default, they contain placeholders for an image, text (product details), and a button.
- Conditional content—here you can find a helpful reminder that to add conditional content, you need to go to Sections → Conditional. All conditional content can be configured in Section settings.
Read the article dedicated to conditional content in the Email Design Studio >>
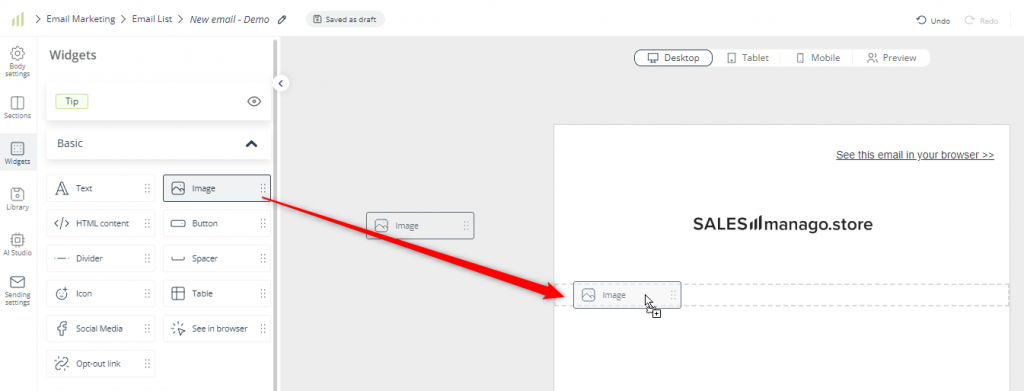
Widgets are placed inside sections, which can consist of one or more columns. To insert a widget into a column, simply drag it from the menu and drop it into the intended spot in the email body:
Note that widgets can’t be placed outside sections.
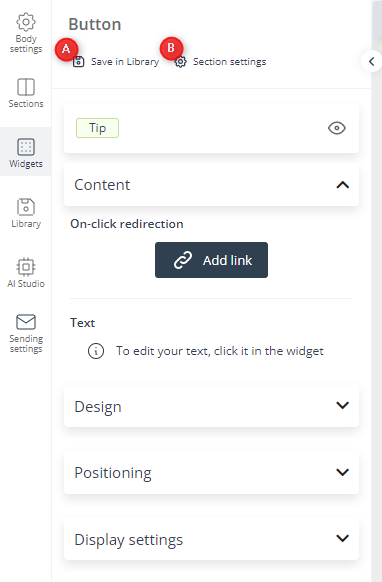
To access widget settings, click on the widget you want to modify. A new menu will open in the left-side panel, for example:
Pay special attention to the buttons that allow you to save the widget in the Library [A] or access the settings of the section in which the widget is placed [B].
The settings you can define vary from widget to widget. Usually you can define parameters such as:
- positioning—the horizontal positioning and/or padding,
- size and color,
- corner rounding,
- display settings—whether you want the widget to be displayed only on desktop computers, only on mobile devices, or on both,
- you can also add links to many widgets, especially buttons, images, and text.
IMPORTANT: When you click on any text, the formatting options are displayed in a toolbar at the top of the screen:
D. Library
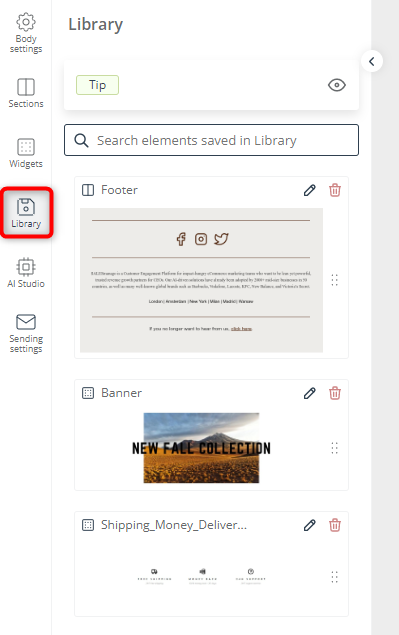
Save time and ensure the consistency of your messages. The Email Design Studio Library allows you to store email components (sections or widgets) that you are going to use repeatedly, across many emails. A good example is the footer, which will probably be the same in most of your emails.
Add sections and widgets to your Library and simply drag them into newly created messages whenever you need them.
TIP: It’s important to have a good naming convention for items saved in the Library. Discuss it with your team!
To learn more, read the article dedicated to the Email Design Studio Library >>
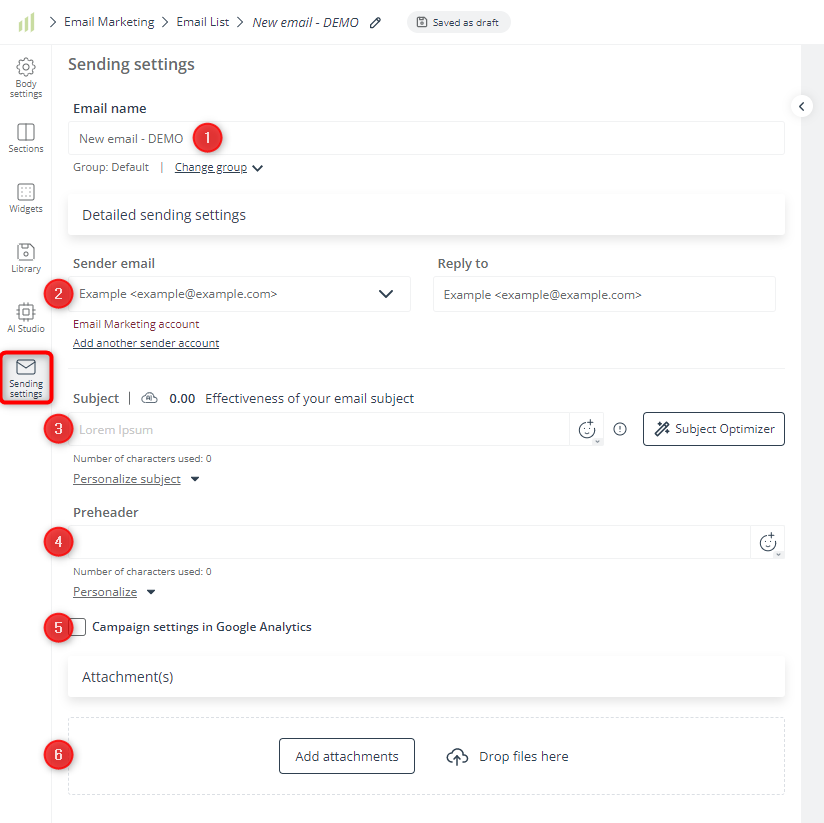
E. Sending settings
[1] Email name—this field is mandatory. Enter a name for your new email, which will allow you to identify it on the Email List. This name is for internal purposes only—your Contacts will not see it.
[2] Sender email—this field is mandatory. Select the sending account from which the email will be sent. If you have configured a reply-to email address for the selected account, it will be displayed in the Reply to field.
[3] Subject—this field is mandatory. Enter a subject line that will catch your Contacts’ attention and encourage them to open your email. Above the input field, the SALESmanago Subject AI Grader rates your subject line on a scale from 0 to 10. Below the input field, you can see the character count.
Click on Personalize to enhance your subject with a personalization attribute that will be replaced with an individual detail from the Contact Card.
Read more about personalization using placeholders >>
TIP: Over 50% of emails are opened on mobile devices. Most email clients, such as Gmail and Yahoo!, display only 33 to 43 characters of the subject line on mobile devices (AWeber). To optimize your subject line, do not exceed 65 characters and include the most important information in the first 30 characters.
[4] Preheader—here, you can enter a line of text that your Contacts will see in their inbox right next to (or below) the subject line. Just like the subject, the preheader can be personalized.
If you don’t set up a preheader, only the subject will be displayed.
EXAMPLE: Emails with [A] and without [B] a preheader in a Contact’s inbox:
[5] Campaign settings in Google Analytics—check this box to specify the utm_campaign parameter for all links included in your email. This applies only to links leading to a website URL (and not, e.g., mailto: or tel:).
Enter your utm_campaign parameter in the input field that will appear after you check this box.
[6] Attachment(s)—this is where you can add attachments to your email. Just drag the file to be attached from a local folder and drop it here. You can also click on Add attachments to search the files available on your SALESmanago account or upload a new file from your computer.
IMPORTANT: Each email with an attachment larger than 5 MB is subject to moderation.
Read more about the account moderation rules >>
If the attachment is larger than 5 MB, we suggest that you upload the file to your own server and provide a link where the file can be downloaded. Sending large attachments to large groups of Contacts can result in the message ending up in the spam folder.
4. Basic actions: move, save, duplicate, delete
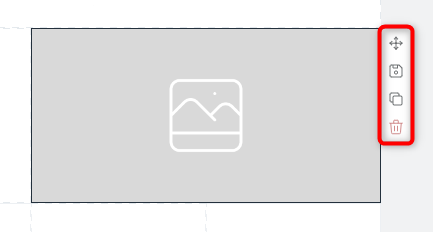
Whether you click on a section or a widget, a small side menu will open to the right of that element. Use these icons to, respectively:
- Move the element—for instance, to change the order of sections, or to move a widget from one column to another.
- Save the element in the Library—see section 3D above.
- Duplicate the element—an identical copy will appear below the original. You can duplicate widgets or entire sections.
- Delete the element—this action can be reversed using the undo button.
5. Saving options
When you have finished your work, you can save it as a draft or a finished email. The two options are available in the top right-hand corner of the screen:
Read more about saving emails on the SALESmanago platform >>
Emails saved as drafts, including autosaved versions, are available on the Draft List (Menu → Channels → Email Marketing → Drafts).
Finished emails are available on the Email List (Menu → Channels → Email Marketing → Email List).
Read more about the Email List >>
