Useful links
This article describes how to create a Workflow—an Automation Process that allows you to respond to Contact behaviors in various channels with no manual work on your part.
In the simplest terms, a Workflow process consists of Events, Conditions, and Actions (ECA model). The occurrence of an Event triggers the Workflow; provided that any specified Conditions are met, one or more Actions are performed by the SALESmanago system.
Workflows allow you to automate your communication across different channels, react to individual Contact behaviors on your website, and accelerate the sales process. With our intuitive Workflow creator, you can effortlessly configure an Automation Process tailored precisely to your unique needs and specificities. Experience the power of SALESmanago’s highly advanced Workflow feature, designed to take your marketing activities to an unrivaled level of efficiency and effectiveness. Stay ahead of the competition and unlock unparalleled growth with SALESmanago.
To create a new Workflow, go to
Automations → Automation Processes → Workflow → + New Workflow
Contents:
1. Getting started
Workflow processes allow you save huge amounts of time and effort by automating your tasks. A well-designed Workflow can get the best out of every marketing channel and help you achieve your marketing goals.
A Workflow is an Automation Process in which the SALESmanago system performs an Action in response to an Event, provided that any specified Conditions are met.
Events include activities performed by Contacts (e.g., opening an email), by SALESmanago users (e.g., completing a task on a Contact Card) or by the SALESmanago system (e.g., increasing a Contact scoring in response to a Contact’s behavior).
Conditions allow you to set certain requirements that must be met for a Contact to move further along a path. By using Conditions, you can precisely define under what circumstances an Action will be performed. This, in turn, allows you to create multiple paths leading from a single Event to different Actions, depending on what Conditions are (or are not) satisfied.
Actions are activities performed by the SALESmanago system. The effects of Actions can be directly visible to Contacts (e.g., sending an email) or only visible to SALESmanago users (e.g., adding a tag or increasing Contact scoring).
Workflows are built using convenient, predefined elements in the form of tiles that can be moved around the board and connected by arrows to create cause-and-effect relationships. A detailed description of all element types and the rules for connecting them are provided further in this article.
Especially for those Customers who are only beginning their marketing automation journey, a great starting point will be the Workflow Library, which contains predefined Workflow templates (both basic and advanced) that can be used to create comprehensive campaigns.
Read more about the Workflow Library >>
The Workflow Library comes with the Workflow Generator—the first such feature on the market, designed to help you create the perfect Automation Process tailored to your specific needs. Just select a marketing goal and a communication channel and generate a list of all possible tactics for your combination.
Read more about the Workflow Generator >>
2. Element types
Workflow processes are built using five types of elements:
- Start—The opening element, which is present by default and cannot be deleted. The Start element must be connected to one or more Events.
- Events—An Event is something that needs to occur and be recorded by the system for the Workflow to be initiated (in the case of triggering Events, connected to the Start element) or for a Contact to move further along a path (in the case of conditional Events, not connected to the Start element).
Nearly all Events can be used as both triggering and conditional events. Only the Event: Contact added to system and the Event: Date from dictionary detail is approaching/approached can only be used as triggering Events.
Each Workflow process must include at least one Event. Only an Event can initiate (trigger) a Workflow. Consequently, only Events can be connected to the Start element.
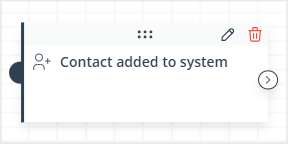
You can easily distinguish Events from other elements by their dark-blue color:
- Conditions—A Condition is a requirement that needs to be met for a Contact to move further along a path. Conditions are optional, which means that you can build a Workflow without using any Condition elements.
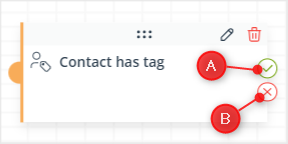
You can easily distinguish Conditions from other tiles by their yellow color:
As you can see in the screenshot above, by default, each Condition has two connectors [A and B] intended for two different paths: one [A] that will be followed if the Condition is met and one [B] that will be followed if the Condition is not met. Additionally, for most Condition elements, you can add up to 4 more paths, each depending on a different configuration of the same Condition.
- Actions—An Action is what the system does if all the conditions (specified using Event and Condition elements) preceding the Action on the same path have been met.
Each Workflow process must include at least one Action. An Action does not need to be the last element before a Finish element – it can be followed by an Event, a Condition, or even another Action.
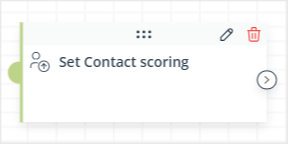
You can easily distinguish Actions from other tiles by their green color:
- Other nodes—These elements perform complementary functions.
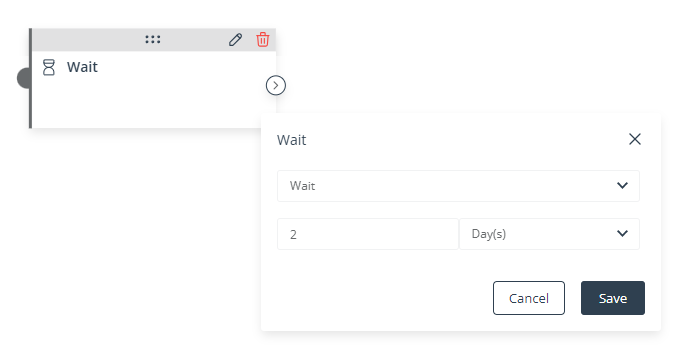
- Wait—Use this element if you want the system to wait for a specified period of time (from minutes to months) before moving on to the next Workflow element.
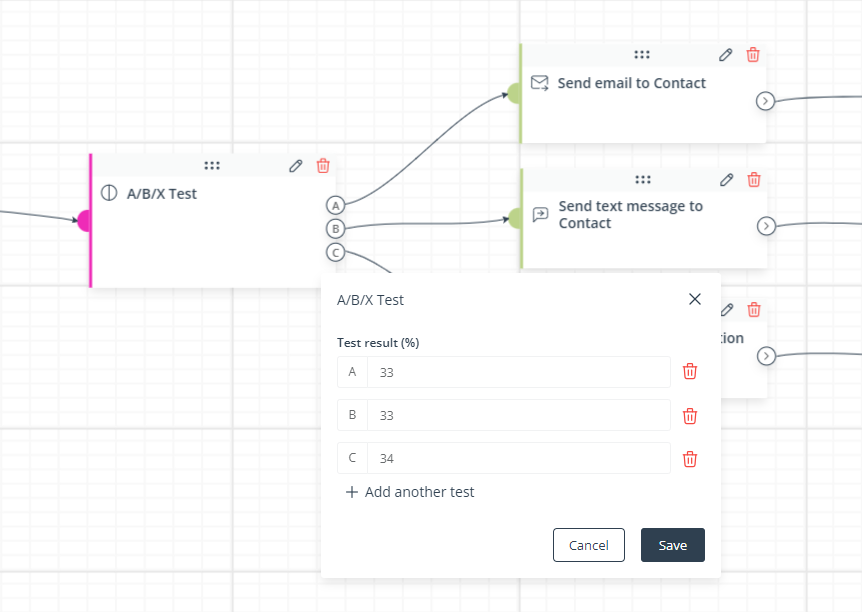
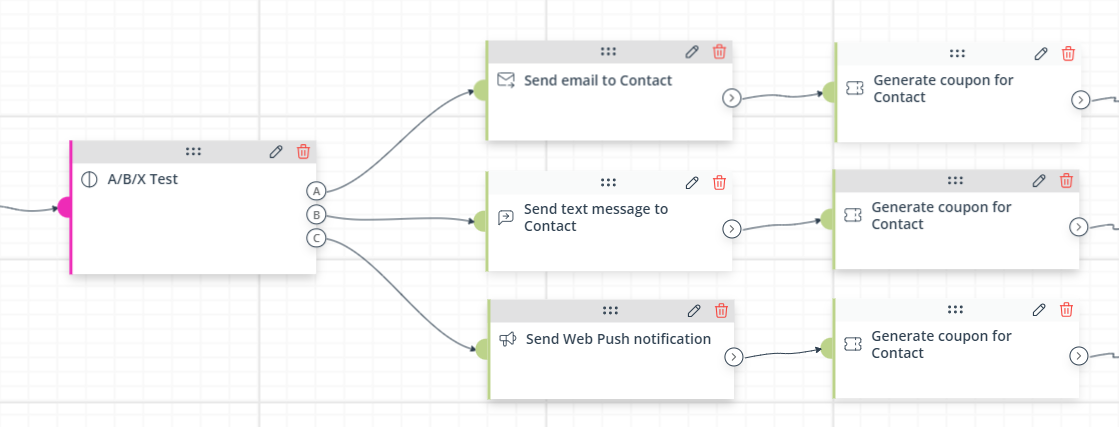
- A/B/X Test—Use this element if you want to test the effectiveness of two or more (up to 4) alternative paths starting from the same element. Contacts reaching this element will be randomly distributed into groups that will follow the different paths.
You can specify the percentage of Contacts that will follow the individual alternative paths.
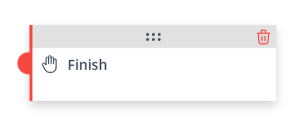
- Finish—The Finish element marks the moment when a Contact has completed the Workflow. Each Workflow path must end with its own Finish element.
This element is mandatory (each Workflow must include at least one Finish element).
- Wait—Use this element if you want the system to wait for a specified period of time (from minutes to months) before moving on to the next Workflow element.
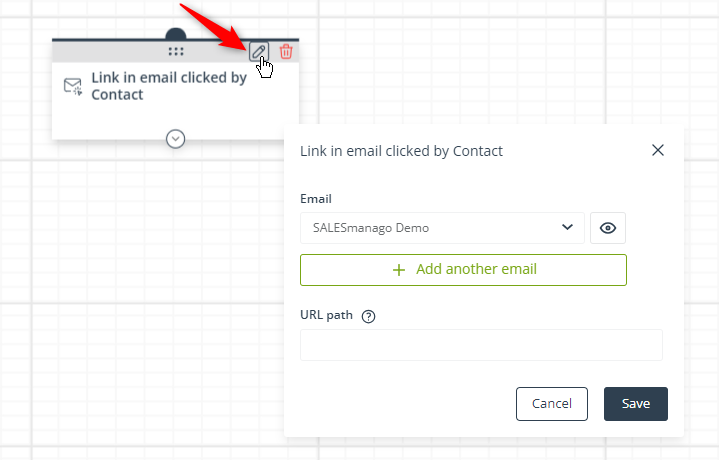
Most Workflow elements have their individual settings that must be defined to suit your individual needs and goals. To configure an element, click on the pencil icon:
After entering your settings, remember to click Save. To discard any changes to the settings, click Cancel.
All the different Workflow elements must be connected with one another to create cause-and-effect relationships. The instructions and basic rules for connecting them are set out further in this article.
3. Create a Workflow
Workflow processes are built using convenient, predefined elements in the form of tiles that can be moved around the board and connected by arrows to create cause-and-effect relationships.
To create a new Workflow, go to Menu → Automations → Automation Processes → Workflow and click on + New Workflow.
A. Moving around the Workflow creator
After clicking on + New Workflow, you will see the following screen:
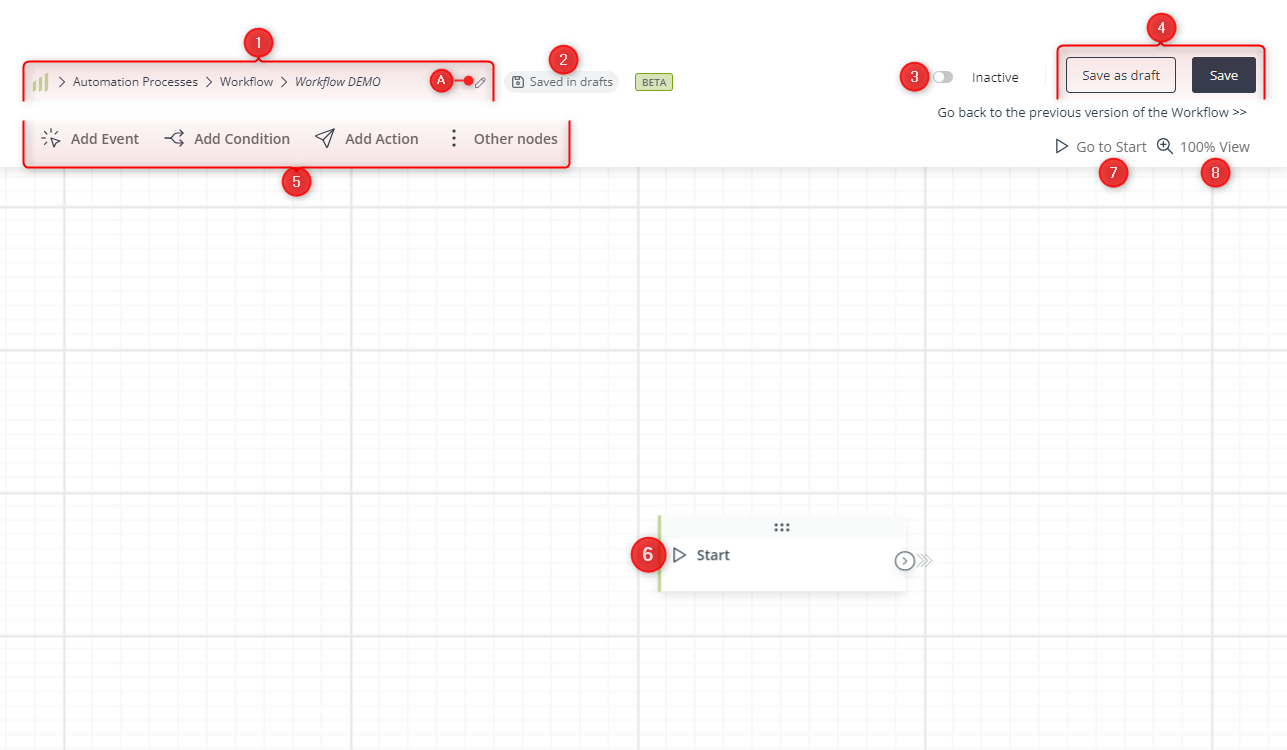
[1] Path and name—Here, you can see the path to your new Workflow, ending with its name. To change the name of your Workflow, click the pencil icon [A].
[2] Saved in drafts—Here, you can see the information that your work has been saved as a draft. If you edit an active Workflow but do not save your changes, next time you edit the same Workflow, you will be asked if you want to discard or accept any autosaved changes.
The autosave function saves your work on an ongoing basis. For example, if you close the browser tab by accident or your browser crashes, the last autosaved version will be available for recovery.
[3] Active/Inactive—Here, you can activate or deactivate your Workflow. Only an active Workflow can actually be triggered (initiated) for a Contact.
[4] Saving options—Decide if you want to save your work as a draft or a ready Workflow process. Remember that a Workflow can only be triggered for a Contact when it is active (see point [3]).
[5] Add element—Here, you can find all available Workflow elements, grouped into four categories. Click on any of these buttons to see a list of all elements available within the selected category.
[6] Start element—This element is required and present by default. Connect it to one or more Events to start building your Workflow.
[7] Go to Start—Click on this button to center the view on the Start element. This can be especially useful in the case of large Workflows.
[8] 100% View—Here, you can see the current zoom value. Additionally, if you click on this button, a menu with more view-related options will open:
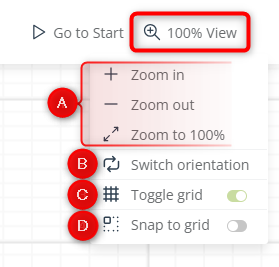
[A] Zooming options—Here, you can zoom in, zoom out, or return to 100% view.
[B] Switch orientation—Choose whether you want to build your Workflow vertically (from top to bottom) or horizontally (from left to right). Note that if you change the orientation after some elements have already been added, their layout may need some manual adjustment.
[C] Toggle grid—Toggle this switch to show or hide the grid. The grid is the fine gray lines that run horizontally and vertically across the board. You may find these lines helpful in arranging the elements of your Workflow in a neat and orderly manner.
[D] Snap to grid—Turn on this switch if you want the SALESmanago system to automatically adjust the layout of your elements to the grid (so that each element lies perfectly in the middle of a grid cell).
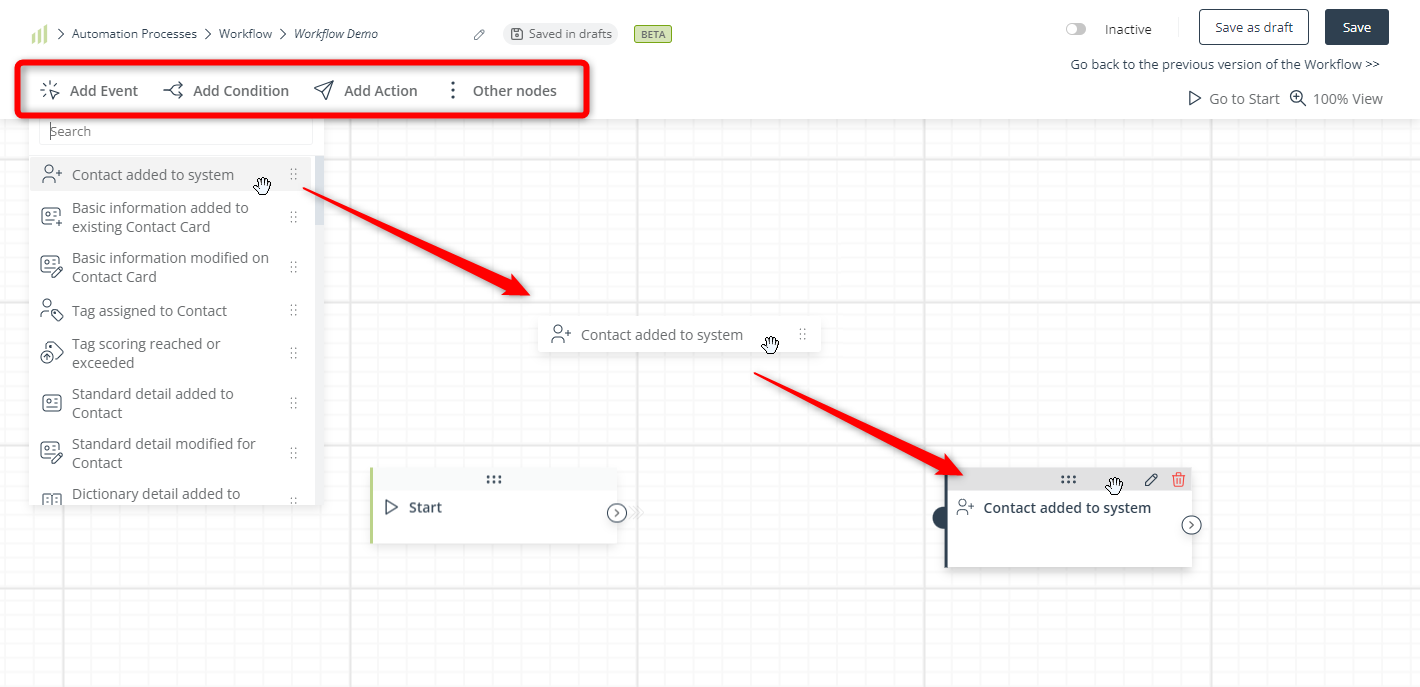
To build a Workflow, first you need to place the required elements on the board. You can do this in two ways:
- Select an element from one of the menus at the top of the screen and drag the element onto the board:
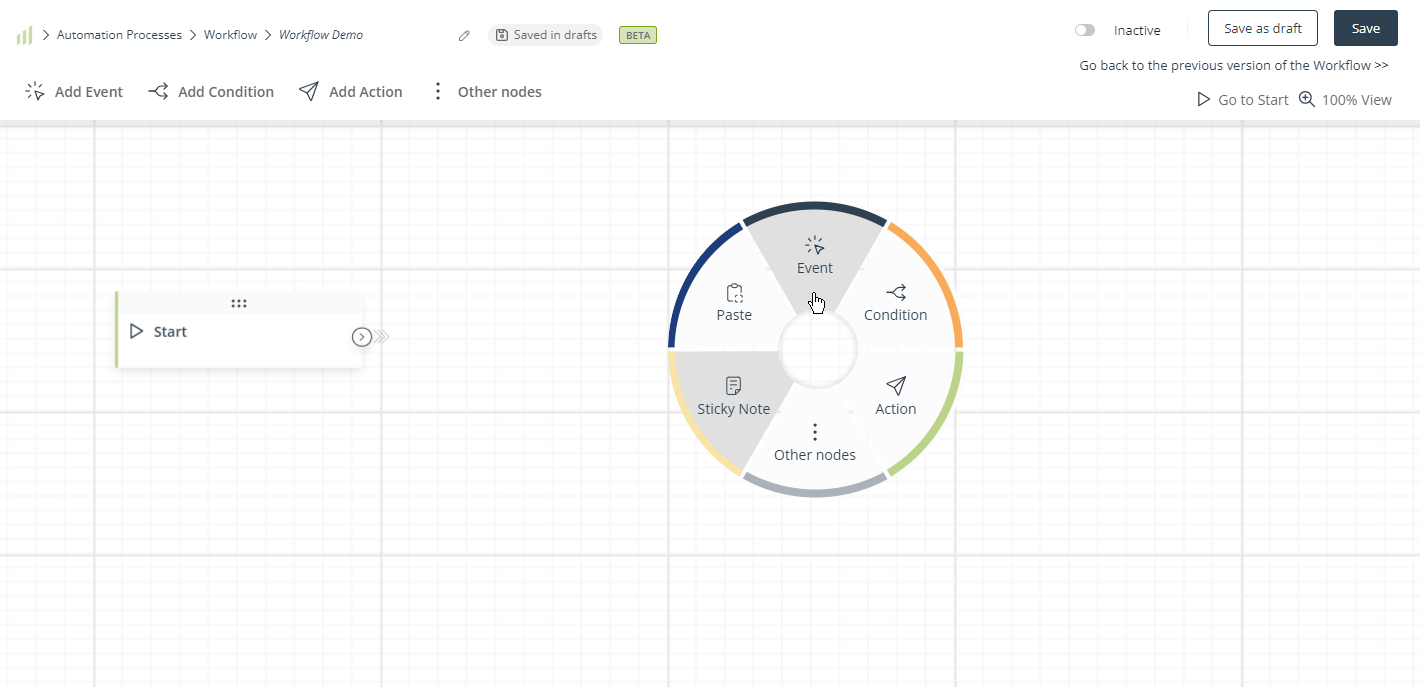
- Right-click anywhere on the board. A circular menu will appear. Select the action you want to perform: add an Event, Condition, Action, or one of Other nodes, or paste a copied element.
After clicking on the selected segment, the respective menu will open:
 Click on the element of interest and it will appear on the board. You can also drag and drop it in the desired position.
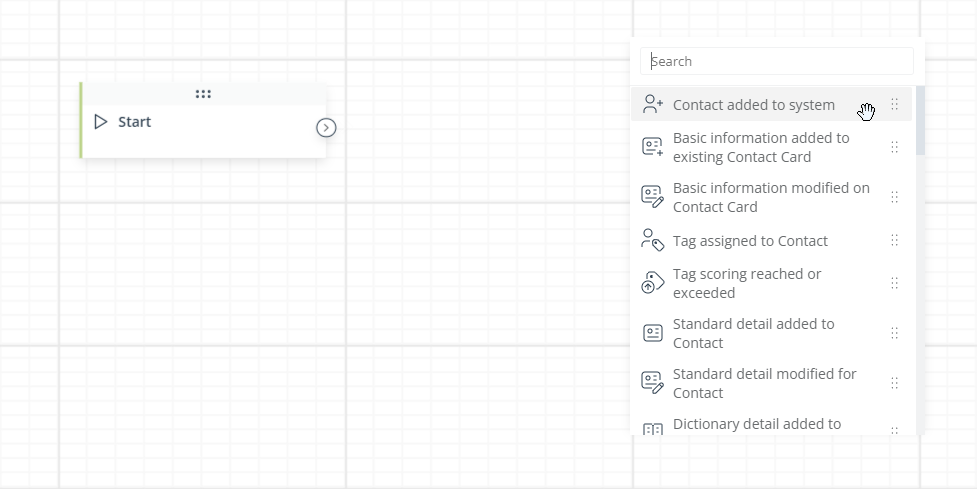
If you want, you can move an element by clicking on the gray strip at the top and dragging it to the desired position:
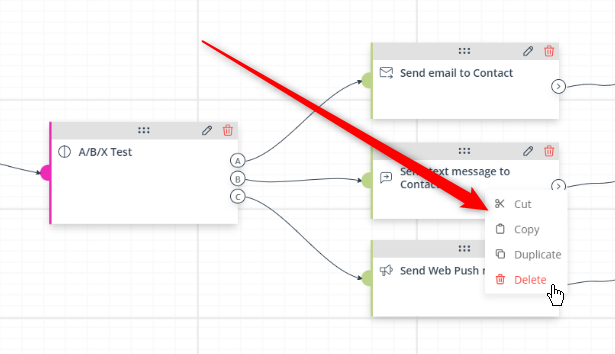
To define element settings, click on the pencil icon [A]. To delete an element, click on the trash can icon [B]. You can also right-click on an element to see a context menu with further options [C].
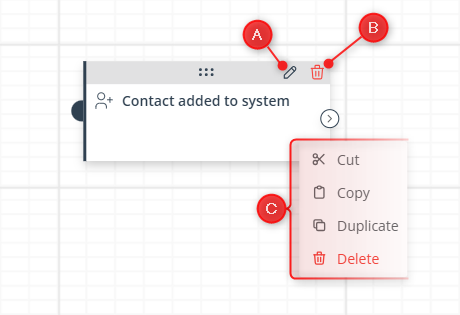
After cutting an element, you can paste it anywhere on the board, by right-clicking in the desired position and selecting Paste from the circular menu.
The Copy option allows you to copy an element and then paste it anywhere on the board, by right-clicking in the desired position and selecting Paste from the circular menu. Note that the copy has the same settings as the original.
The Duplicate option creates a copy of the element right below the original. Note that the duplicated element has the same settings as the original.
TIP: An element (or a group of elements—see Section A.1. below) copied in one Workflow can be pasted into another Workflow. To do that, right-click on an element and select Copy from the context menu. Then, save the Workflow, go to the List of Workflows, open another Workflow, right-click anywhere on the board, and select Paste from the circular menu.
You can also open two or more Workflows in separate browser tabs and switch between the tabs, copying and pasting elements.
A.1. Selecting multiple elements
You can select multiple elements to perform the same action for all of them at once.
You can do this in two ways:
- Press the Ctrl button and click on each individual element you want to select.
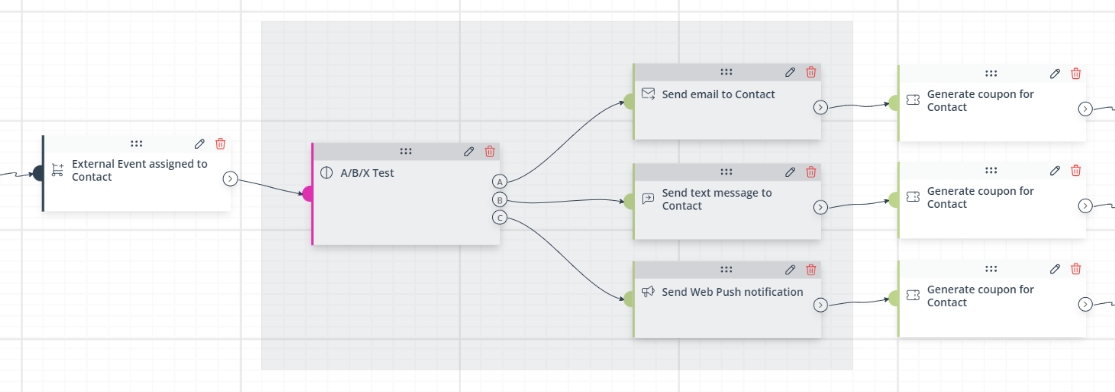
- Press the Ctrl button and draw a selection box by clicking next to an element and dragging your cursor over the area you want to select (as shown in the screenshot below).
Note that the top bars of the elements selected will be highlighted in darker gray.
After selecting a number of elements, you can move all of them at once or right-click on any of them to open the context menu:
The action selected from the context menu will be applied to all the highlighted elements. This way, you can cut, copy, duplicate, or delete multiple elements at once.
Note that multiple elements are copied or duplicated along with all their individual settings and any connections (arrows) between them.
TIP: An element (or a group of elements) copied in one Workflow can be pasted into another Workflow. To do this, right-click on an element and select Copy from the context menu. Then, save the Workflow, go to the List of Workflows, edit another Workflow, right-click anywhere on the board, and select Paste from the circular menu.
You can also open two or more Workflows in separate browser tabs and switch between the tabs, copying and pasting elements.
A.2. Keyboard shortcuts
The following actions can be performed by using a keyboard shortcut:
- Switching orientation.
- Press Ctrl + down arrow to switch orientation to vertical.
- Press Ctrl + right arrow to switch orientation to horizontal.
- Zooming in/out.
- Press Ctrl + plus button to zoom in.
- Press Ctrl + minus button to zoom out.
- Press Ctrl + 0 to return to 100% view.
- You can also zoom in/out by pressing the Ctrl button and using the mouse scroll wheel.
- Copying and pasting.
- Press Ctrl + C to copy a highlighted element or a group of highlighted elements.
- Press Ctrl + V to paste a copied element or group of elements.
B. Connecting elements
When the element you want to use is already on the board and has been moved to the desired position, connect it with the previous element(s) and any following element(s) using arrows.
Click on the connector [A] and draw a line leading to the next element.

Elements connected by arrows form a path, which must always end with a Finish element. A single Workflow can comprise multiple paths, each with its own Events, Conditions, and Actions, but always ending with a Finish element.
The arrows indicate the direction in which the path will be followed by a Contact, i.e., the order in which the connected elements will be processed by the SALESmanago system.
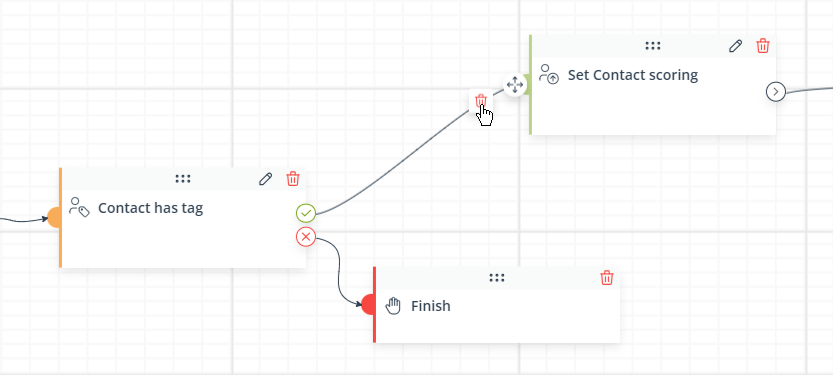
To remove a connection, place your cursor over the line and click on the trash bin icon that will appear:
The rules for connecting Workflow elements are described further in this article.
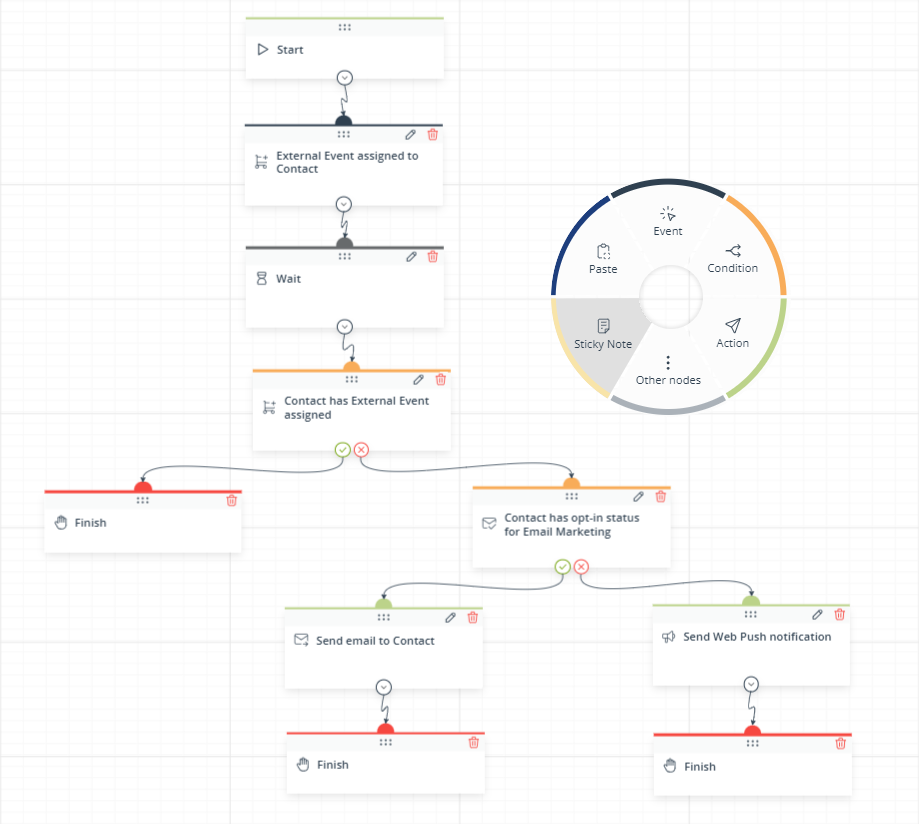
C. Building a Workflow: Example
While the SALESmanago Workflow feature offers great flexibility and allows you to build an Automation Process perfectly tailored to your specific needs, there are certain rules that must always be followed. This section will guide you through the process of creating an example Workflow while providing the necessary instructions.
EXAMPLE: Abandoned Cart Workflow
USE CASE: You want to create a Workflow that will help you recover abandoned carts. If a Contact adds products with a value of more than 50 to their cart but makes no purchase, they will receive an email encouraging them to complete the purchase process.
Each Workflow must begin with the Start element, which is present by default and cannot be removed. The Start element must be connected to at least one triggering Event.
Add the Event: External Event assigned to Contact to the board. Configure the Event to suit your individual needs and goals. In this case, you want the Workflow to be triggered when a CART External Event is assigned to a Contact (which indicates that the Contact has added a product to their cart), provided that the cart value exceeds 50.
Configure the Event as follows:

The Workflow will be triggered when the triggering Event occurs.
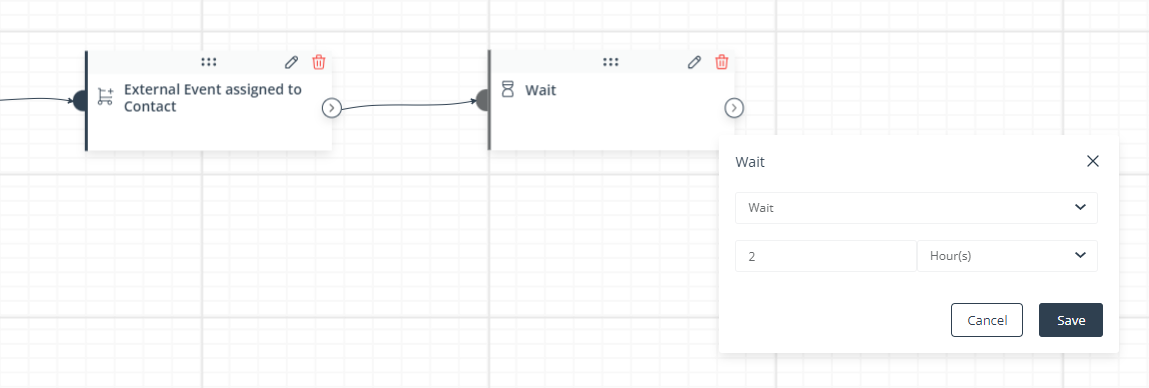
Before checking whether the Contact has actually purchased the products added to the cart, you want to wait for 2 hours, which is a sufficient time to complete a purchase. Add the Wait element, connect it to the Event, and configure it as follows:
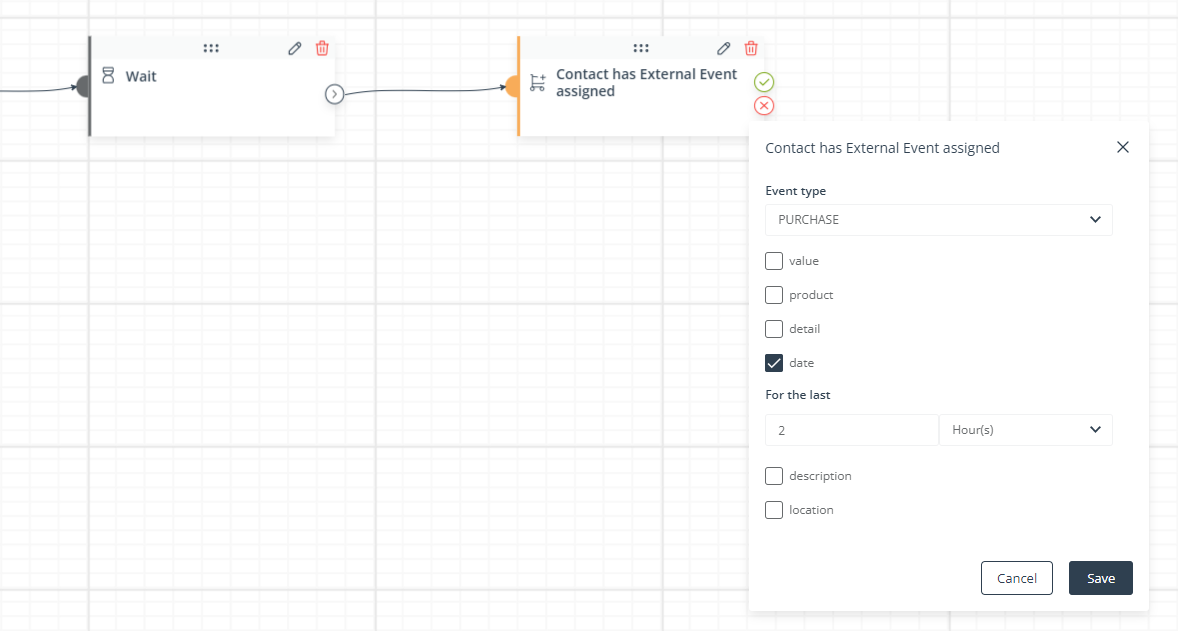
Then, you want to check whether a PURCHASE External Event has been assigned to the Contact within the last 2 hours (because you are not interested in any purchases made before the occurrence of the CART External Event that triggered this Workflow). Add the Condition: Contact has External Event assigned, connect it to the Wait element, and configure the Condition as follows:
If the Condition is met (i.e., the Contact has made the purchase), you do not want to take any action. Add a Finish element and draw a line from the green connector to the Finish element:
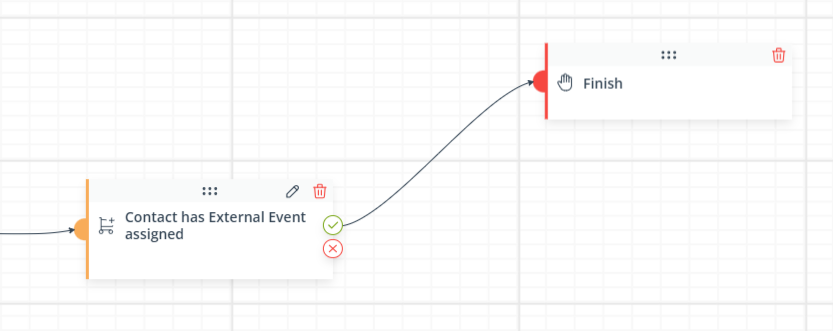
This is how you instruct the system to perform this action (“Finish”) if the preceding Condition is met.
However, if the Condition is not met (i.e., the Contact has not completed the purchase process within the past two hours), you want to send them an email. The email can be configured to contain recommendations of products left in the cart.
Read about Product Blocks in the Email Design Studio >>
Add the Action: Send email to Contact and draw a line from the red (X) connector to the Action. Then, configure the Action as follows:
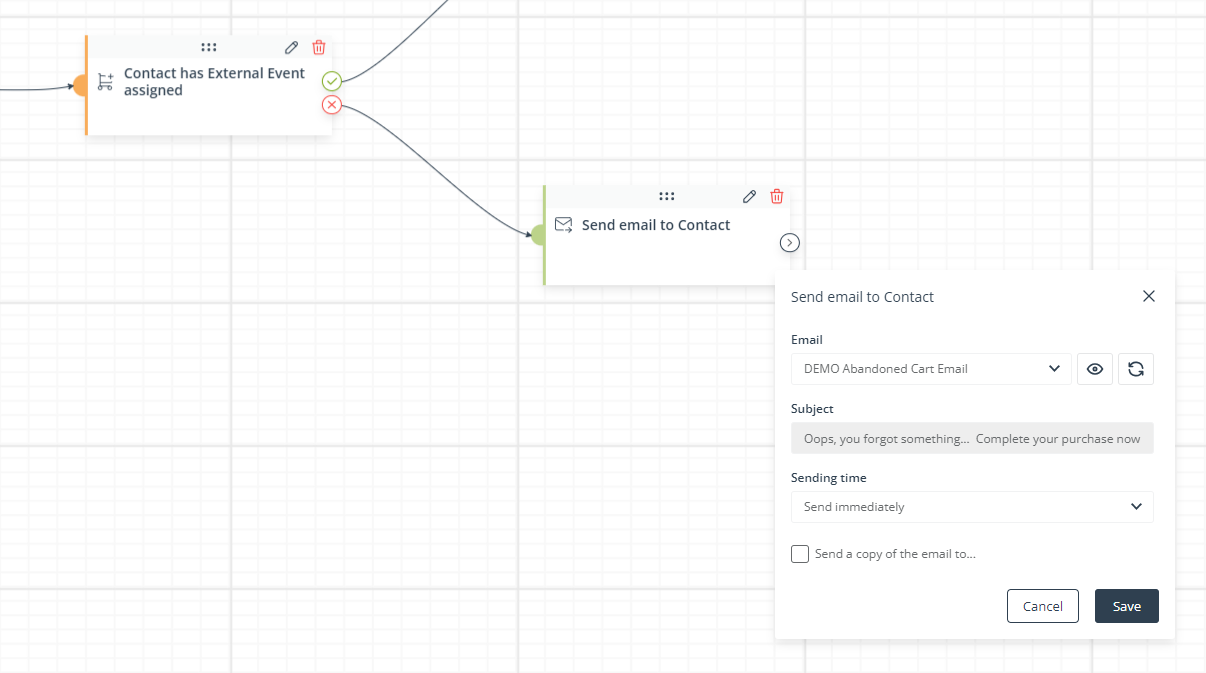
As you can see, the Action is so configured that the system will send the email immediately after a Contact has reached this stage of the Workflow.
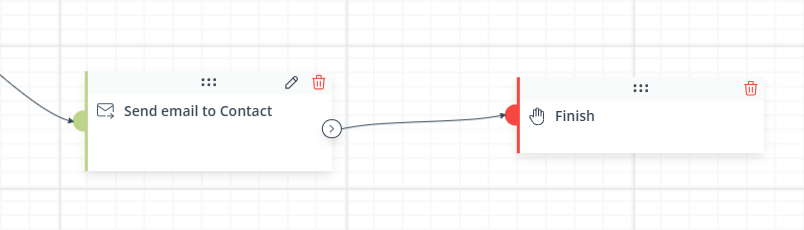
You don’t want to take any more actions at this point – the path (and the Workflow) should end at this Action, the moment the selected email is sent. Therefore, add a Finish element and connect it to the Action:
If you want to immediately start using your Workflow, activate it and save it as ready:
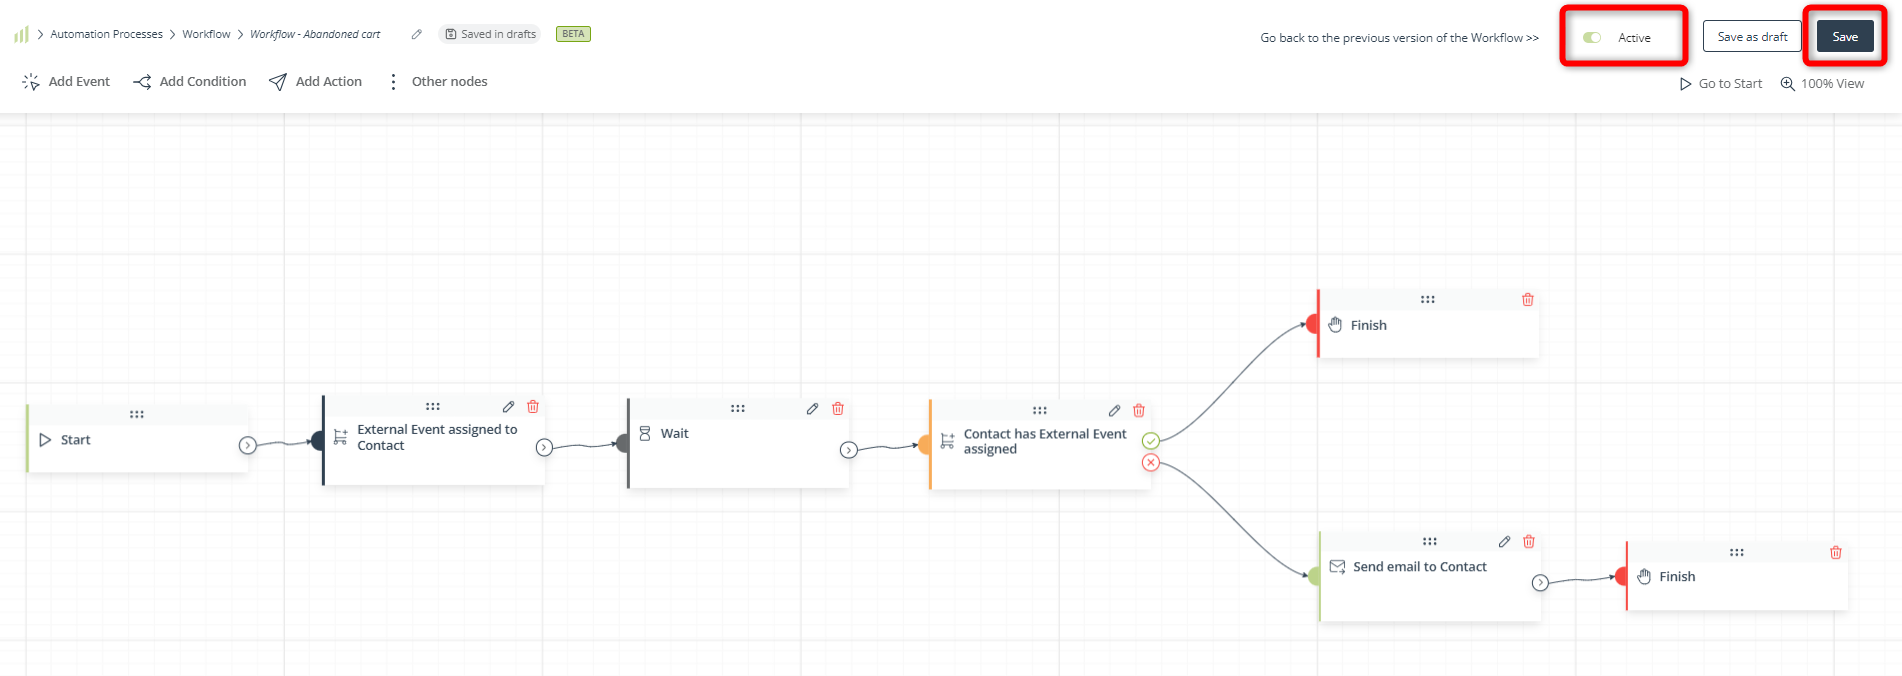
That’s it! You have just created a very simple Workflow based on the very basic element configuration: Event → Condition → Action.
See Section 2.E below for additional information and a summary of basic rules for building Workflows.
If you are interested in more advanced Workflow building options, see Section 2.F below and read the article dedicated to advanced Workflow configurations >>
For more examples, read the article: Workflow | Examples and use cases >>
D. Basic rules
Below, you can find a list of the basic rules that you should bear in mind when creating a Workflow process.
Mandatory elements and basic connections
- Each Workflow must begin with the Start element connected to an Event.
- Only Events can be connected to the Start element.
- You can connect more than one Event to the Start element. If the Start element is connected to more than one triggering Events, the Events will be connected by the OR operator, which means that the Workflow will be triggered as soon as one of the Events occurs.
- If more than one triggering Events occur at the same time, the system will choose the path to be followed at random.
- Each Workflow must contain at least one Event and at least one Action.
- All paths in a Workflow process must end with the Finish element.
Contact in a Workflow
- A Contact who has entered a Workflow process always follows only one path. In other words, a Contact cannot be in several places in one Workflow at the same time.
- A Contact who has entered a Workflow process cannot enter the same Workflow before reaching a Finish element in that first process (i.e., before that first process comes to an end for that Contact). However, a Contact that has already reached the end of a Workflow can enter the same Workflow again.
- A Contact can participate in several different Workflows at the same time.
Activating a Workflow and editing an active Workflow
- A Workflow can only be triggered if it is saved and activated.
- If you edit an active Workflow, any modifications will be autosaved as draft on an ongoing basis. However, to actually apply the changes, you need to save the Workflow.
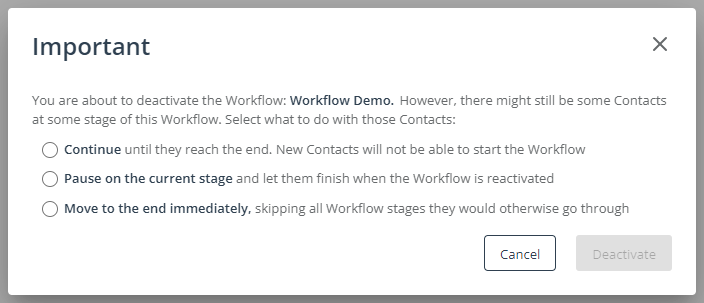
- When deactivating an active Workflow, you will see the following communication:
Decide how the system should proceed for Contacts that have entered the Workflow you want to deactivate but have not reached a Finish element. You must select one of the available options to be able to actually deactivate the Workflow.
-
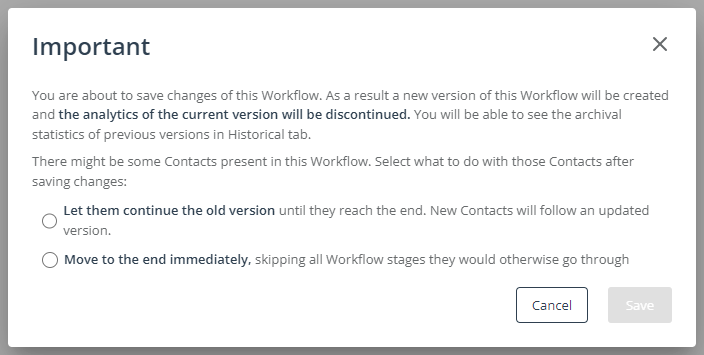
If you edit an active Workflow and click Save, you will see the following communication:
Decide how the system should proceed for Contacts that have entered the Workflow you want to modify but have not reached a Finish element. You must select one of the available options to be able to actually save the modified Workflow.
E. Advanced options
SALESmanago offers a highly advanced Workflow feature that allows you to configure an Automation Process tailored precisely to your needs and the specificity of your marketing activities. While the basic configuration of Workflow elements is Event → Condition → Action (ECA model), you can also create much more intricate and comprehensive processes that enable you to respond to all possible developments and outcomes.
Here are some examples of advanced Workflow configurations that can elevate your Automation Processes to another level:
-
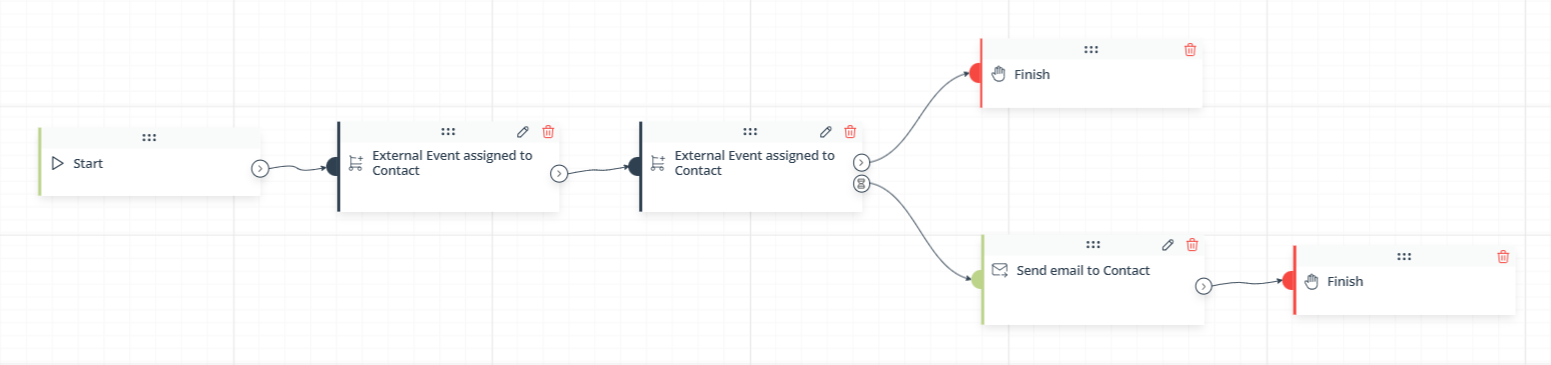
An Event doesn’t need to be connected to the Start element but can be used in a way similar to a Condition.
All Events can be connected to the Start element and function as the triggering Events for a Workflow. However, you can also place an Event further along a Workflow path, preceding it with an Action, Condition, or even another Event. Such Events (placed anywhere in the middle of a Workflow and not directly after Start) are referred to as conditional Events.
By using Conditional Events, you can instruct the system to wait for an Event to occur and move a Contact further along the path as soon as the Event occurs. This requires the configuration of an alternative path that will be followed if the Event does not occur within a specified time.
-
You can connect elements of the same type directly with each other.
For instance, you can configure a series of Condition elements in the following way:
Such Conditions will be connected by the AND operator, which means that a Contact will only move further along the path marked in green if all the Conditions are met.

-
You can configure certain Conditions to be the branching point for up to 6 paths (instead of the default 2).

-
You can create a number of alternative paths and test their effectiveness using the element: A/B/X Test.

For more ideas and examples, see the article dedicated to advanced Workflow configurations >>
F. Testing your Workflow
A good idea is to check whether your Workflow functions as intended before letting your Contacts actually participate in it.
To test your Workflow, create a test Contact and use it to follow all possible paths in your process. Note that the test can only be performed if the Workflow is saved and activated. To make sure that at this stage you remain the only person who can enter the Workflow, add a Condition that will prevent any Contacts other than the test Contact from entering the Workflow.
The easiest way to do this is by assigning a unique tag to the test Contact and including the Condition: Contact has tag right after the triggering Event(s) of your Workflow, as shown in the example below.
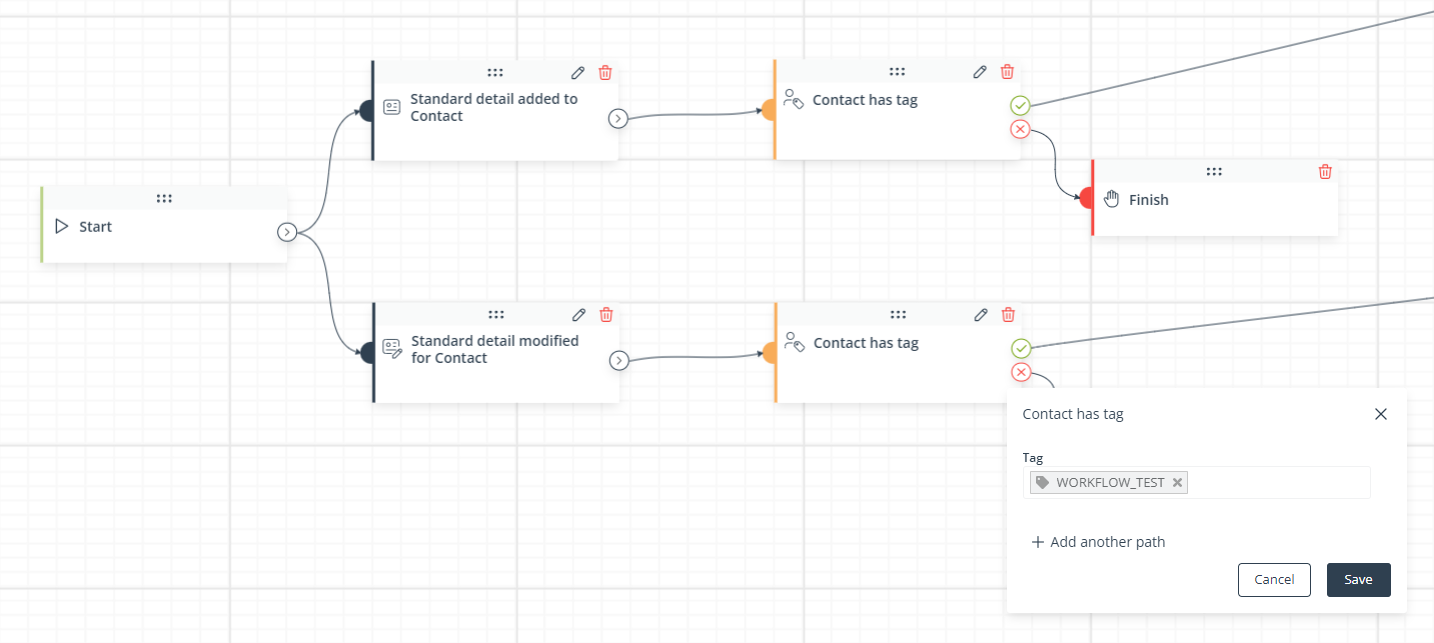
This way, no Contact without this special tag (WORKFLOW_TEST) will be able to follow any of the paths in your Workflow.