Useful links
This article explains how to schedule the sending of an email on the SALESmanago platform and how to send emails in response to actions taken by Contacts (using Automation Rules and/or Workflows).
SALESmanago allows you to schedule an email up to 10 years in advance. You can also configure emails to be sent as a result of specific actions performed by Contacts. Importantly, emails can be sent not only from the Email List, but also using other system features. All this enables you to create advanced, precisely planned email campaigns.
1. What is the process for sending scheduled mailings?
Scheduled mailings are transferred to the sending server immediately. The server saves the sending settings defined by the user and adds the mailing to the queue. When the scheduled sending time comes, the server downloads the current version of the email from the SALESmanago account and sends it according to the memorized settings.
This procedure applies to all email sending methods (see Section 2).
2. Schedule a mailing
SALESmanago allows you to schedule an email up to 10 years in advance. You can also configure emails to be sent as a result of specific actions performed by Contacts. Thanks to this, you can create advanced, precisely planned email campaigns.
You can schedule the sending of an email using the following tools available on the SALESmanago platform:
- Email Marketing:
- Email List,
- Email wizards;
- Automation Processes:
- Automation Rules,
- Workflows;
- Command Center.
Specific instructions on how to schedule an email using these tools are provided further in the article.
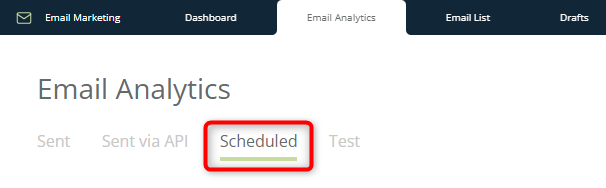
The list of scheduled mailings is available under the Scheduled tab (Menu → Channels → Email Marketing → Email Analytics → Scheduled tab).
A. Email Marketing
In the Email Marketing feature, you can send an email immediately or schedule it to be sent at a specific later time. To do this, go to the sending screen.
There are two ways to access the sending screen:
- go to the Email List and locate the email you want to send or schedule on the list. Click Preview and send [1].

A new window, with a preview of the email and its basic information, will open. Click Send… in the top right-hand corner to go to the sending screen.
- While in the Email Design Studio, click Save in the top right-hand corner. In any other email wizard, click Save… and then Save and finish. A new window will open, with a description of the options available.
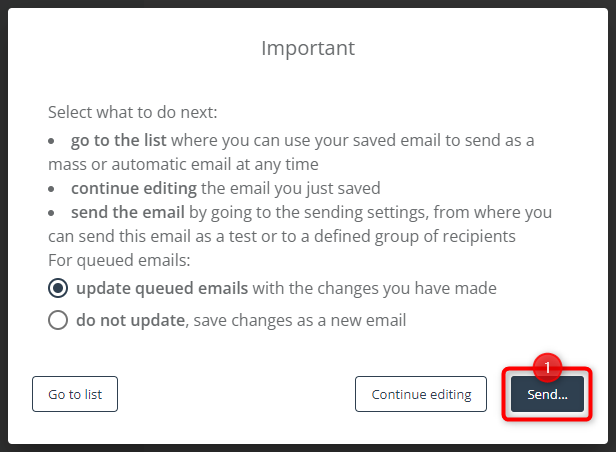
If you have edited a previously saved email, the system will ask you to decide if you want to update any queued mailings or save the modified version as a new email. Select the right option.
Click Send [1] to go to the sending screen.
On the sending screen, in the Send on section, you have two options: Send now [1] and Send on [2].

If you select the option Send now [1], the email will be queued immediately after you click Send in the top right-hand corner of the screen. To schedule an email to be sent at a later time, select Send on [2]. The following new options will appear:

[A] Date and time—click the calendar icon to select when the email is to be sent.
IMPORTANT: If you want the list of recipients to be updated an hour before the scheduled sending time, in the Contact selection section, select the option: Re-count Contacts before sending.

This way the list of Contacts determined at the time of scheduling the mailing will be updated with any potential changes in the profiles of individual Contacts (such as added/removed tags, new email opens, new transactions, etc.—depending on the segment selected and/or selectors or filters applied).
Read about predefined Contact segments and selectors >>
[B] Choose the time zone—check this box to define the time zone according to which the selections made in point [A] above are to be implemented.
[C] For monitored Contacts, adjust the sending time according to their peak activity—click here if you want to adjust the sending time to the behavioral patterns of individual Contacts. The SALESmanago system will determine the optimum sending date and/or hour based on data stored on Contact Cards. Each Contact on the list of recipients will receive the email at a time when they are most likely to be interested in it.
Learn more about these options from the article dedicated to sending emails from SALESmanago >>
i. Periodic, birthday, and subscription confirmation emails
Apart from the option to schedule a standard email (i.e., mass mailings), the SALESmanago platform offers the options to configure:
- a birthday email—which is sent based on the birthday dates of individual Contacts. Learn how to configure a birthday email >>
- a periodic email—which is sent regularly, at specified intervals, or based on a Contact Card detail. Learn how to configure a periodic email >>
- a subscription confirmation email—which is sent if a Contact expresses their intention to subscribe to your newsletter. Such a request for confirmation is referred to as the double opt-in mechanism. Learn how to configure a subscription confirmation email >>
Following their configuration, such emails are scheduled and sent automatically by the SALESmanago system.
B. Automation Processes
Email can be sent as part of an Automation Rule or a Workflow. To send an email to a Contact in response to a specific Event, add the Action: Send email to a Contact to your Automation Process.
Read more in articles dedicated to this action: Action: Send email to a Contact >> and Workflow | Action: Send email to a Contact >>
C. Command Center
You can schedule the sending of emails through the Command Center, by adding an appropriately defined element to the calendar. To do this, open the side menu: Elements and select E–mail Marketing on the list of categories. Then select the email category of interest:
- Email,
- Birthday email,
- Periodic email.
After clicking the selected category, you will see the current list of completed email messages. Click on the one you want to send and drag it into the appropriate field in the calendar. As a result, you will be redirected to the sending screen (see the description in Section 2.A: Email Marketing).
Read more about the SALESmanago Command Center >>
Learn more about sending emails from SALESmanago >>
3. Use examples
EXAMPLE 1. You want to schedule an email with Christmas wishes for your customers. The email is to be sent on December 20, but you have it ready a few days earlier. You send a test email to make sure that everything looks and works correctly. You don’t want to go back to this job, so you are going to schedule the mailing directly after the test.
Locate the email on the Email List and click Preview and send, and then, on the preview screen, click Send… You will be redirected to the sending screen. In the Send on section, check the box: Send on. Select December 20 and an appropriate hour on the calendar. If you don’t want to select a time zone other than that defined in your account settings, you don’t need to check the Choose the time zone option.
After entering all other sending settings, click Send in the top right-hand corner.
You can find the scheduled mailing under the Scheduled tab (Menu → Channels → Email Marketing → Email Analytics → Scheduled tab).
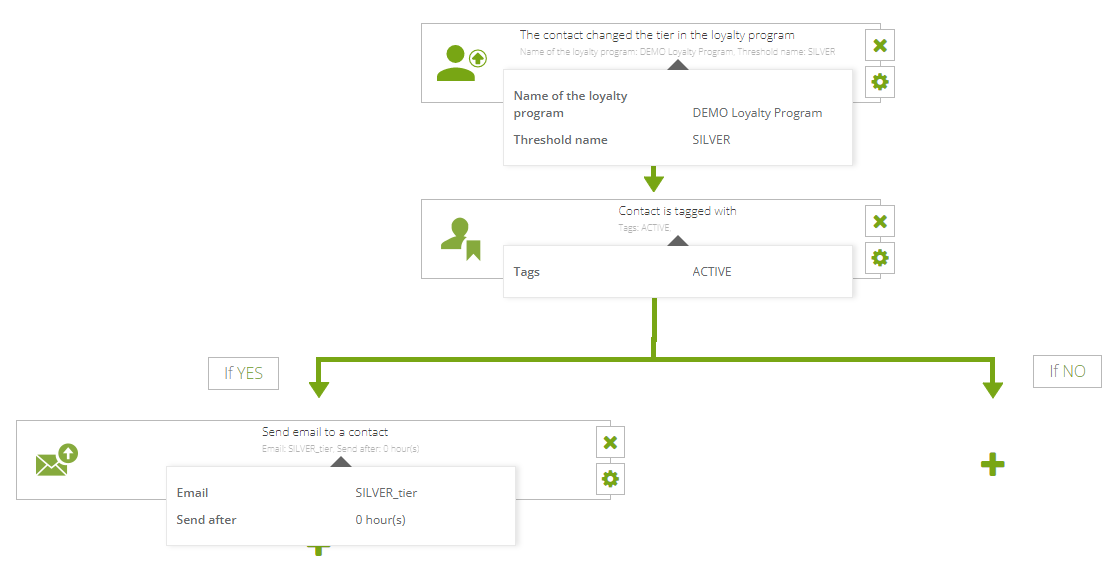
EXAMPLE 2. You want to create an Automation Rule that will send a congratulation email to a Contact who has reached a certain tier in your Loyalty Program—but only on condition that the Contact has the tag ACTIVE assigned to them. The email is to be sent immediately (0 hours) after a Contact reaches the specific threshold.
In the SALESmanago menu, select Menu → Automations → Automation Processes → Automation Rules → + New Rule. Select the appropriate tiles from the Elements list and drop them into the panel. Then define the settings for each Element as shown in the screenshot below:
EXAMPLE 3. You want to schedule a series of three email messages (named Mail_1, Mail_2, and Mail_3). Each of these emails is to be sent only to those Contacts who clicked any link included in the previous email. Mail_2 is to be sent one day after Mail_1, and Mail_3 two days after Mail_2.
In the SALESmanago menu, select Menu → Automations → Automation Processes → Workflow → + New Workflow. Create the following Workflow process:
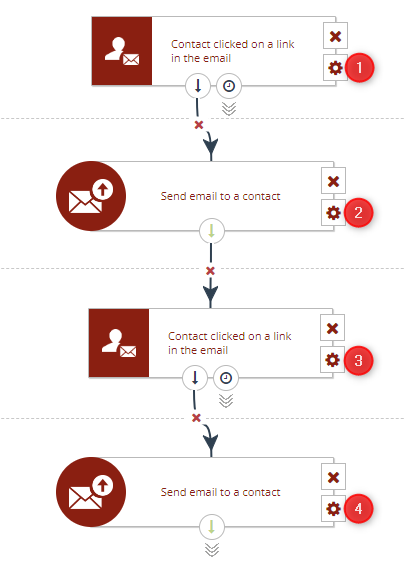
Enter the following setting for the individual elements:
[1] Select the email: Mail_1.
[2] Select the email: Mail_2. Schedule it to be sent after 1 day.
[3] Select the email: Mail_2.
[4] Select the email: Mail_3. Schedule it to be sent after 2 days.
Then send Mail_1 to the initial group of Contacts.
If a Contact clicks a link included in Mail_1, they will receive Mail_2 the next day.
If a Contact clicks a link included in Mail_2, they will receive Mail_3 two days after this event.
EXAMPLE 4. You want to schedule a series of three email messages (named Mail_1, Mail_2, and Mail_3). Each of them is to be sent only to those Contacts who clicked a link included in the previous email. Mail_1 is to be sent on December 1, Mail_2 on December 8, and Mail_3 on December 15.
On December 1, send Mail_1 to the initial group of Contacts (or schedule it to be sent on this day). Then schedule Mail_2 to be sent on December 8, specifying the following settings on the sending screen:
- In the Contact selection section, in the field Select Contacts, add the selector: Clicked. Select Mail_1 on the list of emails. This way, you will indicate Contacts who clicked a link included in Mail_1 as the recipients of Mail_2.
- Check the box Re-count Contacts before sending. This way, the list of recipients will be finally determined an hour before Mail_2 is sent as scheduled.
Consequently, Mail_2 will be sent on December 8 only to those Contacts who clicked a link included in Mail_1 in the period between December 1–December 8.
Then schedule Mail_3 to be sent on December 15, specifying the following settings on the sending screen:
- In the Contact selection section, in the field Select Contacts, add the selector: Clicked. Select Mail_2 on the list of emails. This way, you will indicate Contacts who clicked a link included in Mail_2 as the recipients of Mail_3.
- Check the box: Re-count Contacts before sending. This way, the list of recipients will be finally determined an hour before Mail_3 is sent as scheduled.
Consequently, Mail_3 will be sent on December 15 only to those Contacts who clicked a link included in Mail_2 in the period between December 8–December 15.
You can find your scheduled mailings under the Scheduled tab (Menu → Channels → Email Marketing → Email Analytics → Scheduled tab).